SpringBoot自动装配原理 & 手写SpringBoot-starter
SpringBoot自动配置原理 和 手写SpringBoot-starter
- 前言
- 一、注解驱动
- 二、自动装配
-
- 1. SPI扩展机制
- 2. 自动装配原理分析
- 三、starter组件
- 三、手写starter组件实现自动装配
-
- 1. 自定义相关参数类
- 2. 自定义服务端,类似于redisTemplate
- 3. 自定义相关配置类,用于加载client,类似于RedisAutoConfiguration
- 4. 新建resources.MET-INF文件夹,在MET-INF内新建文件: spring.factories
- 5. 将项目打包,再新建一个springboot项目添加依赖
- 6. springboot项目,yml配置新增
- 7.添加@ComponentScan注解
- 8. 添加测试类
- 9. 启动项目,验证是否已被自动装配
前言
springboot给我的印象就是省去了繁琐的xml配置、自动装配 、微服务、starter组件等等相关内容。虽然平时也一直在用,但是具体的原理没有很深入的了解过。趁这段时间工作不忙针对性的学习了下。
一、注解驱动
要学习springboot首先要对相关注解有一定了解,我大致列出了以下注解,注解的作用自行百度:
@Configuration
@Import
@Conditional 相关注解
@EnableConfigurationProperties
@ComponentScan
springboot主要就是通过相关的注解和自己自定义的一些约定来实现自动装配的。
二、自动装配
1. SPI扩展机制
在springboot的自动装配过程中,最终会加载META-INF/spring.factories文件,而加载的过程是由SpringFactoriesLoader加载的。从CLASSPATH下的每个Jar包中搜寻所有META-INF/spring.factories配置文件,然后将解析properties文件,找到指定名称的配置后返回。需要注意的是,其实这里不仅仅是会去ClassPath路径下查找,会扫描所有路径下的Jar包,只不过这个文件只会在Classpath下的jar包中。
public static final String FACTORIES_RESOURCE_LOCATION = "META-INF/spring.factories";
// spring.factories文件的格式为:key=value1,value2,value3
// 从所有的jar包中找到META-INF/spring.factories文件
// 然后从文件中解析出key=factoryClass类名称的所有value值
public static List<String> loadFactoryNames(Class<?> factoryClass, ClassLoader classLoader) {
    String factoryClassName = factoryClass.getName();
    // 取得资源文件的URL
    Enumeration<URL> urls = (classLoader != null ? classLoader.getResources(FACTORIES_RESOURCE_LOCATION) : ClassLoader.getSystemResources(FACTORIES_RESOURCE_LOCATION));
    List<String> result = new ArrayList<String>();
    // 遍历所有的URL
    while (urls.hasMoreElements()) {
        URL url = urls.nextElement();
        // 根据资源文件URL解析properties文件,得到对应的一组@Configuration类
        Properties properties = PropertiesLoaderUtils.loadProperties(new UrlResource(url));
        String factoryClassNames = properties.getProperty(factoryClassName);
        // 组装数据,并返回
        result.addAll(Arrays.asList(StringUtils.commaDelimitedListToStringArray(factoryClassNames)));
    }
    return result;
}
2. 自动装配原理分析
可以参考下面的文章,建议根据文章内容自行创建一个springboot项目进行调试,需要注意的是自己springboot版本如果和文章不一致,代码会有略微不同,不需要太在意只需要看大体的思路即可。
https://blog.csdn.net/Dongguabai/article/details/80865599
文章里有提到了spring-boot-autoconfigure-2.0.3.RELEASE.jar和META-INF/spring.factories。
Spring Boot在启动的时候会从类路径下的META-INF/spring.factories中获取EnableAutoConfiguration指定的配置类进行自动装配。
spring-boot-autoconfigure.jar包中的META-INF/spring.factories文件是springboot官方提供的自动装配类,即springboot会把一些比较主流的功能进行自动装配,比如redis、jdbc、oauth2等等,这样就不再需要我们自己进行引入和相关配置了。
三、starter组件
根据上面我们知道springboot官方提供了一些自动装配的类,但是如果我们想用的功能或插件不在官方提供的范围内,那该如何实现自动装配?其实上面已经说了自动装配的原理:
Spring Boot在启动的时候会从类路径下的META-INF/spring.factories中获取EnableAutoConfiguration指定的配置类进行自动装配。
根据原理可以推导出,假设我们自己编写一个maven项目,在项目的类路径下也创建 META-INF/spring.factories 文件以及在文件里按照规则写上对应的配置类,然后再把此项目打成jra包,springboot项目引入该jar包后就可以扫描到我们编写的配置类实现自动装配。这个自定义的maven项目就是我们所谓的starter组件,starter组件其实就是按照springboot提出的约定建立的一个maven项目而已。
可能看到上面的解释还是不太理解,举个例子:
平时我们在用springboot整合mybaits时,会有以下步骤
(1)引入mybatis的starter组件
        <dependency>
            <groupId>org.mybatis.spring.bootgroupId>
            <artifactId>mybatis-spring-boot-starterartifactId>
            <version>2.1.3version>
        dependency>
(2)配置yml
mybatis:
  mapper-locations: classpath:mapping/*Mapper.xml
  type-aliases-package: com.example.entity
(3)给出需要扫描的mapper文件路径
@MapperScan("com.example.mapper")
@SpringBootApplication
public class SpringbootDemoApplication {

    public static void main(String[] args) {
        SpringApplication.run(SpringbootDemoApplication.class, args);
    }

}
其实后面两步没什么好说的,重点在第一步,引入starter依赖后相关jar包的内容:
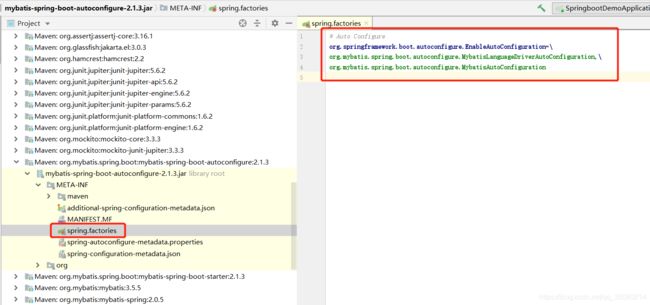
可以看到mybaits官方为了实现springboot的自动装配,按照相应的约定(META-INF/spring.factories)编写了starter组件。
三、手写starter组件实现自动装配
类似于redis的使用,项目启动,可以自动注入redisTemplate,开箱即用;
注意: 这个是个普通的maven项目,完成后intall到仓库中,其他项目直接依赖使用
其中pom.xml:
<project xmlns="http://maven.apache.org/POM/4.0.0" xmlns:xsi="http://www.w3.org/2001/XMLSchema-instance"
  xsi:schemaLocation="http://maven.apache.org/POM/4.0.0 http://maven.apache.org/xsd/maven-4.0.0.xsd">
  <modelVersion>4.0.0modelVersion>

  <groupId>com.szgroupId>
  <artifactId>handwrittenstarterartifactId>
  <version>1.0-SNAPSHOTversion>

  <name>handwrittenstartername>

  <url>http://www.example.comurl>

  <properties>
    <project.build.sourceEncoding>UTF-8project.build.sourceEncoding>
    <maven.compiler.source>1.7maven.compiler.source>
    <maven.compiler.target>1.7maven.compiler.target>
  properties>

  <dependencies>
    <dependency>
      <groupId>junitgroupId>
      <artifactId>junitartifactId>
      <version>4.11version>
      <scope>testscope>
    dependency>

    <dependency>
      <groupId>org.projectlombokgroupId>
      <artifactId>lombokartifactId>
      <version>1.18.12version>
    dependency>

    <dependency>
      <groupId>org.springframework.bootgroupId>
      <artifactId>spring-boot-starterartifactId>
      <version>2.3.3.RELEASEversion>
      <optional>trueoptional>
    dependency>
  dependencies>

  <build>
    <pluginManagement>
      <plugins>

        <plugin>
          <artifactId>maven-clean-pluginartifactId>
          <version>3.1.0version>
        plugin>

        <plugin>
          <artifactId>maven-resources-pluginartifactId>
          <version>3.0.2version>
        plugin>
        <plugin>
          <artifactId>maven-compiler-pluginartifactId>
          <version>3.8.0version>
        plugin>
        <plugin>
          <artifactId>maven-surefire-pluginartifactId>
          <version>2.22.1version>
        plugin>
        <plugin>
          <artifactId>maven-jar-pluginartifactId>
          <version>3.0.2version>
        plugin>
        <plugin>
          <artifactId>maven-install-pluginartifactId>
          <version>2.5.2version>
        plugin>
        <plugin>
          <artifactId>maven-deploy-pluginartifactId>
          <version>2.8.2version>
        plugin>

        <plugin>
          <artifactId>maven-site-pluginartifactId>
          <version>3.7.1version>
        plugin>
        <plugin>
          <artifactId>maven-project-info-reports-pluginartifactId>
          <version>3.0.0version>
        plugin>
      plugins>
    pluginManagement>
  build>
project>
1. 自定义相关参数类
@Data
@ConfigurationProperties(prefix = "sz") //如果加上此注解标红可先不必理会,@EnableConfigurationProperties引用该类后标红就会消失
public class MyRedisProperty {

    private String host = "127.0.0.1";

    private Integer port = 6399;

    private Integer timeOut;
}
2. 自定义服务端,类似于redisTemplate
@Data
public class MyRedisClient {

    private String address;

    public MyRedisClient(MyRedisProperty myRedisProperty) {
        this.address = myRedisProperty.getHost() + ":" + myRedisProperty.getPort();
    }
}
3. 自定义相关配置类,用于加载client,类似于RedisAutoConfiguration
@EnableConfigurationProperties(MyRedisProperty.class) // 属性注入,自动装载MyRedisProperty
@Configuration
@ConditionalOnProperty(prefix = "sz", value = "enable") // 满足条件才加载此配置类
public class MyRedisAutoConfiguration {

    @Bean
    public MyRedisClient myRedisClient(MyRedisProperty myRedisProperty) {
        System.out.println("myRedisProperty: " + myRedisProperty.getHost() + "  " + myRedisProperty.getPort());
        return new MyRedisClient(myRedisProperty);
    }
}
4. 新建resources.MET-INF文件夹,在MET-INF内新建文件: spring.factories
org.springframework.boot.autoconfigure.EnableAutoConfiguration=\
  com.sz.MyRedisAutoConfiguration
5. 将项目打包,再新建一个springboot项目添加依赖
        <dependency>
            <groupId>com.szgroupId>
            <artifactId>handwrittenstarterartifactId>
            <version>1.0-SNAPSHOTversion>
        dependency>
6. springboot项目,yml配置新增
##这里在输入配置时没有实现自动提示,不过不影响功能,若想实现自动提示可自行百度学习。
sz:
  enable: true
  host: 127.0.0.1
  port: 1234
7.添加@ComponentScan注解
@ComponentScan("com.sz") // 需要扫描MyRedisClient所在路径,不然会提示找不到MyRedisClient这个bean
@SpringBootApplication
public class CustomstartertestApplication {

    public static void main(String[] args) {
        SpringApplication.run(CustomstartertestApplication.class, args);
    }

}
8. 添加测试类
@RequestMapping("/test")
@RestController
public class TestController {

    @Autowired
    private MyRedisClient myRedisClient;

    @RequestMapping("/address")
    public String test() {
        return myRedisClient.getAddress();
    }
}
9. 启动项目,验证是否已被自动装配
