Qt 之 opus编码
背景
项目需要实现语音翻译功能,对接的图灵的websocket api, 第一步是实现了pcm数据的上传,第二步实现pcm to opus编码,来压缩数据量。所以仅仅使用到了opus的编码功能,通过opus的设置,实现了1/8的压缩效果。
opus简介
opus是一个有损声音编码的格式,由IETF开发,没有任何专利或限制,适用于网络上的实时声音传输,标准格式为RFC 6716,其技术来源于Skype的SILK及Xiph.Org的CELT编码.
opus文件是一个用开放的Opus编解码器编码的数字音频文件。Opus文件使用Ogg容器格式。目前一些知名的媒体播放器如VLC支持直接播放.opus文件,而其他的播放器则需要先安装一个外部的Opus编解码器(“libopus”)。
Opus开发团队提供了一套参考工具,用于获取.opus文件的信息(“opusinfo”),并将它们转换为/从WAV(“opusenc”、“opusdec”)。在Microsoft Windows上,可以使用安装了免费编码器包的foobar2000创建Opus编码的音频。
主要特性如下:
- 6 kb /秒到510 kb / s的比特率
- 采样率从8 kHz(窄带)到48 kHz(全频)
- 帧大小从2.5毫秒到60毫秒
- 支持恒定比特率(CBR)和可变比特率(VBR)
- 从窄带到全频段的音频带宽
- 支持语音和音乐
- 支持单声道和立体声
- 支持多达255个频道(多数据流的帧)
- 可动态调节比特率,音频带宽和帧大小
- 良好的鲁棒性丢失率和数据包丢失隐藏(PLC)
- 浮点和定点实现
opus使用约束
-
采样率约束:
输入信号的采样率(Hz),必须是8000、12000、16000、24000、或48000。
OpusEncoder* opus_encoder_create(opus_int32 Fs, int channels, int application, int *error);
函数参数中的Fs就是采样率。 -
帧长约束:
opus为了对一个帧进行编码,必须正确地用音频数据的帧(2.5, 5, 10, 20, 40 or 60 ms)来调用opus_encode()或opus_encode_float()函数。
比如,在48kHz的采样率下,opus_encode()参数中的合法的frame_size(单通道的帧大小)值只有:120, 240, 480, 960, 1920, 2880。即:
frame_size = 采样率 * 帧时间。因为需要满足帧时间长度为10,20,40,60ms这些才能编码opus,因而需要对输入数据进行缓冲裁剪
-
兼容opus的容器格式:
有ogg,ts,mkv。但ts无法播放,mkv只能foobar播放,ogg能用foobar,vlc播放。因而不再考虑opus合成到ts
opus环境搭建
linux环境和arm交叉编译
首先需要在opus官网上下载opus相关的源码资料
http://www.opus-codec.org/
在downloads里面可以看到全部的源码下载
这里我们需要下载
opus-tools-0.2.1.tar.gz和opus-1.3.1.tar.gz
下载后可以在ubuntu里解压
然后
./configure
(如果是其余平台如Mips或Arm,需要添加 --host=(交叉编译链),在ARM和mips平台推荐使用–enable-fixed-point命令关闭浮点运算)
#!/bin/sh
export export PATH=/home/flourier/work/gcctool/gcc-linaro-4.9-2015.02-3-x86_64_arm-linux-gnueabihf/bin:$PATH
export CC=arm-linux-gnueabihf-gcc
export CXX=arm-linux-gnueabihf-g++
指定你的host,你的交叉编译工具,还有安装目录等
./configure --host=arm-linux-gnueabihf --enable-fixed-point --disable-float-api CFLAGS="-O2 -mfpu=neon -mfloat-abi=hard" HAVE_ARM_NEON_INTR=1 --prefix /home/zyb/opus-arm/install
然后
make && make install
之后,会出现一堆供测试用的可执行文件, arm下:


linux下:

编码功能模块
由于项目需要实时编码,并且qt提供了非常方便的QIODevice,所以数据大概流程是:
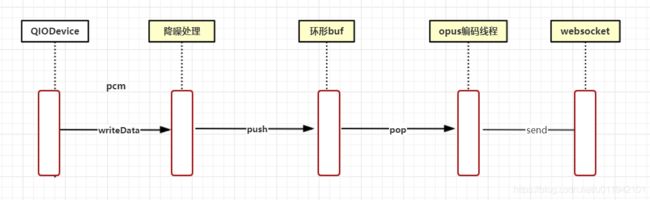
- 从IODevice,拿到音频设备pcm数据
- 通过降噪处理后,push到一个缓存buf中
- opus编码线程不断的从缓存buf中,将数据去除,进行编码
- 将编码后的数据通过websocket发送的云端请求
opus实现
创建opus编码器
opus_int16 pcm_bytes[FRAME_SIZE * MAX_CHANNELS];
unsigned char cbits[MAX_PACKET_SIZE];
OpusEncoder *g_encoder = nullptr;

bool creatOpusEncoder(uint32_t sampleRate,uint16_t channels,int err)
{
    g_encoder = opus_encoder_create(sampleRate, channels, OPUS_APPLICATION_AUDIO, &err);
    qDebug() << "opus_encoder_create  ::::" <<  QString::fromLocal8Bit(opus_strerror(err));
    if (!g_encoder || err < 0) {
        qDebug() << "failed to create an encoder" <<  QString::fromLocal8Bit(opus_strerror(err));
        fprintf(stderr, "failed to create an encoder: %s\n", opus_strerror(err));
        if (!g_encoder) {
            opus_encoder_destroy(g_encoder);
        }
        return false;
    }

    opus_encoder_ctl(g_encoder, OPUS_SET_VBR(0));//0:CBR, 1:VBR
    opus_encoder_ctl(g_encoder, OPUS_SET_VBR_CONSTRAINT(true));
    opus_encoder_ctl(g_encoder, OPUS_SET_BITRATE(32000));
    opus_encoder_ctl(g_encoder, OPUS_SET_COMPLEXITY(8));//8    0~10
    opus_encoder_ctl(g_encoder, OPUS_SET_SIGNAL(OPUS_SIGNAL_VOICE));
    opus_encoder_ctl(g_encoder, OPUS_SET_LSB_DEPTH(16));
    opus_encoder_ctl(g_encoder, OPUS_SET_DTX(0));
    opus_encoder_ctl(g_encoder, OPUS_SET_INBAND_FEC(0));
    //opus_encoder_ctl(g_encoder, OPUS_SET_PACKET_LOSS_PERC(0));

    return  true;
}
其中的参数,需要根据实际的硬件才设置
比如本项目降噪后的数据是:
output_cfg.audio_channels = 1; //输出音频通道数,1通道数据
output_cfg.sample_rate = 16000; //输出音频采样率,16k
output_cfg.audio_format = kHrscAudioFormatPcm16Bit; //输出音频位数,16bit
帧长为20ms
所以比特率为 16000*2 = 32000
采样率为16000,所以一毫秒为16 20ms为320个采样,每个采样是16bit即 2个byte,所以每帧大小为640
编码
可以
传入一段长度的pcm数据,可以是frame_size*N,即数据帧的整数倍,可以根据次参数,来调节进行最大的优化
QByteArray pcmData2opus(void *audio_data,unsigned int aduio_data_size )
{
    QByteArray opusdata;

    const uint16_t *data = (uint16_t *) (audio_data);
    size_t size = aduio_data_size/2;
    size_t index = 0;
    size_t step = static_cast<size_t>(FRAME_SIZE * 1);
    size_t frameCount = 0;
    size_t readCount = 0;

    while (index < size) {
        memset(&pcm_bytes, 0, sizeof(pcm_bytes));
        if ((index + step) <= size) {
            memcpy(pcm_bytes, data + index, step * sizeof(uint16_t));
            index += step;
        } else {
            readCount = size - index;
            memcpy(pcm_bytes, data + index, (readCount) * sizeof(uint16_t));
            index += readCount;
        }
        int nbBytes = opus_encode(g_encoder, pcm_bytes, 1 * FRAME_SIZE, cbits, MAX_PACKET_SIZE);
        if (nbBytes < 0) {
            qDebug() << "encode failed:" << opus_strerror(nbBytes);
            break;
        }
        ++frameCount;
        qDebug()<< "total size= "<<size << "framecount =" << frameCount  << index << nbBytes;
        opusdata.append((char *) cbits, static_cast<size_t>(nbBytes));
    }

    return  opusdata;
}
其中需要注意的是每帧大小为640,而opus_encode的函数原型为:
opus_int32 opus_encode (OpusEncoder *       st,
        const opus_int16 *  pcm,
        int                 frame_size,
        unsigned char *     data,
        opus_int32          max_data_bytes
)
其中pcm数据类型为opus_int16是short类型,所以frame_size应该是 640/2 =320
也可以直接传入一帧数据,进行编码,比如下面的编码线程实现:
void OpusProcess::run()
{
    m_State = STATE_STARTED;
    m_dataBuf.clear();
    int err=0;
    bool b = creatOpusEncoder(ONLINE_ASR_AUDIO_SAMPLE_RATE,ONLINE_CHANNEL,err);

    while (true) {
        if (m_State == STATE_STOPPED)
            break;
        if(m_dataBuf.length() >= FRAME_SIZE)
        {
            m_Mutex.lock();
            QByteArray tmpdata = m_dataBuf.left(FRAME_SIZE);
            quint16 nbBytes =(quint16)opus_encode(g_encoder, (opus_int16 *)tmpdata.data(), FRAME_SIZE/2, cbits, MAX_PACKET_SIZE);

            emit speechDataEncoded(QByteArray des((char *) cbits, nbBytes));

            m_dataBuf = m_dataBuf.mid(FRAME_SIZE);
            m_Mutex.unlock();
        }
        else {
            //qWarning() << "ring buffer data is not enough, need wait";
            usleep(100 * 1000);
        }
    }

    destroyOpusEncoder();
    m_State = STATE_STOPPED;
    qDebug() << "OpusProcess thread end";
}
线程结束后释放编码器:
bool destroyOpusEncoder()
{
    if(g_encoder)
    {
        opus_encoder_destroy(g_encoder);
        qDebug() << "*****opus_encoder_destroy********";
    }
}
注意事项:
1.对于连续的一段声音,一定只能用一个解码器(不能创建之后释放再去创建解码器)
2 发送的云端的opus编码数据,一般是要加头信息的,用来告诉这段数据的长度,音频数据的每帧都要加头的。
验证
为了验证自己编码后的数据是否正确,可以用编码后的数据,再进行解码,然后把解码数据存储都一个文件,来进行播放,如果播放正常,基本数据都正常
所以,附上解码代码
OpusDecoder *g_decoder = nullptr;

```cpp
bool creatOpusDecoder(uint32_t sampleRate,uint16_t channels,int err)
{
    g_decoder = opus_decoder_create(sampleRate, channels, &err);
    qDebug() << "opus_decoder_create  ::::" <<  QString::fromLocal8Bit(opus_strerror(err));
    if (!g_decoder || err < 0) {
        qDebug() << "failed to create an encoder" <<  QString::fromLocal8Bit(opus_strerror(err));
        fprintf(stderr, "failed to create an encoder: %s\n", opus_strerror(err));
        if (!g_decoder) {
            opus_decoder_destroy(g_decoder);
        }
        return false;
    }

    return  true;
}
保存文件:
QFile f("pcm.data");
bool bisOk = f.open(QIODevice::WriteOnly | QIODevice::Truncate);
if(bisOk2== true)
{
    qDebug() << "save file size=" << testpcm.size();
    f.write(testpcm.data(), testpcm.size());
    f.close();
}else{
    qDebug() << " pcm.data voice file open failed";
}
需要更详细的了解opus可以去官网了解 https://www.opus-codec.org/
另附笔者参考的demo
https://download.csdn.net/download/u011942101/16744647