【HCIE】跨域 MPLS-VPN OPTION B

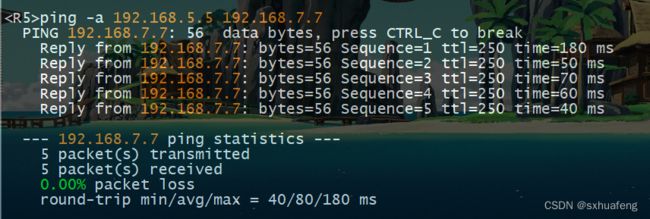
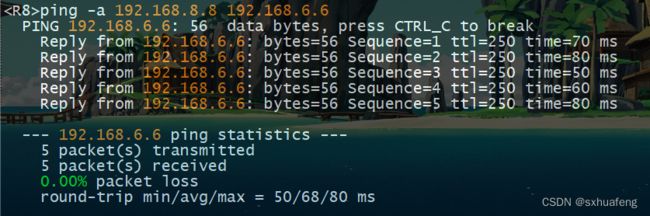
实验目的:R5与R7、R6与R8的私网地址可以互相通讯。
说明:Ra与Rb的直连IP设置为ab.1.1.a/24与ab.1.1.b/24
例 R1的g0/0/0设为19.1.1.1/24 R9的g0/0/0设为19.1.1.9/24
各路由设备都有lo0:x.x.x.x /32
例 R1的lo0为 1.1.1.1/32
实验步骤:
步骤1:IGP互通
R1:
ospf 1 router-id 1.1.1.1
area 0.0.0.0
network 1.1.1.1 0.0.0.0
network 19.1.1.1 0.0.0.0
R2:
ospf 1 router-id 2.2.2.2
area 0.0.0.0
network 2.2.2.2 0.0.0.0
network 29.1.1.2 0.0.0.0
R9:
ospf 1 router-id 9.9.9.9
area 0.0.0.0
network 9.9.9.9 0.0.0.0
network 19.1.1.9 0.0.0.0
network 29.1.1.9 0.0.0.0
R3:
ospf 1 router-id 3.3.3.3
area 0.0.0.0
network 3.3.3.3 0.0.0.0
network 34.1.1.3 0.0.0.0
R4:
ospf 1 router-id 4.4.4.4
area 0.0.0.0
network 4.4.4.4 0.0.0.0
network 34.1.1.4 0.0.0.0
配置完成检查邻居关系,并ping测试


步骤2:在各AS内部运行MPLS-LDP,保证T标隧道的建立
R1-4;R9
mpls lsr-id x.x.x.x \\R1:mpls lsr-id 1.1.1.1
mpls
mpls ldp
#
interface GigabitEthernet0/0/X
mpls
mpls ldp
#在合适的接口上配置。注意在R2的g0/0/1只需开mpls ;R3的g0/0/0只需开mpls。
配置完成后检查各设备T标 命令:dis mpls lsp

步骤3:在PE1-ASBR1-ASBR2--PE2(R1--R2;R2--R3;R3--R4)之间建立VPNV4邻居关系
R1:
#
bgp 12
router-id 1.1.1.1
undo default ipv4-unicast
peer 2.2.2.2 as-number 12
peer 2.2.2.2 connect-interface LoopBack0
#
ipv4-family unicast
undo synchronization
undo peer 2.2.2.2 enable
#
ipv4-family v4
policy -target
peer 2.2.2.2 enable
R2:
bgp 12
router-id 2.2.2.2
undo default ipv4-unicast
peer 1.1.1.1 as-number 12
peer 1.1.1.1 connect-interface LoopBack0
peer 23.1.1.3 as-number 34
#
ipv4-family unicast
undo synchronization
undo peer 1.1.1.1 enable
undo peer 23.1.1.3 enable
#
ipv4-family v4
policy -target
peer 1.1.1.1 enable
peer 23.1.1.3 enable
R3:
bgp 34
router-id 3.3.3.3
undo default ipv4-unicast
peer 4.4.4.4 as-number 34
peer 4.4.4.4 connect-interface LoopBack0
peer 23.1.1.2 as-number 12
#
ipv4-family unicast
undo synchronization
undo peer 4.4.4.4 enable
undo peer 23.1.1.2 enable
#
ipv4-family v4
policy -target
peer 4.4.4.4 enable
peer 23.1.1.2 enable
R4:
bgp 34
router-id 4.4.4.4
undo default ipv4-unicast
peer 3.3.3.3 as-number 34
peer 3.3.3.3 connect-interface LoopBack0
#
ipv4-family unicast
undo synchronization
undo peer 3.3.3.3 enable
#
ipv4-family v4
policy -target
peer 3.3.3.3 enable
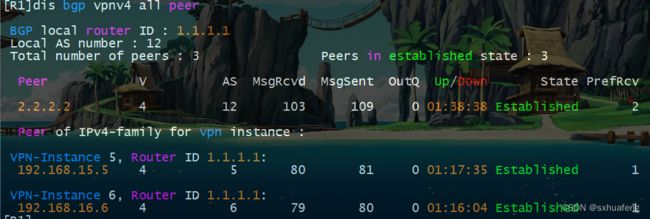
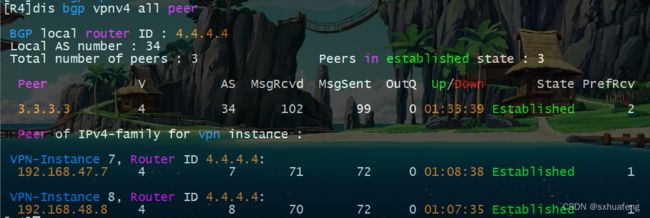
配置完成后检查邻居关系

步骤4:建立VRF实例,并绑定接口
R1:
ip -instance 5
ipv4-family
route-distinguisher 5:5
-target 5:7 export-extcommunity
-target 7:5 import-extcommunity
ip -instance 6
ipv4-family
route-distinguisher 6:6
-target 6:8 export-extcommunity
-target 8:6 import-extcommunity
#
interface GigabitEthernet0/0/1
ip binding -instance 5
ip address 192.168.15.1 255.255.255.0
#
interface GigabitEthernet0/0/2
ip binding -instance 6
ip address 192.168.16.1 255.255.255.0
R4:
ip -instance 7
ipv4-family
route-distinguisher 7:7
-target 7:5 export-extcommunity
-target 5:7 import-extcommunity
#
ip -instance 8
ipv4-family
route-distinguisher 8:8
-target 8:6 export-extcommunity
-target 6:8 import-extcommunity
#
interface GigabitEthernet0/0/1
ip binding -instance 7
ip address 192.168.47.4 255.255.255.0
#
interface GigabitEthernet0/0/2
ip binding -instance 8
ip address 192.168.48.4 255.255.255.0
步骤5:PE与CE建立实例邻居,在CE端发布环路口路由。
R5:
bgp 5
router-id 5.5.5.5
peer 192.168.15.1 as-number 12
#
ipv4-family unicast
undo synchronization
network 192.168.5.5 255.255.255.255
peer 192.168.15.1 enable
R6:
bgp 6
router-id 6.6.6.6
peer 192.168.16.1 as-number 12
#
ipv4-family unicast
undo synchronization
network 192.168.6.6 255.255.255.255
peer 192.168.16.1 enable
R3:
bgp 12
#
ipv4-family -instance 5
peer 192.168.15.5 as-number 5
#
ipv4-family -instance 6
peer 192.168.16.6 as-number 6
R7:
bgp 7
router-id 7.7.7.7
peer 192.168.47.4 as-number 34
#
ipv4-family unicast
undo synchronization
network 192.168.7.7 255.255.255.255
peer 192.168.47.4 enable
R8:
bgp 8
router-id 8.8.8.8
peer 192.168.48.4 as-number 34
#
ipv4-family unicast
undo synchronization
network 192.168.8.8 255.255.255.255
peer 192.168.48.4 enable
R4:
bgp 34
ipv4-family -instance 7
peer 192.168.47.7 as-number 7
#
ipv4-family -instance 8
peer 192.168.48.8 as-number 8
配置完成检查邻居关系
步骤6:在R2;R3上关闭policy -target 使得设备不需要RT就可以接收路由
R2:
bgp 12
ipv4-family v4
undo policy -target
R3:
bgp 34
ipv4-family v4
undo policy -target
步骤7:R5与R7、R6与R8的私网地址测试联通性