python VS matlab: reshape/max/matrix index等方法比较
matlab是进行学术研究必备的工具软件,python是进行工程实践的必备软件。因为matlab中矩阵运算的方便高效,有些代码前期会在matlab中编写,后面再转到python。在转换的过程中,发现matlab和python中一些功能函数的不同,现总结如下,欢迎大家批评指正!
1.reshape
- matlab
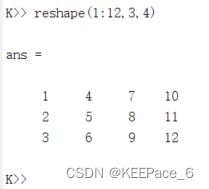
reshape(1:12,3,4)
- python
    a = np.array(range(1,13)).reshape(-1,4)
    print(a)

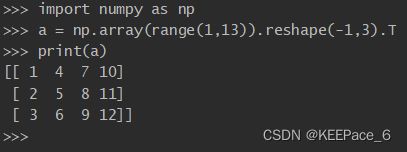
对比发现,matlab和python对数组的存储方式不同,==前者按列,后者按行。==
python中要得到同matlab的数组,可通过矩阵转置实现:
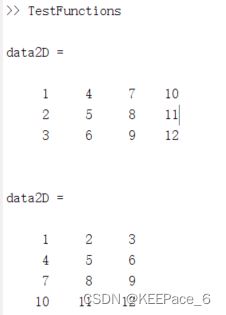
对于高维数组,通过矩阵转置就不方便了,在matlab中可以通过permute函数实现矩阵维度的交换:
%% 2D
data2D = reshape(1:12,3,4)
data2D = permute(data2D,[2,1])

%% 3D
data3D = reshape(1:12,3,2,2)  % 维度顺序为:1,2,3
data3D = permute(data3D,[3,2,1]) % 即实现1,3维度置换,为 2*2*3. ps:可以再测试[3,1,2]
对于在图像频率滤波和光度立体的基于Fourier基函数深度估计中应用广泛的FFT,同样存在matlab、python的主轴不同问题。
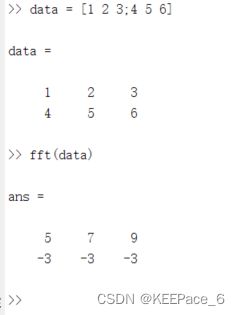
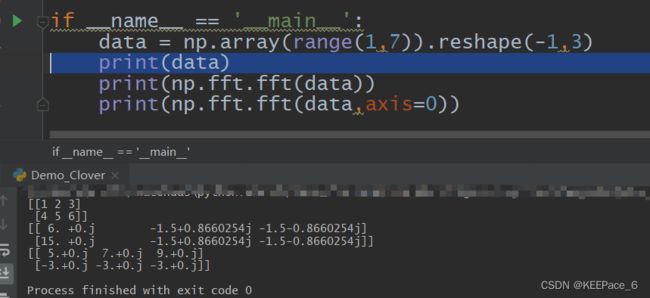
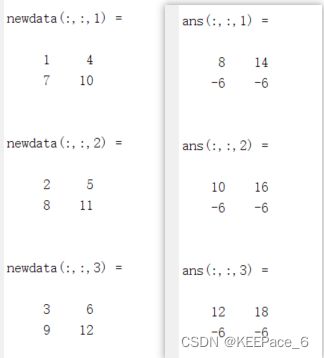
对于三维数组的FFT变换,转换方式如下:
data = reshape(1:12,3,2,2)
% newdata = permute(data,[3,2,1])
%% 除了用permute函数,也可以自定义实现
newdata = zeros(2,2,3);
for i = 1:2
    for j = 1:2
        newdata(j,i,:) = data(:,i,j); % 转置
    end
end
newdata
fft(newdata)
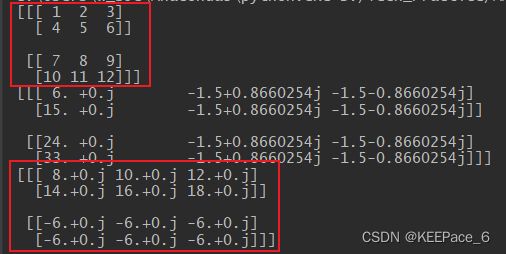
    data = np.array(range(1,13)).reshape(-1,2,3)
    print(data)
    print(np.fft.fft(data))
    print(np.fft.fft(data,axis=0))
2.max
- matlab
clc
close all
clear all

TestMax

function  TestMax()
%% scalar
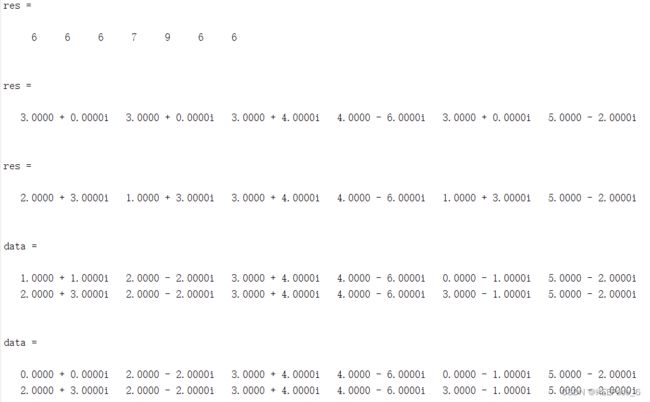
res = max(6,[1 4 6 7 9 0 3])   % 逐个比较,输出数组
res = max(3,[1+i,2-2i,3+4i,4-6i,-i,5-2i]) % 只与复数的实部比较
res = max(1+3i,[2+3i,2-2i,3+4i,4-6i,3-i,5-2i])  % 按照模长比较

data = [1+i,2-2i,3+4i,4-6i,-i,5-2i;2+3i,2-2i,3+4i,4-6i,3-i,5-2i]
data(1) = 0 % 数组在matlab中按列存储,每个元素对应一个索引,将第一个元素设为0,与data(1,:)相区别

end
def TestMax():
    # res = max(3,np.array([1,4,6,7,9,0,3]))  #  error
    # res = np.max(3,np.array([1,4,6,7,9,0,3]))  # error

    # res = np.maximum(3,np.array([1,4,6,7,9,0,3]))  # 同matlab中 max
    # res = np.maximum(3,np.array([1-1j,4+1j,6-2j,7,9+3j,0-2j,3-1j]))  # 同matlab中 max
    res = np.maximum(3+1j,np.array([1-1j,4+1j,6-2j,7,9+3j,0-2j,3-1j]))  # 同matlab中 max
    print(res)
    data = np.array([[1+1j,2-2j,3+4j,4-6j,-1j,5-2j],[2+3j,2-2j,3+4j,4-6j,3-1j,5-2j]])
    data[0] = 0  # 结果同data[0,:]  将第一行全设为0
    print(data)
3.index
matlab是矩阵实验室(Matrix laboratory)的简称,原就是为了方便高效进行矩阵运算而开发。特点是矩阵index从1开始,支持end操作,矩阵的切片操作十分简便。
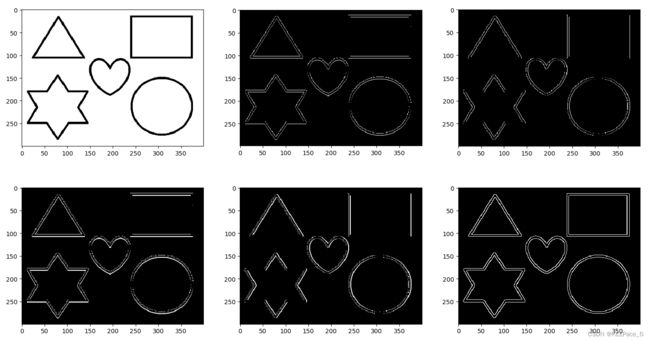
以矩阵的中心差分说明numpy包和matlab在矩阵操作上的异同。
- matlab
function TestIndex()
    img = imread('demoshape.png');
    if(numel(size(img)) > 2)
        img = rgb2gray(img);
    end
    %% 与原图不同大小
    px = img(2:end,:) - img(1:end-1,:); % 数据类型均为uint8, 负数强制为0. python中负数强制为其补数
    qy = img(:,2:end) - img(:,1:end-1);

    %% 与原图相同大小
    ppx = img([2:end end],:) - img([1 1:end-1],:);
    qqy = img(:,[2:end end]) - img(:,[1 1:end-1]);

    figure
    subplot(231)
    imshow(img)

    subplot(232)
    imshow(px)

    subplot(233)
    imshow(qy)

    subplot(234)
    imshow(ppx)

    subplot(235)
    imshow(qqy)

    canny = edge(img,'canny',0.1);
    subplot(236)

    imshow(canny)
end

matlab的imshow函数显示的原因,有些细节需要放大才会显示清楚,建议自己运行下代码查看结果。
- python
关键在于如何在python中方便高效地表达矩阵的索引操作:
- end - k 的表达
- k:end,m:end - k的表达
def CalcImgDiff(imglight,imgdark,opt: int = 0):

    assert imglight.shape == imgdark.shape

    H,W = imglight.shape

    imgdiff = np.zeros_like(imglight,dtype=np.uint8)

    if opt == 0:
        return imglight - imgdark

    elif opt == 1:
        for i in range(H):
            for j in range(W):
                if imglight[i,j] > imgdark[i,j]:
                    imgdiff[i,j] = imglight[i,j] - imgdark[i,j]

    elif opt == 2:
        for i in range(H):
            for j in range(W):
                imgdiff[i, j] = abs(imglight[i, j] - imgdark[i, j])

    return imgdiff

def TestIndex():
    img = cv2.imread('./imgs/others/img/demoshape.png',0)

    # img_ref = scio.loadmat('./imgs/others/img/demoshape_img.mat')['img']
    # px_ref = scio.loadmat('./imgs/others/img/demoshape_px.mat')['px']
    # qy_ref = scio.loadmat('./imgs/others/img/demoshape_qy.mat')['qy']
    # ppx_ref = scio.loadmat('./imgs/others/img/demoshape_ppx.mat')['ppx']
    # qqy_ref = scio.loadmat('./imgs/others/img/demoshape_qqy.mat')['qqy']


    img = cv2.resize(img,(400,300))
    H,W = img.shape

    imglight = img[1:H, :]
    imgdark = img[0:H - 1, :]

    px = CalcImgDiff(imglight,imgdark,0)

    imglight = img[:,1:W]
    imgdark = img[:,0:W-1]

    qy = CalcImgDiff(imglight, imgdark,0)

    # 关键如何表达 [1:end end]

    row_former_index = list(range(0, H - 1))
    row_former_index.insert(0, 0)

    row_latter_index = list(range(1, H))
    row_latter_index.append(-1)

    col_former_index = list(range(0, W - 1))
    col_former_index.insert(0, 0)

    col_latter_index = list(range(1, W))
    col_latter_index.append(-1)

    imglight = img[row_latter_index, :]
    imgdark = img[row_former_index, :]
    ppx =  CalcImgDiff(imglight,imgdark,0)

    imglight = img[:, col_latter_index]
    imgdark = img[:, col_former_index]
    qqy =  CalcImgDiff(imglight,imgdark,0)

    plt.figure()
    plt.subplot(231)
    plt.imshow(img,cmap=plt.cm.gray,vmin=0,vmax=255)

    plt.subplot(232)
    plt.imshow(px,cmap=plt.cm.gray,vmin=0,vmax=255)

    plt.subplot(233)
    plt.imshow(qy,cmap=plt.cm.gray,vmin=0,vmax=255)

    plt.subplot(234)
    plt.imshow(ppx,cmap=plt.cm.gray,vmin=0,vmax=255)

    plt.subplot(235)
    plt.imshow(qqy,cmap=plt.cm.gray,vmin=0,vmax=255)


    canny = cv2.Canny(img,1,255)

    plt.subplot(236)
    plt.imshow(canny,cmap=plt.cm.gray,vmin=0,vmax=255)

    plt.show()
总结:
matlab: index从1开始,python: index从0开始
matlab:m:n,列表结果包含n,python:m:n,列表结果不含n
具体表达如下,其中 i ∈ N + ; j , k ∈ N i\in \mathbb{N^+}; j, k \in \mathbb{N} i∈N+;j,k∈N
- matlab:A(end-k,:) python : A[H - k - 1,:]
- matlab: A(i:end-j,:) python : A[i - 1:H - j,:]
