Spring Cloud Alibaba训练营 —— 服务注册与发现
提示:手机查看排版可能不太友好,可以点击文章底部“阅读原文”
1. 简介
服务注册与发现是微服务架构体系中最关键的组件之一。如果尝试着用手动的方式来给每一个客户端来配置所有服务提供者的服务列表是一件非常困难的事,而且也不利于服务的动态扩缩容。Nacos Discovery 可以帮助您将服务自动注册到 Nacos 服务端并且能够动态感知和刷新某个服务实例的服务列表。除此之外,Nacos Discovery 也将服务实例自身的一些元数据信息-例如 host,port, 健康检查URL,主页等内容注册到 Nacos。Nacos 的获取和启动方式可以参考?Nacos 官网。
2. 学习目标
掌握 Nacos Discovery 实现 Spring Cloud 服务注册和发现
掌握 Nacos Discovery 整合 Spring Cloud 负载均衡和服务调用
理解 Nacos Discovery 高级特性:命名空间、安全控制、元数据、Nacos Watch 等
3. 详细内容
快速上手:指导读者从使用 Nacos Discovery 进行服务注册/发现
服务调用整合:实战 Nacos Discovery 整合 @LoadBalanced RestTemplate 以及 Open Feign
运维特性:演示 Nacos Discovery 高级外部化配置以及 Endpoint 内部细节
4. 快速上手
4.1 如何引入 Nacos Discovery 进行服务注册/发现
Nacos Discovery 引入的方式通常有两种,由易到难分别为:Aliyun Java Initializr?引入和 Maven pom.xml 依赖。官方推荐使用 Aliyun Java Initializr 方式引入 Nacos Discovery,以便简化组件之间的依赖关系。
4.1.1 [偷懒] 直接在沙箱里查看应用代码
点击链接,直接访问沙箱环境,这里会有为你准备好的案例代码^_^。
4.1.2 [简单] 通过 Aliyun Java Initializr 创建工程并引入 Nacos Discovery(推荐)
由于 Spring Cloud 组件的版本和依赖较为复杂,推荐读者使用 Aliyun Java Initializr 构建应用工程。
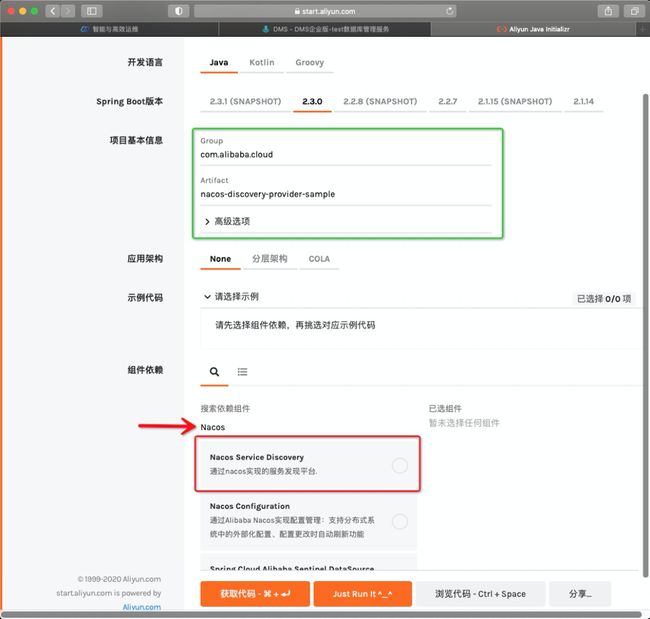
下文以 Google Chrome 浏览器为例,当网页加载后,首先,在 “项目基本信息” 部分输入 Group :“com.alibaba.cloud” 以及 Artifact:“nacos-discovery-provider-sample”(见下图绿框部分)
然而,“组件依赖” 输入框搜索:“Nacos”(见下图红箭头部分),最后,选择 “Nacos Service Discovery”(见下图红框部分),如下所示:

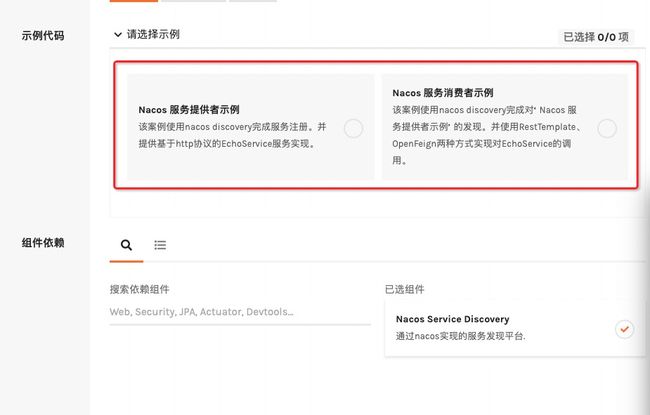
Nacos Service Discovery 组件选择后,展开“示例代码”部分,选择合适的示例代码:

由于“服务注册&发现”是两个独立的端,所以示例代码也被分为两个部分。
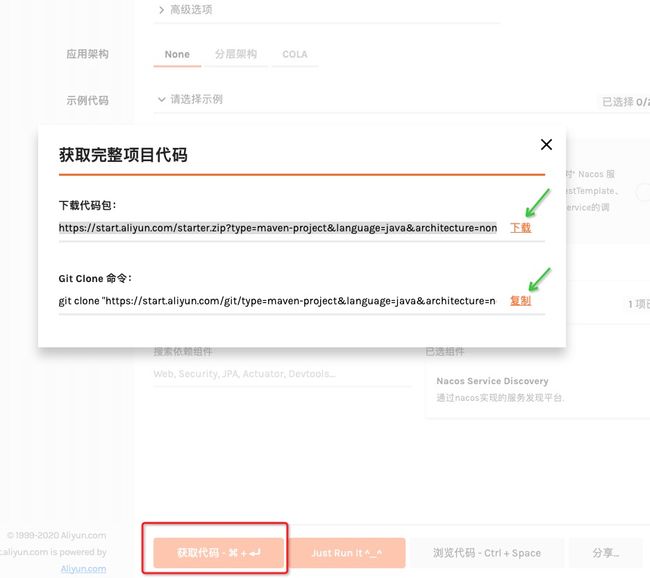
通过点击“获取代码”来获得由平台生成的代码:

点击
下载按钮后,平台将生成一个名为 “nacos-discovery-provider-sample.zip” 的压缩文件,将其保存到本地目录,并解压该文件,工程目录将随之生成。
打开目录下的 pom.xml 文件,不难发现 Nacos Discovery starter 声明其中(以下 XML 内容均来自于项目根路径中的 pom.xml 文件):
          com.alibaba.cloud
          spring-cloud-starter-alibaba-nacos-discovery
不过该 starter 并未指定版本,具体的版本声明在 com.alibaba.cloud:spring-cloud-alibaba-dependencies 部分:
              com.alibaba.cloud
              spring-cloud-alibaba-dependencies
              ${spring-cloud-alibaba.version}
              pom
              import


              org.springframework.boot
              spring-boot-dependencies
              ${spring-boot.version}
              pom
              import
其中,${spring-cloud-alibaba.version} 和 ${spring-boot.version} 分别为 Spring Cloud Alibaba 和 Spring Boot 组件依赖的版本,它们的版本定义在
      1.8
      UTF-8
      UTF-8
      2.3.0.RELEASE
      2.2.1.RELEASE
如果读者非常熟悉 Maven 依赖管理的配置方式,可以考虑 Maven pom.xml 依赖 Nacos Discovery。
4.1.3 [高级] 通过 Maven pom.xml 依赖 Nacos Discovery
如果要在您的项目中使用 Nacos 来实现服务注册/发现,使用 group ID 为com.alibaba.cloud 和 artifact ID 为spring-cloud-starter-alibaba-nacos-discovery 的 starter。
  com.alibaba.cloud
  spring-cloud-starter-alibaba-nacos-discovery
该声明方式同样需要声明 com.alibaba.cloud:spring-cloud-alibaba-dependencies,内容与上小节相同,在此不再赘述。下一节将讨论如何使用 Nacos Discovery 进行服务注册/发现。
4.2 使用 Nacos Discovery 进行服务注册/发现
使用 Nacos Discovery 进行服务注册/发现与传统 Spring Cloud 的方式并没有本质区别,仅需添加相关外部化配置即可工作。换言之,Nacos Discovery 不会侵入应用代码,方便应用整合和迁移,这归功于 Spring Cloud 的高度抽象。
如果读者熟悉 Spring Cloud 服务注册和发现的话,通常需要将注册中心预先部署,Nacos Discovery 也不例外。
4.2.1 启动 Nacos 服务器
具体启动方式参考 Nacos 官网。
Nacos Server 启动后,进入 http://ip:8848 查看控制台(默认账号名/密码为 nacos/nacos):

关于更多的 Nacos Server 版本,可以从 release 页面 下载最新的版本。
4.2.2 启动服务提供者(Provider)
4.2.2.1 增加 Maven 依赖
回到之前构建的应用 nacos-discovery-provider-sample,在此基础增加 Spring WebMVC 以及 Spring Boot Actuator Starter 依赖:
          org.springframework.boot
          spring-boot-starter-web


          org.springframework.boot
          spring-boot-starter-actuator


          com.alibaba.cloud
          spring-cloud-starter-alibaba-nacos-discovery


    ...
4.2.2.2 增加 Nacos Discovery 外部化配置
Nacos 基本的配置需要添加到 application.properties (也可以是 application.yaml ) 文件中。application.proeprties 文件已被 Aliyun Java Initializr 生成,内容如下:
spring.application.name=nacos-discovery-provider-sample

management.endpoints.jmx.exposure.include=*
management.endpoints.web.exposure.include=*
management.endpoint.health.show-details=always


# spring cloud access&secret config
# 可以访问如下地址查看: https://usercenter.console.aliyun.com/#/manage/ak
alibaba.cloud.access-key=****
alibaba.cloud.secret-key=****

# 应用服务 WEB 访问端口
server.port=8080
# Actuator Web 访问端口
management.server.port=8081
增加 Nacos?Discovery 配置,如下所示:
spring.application.name=nacos-discovery-provider-sample

management.endpoints.jmx.exposure.include=*
management.endpoints.web.exposure.include=*
management.endpoint.health.show-details=always


# spring cloud access&secret config
# 可以访问如下地址查看: https://usercenter.console.aliyun.com/#/manage/ak
alibaba.cloud.access-key=****
alibaba.cloud.secret-key=****

# 应用服务 WEB 访问端口
server.port=8080
# Actuator Web 访问端口
management.server.port=8081

## Nacos 注册中心配置地址(无需配置 HTTP 协议部分)
spring.cloud.nacos.discovery.server-addr=127.0.0.1:8848
## Nacos 客户端认证信息(默认用户名和密码均为 nacos)
spring.cloud.nacos.discovery.user-name=nacos
spring.cloud.nacos.discovery.password=naocs
请注意,Nacos 服务器默认关闭认证,建议在生产环境开启,详情请参考此 [Blog](https://nacos.io/zh-cn/blog/nacos 1.2.0 guide.html)。
4.2.2.3 激活 Nacos Discovery 服务注册与发现
Aliyun Java Initializr 默认不会自动激活 Nacos Discovery 服务注册与发现,需要在引导类(main 方法所在类)标注 Spring Cloud 服务注册与发现标准注解@EnableDiscoveryClient?,代码如下所示:
import org.springframework.boot.SpringApplication;
import org.springframework.boot.autoconfigure.SpringBootApplication;
import org.springframework.cloud.client.discovery.EnableDiscoveryClient;

@SpringBootApplication
@EnableDiscoveryClient
public class NacosDiscoveryProviderSampleApplication {

  public static void main(String[] args) {
      SpringApplication.run(NacosDiscoveryProviderSampleApplication.class, args);
  }
}
4.2.2.4 启动引导类
启动引导类 NacosDiscoveryProviderSampleApplication?,观察控制台输出(隐藏时间部分的内容):
[           main] o.s.b.w.embedded.tomcat.TomcatWebServer  : Tomcat started on port(s): 8080 (http) with context path ''
[           main] c.a.c.n.registry.NacosServiceRegistry    : nacos registry, DEFAULT_GROUP nacos-discovery-provider-sample 30.225.19.241:8080 register finished
[           main] o.s.b.w.embedded.tomcat.TomcatWebServer  : Tomcat initialized with port(s): 8081 (http)
[           main] o.apache.catalina.core.StandardService   : Starting service [Tomcat]
[           main] org.apache.catalina.core.StandardEngine  : Starting Servlet engine: [Apache Tomcat/9.0.35]
[           main] o.a.c.c.C.[Tomcat-1].[localhost].[/]     : Initializing Spring embedded WebApplicationContext
[           main] o.s.web.context.ContextLoader            : Root WebApplicationContext: initialization completed in 176 ms
[           main] o.s.b.a.e.web.EndpointLinksResolver      : Exposing 18 endpoint(s) beneath base path '/actuator'
[           main] o.s.b.w.embedded.tomcat.TomcatWebServer  : Tomcat started on port(s): 8081 (http) with context path ''
[           main] .NacosDiscoveryProviderSampleApplication : Started NacosDiscoveryProviderSampleApplication in 3.037 seconds (JVM running for 3.615)
按照日志的描述,应用使用了 Tomcat 作为 Web 服务器,并且将 8080 和 8081 作为应用服务和 Actuator Web 端口。同时, “c.a.c.n.registry.NacosServiceRegistry ? ?: nacos registry, DEFAULT_GROUP nacos-discovery-provider-sample 30.225.19.241:8080 register finished” 表明服务实例注册成功,其 IP 为 30.225.19.241,服务端口为 8080。下一步,观察 Nacos 控制台 注册情况。
4.2.2.5 观察 Nacos 控制台服务注册
打开 Nacos 控制台中的“服务列表”,点击“查询”按钮,观察页面的变化:
 image.png
其中应用 nacos-discovery-provider-sample 出现在列表中,说明该应用已成功注册。至此,使用 Nacos Discovery 进行服务注册/发现演示完毕。接下来的示例将变得更为复杂,实现 Spring Cloud 服务调用。
如果不想使用 Nacos 作为您的服务注册与发现,可以将?
spring.cloud.nacos.discovery?设置为?false。
5. Nacos Discovery 整合 Spring Cloud 服务调用
从应用架构上,Spring Cloud 服务调用通常需要两个应用,一个为服务提供者(Provider),一个为服务消费者(Consumer)。从技术上,传统的 Spring Cloud 服务通讯方式是基于 REST 实现的,包好两种内建实现方法,分别是 @LoadBalanced RestTemplate 以及 Open Feign,两者均作用于服务消费者,而服务提供者仅为 WebMVC 或者 WebFlux 应用(需注册到注册中心)。同时,还允许整合 Spring Cloud 负载均衡 API,实现自定义 REST 服务调用。至于,Spring Cloud Alibaba 引入 Dubbo 服务通讯方式,会在后续内容中单独讨论。
综上所述,首先,需要在服务提供者增加 Web 服务
5.1 服务提供者添加 Web 服务
复用应用 nacos-discovery-provider-sample,在引导类NacosDiscoveryProviderSampleApplication?同包下增加@RestController?实现类:
import org.springframework.web.bind.annotation.GetMapping;
import org.springframework.web.bind.annotation.PathVariable;
import org.springframework.web.bind.annotation.RestController;

@RestController
public class ServiceController {

  @GetMapping("/echo/{message}")
  public String echo(@PathVariable String message) {
      return "[ECHO] : " + message;
  }
}
重启应用 nacos-discovery-provider-sample,测试该 Web 服务端口:
% curl http://127.0.0.1:8080/echo/Hello,World
[ECHO] : Hello,World
结果符合期望,下一步增加消费者应用。
5.2 Nacos Discovery 整合 @LoadBalanced RestTemplate
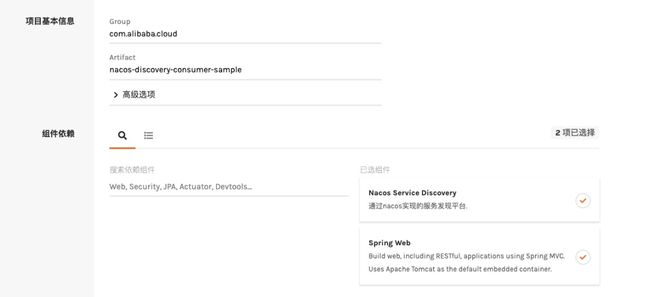
继续使用 Aliyun Java Initializr 创建消费者应用 - nacos-discovery-consumer-sample,选择 Nacos Service Discovery 和 Spring Web 组件:

生成项目,并使用 IDE 导入工程。
5.2.1 增加 Nacos Discovery 外部化配置
与应用 nacos-discovery-provider-sample 配置类似,增加 Nacos Discovery 外部化配置。如果是本地部署的话,请调整应用服务和 Actuator 端口,以免与应用 nacos-discovery-provider-sample 端口冲突 ,完整配置如下:
spring.application.name=nacos-discovery-consumer-sample

management.endpoints.jmx.exposure.include=*
management.endpoints.web.exposure.include=*
management.endpoint.health.show-details=always

# spring cloud access&secret config
# 可以访问如下地址查看: https://usercenter.console.aliyun.com/#/manage/ak
alibaba.cloud.access-key=****
alibaba.cloud.secret-key=****

# 应用服务 WEB 访问端口
server.port=9090
# Actuator Web 访问端口
management.server.port=9091

## Nacos 注册中心配置地址(无需配置 HTTP 协议部分)
spring.cloud.nacos.discovery.server-addr=127.0.0.1:8848
## Nacos 客户端认证信息(默认用户名和密码均为 nacos)
spring.cloud.nacos.discovery.user-name=nacos
spring.cloud.nacos.discovery.password=naocs
5.2.2 服务消费者激活 Nacos Discovery 服务注册与发现
与应用 nacos-discovery-provider-sample 实现一样,在引导类上标注@EnableDiscoveryClient?,代码如下:
import org.springframework.boot.SpringApplication;
import org.springframework.boot.autoconfigure.SpringBootApplication;
import org.springframework.cloud.client.discovery.EnableDiscoveryClient;

@SpringBootApplication
@EnableDiscoveryClient
public class NacosDiscoveryConsumerSampleApplication {

  public static void main(String[] args) {
      SpringApplication.run(NacosDiscoveryConsumerSampleApplication.class, args);
  }
}
5.2.3 服务消费者使用 @LoadBalanced RestTemplate 实现服务调用
前文提到 @LoadBalanced RestTemplate 是 Spring Cloud 内建的服务调用方式,因此需要在应用 nacos-discovery-consumer-sample 增加执行代码,消费应用 nacos-discovery-provider-sample REST 服务/echo/{message}?,故在引导类同包下新增RestController?实现:
import org.springframework.beans.factory.annotation.Autowired;
import org.springframework.cloud.client.loadbalancer.LoadBalanced;
import org.springframework.context.annotation.Bean;
import org.springframework.web.bind.annotation.GetMapping;
import org.springframework.web.bind.annotation.PathVariable;
import org.springframework.web.bind.annotation.RestController;
import org.springframework.web.client.RestTemplate;

@RestController
public class RestTemplateController {

  @LoadBalanced
  @Autowired
  public RestTemplate restTemplate;

  @LoadBalanced
  @Bean
  public RestTemplate restTemplate() {
      return new RestTemplate();
  }

  @GetMapping("/call/echo/{message}")
  public String callEcho(@PathVariable String message) {
      // 访问应用 nacos-discovery-provider-sample 的 REST "/echo/{message}"
      return restTemplate.getForObject("http://nacos-discovery-provider-sample/echo/" + message, String.class);
  }
}
以上代码实现方式与传统 Spring Cloud 的方式无异,下一步启动引导类NacosDiscoveryConsumerSampleApplication?,并测试运行结果:
% curl http://127.0.0.1:9090/call/echo/Hello,World
[ECHO] : Hello,World
结果符合期望,说明 Nacos Discovery 整合 @LoadBalanced RestTemplate 的实现与标准 Spring Cloud 实现的差异仅体现在 Maven 依赖 starter 以及外部化配置上。接下来,应用 nacos-discovery-consumer-sample 将继续与 Spring Cloud OpenFeign 整合。
5.3 Nacos Discovery 整合 Spring Cloud OpenFeign
Spring Cloud OpenFeign 是 Spring Cloud 基于 REST 客户端框架 OpenFeign 而构建,使得服务发现和负载均衡透明,开发人员只需关注服务消费者接口契约。同时,Spring Cloud OpenFeign 可以与 @LoadBalanced RestTemplate 共存,因此,可在原有应用 nacos-discovery-consumer-sample 的基础上,增加 Maven 依赖和代码实现整合。
关于 Spring Cloud OpenFeign 的技术细节,可参考官方文档:https://docs.spring.io/spring-cloud-openfeign/docs/current/reference/html/
5.3.1 服务消费者增加 Spring Cloud OpenFeign Maven 依赖
在 nacos-discovery-consumer-sample 项目 pom.xml 中追加 Spring Cloud OpenFeign Maven 依赖:
          org.springframework.cloud
          spring-cloud-starter-openfeign
          2.2.2.RELEASE
下一步,则是新增 Spring Cloud OpenFeign 服务声明接口
5.3.2 服务消费者增加 Spring Cloud OpenFeign 服务声明接口
由于需要消费应用 nacos-discovery-provider-sample 提供的 REST 服务/echo/{message},根据 Spring Cloud OpenFeign 的要求,需要在消费者应用增加 REST 服务声明接口,即:
@FeignClient("nacos-discovery-provider-sample") // 指向服务提供者应用
public interface EchoService {

  @GetMapping("/echo/{message}")
  String echo(@PathVariable("message") String message);
}
不难发现,echo(String)? 方法在 Spring MVC 请求映射的方式与 nacos-discovery-provider-sample 中的ServiceController?基本相同,唯一区别在于 @PathVariable 注解指定了 value 属性 “message”,这是因为默认情况,Java 编译器不会讲接口方法参数名添加到 Java 字节码中。
下一步,激活 Spring Cloud OpenFeign 服务声明接口。
5.3.3 服务消费者激活 Spring Cloud OpenFeign 服务声明接口
激活 Spring Cloud OpenFeign 服务声明接口的方法非常简单,仅需在引导类标注@EnableFeignClients?,如果声明接口与引导类不在同一个包的话,请使用basePackages?属性指定。由于本例的EchoService?与引导类位于同一包下,因此,无需指定:
@SpringBootApplication
@EnableDiscoveryClient
@EnableFeignClients // 激活 @FeignClient
public class NacosDiscoveryConsumerSampleApplication {

  public static void main(String[] args) {
      SpringApplication.run(NacosDiscoveryConsumerSampleApplication.class, args);
  }
}
激活步骤就此完成,下一步为 Spring Cloud OpenFeign 服务接口增加RestController? 实现。
5.3.4 服务消费者使用 Spring Cloud OpenFeign 服务声明接口实现服务调用
新增名为OpenFeignController?的实现类:
import org.springframework.beans.factory.annotation.Autowired;
import org.springframework.web.bind.annotation.GetMapping;
import org.springframework.web.bind.annotation.PathVariable;
import org.springframework.web.bind.annotation.RestController;

@RestController
public class OpenFeignController {

  @Autowired
  private EchoService echoService;

  @GetMapping("/feign/echo/{message}")
  public String feignEcho(@PathVariable String message) {
      return echoService.echo(message);
  }
}
重启引导类NacosDiscoveryConsumerSampleApplication?,并测试/feign/echo/{message}?结果:
% curl http://127.0.0.1:9090/feign/echo/Hello,World
[ECHO] : Hello,World
结果符合期望,说明 Nacos Discovery 整合 Spring Cloud OpenFeign 与传统方式也是相同的。
综上所述,Nacos Discovery 在 Spring Cloud 服务调用是无侵入的。
6. Nacos Discovery 更多配置项信息
更多关于 Nacos Discovery Starter 的配置项如下所示:
| 配置项 | Key | 默认值 | 说明 |
|---|---|---|---|
| 服务端地址 | spring.cloud.nacos.discovery.server-addr |
Nacos Server 启动监听的ip地址和端口 | |
| 服务名 | spring.cloud.nacos.discovery.service |
${spring.application.name} |
注册的服务名 |
| 权重 | spring.cloud.nacos.discovery.weight |
1 |
取值范围 1 到 100,数值越大,权重越大 |
| 网卡名 | spring.cloud.nacos.discovery.network-interface |
当IP未配置时,注册的IP为此网卡所对应的IP地址,如果此项也未配置,则默认取第一块网卡的地址 | |
| 注册的IP地址 | spring.cloud.nacos.discovery.ip |
优先级最高 | |
| 注册的端口 | spring.cloud.nacos.discovery.port |
-1 |
默认情况下不用配置,会自动探测 |
| 命名空间 | spring.cloud.nacos.discovery.namespace |
常用场景之一是不同环境的注册的区分隔离,例如开发测试环境和生产环境的资源(如配置、服务)隔离等 | |
| AccessKey | spring.cloud.nacos.discovery.access-key |
当要上阿里云时,阿里云上面的一个云账号名 | |
| SecretKey | spring.cloud.nacos.discovery.secret-key |
当要上阿里云时,阿里云上面的一个云账号密码 | |
| Metadata | spring.cloud.nacos.discovery.metadata |
使用Map格式配置,用户可以根据自己的需要自定义一些和服务相关的元数据信息 | |
| 日志文件名 | spring.cloud.nacos.discovery.log-name |
||
| 集群 | spring.cloud.nacos.discovery.cluster-name |
DEFAULT |
Nacos集群名称 |
| 接入点 | spring.cloud.nacos.discovery.endpoint |
地域的某个服务的入口域名,通过此域名可以动态地拿到服务端地址 | |
| 是否集成Ribbon | ribbon.nacos.enabled |
true |
一般都设置成true即可 |
| 是否开启Nacos Watch | spring.cloud.nacos.discovery.watch.enabled |
7. Nacos Discovery Actuator Endpoint
Nacos Discovery 内部提供了一个 Endpoint, 对应的 endpoint id 为nacos-discovery,其 Actuator Web Endpoint URI 为/actuator/nacos-discovery
注:使用 Nacos Config Spring Cloud 1.x 版本的话,其 URI 地址则为
/nacos-discovery)
Endpoint 暴露的 json 中包含了两种属性:
subscribe: 显示了当前服务有哪些服务订阅者
NacosDiscoveryProperties: 当前应用 Nacos 的基础配置信息
由于 Aliyun Java Initializr 所生成的应用工程默认激活 Spring Boot Actuator Endpoints(JMX 和 Web),具体配置存放在application.properties 文件中,同时,Actuator Web 端口设置为 8081,内容如下:
management.endpoints.jmx.exposure.include=*
management.endpoints.web.exposure.include=*
management.endpoint.health.show-details=always

# Actuator Web 访问端口
management.server.port=8081
因此,应用 nacos-discovery-provider-sample 无需调整,直接访问:http://127.0.0.1:8081/actuator/nacos-discovery,服务响应的内容如下:
{
"subscribe": [
  {
    "jsonFromServer": "",
    "name": "nacos-provider",
    "clusters": "",
    "cacheMillis": 10000,
    "hosts": [
      {
        "instanceId": "30.5.124.156#8081#DEFAULT#nacos-provider",
        "ip": "30.5.124.156",
        "port": 8081,
        "weight": 1.0,
        "healthy": true,
        "enabled": true,
        "cluster": {
          "serviceName": null,
          "name": null,
          "healthChecker": {
            "type": "TCP"
          },
          "defaultPort": 80,
          "defaultCheckPort": 80,
          "useIPPort4Check": true,
          "metadata": {

          }
        },
        "service": null,
        "metadata": {

        }
      }
    ],
    "lastRefTime": 1541755293119,
    "checksum": "e5a699c9201f5328241c178e804657e11541755293119",
    "allIPs": false,
    "key": "nacos-provider",
    "valid": true
  }
],
"NacosDiscoveryProperties": {
  "serverAddr": "127.0.0.1:8848",
  "endpoint": "",
  "namespace": "",
  "logName": "",
  "service": "nacos-provider",
  "weight": 1.0,
  "clusterName": "DEFAULT",
  "metadata": {

  },
  "registerEnabled": true,
  "ip": "30.5.124.201",
  "networkInterface": "",
  "port": 8082,
  "secure": false,
  "accessKey": "",
  "secretKey": ""
}
}