【多媒体技术与实践】使用OpenCV处理图像(实验三.上)
1:图像直方图
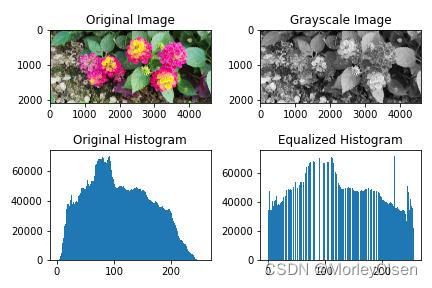
将原彩色图像转成灰度图像,得到该灰度图像的灰度直方图,并对灰度直方图进行直方图均衡化,将原图、灰度图、直方图及均衡化后的直方图一起拼接为一张图片
import cv2
import numpy as np
import matplotlib.pyplot as plt

# 读取原彩色图像
img = cv2.imread(r'input.jpg')

# 将原彩色图像转换为灰度图像
gray_img = cv2.cvtColor(img, cv2.COLOR_BGR2GRAY)

# 获取灰度直方图
hist, bins = np.histogram(gray_img.flatten(), 256, [0, 256])

# 进行直方图均衡化
equ_img = cv2.equalizeHist(gray_img)

# 获取均衡化后的灰度直方图
equ_hist, bins = np.histogram(equ_img.flatten(), 256, [0, 256])

# 绘制原图、灰度图、直方图和均衡化后的直方图
fig, axs = plt.subplots(2, 2)
axs[0, 0].imshow(cv2.cvtColor(img, cv2.COLOR_BGR2RGB))
axs[0, 0].set_title('Original Image')
axs[0, 1].imshow(gray_img, cmap='gray')
axs[0, 1].set_title('Grayscale Image')
axs[1, 0].hist(gray_img.flatten(), 256, [0, 256])
axs[1, 0].set_title('Original Histogram')
axs[1, 1].hist(equ_img.flatten(), 256, [0, 256])
axs[1, 1].set_title('Equalized Histogram')
plt.tight_layout()

# 保存拼接后的图片
plt.savefig(r'out.jpg')
eg.
2:图像变换
对作品一的灰度图像进行傅里叶变换,转成频域图像,对该频域图像分别进行低通和高通滤波后做傅里叶逆变换还原,得到两幅图像,将灰度图像、频域图像、低通还原图像及高通还原图像一起拼接为一张图片
import cv2
import numpy as np
import matplotlib.pyplot as plt

# 读取原彩色图像
img = cv2.imread(r'input.jpg')

# 将原彩色图像转换为灰度图像
gray_image = cv2.cvtColor(img, cv2.COLOR_BGR2GRAY)

# 进行傅里叶变换
f_transform = np.fft.fft2(gray_image)
fshift = np.fft.fftshift(f_transform)
magnitude_spectrum = 20 * np.log(np.abs(fshift))

# 创建一个低通滤波器(示例中使用方形掩码)
rows, cols = gray_image.shape
crow, ccol = rows // 2, cols // 2
low_pass_filter = np.zeros((rows, cols), np.uint8)
low_pass_filter[crow-30:crow+30, ccol-30:ccol+30] = 1

# 应用低通滤波器
fshift_low = fshift * low_pass_filter

# 创建一个高通滤波器(高通滤波器是低通滤波器的逆)
high_pass_filter = 1 - low_pass_filter

# 应用高通滤波器
fshift_high = fshift * high_pass_filter

# 傅里叶逆变换还原
img_low = np.fft.ifftshift(fshift_low)
img_low = np.fft.ifft2(img_low)
img_low = np.abs(img_low)

img_high = np.fft.ifftshift(fshift_high)
img_high = np.fft.ifft2(img_high)
img_high = np.abs(img_high)

# 调整图像位置
result_image = np.zeros((rows*2, cols*2), dtype=np.uint8)
result_image[0:rows, 0:cols] = gray_image
result_image[0:rows, cols:] = magnitude_spectrum
result_image[rows:, 0:cols] = img_low
result_image[rows:, cols:] = img_high

# 显示并保存拼接后的图像
cv2.imwrite(r'output.jpg', result_image)
plt.imshow(result_image, cmap='gray')
plt.axis('off')
plt.show()
eg.
3:图像平滑
从作品一的原彩色图像中的任意位置截取一块大小为 300*400 的图像块,然后添加高斯噪声,并用任意一种平滑方法(均值滤波、高斯滤波、中值滤波)对图像进行平滑处理,将原图截取的图像块、加噪图像及平滑图像一起拼接为一张图片
import cv2
import numpy as np

# 读取原彩色图像
original_image = cv2.imread(r'input.jpg')

# 截取图像块
x, y = 100, 200  # 起始坐标,请根据需要修改
roi = original_image[y:y+300, x:x+400]

# 添加高斯噪声
mean = 0
stddev = 25  # 调整噪声的强度
gaussian_noise = np.random.normal(mean, stddev, roi.shape).astype(np.uint8)
noisy_roi = cv2.add(roi, gaussian_noise)

# 使用均值滤波对图像进行平滑处理
smoothed_mean = cv2.blur(noisy_roi, (5, 5))  # 调整内核大小

# 创建一个空白的拼接图像
result_image = np.zeros((300, 1200, 3), dtype=np.uint8)

# 将原图截取的图像块、加噪图像和平滑图像拼接在一起
result_image[0:300, 0:400] = roi
result_image[0:300, 400:800] = noisy_roi
result_image[0:300, 800:1200] = smoothed_mean

# 保存拼接后的图像
cv2.imwrite(r'output.jpg', result_image)
eg.


