maven
文章目录
- IDEA
-
- 概述
- DEBUG:
- 创建Module时的language level:
- Maven--概述
-
- 1、maven的概念
- 2、Maven的作用
- 3、Maven的概念模型
- 4、Maven的仓库
-
- 4.1 Maven的仓库
- 4.2 仓库中存放的内容
- 5、maven的坐标
- 6、配置本地maven
- 7、pom.xml
- IDEA创建maven工程
-
- 1.创建空的工程
- 2.创建跳过骨架的java项目
-
- 2.1 how
- 2.2创建Java代码
- 2.3生成测试代码
-
- 方法1
- 方法2
- 2.4导入依赖
- 2.5.进行测试
- 3.创建有骨架的java项目
- 4.创建有骨架的web工程
- 5.maven的常用指令
-
- clean:
- compile
- test
- package
- install
- 6.maven插件
-
- 6.1jdk编译版本的插件
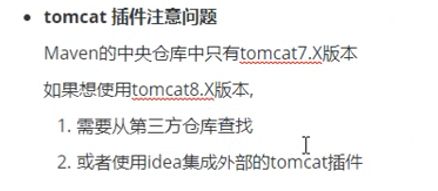
- 6.2tomcat7服务端的插件
- 7.导入依赖
-
- 7.1导入junit依赖
- 7.2导入servlet依赖
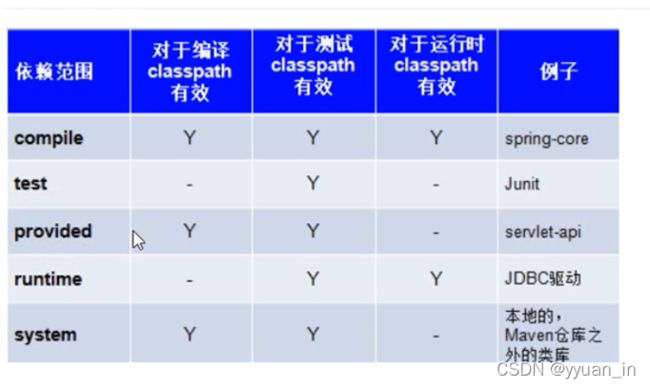
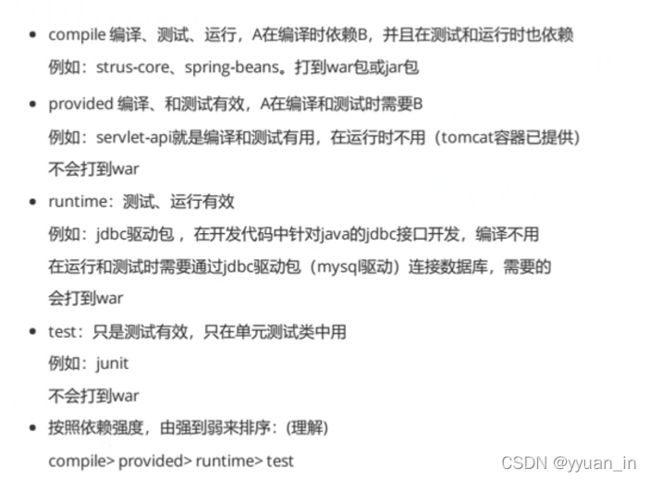
- 7.3依赖范围
- 8.继承
-
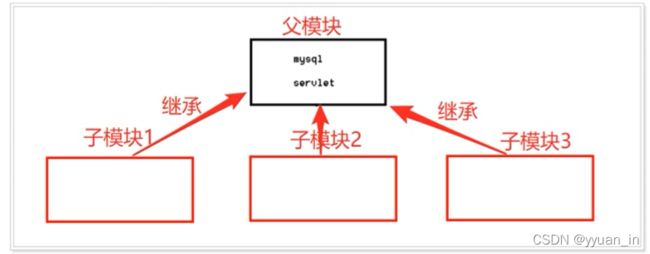
- 8.1原理
- 8.2创建父模块
- 8.3创建第一个子模块(有骨架的java项目)
- 8.4创建第二个子模块(有骨架的web工程)
- 8.5版本管理
- 8.6依赖管理
- 8.7排除依赖
- 9. 聚合
- 10.聚合工程分析
-
- 1.分析
- 2.创建父工程
-
- 2.1创建父模块
- 2.2pom
- 3 创建公共子模块
- 4 创建后台模块
-
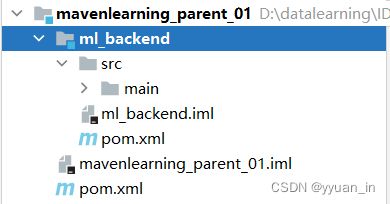
- 4.1 创建子模块:
- 4.2补充目录
- 4.3pom.xml
- 4.4web层 业务层 数据层 前端代码
IDEA
概述
DEA全称IntelliJ IDEA,是用于java语言开发的集成环境IDE,也可用于其他语言,IntelliJ在业界被公认为最好用的java
开发工具之一,尤其在智能代码助手,代码自动提示、重构、J2EE支持、Ant、Junit、CVS整合、代码审查、创新
的GUI设计等方面的功能可以说是超常的。
DEBUG:
1.行断点
2.可直接详细设置的断点。shift+左键
3.方法断点。菱形的。在接口的方法中打一个方法断点,则debug时会直接跳转至具体的实现类中。
4.异常断点。闪电形。ctrl+shift+F8–展开Java Exception Breakpoints,点击加号 ,添加Java Exception Breakpoint。如:NullPointerException,把它勾选上,当我们的程序触发空指针异常时,断点就会停在那一行
5.字段断点。眼睛形。读写全监控。如在age这个成员变量处打断点,则默认当程序改变age的值时,会停顿在该处。右键眼睛形断点,勾选watch中的“Field access”,则可以在“读”的过程中也停顿,如当getAge()调用age时,会停顿。
创建Module时的language level:

jetbrains的的用户手册中有如下说明:
Project language level
Language level defines coding assistance features that the editor provides. Language level can differ from your project SDK. For example, you can use the JDK 9 and set the language level to 8. This makes the bytecode compatible with Java 8, while inspections make sure you don’t use constructs from Java 9.
Language level also affects compilation. If you don’t manually configure the target bytecode version for your compiler (Settings/Preferences | Build, Execution, Deployment | Compiler | Java Compiler), it will be the same as the project language level.
For each module, you can configure its own language level.
In some cases, you can select the language level that allows you to use preview features as described in Java Language Specification. Refer to Preview features policy for additional information about preview features support in IntelliJ IDEA.
如:安装jdk8,那么你可以选择Language level为8或8以下的,但是不可以选择8以上的。安装jkd8,选择Language level为7,则会按照jdk7的规则来
Maven–概述
1、maven的概念
擅长管理大型项目
自动管理你需要的jar包
自动进行下载我们需要的jar包。
Maven是项目进行模型抽象,充分运用面向对象的思想,Maven可以通过一小段描述信息来管理项目的构建,报告和文档的软件项目管理工具。Maven 除了以程序构建能力为特色之外,还提供高级项目管理工具。由于 Maven 的缺省构建规则有较高的可重用性,所以常常用两三行 Maven 构建脚本就可以构建简单的项目。
说白了: Maven是由Apache开发的一个工具用来管理java项目, 依赖管理(jar包的管理),项目构建。
jar包:java rar.
war包: web rar.
2、Maven的作用
依赖管理: maven对项目的第三方构件(jar包)进行统一管理。向工程中加入jar包不要手工从其它地方拷贝,通过maven定义jar包的坐标,自动从maven仓库中去下载到工程中。
项目构建: maven提供一套对项目生命周期管理的标准,开发人员、和测试人员统一使用maven进行项目构建。项目生命周期管理:编译、测试、打包、部署、运行。
maven对工程分模块构建,提高开发效率。
3、Maven的概念模型
项目对象模型(Project Object Model),POM对象模型,每个maven刚工程中都有一个pom.xml文件,定义工程所依赖的jar包、本工程的坐标、打包的方式。
依赖管理系统(基础核心),maven通过坐标对项目工程所依赖的jar包统一规范管理。
maven定义一套项目生命周期。清理、初始化、编译、测测试、报告、打包、部署、站点生成。
一组标准集合,maven工程有自己标准的工程目录结构、定义坐标有标准。
maven管理项目生命周期过程都是基于插件完成的,例如:开发中使用的tomcat插件。
4、Maven的仓库
4.1 Maven的仓库
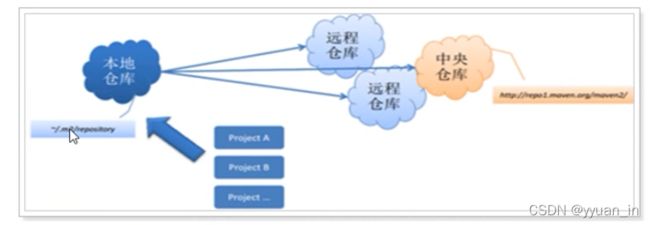
本地仓库: 相当于缓存,工程第一次会从远程仓库(互联网)去下载jar 包,将jar包存在本地仓库(在程序员的电脑上)。第二次不需要从远程仓库去下载。先从本地仓库找,如果找不到才会去远程仓库找。
中央仓库: 就是远程仓库,仓库中jar由专业团队(maven团队)统一维护。中央仓库的地址:[https://repo1.maven.org/maven2/]
远程仓库(私服):私服是一种特殊的远程仓库,它是架设在局域网内的仓库服务,私服代理广域网上的远程仓库,供局域网内的Maven用户使用。当Maven须要下载构件的时候。它从私服请求,假设私服上不存在该构件,则从外部的远程仓库下载,缓存在私服上之后,再为Maven的下载请求提供服务。
4.2 仓库中存放的内容
1Maven自身运行所需要的插件
2第三方框架(spring/mybatis/springmvc)和工具类的jar包
3我们自己开发的maven项目安装后的jar包
5、maven的坐标
Maven的一个核心的作用就是管理项目的依赖,引入我们所需的各种jar包等。在Maven中,不论什么一个依赖、插件或者项目构建的输出, 都能够称之为构件。
为了能自动化的解析任何一个Java构件. Maven必须将这些Jar包或者其他资源进行唯一标识,这是管理项目的依赖的基础,也就是我们要说的坐标。

包括我们自己开发的项目,也是要通过坐标进行唯一标识的,这样才能才其它项目中进行依赖引用。坐标的定义元素如下:
groupId:项目组织唯一的标识符,实际对应JAVA的包的结构
(一般写公司的组织名称 例如:com.han,com.alibaba)
artifactId: 项目的名称
version:定义项目的当前版本
例如:要引入druid的jar包,只需要在pom.xml配置文件中配置引入druid的坐标即可:

6、配置本地maven
<!-- junit镜像地址 -->
<mirror>
<id>junit</id>
<name>junit Address/</name>
<url>http://jcenter.bintray.com/</url>
<mirrorOf>central</mirrorOf>
</mirror>


8 在IDEA中配置maven

进入settings中修改如下三处即可:
![]()
7、pom.xml
IDEA创建maven工程
1.创建空的工程
2.创建跳过骨架的java项目
2.1 how
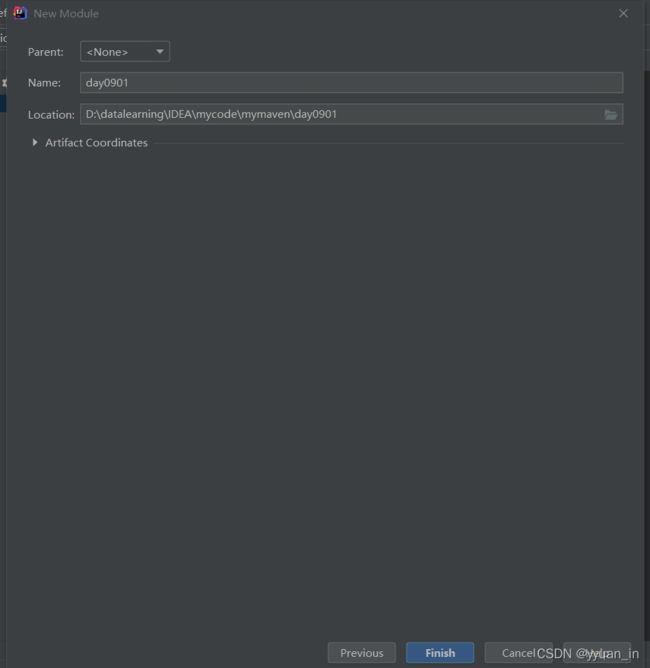
上图注意location:Module模块day0901要放在刚刚创建的空项目mymaven里面。同时注意location不能有中文不能有空格这很重要。
 上图看目录:main/java是存放代码的,resources存放配置文件,test/java存放测试用例,pom.xml是当前maven项目的配置文件

要勾选允许自动导入。
2.2创建Java代码
package mavenlearning;

public class ProductService {

    public void add(){
        System.out.println("add");
    }
    public void del(){
        System.out.println("del");
        int i = 1/0;
    }
    public void update(){ System.out.println("update更新更新"); }
    public void findAll(){
        System.out.println("findAll");
    }

}
2.3生成测试代码
在java文件夹下创建包和类以后,怎么写测试用例呢?有以下方法:
方法1
鼠标点中类名,然后alt+回车键选择Create Test即可

方法2
右键Generate–Test–

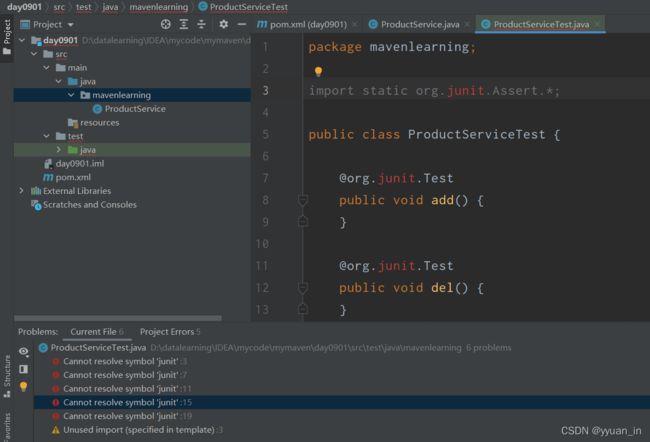
–选择JUnit4并且在Member处勾选上需要测试的方法–
–报错(为何iunit标红,因为没有对junit进行导包),以前导包是先把jar包导进去然后add,现在只需要在配置文件pom.xml中配一下坐标就行–
2.4导入依赖
–打开pom.xml添加如下内容–
    <dependencies>


        <dependency>
            <groupId>junitgroupId>
            <artifactId>junitartifactId>
            <version>4.12version>
            <scope>testscope>
        dependency>

    dependencies>
–如何确认生效了呢?打开IDEA右侧栏目中的maven,看到有Dependencies看到有junit就说明生效了。如果想更改版本,直接更改version部分即可,如:将version部分改成4.11,则版本对应也更改为4.11了。
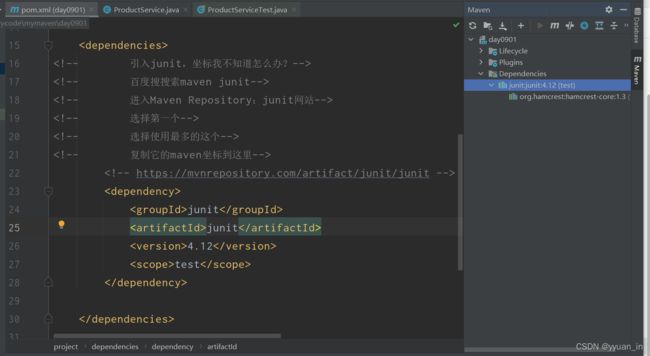
现在再看测试用例处就已经不报错了

2.5.进行测试
可以一个个点击行标旁的三角按钮,但是这样很麻烦,于是先点击IDEA右侧栏目的maven,然后点击Lifecycle–test就自动帮你完成所有测试。但是注意这样测试不支持中文,如:输出的内容中含有中文“update测试测试”,则结果会在中文部分显示乱码“update���Բ���”


如果测试时发现错误如何寻找错误?
一般在错误报告中你认识的类(你自己写的类)的地方找就可以了。下图中错误就在我们写的类ProductService中的第10行(有一个1/0)和ProductServiceTest类中的第15行(因为它调用了含有1/0的方法)

3.创建有骨架的java项目
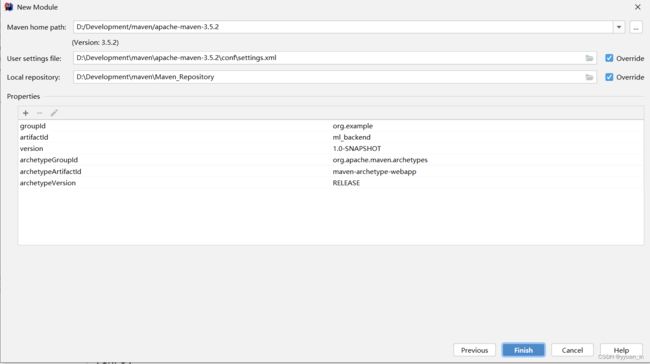
1.File – new --Module–Maven–设置SDK–勾选create from archetype–选择下图所选的org.ap…–next
![]()
2.Artifact Coordinates下图展示的是默认的(将来就会发布到org那里去),你也可以自己更改。注意:location不允许有中文或空格!
然后点击next–

3.设置一下然后点击finish即可

4.

有骨架的(day0902)的java项目src/main目录下缺少resources,我们可以自己创建一个。–对main右键new–directory–输入resources–回车即可。
有骨架的java项目帮我们自动生成了App类和AppTest类,但这没啥用,我们可以删除它。
5.day0902中的pom.xml 内容如下。会有一些多余的配置,删除即可
<project xmlns="http://maven.apache.org/POM/4.0.0" xmlns:xsi="http://www.w3.org/2001/XMLSchema-instance"
  xsi:schemaLocation="http://maven.apache.org/POM/4.0.0 http://maven.apache.org/xsd/maven-4.0.0.xsd">
  <modelVersion>4.0.0modelVersion>

  <groupId>org.examplegroupId>
  <artifactId>day0902artifactId>
  <version>1.0-SNAPSHOTversion>

  <name>day0902name>

  <url>http://www.example.comurl>


  <properties>
    <project.build.sourceEncoding>UTF-8project.build.sourceEncoding>
    <maven.compiler.source>1.7maven.compiler.source>
    <maven.compiler.target>1.7maven.compiler.target>
  properties>


  <dependencies>
    <dependency>
      <groupId>junitgroupId>
      <artifactId>junitartifactId>
      <version>4.11version>
      <scope>testscope>
    dependency>
  dependencies>


    <build>
        <plugins>

             <plugin>
                <groupId>org.apache.maven.pluginsgroupId>
                <artifactId>maven-compiler-pluginartifactId>
                <version>3.2version>
                <configuration>
                    <source>1.8source>
                    <target>1.8target>
                    <encoding>UTF-8encoding>
                configuration>
            plugin>
        plugins>
    build>

project>
4.创建有骨架的web工程
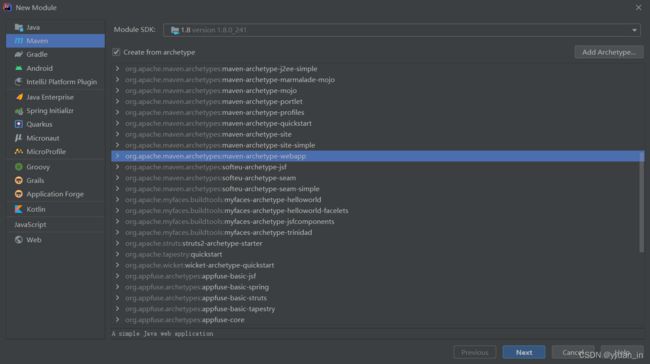
1.File – new --Module–Maven–设置SDK–勾选create from archetype–选择下图所选的org.ap…–next
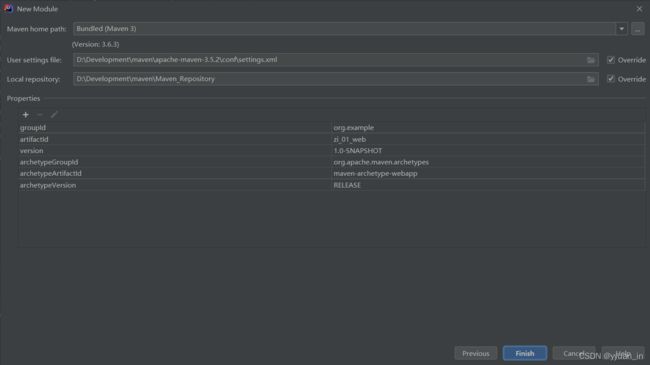
2.Artifact Coordinates下图展示的是默认的(将来就会发布到org那里去),你也可以自己更改。注意:location不允许有中文或空格!
然后点击next–

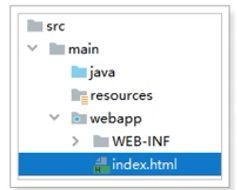
4.对比标准web工程目录结构,观察可知我们这个没有main/java和main/resources,也没有test。
–对main右键new–directory–输入java–回车。再–对main右键new–directory–输入resources–回车,即可创建这两个东西。
接着–对src右键new–directory–输入test\java–回车,即创建test。
<project xmlns="http://maven.apache.org/POM/4.0.0" xmlns:xsi="http://www.w3.org/2001/XMLSchema-instance"
  xsi:schemaLocation="http://maven.apache.org/POM/4.0.0 http://maven.apache.org/xsd/maven-4.0.0.xsd">
  <modelVersion>4.0.0modelVersion>

  <groupId>org.examplegroupId>
  <artifactId>day0903artifactId>
  <version>1.0-SNAPSHOTversion>

  <packaging>warpackaging>


  <name>day0903 Maven Webappname>

  <url>http://www.example.comurl>


  <properties>
    <project.build.sourceEncoding>UTF-8project.build.sourceEncoding>
    <maven.compiler.source>1.7maven.compiler.source>
    <maven.compiler.target>1.7maven.compiler.target>
  properties>

  <dependencies>
    <dependency>
      <groupId>junitgroupId>
      <artifactId>junitartifactId>
      <version>4.11version>
      <scope>testscope>
    dependency>


    <dependency>
      <groupId>javax.servletgroupId>
      <artifactId>javax.servlet-apiartifactId>
      <version>3.1.0version>
      <scope>providedscope>
      这行必须要写provided,因为tomcat里面就有servlet,你自己这里也有一个servlet的jar包,两者冲突了,provided表明该包只在编译和测试的时候用,所以,当启动tomcat的时候,这里的包无效,使用的是tomcat里的包,就不会冲突了。
    dependency>


  dependencies>


      <build>
        <plugins>


          <plugin>

            <groupId>org.apache.tomcat.mavengroupId>
            <artifactId>tomcat7-maven-pluginartifactId>
            <version>2.2version>
            <configuration>

              <port>80port>

              <path>/day0903path>

            configuration>
          plugin>
        plugins>
      build>


project>
DOCTYPE html>
<html lang="en">
<head>
    <meta charset="UTF-8">
    <title>Titletitle>
head>
<body>
  <h1>这是我的mavne web项目h1>

body>
html>
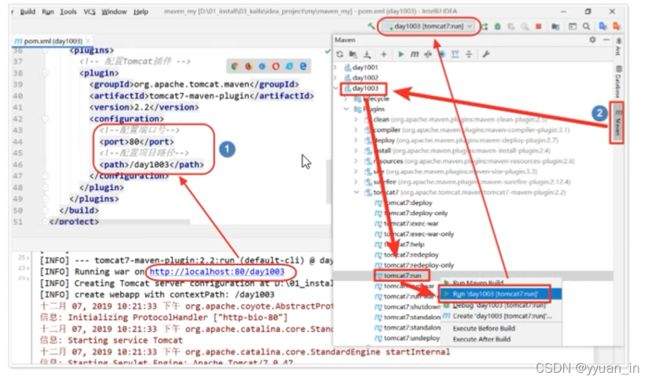
简化启动tomcat(详细看5中的注释部分)

8.创建servlet
在index.html中写入如下内容:
DOCTYPE html>
<html lang="en">
<head>
    <meta charset="UTF-8">
    <title>Titletitle>
head>
<body>
  <h1>这是我的mavne web项目h1>
  <h3><a href="demo01">访问servleta>h3>


body>
html>
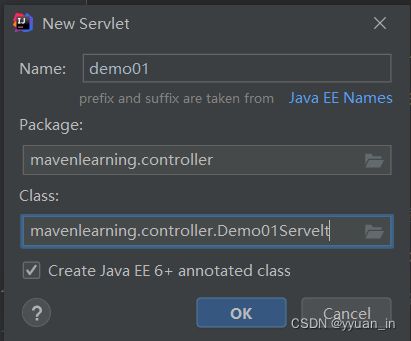
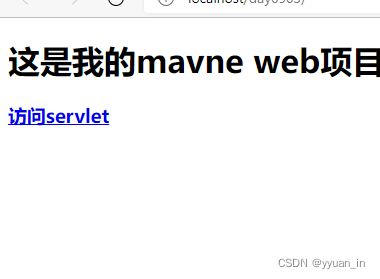
然后就能得到

Demo01Servlet.java的内容如下:
package mavenlearning.controller;

import javax.servlet.*;
import javax.servlet.http.*;
import javax.servlet.annotation.*;
import java.io.IOException;

@WebServlet(name = "demo01", value = "/demo01")
public class Demo01servlet extends HttpServlet {
    @Override
    protected void doGet(HttpServletRequest request, HttpServletResponse response) throws ServletException, IOException {
        response.getWriter().println("======Demo01Servlet doPost ... ...");
    }
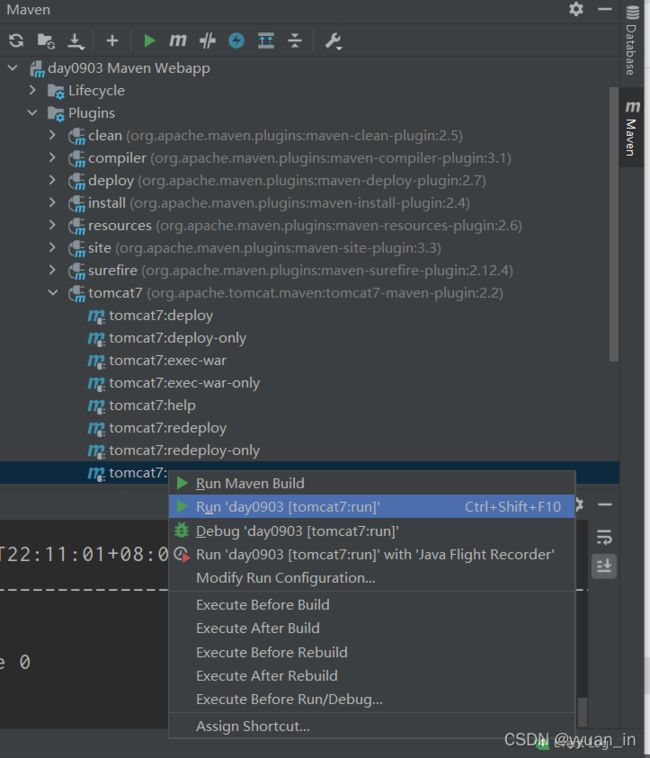
//    点击绿色锤子栏目的绿色三角启动它
//    得到如下内容,点进去
//    [INFO] Running war on http://localhost:80/day0903
//    点击网址如下图所示


    @Override
    protected void doPost(HttpServletRequest request, HttpServletResponse response) throws ServletException, IOException {

    }
}
5.maven的常用指令

下载源码右侧的加号:个别情况下,在Project试图中对项目右键–Load/Unload Modules–Unload以后,想把它再弄回来,但是你发现maven视图中已经没有了,此时你可以点击加号,把项目的pom.xml文件加回来,那么对应的项目就会回到maven视图中。
下面说的命令都是maven视图中,具体项目的Lifecycle里面的命令
clean:
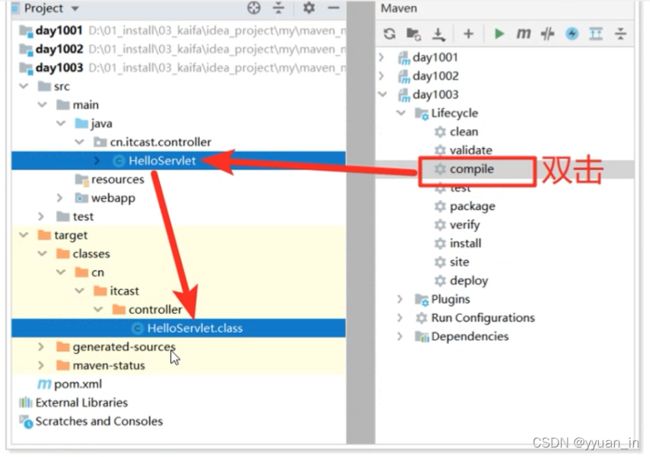
compile
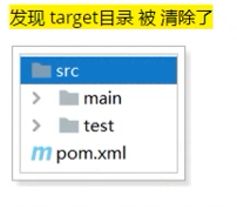
把java代码编译成class文件。(生成target目录,里面有class文件)
test
测试命令:执行src/test/java下junit的测试用例


测试

package
mvn package 打包项目
对java项目打包:
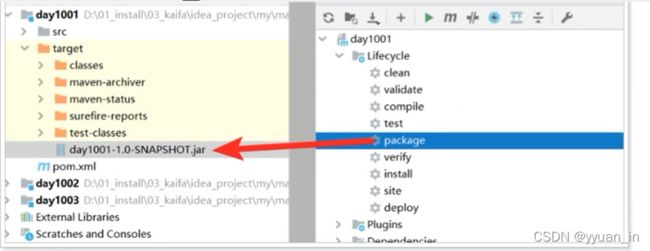
对web项目打包:

改名的事详见4.创建有骨架的web工程中的5.pom.xml
install
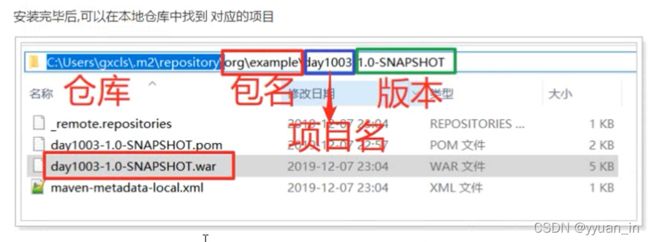
把项目打成jar或者war包仍到仓库中去,扔到什么地方呢?由你的坐标决定。如我的day0901的pom.xml中的坐标如下图:

首级目录org,二级目录example,项目名day0901,版本号1.0
则我去我电脑当时放仓库的地方按照这个目录就能找到了jar包或者war包了。
D:\Development\maven\Maven_Repository\org\example\day0901\1.0-SNAPSHOT
注意:clean会清除target目录,但是不会清除install时生成的目录里的东西,如果我们想要清除只能到目录里面删除day0901文件。
6.maven插件
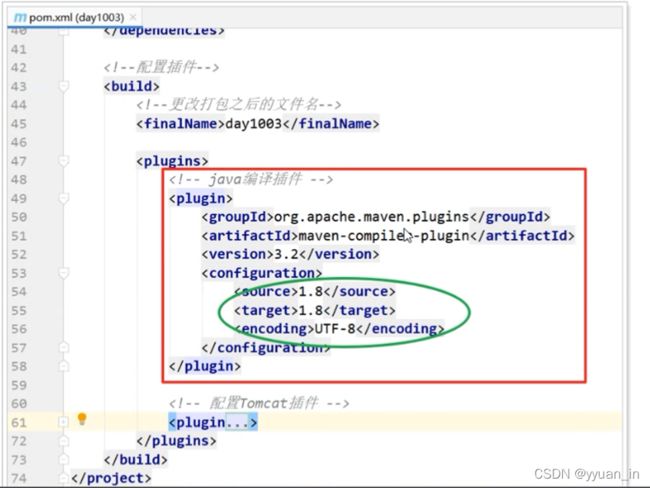
6.1jdk编译版本的插件
关于改版本号(要用java的编译插件)的内容详见3.创建有骨架的java项目中的5.day0902中的pom.xml
             <plugin>
                <groupId>org.apache.maven.pluginsgroupId>
                <artifactId>maven-compiler-pluginartifactId>
                <version>3.2version>
                <configuration>
                    <source>1.8source>
                    <target>1.8target>
                    <encoding>UTF-8encoding>
                configuration>
            plugin>
6.2tomcat7服务端的插件
详见4.创建有骨架的web工程中的5.pom.xml
配置tomcat插件:
          <plugin>

            <groupId>org.apache.tomcat.mavengroupId>
            <artifactId>tomcat7-maven-pluginartifactId>
            <version>2.2version>
            <configuration>

              <port>80port>

              <path>/day0903path>

            configuration>
          plugin>
7.导入依赖
7.1导入junit依赖
7.2导入servlet依赖
详见4.创建有骨架的web工程中的5.pom.xml

新建一个servlet可能会报错,因为你没有导入相关依赖


7.3依赖范围
8.继承
8.1原理
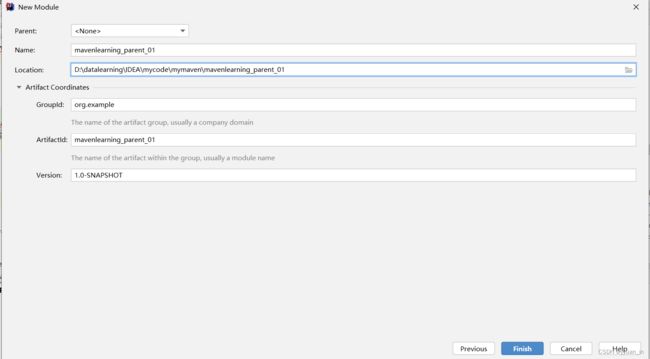
8.2创建父模块
父模块: 不需要打jar包了,所以只用创建跳过骨架的java项目即可。

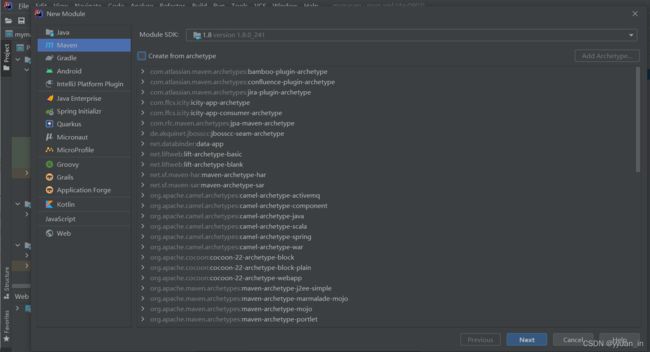
父模块是最顶层的项目所以Parent处选择None

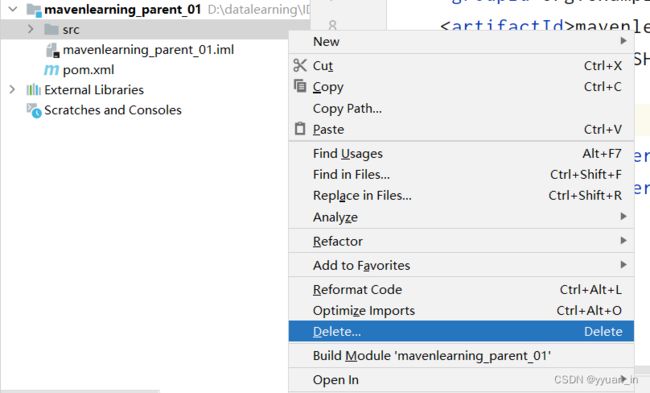
finish就创建好了,因为当前的父工程的目的只有一个,就是让别人继承他,所以我们可以把src文件夹删除,因为我们不需要写java代码。
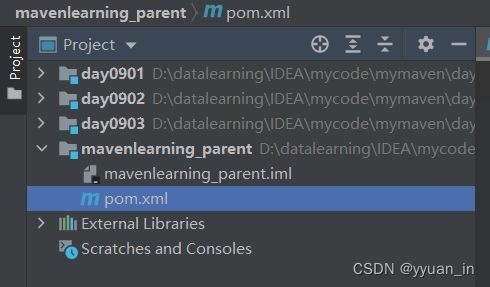
pom.xml文件:
<project xmlns="http://maven.apache.org/POM/4.0.0"
         xmlns:xsi="http://www.w3.org/2001/XMLSchema-instance"
         xsi:schemaLocation="http://maven.apache.org/POM/4.0.0 http://maven.apache.org/xsd/maven-4.0.0.xsd">
    <modelVersion>4.0.0modelVersion>

    <groupId>org.examplegroupId>
    <artifactId>mavenlearning_parentartifactId>
    <version>1.0-SNAPSHOTversion>


    <packaging>pompackaging>


    <dependencies>

        <dependency>
            <groupId>junitgroupId>
            <artifactId>junitartifactId>
            <version>4.12version>
            <scope>testscope>
        dependency>


        <dependency>
            <groupId>mysqlgroupId>
            <artifactId>mysql-connector-javaartifactId>
            <version>5.1.38version>
        dependency>

    dependencies>
project>
8.3创建第一个子模块(有骨架的java项目)

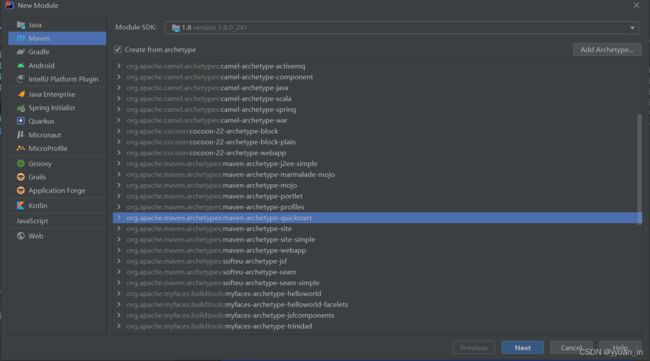
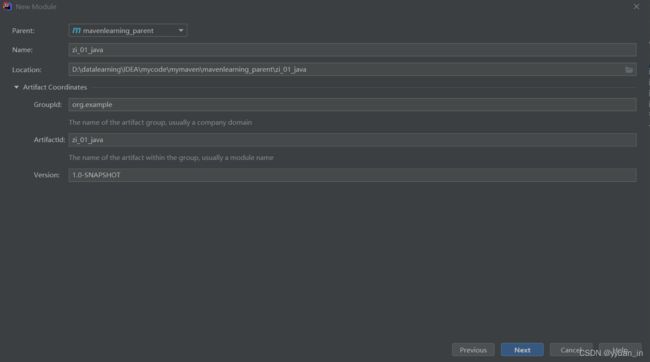

finish就创建好了

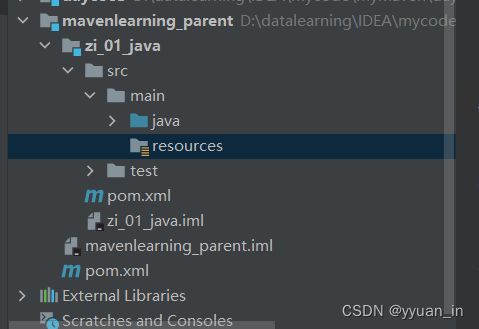
观察目录,发现少一个resources,我们自己创建一个。
<project xmlns="http://maven.apache.org/POM/4.0.0" xmlns:xsi="http://www.w3.org/2001/XMLSchema-instance"
  xsi:schemaLocation="http://maven.apache.org/POM/4.0.0 http://maven.apache.org/xsd/maven-4.0.0.xsd">


  <parent>
    <artifactId>mavenlearning_parentartifactId>
    <groupId>org.examplegroupId>
    <version>1.0-SNAPSHOTversion>
  parent>

  <modelVersion>4.0.0modelVersion>

  <artifactId>zi_01_javaartifactId>


project>
maven视图中刷新一下可以看到子模块已经继承了父模块的依赖了。
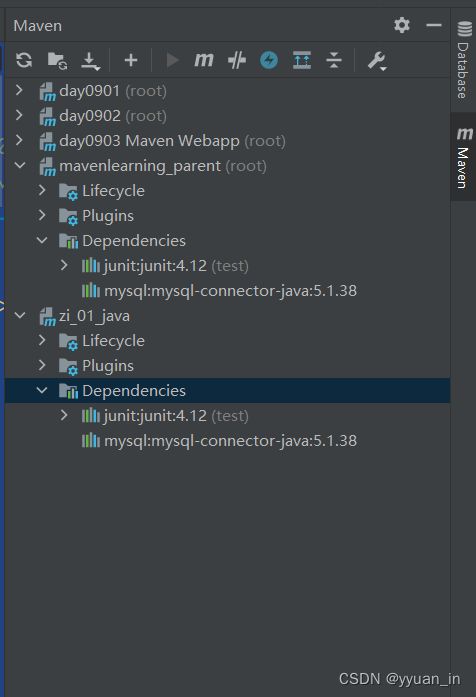
8.4创建第二个子模块(有骨架的web工程)
finish就创建好子模块了
子模块02 的pom中也是先短暂出现parent标签如下:

然后又迅速变成了如下这样:

于是我只能手动添加parent标签
我把改过以后的pom放到这:
<project xmlns="http://maven.apache.org/POM/4.0.0" xmlns:xsi="http://www.w3.org/2001/XMLSchema-instance"
  xsi:schemaLocation="http://maven.apache.org/POM/4.0.0 http://maven.apache.org/xsd/maven-4.0.0.xsd">
  <modelVersion>4.0.0modelVersion>

  <parent>
    <groupId>org.examplegroupId>
    <artifactId>mavenlearning_parentartifactId>
    <version>1.0-SNAPSHOTversion>
  parent>


  <artifactId>zi_02_webartifactId>


  <packaging>warpackaging>

  <name>zi_02_web name>


project>
8.5版本管理
选中版本号,按:ctrl+alt+v
 点击ok
点击ok
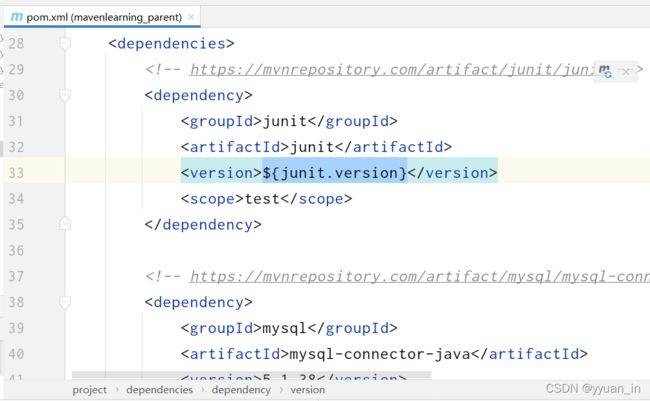
这样dependency中的version就在properties中被统一管理了。方便后期更改jar包和插件的版本。(相当于在properties中创建了我们自定义的标签${…})

<project xmlns="http://maven.apache.org/POM/4.0.0"
         xmlns:xsi="http://www.w3.org/2001/XMLSchema-instance"
         xsi:schemaLocation="http://maven.apache.org/POM/4.0.0 http://maven.apache.org/xsd/maven-4.0.0.xsd">
    <modelVersion>4.0.0modelVersion>

    <groupId>org.examplegroupId>
    <artifactId>mavenlearning_parentartifactId>
    <version>1.0-SNAPSHOTversion>

    <modules>
        <module>zi_01_javamodule>
        <module>zi_02_webmodule>
    modules>

    <properties>


        <junit.version>4.12junit.version>
        <mysql-connector-java.version>5.1.38mysql-connector-java.version>
    properties>


    <packaging>pompackaging>


    <dependencies>

        <dependency>
            <groupId>junitgroupId>
            <artifactId>junitartifactId>
            <version>${junit.version}version>
            <scope>testscope>
        dependency>


        <dependency>
            <groupId>mysqlgroupId>
            <artifactId>mysql-connector-javaartifactId>
            <version>${mysql-connector-java.version}version>
        dependency>

    dependencies>
project>
8.6依赖管理
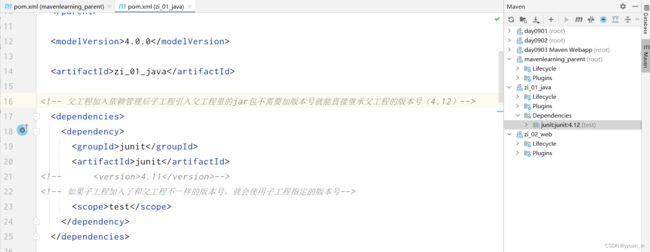
依赖管理:子工程需要用到父工程的哪个依赖就给子工程哪个依赖,用不到就不用给子工程。
将父工程的pom文件中的dependencies放入dependencyManagement中可以实现依赖管理。此时刷新maven视图发现子工程没有继承父工程中的依赖。

此时如果子工程需要用到父工程的哪个依赖就到子工程的pom文件中添加相应的dependencies(不用写版本号,直接继承的就是父工程的版本号,如果在子工程中写版本号,则该子工程就用的是自己标明的版本号)
8.7排除依赖
在zi_02_web的pom中添加如下内容:
    <dependency>
      <groupId>org.examplegroupId>
      <artifactId>zi_01_javaartifactId>
      <version>1.0-SNAPSHOTversion>
    dependency>
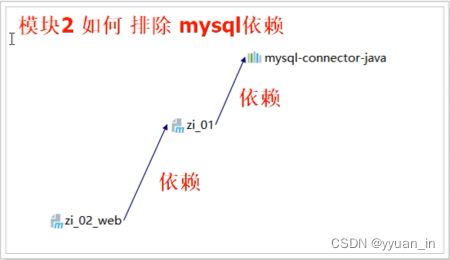
就相当于模块zi_02_web 依赖于模块zi_01_java,而zi_01_java中有mysql(5.1.36版本)依赖,所以zi_02_web也间接有mysql依赖,但是注意,我们从maven视图中看到zi_02_web的mysql依赖此时是5.1.38版本,是父工程的mysql版本:

zi_02_web 依赖于模块zi_01_java,但是zi_02_web不想用zi_01_java的MySQL依赖,于是就排除依赖,在zi_02_web的pom中添加如下内容:
  <dependencies>
    <dependency>
      <groupId>org.examplegroupId>
      <artifactId>zi_01_javaartifactId>
      <version>1.0-SNAPSHOTversion>

      <exclusions>
        <exclusion>
          <groupId>mysqlgroupId>
          <artifactId>mysql-connector-javaartifactId>
        exclusion>
      exclusions>
    dependency>
  dependencies>
再次查看maven视图如下:
9. 聚合
在父工程的pom中添加:
    <modules>
        <module>zi_01_javamodule>
        <module>zi_02_webmodule>
    modules>
这样对父工程进行发布打包时,会自动对子模块进行发布打包。
继承是为了复用,聚合是为了管理。
然后再maven视图中对父工程进行install即可打包成功。但是我install时出现了如下问题:

报错:Failed to execute goal org.apache.maven.plugins:maven-surefire-plugin:2.12.4:test (default-test) on project zi_01_java: Execution default-test of goal org.apache.maven.plugins:maven-surefire-plugin:2.12.4:test failed: The forked VM terminated without saying properly goodbye. VM crash or System.exit called ?
我查了一下,大部分人的解决办法就是把“test”禁掉,跳过“test”。我尝试了这个方法,install时成功了。但我觉得这个方法治标不治本。后来请教了别人,发现我应该在父工程的pom中添加如下内容:
<build>
        <plugins>

            <plugin>
                <groupId>org.apache.maven.pluginsgroupId>
                <artifactId>maven-compiler-pluginartifactId>
                <version>3.8.0version>
                <configuration>
                    <source>1.8source>
                    <target>1.8target>
                    <encoding>UTF-8encoding>
                configuration>
            plugin>
        plugins>
    build>
并且在下图中将Bundled (Maven 3)改成我自己D盘中的maven
并且将下图中的Project SDK和 Project langua leve设置为如图所示(之前Project SDK是< No SDK>的状态)
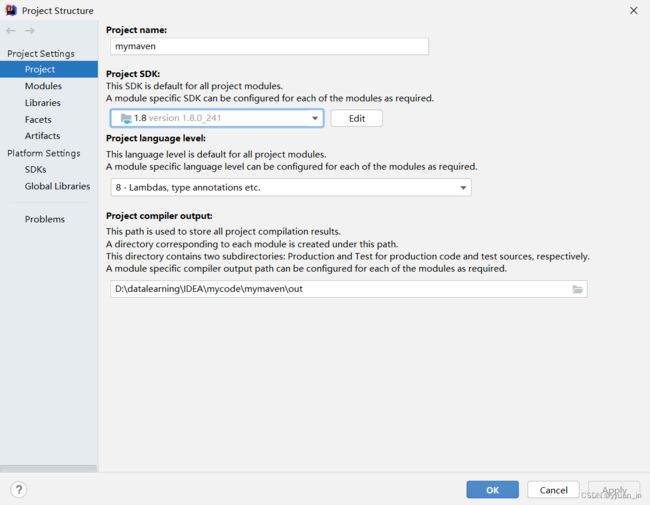 然后不需要跳过test去install也是成功的!
10.聚合工程分析
1.分析
2.创建父工程
2.1创建父模块
2.2pom
<project xmlns="http://maven.apache.org/POM/4.0.0"
         xmlns:xsi="http://www.w3.org/2001/XMLSchema-instance"
         xsi:schemaLocation="http://maven.apache.org/POM/4.0.0 http://maven.apache.org/xsd/maven-4.0.0.xsd">
    <modelVersion>4.0.0modelVersion>

    <groupId>org.examplegroupId>
    <artifactId>mavenlearning_parent_01artifactId>
    <version>1.0-SNAPSHOTversion>


    <packaging>pompackaging>

    <properties>
        <maven.compiler.source>8maven.compiler.source>
        <maven.compiler.target>8maven.compiler.target>

    properties>


    <dependencyManagement>
        <dependencies>
            <dependency>

            dependency>
        dependencies>
    dependencyManagement>

    <build>

        <finalName>parent_01finalName>


        <plugins>

            <plugin>
                <groupId>org.apache.maven.pluginsgroupId>
                <artifactId>maven-compiler-pluginartifactId>
                <version>3.8.0version>
                <configuration>
                    <source>1.8source>
                    <target>1.8target>
                    <encoding>UTF-8encoding>
                configuration>
            plugin>

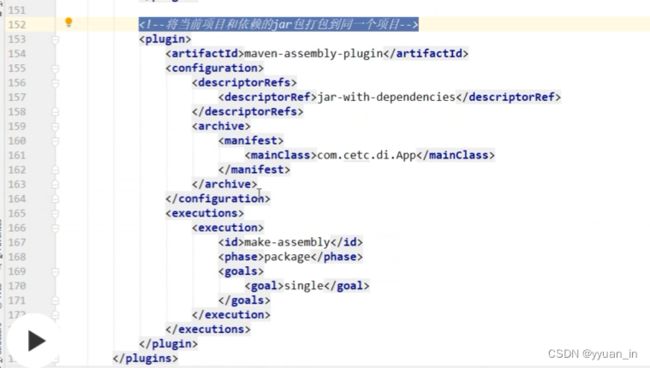
            <plugin>
                <groupId>org.apache.maven.pluginsgroupId>
                <artifactId>maven-assembly-pluginartifactId>
                <version>2.6version>
                <configuration>
                    <descriptorRefs>
                        <descriptorRef>jar-with-dependenciesdescriptorRef>
                    descriptorRefs>
                configuration>
                <executions>
                    <execution>
                        <id>make-assemblyid>
                        <phase>packagephase>
                        <goals>
                            <goal>singlegoal>
                        goals>
                    execution>
                executions>
            plugin>
        plugins>

        <pluginManagement>


        pluginManagement>

    build>

project>
3 创建公共子模块
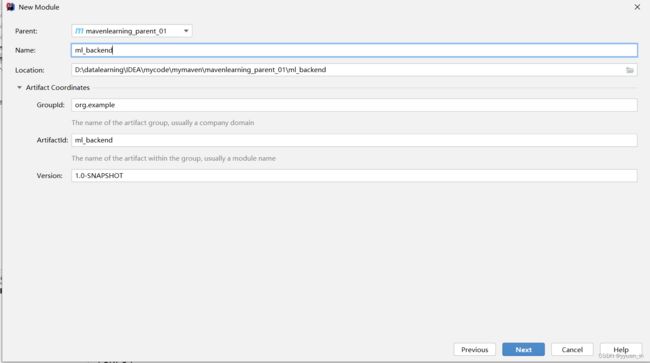
4 创建后台模块
4.1 创建子模块:
![]()
4.2补充目录

java和resources都添加一下

添加test

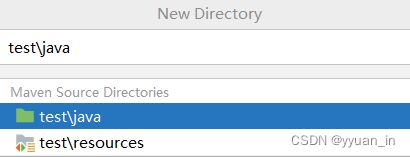
补充完成: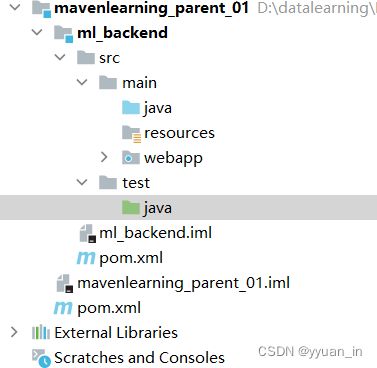
4.3pom.xml
<project xmlns="http://maven.apache.org/POM/4.0.0" xmlns:xsi="http://www.w3.org/2001/XMLSchema-instance"
  xsi:schemaLocation="http://maven.apache.org/POM/4.0.0 http://maven.apache.org/xsd/maven-4.0.0.xsd">
  <modelVersion>4.0.0modelVersion>

  <parent>
    <groupId>org.examplegroupId>
    <artifactId>mavenlearning_parent_01artifactId>
    <version>1.0-SNAPSHOTversion>
  parent>

  <artifactId>ml_backendartifactId>

  <packaging>warpackaging>


  <name>ml_backend name>


  <url>http://www.example.comurl>

  <properties>
    <project.build.sourceEncoding>UTF-8project.build.sourceEncoding>
    <maven.compiler.source>1.7maven.compiler.source>
    <maven.compiler.target>1.7maven.compiler.target>
  properties>

  <dependencies>
    <dependency>
      <groupId>junitgroupId>
      <artifactId>junitartifactId>
      <version>4.11version>
      <scope>testscope>

    dependency>
  dependencies>

  <build>
    <finalName>ml_backendfinalName>


    <plugins>
      <plugin>

        <artifactId>tomcat7-maven-pluginartifactId>
        <groupId>org.apache.tomcat.mavengroupId>
        <configuration>

            <port>9090port>

            <path>/path>

        configuration>

      plugin>
    plugins>
  build>
project>
文件夹“java”下建包:
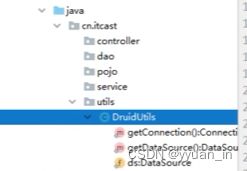
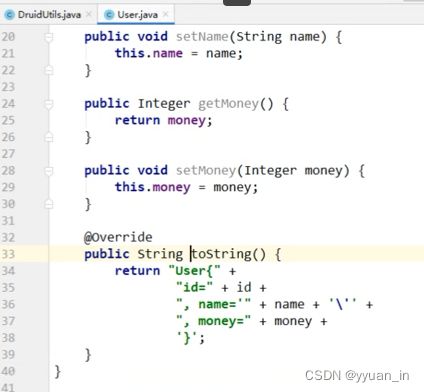
pojo右键new–java class–创建一个名为User的类:

写入get,set方法和toString方法即可
“resource”下放入druid.properties,再相应配置一下
![]()

4.4web层 业务层 数据层 前端代码
DOCTYPE html>
<html lang="en">
<head>
    <meta charset="UTF-8">
    <title>Titletitle>
head>
<body>

  <h1>后台程序首页h1>
<h3><a href=“userListServlet”>用户列表展示a>h3>


body>
html>
然后启动tomcat


点击链接:
http://localhost:9090/ 得到:
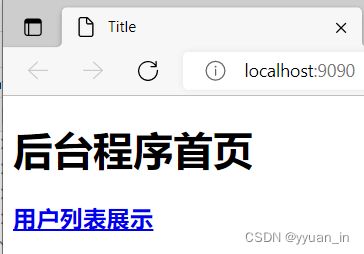
点击“用户列表展示”得到:

为何会如此?因为你根本没有userListServlet。怎么办?加上它即可。到contrl中加:


现在就多了一个servlet

然后继续进行相应配置。
