超详细的SpringBoot学习笔记
写在前面
你们好,我是小庄。很高兴能和你们一起学习Springboot。如果您对Java感兴趣的话可关注我的动态.
写博文是一种习惯,在这过程中能够梳理知识和巩固知识点。
1.快速搭建项目
(1)选定Spring Initializr =>Next =>配置包名,项目名 =>Next =>Web ->Spring Web =>Next =>项目名和项目存放路径 =>Finish
(2)选择自动装配
(3)删去不需要的东西
(4)写代码
2.入门的注解的简单介绍
@SpringBootApplication
@ComponentScan+@SpringBootConfiguration+@EnableAutoConfiguration的组合
Springboot的Controller中常用注解
@Controller
标注类的方法,return时会被视图处理器识别成静态文件的路径
@ResponseBody
可以标注方法也可以标注类,当标注方法时表示该方法的返回值会被解析成json,视图处理器将不会将return的参数识别成路径,当它标注类时,类中的所有方法的返回值都将直接返回值到页面
@RestController
这个是@Controller和ResponseBody的结合体,只能注解类。return返回值将被转换成json,字符串除外,直接写入HTTP响应体返回到页面中
@RequestMapping
可以注解类也可以注解方法,注解类时标注请求的路径,注解方法时表示将特定的URL映射到指定的方法
3.yaml学习
1.书写形式
YAML以数据为中心
server:
  port:8081
2.YAML语法
1.基本语法
k:(空格)v:表示一对键值对(空格必须有)
以空格的缩进来控制层级关系:只要是左对齐的一列数据,都是同一个层级的
server:
	port:8081
	path:/hello
属性和值也是大小写敏感:
2.值的写法
字面量:普通的值(数字,字符串,布尔)
k: v:字面直接来写;
字符串默认不用加上单引号或者双引号;
对象、Map(属性和值) (键值对)
k: v:在下一行来写对象的属性和值的关系;注意缩进
对象还是k: v的方式
friends:
		lastName:zhangsan
		age:20
行内写法:
friends: {lastName: zhansan,age: 18}
数组(List、Set)
用-值表示数组中的一个元素
pets:
-cat
-dog
-plg
3.配置文件值注入
配置文件
person:
  lastName: 张三
  age: 18
  boss: false
  birth: 2020/7/6
  maps: {k1: v1,k2: 12}
  lists:
    -lisi
    -zhangsan
  dog:
    name: 二哈
    age: 3
JavaBean
/**
 * 将配置文件中配置的每一个属性的值,映射到这个组件中
 * @ConfigurationProperties,告诉SpringBoot将本类中的所有属性和配置文件中相关的配置进行绑定;
 *      prefix="person":配置文件中哪个下面的所有属性进行一一映射
 *
 * 只有这个组件是容器中的组件,才能容器提供的@ConfigurationProperties功能
 */
@Component
@ConfigurationProperties(prefix = "person")
public class Person {
    private String lastName;
    private Integer age;
    private Boolean boss;
    private Date birth;
    private Map<String,Object> maps;
    private List<Object> lists;
    private Dog dog;
我们可以导入配置文件处理器,以后编写配置就有提示了
 <dependency>
            <groupId>org.springframework.bootgroupId>
            <artifactId>spring-boot-configuration-processorartifactId>
            <optional>trueoptional>
 dependency>
@value获取值和@ConfigurationProperties获取值的区别
| @ConfigurationProperties | @Value | |
|---|---|---|
| 功能 | 批量注入配置文件中的属性 | 一个个指定 |
| 松散绑定 | 支持 | 不支持 |
| SpEL | 不支持 | 支持 |
| JSR303数据校验 | 支持 | 不支持 |
配置文件yml和properties都能获取到值
如果说,我们只是在某个业务逻辑中需要获取一下配置文件中的某项值,使用@Value;
如果说,我们专门编写一个JavaBean来和配置文件进行映射;我们就直接使用@ConfigurationProperties。
4.@PropertySource&@ImportResource
@PropertySource:加载指定文件
@PropertySource(value = {"classpath:person.properties"})
@ImportResource:导入Spring的配置文件,让配置文件里面的内容生效;
SpringBoot里面没有Spring的配置文件,我们自己编写的配置文件,也不能自动识别;想让Spring的配置文件生效,加载尽量:@ImportResource标注在一个配置类上
@ImportResource(locations={"classpath:beans.xml"})
导入Spring的配置
4、配置文件占位符
1、随机数
random.value、{random.int}、${random.long}

random.int(10)、{random.int[1024,65536]}
2、占位符获取之前配置的值,如果没有可以使用:指定默认值
person.last-name=张三${random.uuid}
person.age=${random.int}
person.birth=2020/7/8
person.boss=false
person.maps.k1=v1
person.lists=a,b,c
person.dog.name=${person.hello:hello}_dog
person.dog.age=15
5、Profile
1、多个Profile
我们在主配置文件编写的时候,文件名可以是application-(profile).properties/yml
默认使用application.properties的配置
2、yml支持多个文档块方式
server:
  port: 8081
spring:
  profiles:
    active: prod
---
server:
  port: 8082
spring:
  profiles:
    active: dev

---
server:
  port: 8083
spring:
  profiles:
    active: prod
3、激活指定profile
1、在配置文件中指定spring.profiles.active=dev
2.命令行:
java-jar spring-boot-02-config-0.01.SNAPSHOT.jar-spring.profiles.active=dev;
3.虚拟机参数:
-Dspring.profiles.active=dev
6、配置文件加载位置
springboot启动会扫描以下位置的application.properties或者application.yml文件作为Spring boot的默认配置文件
-file:./config/

-file:./

-classpath:/config/

-classpath:/
优先级由高到低,高优先级的配置会覆盖低优先级的配置:SpringBoot会从四个位置全部加载主配置文件:互补配置;
二、Web开发
1、使用SpringBoot
1)、创建SpringBoot应用,选中我们需要的模块
2)、SpringBoot已经默认将这些场景配置好,只要在配置文件中指定少量就可以运行起来
3)、自己编写业务逻辑代码
自动配置原理
这个场景Springboot
2、SpringBoot对静态资源的映射规则
1)所有/Webjars/,都去classpath:/META-INF/resources/webjars/找资源;
webjars:以jar包的方式引入静态资源;
访问路径:localhost:8080/webjars/对应的文件
2)、/访问当前项目的任何资源,(静态资源的文件)**
1、"classpath:/META-INF/resources"
2、"classpath:/resoures/"
3、"classpath:/static/"
4、"classpath:/public"
5、"/":当前项目的根路径
localhost:8080/abc ===去静态资源文件夹里面找abc
3)、欢迎页:静态资源文件夹下的所有index.html页面:被”/“映射;**
localhost:8080/ 找index页面
4)、所有/favicon.ico 都是在静态资源文件夹下找;(图标设置)**
3、模板引擎
1、引入thymeleaf
<dependency>
	<groupId>org.springframework.bootgroupId>
    <artifactId>spring-boot-starter-thymeleafartifactId>
dependency>

切换thymeleaf版本
<thymeleaf.version>3.0.9.RELEASEthymeleaf.version>
<thymeleaf-layout-dalect.version>
    2.2.2
thymeleaf-layout-dalect.version>
2、Thymeleaf使用
1)、字符串与变量输出
1.添加th命名空间
<html xmlns:th="http://www.thymeleaf.org">

html>
2.字符串输出显示
<div th:text="${hello}">div>
<hr>
<div th:utext="${hello}">div>


    <span th:text="${#strings.isEmpty(mes)}">span>

     <span th:text="${#strings.contains(mes,'T')}">
   span>

h4>
2)、日期格式化处理
<span th:text="${#dates.format(key)}">span>

<span th:text="${#dates.format(key,'yyyy/MM/dd')}">span>

<span th:text="${#dates.year(key)}">span>
<span th:text="${#dates.month(key)}">span>
<span th:text="${#dates.day(key)}">span>
3)、条件判断
<span th:if="${sex}=='0'? '女':'男'">span>

<span th:switch="${id}">
	<span th:case="1">ID为1span>
    <span th:case="2">ID为2span>
    <span th:case="3">ID为3span>
    <span th:case="*">ID为*span>
span>
4)、each迭代遍历
<h4 th:text="${user}" th:each="user:${users}">[[${user.name}]]h4>

<hr>
<h4>
    <span th:each="user:${user}"> [[${user}]]span>

<table border="1" width="100px">
	<tr>
    	<th>IDth>
        <th>Nameth>
    tr>
    <tr th:each="m : ${map}">
    	<td th:text="${m.value.id}">td>
        <td th:text="${m.value.name}">td>
        <td th:text="${m.key}">td>
    tr>
table>
5)、thymeleaf操作域对象
<span th:text="${#httpServletRequest.getAttribute('req')}">span>
<span th:text="${#request.getAttribute('req')}">span>


<span th:text="${session.sess}">span>
<span th:text="${#session.getAttribute('sess')}">span>


<span th:text="${application.app}">span>
6)、URL表达式
<a th:href="@{http://www.baidu.com}">打开百度a>


<a th:href="@{/show}">相对路径a>

<a th:href="@{~/project2/resourcename}">相对于服务器的根a>
//访问Controller
@GetMapping("/show2")
public String show2(){
    return "index2";
}
7)、URL传递参数
1.普通参数传递
<a th:href="@{/show?id=1&name=zhansan}">a>

<a th:href="@{/show(id=2,name=zhansan)}">a>

<a th:href="@{'/show?id='+${id}+'&name='+${name}}">a>

<a th:href="@{/show(id=${id},name=${name})}">a>
//访问Controller
@GetMapping("/show2")
public String show2(Interger id,String name){
    return "index2";
}
//方式三
@GetMapping("/show")
public String showpage(Model model,HttpServletRequest request ){
    model.addAttribute("id",100);
    model.addAttribute("name","lisi")
}
2.使用restful格式参数传递
<a th:href="@{/show2/{id}(id=1)}">a>

<a th:href="@{/show2/{id}/{name}(id=1,name=admin)}">a>

<a th:href="@{/show/{id}(id=1,name=zhangsan)}">a>

<a th:href="@{/show/{id}(id={id},name={name})}">a>
//方式一
@GetMapping("/show2/{id}")
public String show2(@PathVariable String id){
    System.out.println(id);
    return "index2";
}
//方式二
@GetMapping("/show2/{id}/{name}")
public String show2(@PathVariable Interger id,@PathVariable String name){
    System.out.println(id+"\t"+name);
    return "index2";
}
8)、Thymeleaf的常见配置
spring.thymeleaf.prefix=项目路径	#默认的是templates路径下
spring.thymeleaf.suffix=.html	#这个是默认配置,写代码的时候不用加后缀
spring.thymeleaf.mode=HTML #配置视图模板
spring.thymeleaf.encoding=utf-8	#配置编码
spring.thymeleaf.cache=false	#配置缓存
3、扩展SpringMVC
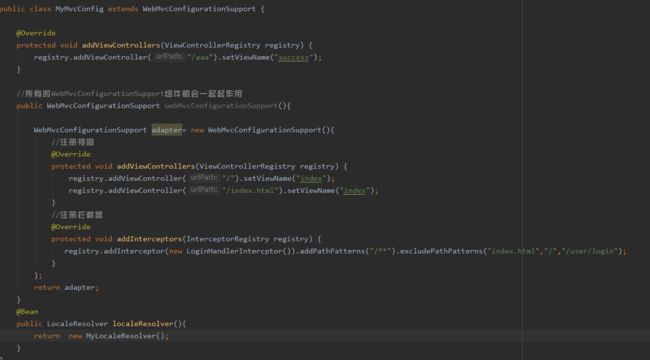
//使用WebMvcConfigurerAdopter可以扩展SpringMVC的功能
@Configuration
public class MyMvcConfig extends WebMvcConfigurerAdapter{//crtl+o查找继承的添加方法
    @Override
    public void addViewControllers(ViewControllerRegistry registry){
        //super.addViewControllers(registry);
        registry.addViewController(urlPath:/sss).setViewName("success");//页面发送sss请求会返回到success.html页面

    }
}
4、如何修改SpringBoot的默认配置
模式:
1)、SpringBoot在自动配置很多组件的时候,先看容器中有没有用户自己配置的(@Bean、@Component)如果有就用用户配置的,如果没有,才自动配置:如果有些组件可以有多个(ViewResolver)将用户配置的喝自己默认的组合起来;
5、国际化
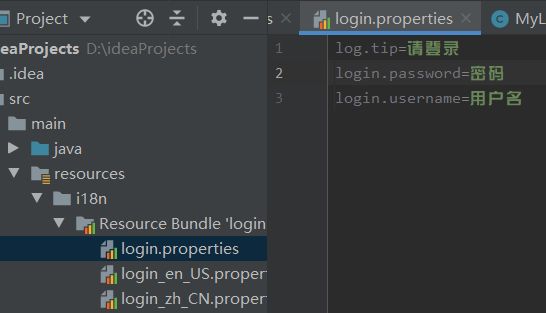
1)、编写国际化配置文件
2)、使用ResourceBundleMessageSource管理国际化资源文件
3)、在页面使用fmt:message取出国际化内容
步骤:
1)、编写国际化配置文件,抽取页面需要显示的国际化消息
2)、SpringBoot自动配置好了管理国际化资源文件的组件;
spring.messages.basename=i18n.login
3)、去页面获取国际化的值
原理:
国际化Locale(区域信息对象):LocaleResolver(获取区域信息对象)
/**
*可以在链接伤携带区域信息
 *
 */
public class MyLocaleResolver implements LocaleResolver {
    @Override
    public Locale resolveLocale(HttpServletRequest request) {
        String l=request.getParameter("l");
        Locale locale=Locale.getDefault();
        if(!StringUtils.isEmpty(l)){
          String[] split=l.split("_");
          locale=new Locale(split[0],split[1]);
        }
        return locale;
    }

    @Override
    public void setLocale(HttpServletRequest httpServletRequest, HttpServletResponse httpServletResponse, Locale locale) {

    }
然后在配置类写
@Bean
    public LocaleResolver localeResolver(){
        return  new MyLocaleResolver();
    }
6、登录
开发期间模板引擎页面修改以后,要实时生效
1)、禁用模板引擎的缓存
#禁用缓存
spring.thymeleaf.cache=false
2)、页面修改完成以后按ctrl+f9键;重新编译
登录错误消息的显示
<p style="color:red" th:text="${msg}" th:if="${not #Strings.isEmpty(msg)}">p>
3)、实现登录拦截检查
步骤一:定义拦截器
/**
 * 登录检查
 */
public class LoginHandlerIntercptor implements HandlerInterceptor {
    //目标方法执行之前
    public boolean preHandle(HttpServletRequest request, HttpServletResponse response, Object handler) throws Exception {
        Object user=request.getSession().getAttribute("loginUser");
        if(user==null){
            //未登录
            request.setAttribute("msg","没有权限请先登录");
            request.getRequestDispatcher("/index.html").forward(request,response);
            return false;
        }
        else {
            return true;
        }
    }

    public void postHandle(HttpServletRequest request, HttpServletResponse response, Object handler, ModelAndView modelAndView) throws Exception {

    }

    public void afterCompletion(HttpServletRequest request, HttpServletResponse response, Object handler, Exception ex) throws Exception {

    }
步骤二:注册拦截器到配置中
 //注册拦截器
            @Override
            protected void addInterceptors(InterceptorRegistry registry) {
               registry.addInterceptor(new LoginHandlerIntercptor()).addPathPatterns("/**").excludePathPatterns("index.html","/","/user/login");
            }
步骤三:在控制器中定义Session值进行判断
public class LoginController {
    //拦截post请求
    @PostMapping(value = "/user/login")
    public String login(@RequestParam("username") String username, @RequestParam("password") String password, Map<String,Object> map, HttpSession session){

        if(!StringUtils.isEmpty(username)&& "123456".equals(password)){
            session.setAttribute("loginUser",username);
            return "sucess";
        }
        else {
            map.put("msg","用户名密码错误");
            return "login";
        }
    }
}
三、sprintboot整合JDBC
1.相关配置
1、添加mysql依赖和驱动
        <dependency>
            <groupId>org.springframework.bootgroupId>
            <artifactId>spring-boot-starter-data-jdbcartifactId>
        dependency>

        <dependency>
            <groupId>mysqlgroupId>
            <artifactId>mysql-connector-javaartifactId>
            <version>5.1.38version>
            <scope>runtimescope>
        dependency>
2、设置application.yml
spring:
  datasource:
    driver-class-name: com.mysql.jdbc.Driver
    username: root
    password: 524265
    url: jdbc:mysql://localhost:3306/test?useUnicode=true&characterEncoding=UTF-8&autoReconnect=true&allowMultiQueries=true&useSSL=false
    type: com.alibaba.druid.pool.DruidDataSource
2、实现增删改查操作
1、添加用户
定义实体类
private Integer id;
private String username;
private String password;
private Integer ago;
定义数据层的接口与实现类
1.导入@Repository注解
2.自动装配JdbcTemlate
    @Autowired
    private JdbcTemplate jdbcTemplate;
3.实现方法。使用update
     String sql = "insert into user(username,password,ago) values(?,?,?)";
        this.jdbcTemplate.update(sql, user.getUsername(), user.getPassword(), user.getAgo());
业务逻辑层的接口与实现类
1.导入Service注解
2.自动装配Dao
    @Autowired
    private UserDao userDao;
3.添加用户需要添加事务管理注解
    @Transactional
4.实现方法
       this.userDao.insertUser(user);
模型层Controller
1.导入Controller注解
2.如果想传数据在页面显示,需要导入@ResponseBody注解
3.如果想在跳转的页面进行数据显示的话直接添加键值对到Model中
 eg: model.addAttribute("list", list);
2、查询用户
数据层
//查询所有
String sql = "select * from user";
return this.jdbcTemplate.query(sql, new RowMapper<User>() {
    @Override
    public User mapRow(ResultSet resultSet, int i) throws SQLException {
        User user = new User();
        user.setId(resultSet.getInt("id"));
        user.setUsername(resultSet.getString("username"));
        user.setPassword(resultSet.getString("password"));
        user.setAgo(resultSet.getInt("ago"));
        return user;
    }
});
//根据id进行查询
String sql = "select * from user where id=?";
        //把参数存放在数组中,qurey方法绑定参数时会根据数组中数据顺序绑定?
        Object[] arr = new Object[]{id};
        User user = new User();
        this.jdbcTemplate.query(sql, arr, new RowCallbackHandler() {
            /**
             * 结果集映射
             * @param resultSet
             * @throws SQLException
             */
            @Override
            public void processRow(ResultSet resultSet) throws SQLException {
                user.setId(resultSet.getInt("id"));
                user.setUsername(resultSet.getString("username"));
                user.setPassword(resultSet.getString("password"));
                user.setAgo(resultSet.getInt("ago"));
            }
        });
        return user;
控制层
//查询所有用户
@RequestMapping("/user/findUserAll")
public String findUserAll(Model model) {
    List<User> list = null;
    try {
        list = this.userService.findUserAll();
        model.addAttribute("list", list);
    } catch (Exception e) {
        e.printStackTrace();
        return "error";
    }
    return "showUsers";
}
//根据id进行查询并跳转到更新页面
@GetMapping("/user/updateUser")
    public String updateUser(Integer id, Model model) {
        User user = null;
        try {
            user = this.userService.findUser(id);
            model.addAttribute("user", user);
        }catch (Exception e){
            e.printStackTrace();
            return "error";
        }

        return "update";
    }
3、修改用户
数据访问层
String sql="update user set username=?,password=?,ago=? where id=?";
     this.jdbcTemplate.update(sql,user.getUsername(),user.getPassword(),user.getAgo(),user.getId());
控制层
@PostMapping("/user/update")
public String update(User user){

    try {
        //一般前端都已经验证是否为空
        if (user!=null){
            this.userService.updateUser(user);
        }else {
            return "error";
        }

    }catch (Exception e){
        e.printStackTrace();
        return "error";
    }
    return "ok";
}
4、删除用户
数据访问层
@Override
public void deleteUser(Integer id) {
    String sql="delete from user where id=?";
    this.jdbcTemplate.update(sql,id);
}
控制层
@GetMapping("/user/deleteUser")
public String deleteUser(Integer id){
    try {
        this.userService.deleteUser(id);
    }catch (Exception e) {
        e.printStackTrace();
        return "error";
    }
    return "ok";
}
5、自定义错误页面
1.在templates文件夹下面添加error.html页面
四、springboot整合JPA
1、添加配置文件
spring.jpa.hibernate.ddl-auto=update
spring.jpa.show-sql=true
2、实体类添加映射
@Entity
@Table(name = "tb_user")//定义数据库的表名
public class User {
    @Id@GeneratedValue(strategy = GenerationType.IDENTITY)//自增主键
    private Integer id;
    @Column(name = "last_name",length = 50)//可省略,不使用时则表示默认
    private String lastName;
    private String email;
3、配置Repository
//定义接口继承JpaRepository,例如以下
public interface UserRepository extends JpaRepository<User, Integer> {//User表示实体类,Integer表示主键的类型
	//这里可自定义实现的内容,有几种方法
    //第一种
    public List<User> findByNotNULL();
    //第二种
    @Query(value = "SELECT * from user where id=?1",nativeQuery = true)
    public List<User> getUser(Integer id,User user);

    //更新
    //一般要带这两个注解 @Transactional 	@Modifying
    @Transactional
    @Modifying
    @Query(value = "DELETE from user where id=?1",nativeQuery = true)
    public void deleteUserById(Integer id);

}
五、使用、RestfulCRUD
1、CRUD-员工列表
实验要求:
1)、RestfulCRUD:CRUD满足Rest风格
URL:/资源名称/资源名称标识 HTTP请求方式区分对资源的CRUD操作
| 普通CRUD(uri来区分操作) | RestfulRUD | |
|---|---|---|
| 查询 | getEmp | emp—GET |
| 添加 | addEmp?xxx | emp—POST |
| 修改 | updateEmp?id=xxx&xxx=xx | emp—PUT |
| 删除 | deleteEmp?id=xxx | emp/ |
2)、实验的请求架构
| 请求URL | 请求方式 | |
|---|---|---|
| 查询所有员工 | emps | GET |
| 查询某个员工(来到修改页面) | emp/{id} | GET |
| 来的添加页面 | emp | GET |
| 添加员工 | emp | POST |
| 来的修改页面(查出员工进行信息回显) | emp/{id} | GET |
| 修改员工 | emp/{id} | PUT |
| 删除员工 | emp/id | DELETE |
 void deleteUserById(Integer id);

}
五、使用、RestfulCRUD
1、CRUD-员工列表
实验要求:
1)、RestfulCRUD:CRUD满足Rest风格
URL:/资源名称/资源名称标识 HTTP请求方式区分对资源的CRUD操作
| 普通CRUD(uri来区分操作) | RestfulRUD | |
|---|---|---|
| 查询 | getEmp | emp—GET |
| 添加 | addEmp?xxx | emp—POST |
| 修改 | updateEmp?id=xxx&xxx=xx | emp—PUT |
| 删除 | deleteEmp?id=xxx | emp/ |
2)、实验的请求架构
| 请求URL | 请求方式 | |
|---|---|---|
| 查询所有员工 | emps | GET |
| 查询某个员工(来到修改页面) | emp/{id} | GET |
| 来的添加页面 | emp | GET |
| 添加员工 | emp | POST |
| 来的修改页面(查出员工进行信息回显) | emp/{id} | GET |
| 修改员工 | emp/{id} | PUT |
| 删除员工 | emp/id | DELETE |

