Docker容器端口暴露方式
【Bridge 模式】
当 Docker 进程启动时,会在主机上创建一个名为docker0的虚拟网桥,此主机上启动的 Docker 容器会连接到这个虚拟网桥上。虚拟网桥的工作方式和物理交换机类似,这样主机上的所有容器就通过交换机连在了一个二层网络中。从 docker0 子网中分配一个 IP 给容器使用,并设置 docker0 的 IP 地址为容器的默认网关。在主机上创建一对虚拟网卡veth pair设备,Docker 将 veth pair 设备的一端放在新创建的容器中,并命名为 eth0(容器的网卡),另一端放在主机中,以vethxxx这样类似的名字命名,并将这个网络设备加入到 docker0 网桥中。可以通过brctl show命令查看:
[root@k8s-node01 ~]# brctl show
bridge name     bridge id               STP enabled     interfaces
docker0         8000.02426b181b43       no              vetha2bf9e3
bridge 模式是 docker 的默认网络模式,使用docker run -p时,实际上是通过 iptables 做了DNAT规则,实现端口转发功能。可以使用iptables -t nat -vnL查看。bridge模式如下图所示:
[root@k8s-node01 ~]# iptables -t nat -nvL
Chain PREROUTING (policy ACCEPT 0 packets, 0 bytes)
 pkts bytes target     prot opt in     out     source               destination
    2   470 KUBE-SERVICES  all  --  *      *       0.0.0.0/0            0.0.0.0/0            /* kubernetes service portals */
    1    60 DOCKER     all  --  *      *       0.0.0.0/0            0.0.0.0/0            ADDRTYPE match dst-type LOCAL

Chain INPUT (policy ACCEPT 0 packets, 0 bytes)
 pkts bytes target     prot opt in     out     source               destination

Chain OUTPUT (policy ACCEPT 2 packets, 152 bytes)
 pkts bytes target     prot opt in     out     source               destination
  297 20227 KUBE-SERVICES  all  --  *      *       0.0.0.0/0            0.0.0.0/0            /* kubernetes service portals */
    0     0 DOCKER     all  --  *      *       0.0.0.0/0           !127.0.0.0/8          ADDRTYPE match dst-type LOCAL

Chain POSTROUTING (policy ACCEPT 2 packets, 152 bytes)
 pkts bytes target     prot opt in     out     source               destination
  442 29299 KUBE-POSTROUTING  all  --  *      *       0.0.0.0/0            0.0.0.0/0            /* kubernetes postrouting rules */
    0     0 MASQUERADE  all  --  *      !docker0  172.17.0.0/16        0.0.0.0/0
    0     0 MASQUERADE  tcp  --  *      *       172.17.0.2           172.17.0.2           tcp dpt:80

Chain DOCKER (2 references)
 pkts bytes target     prot opt in     out     source               destination
    0     0 RETURN     all  --  docker0 *       0.0.0.0/0            0.0.0.0/0
    0     0 DNAT       tcp  --  !docker0 *       0.0.0.0/0            0.0.0.0/0            tcp dpt:8080 to:172.17.0.2:80

Chain KUBE-FIREWALL (0 references)
 pkts bytes target     prot opt in     out     source               destination
    0     0 KUBE-MARK-DROP  all  --  *      *       0.0.0.0/0            0.0.0.0/0

Chain KUBE-KUBELET-CANARY (0 references)
 pkts bytes target     prot opt in     out     source               destination

Chain KUBE-LOAD-BALANCER (0 references)
 pkts bytes target     prot opt in     out     source               destination
    0     0 KUBE-MARK-MASQ  all  --  *      *       0.0.0.0/0            0.0.0.0/0

Chain KUBE-MARK-DROP (1 references)
 pkts bytes target     prot opt in     out     source               destination
    0     0 MARK       all  --  *      *       0.0.0.0/0            0.0.0.0/0            MARK or 0x8000

Chain KUBE-MARK-MASQ (2 references)
 pkts bytes target     prot opt in     out     source               destination
    0     0 MARK       all  --  *      *       0.0.0.0/0            0.0.0.0/0            MARK or 0x4000

Chain KUBE-NODE-PORT (1 references)
 pkts bytes target     prot opt in     out     source               destination

Chain KUBE-POSTROUTING (1 references)
 pkts bytes target     prot opt in     out     source               destination
    2   152 RETURN     all  --  *      *       0.0.0.0/0            0.0.0.0/0            mark match ! 0x4000/0x4000
    0     0 MARK       all  --  *      *       0.0.0.0/0            0.0.0.0/0            MARK xor 0x4000
    0     0 MASQUERADE  all  --  *      *       0.0.0.0/0            0.0.0.0/0            /* kubernetes service traffic requiring SNAT */

Chain KUBE-SERVICES (2 references)
 pkts bytes target     prot opt in     out     source               destination
    0     0 KUBE-MARK-MASQ  all  --  *      *      !10.2.0.0/16          0.0.0.0/0            /* Kubernetes service cluster ip + port for masquerade purpose */ match-set KUBE-CLUSTER-IP dst,dst
    0     0 KUBE-NODE-PORT  all  --  *      *       0.0.0.0/0            0.0.0.0/0            ADDRTYPE match dst-type LOCAL
    0     0 ACCEPT     all  --  *      *       0.0.0.0/0            0.0.0.0/0            match-set KUBE-CLUSTER-IP dst,dst
比如现在我们运行一个 busybox 容器:
[root@k8s-node01 ~]# docker run -tid --net=bridge --name docker_bri busybox top
c7329745be212689b35800ceabea69f9fd4f9cc015948fff14fd6fbe1070ea50
[root@k8s-node01 ~]# brctl show
bridge name     bridge id               STP enabled     interfaces
docker0         8000.02426b181b43       no              vetha2bf9e3
vethf1b9d2e然后进入到容器内部去查看网络情况,这里我们需要使用到一个新的命令docker exec,用来进入容器内部,要记住我们要进行终端交互,所以要带上-it两个参数:
[root@k8s-node01 ~]# docker exec -it docker_bri /bin/sh
/ # ifconfig -a
eth0      Link encap:Ethernet  HWaddr 02:42:AC:11:00:03
          inet addr:172.17.0.3  Bcast:172.17.255.255  Mask:255.255.0.0
          UP BROADCAST RUNNING MULTICAST  MTU:1500  Metric:1
          RX packets:0 errors:0 dropped:0 overruns:0 frame:0
          TX packets:0 errors:0 dropped:0 overruns:0 carrier:0
          collisions:0 txqueuelen:0
          RX bytes:0 (0.0 B)  TX bytes:0 (0.0 B)

lo        Link encap:Local Loopback
          inet addr:127.0.0.1  Mask:255.0.0.0
          UP LOOPBACK RUNNING  MTU:65536  Metric:1
          RX packets:0 errors:0 dropped:0 overruns:0 frame:0
          TX packets:0 errors:0 dropped:0 overruns:0 carrier:0
          collisions:0 txqueuelen:1000
          RX bytes:0 (0.0 B)  TX bytes:0 (0.0 B)

/ # route -n
Kernel IP routing table
Destination     Gateway         Genmask         Flags Metric Ref    Use Iface
0.0.0.0         172.17.0.1      0.0.0.0         UG    0      0        0 eth0
172.17.0.0      0.0.0.0         255.255.0.0     U     0      0        0 eth0
可以通过ip link show命令查看到对应的 veth pair 对名称
[root@k8s-node01 ~]# ip link show
1: lo:  mtu 65536 qdisc noqueue state UNKNOWN mode DEFAULT group default qlen 1000
    link/loopback 00:00:00:00:00:00 brd 00:00:00:00:00:00
2: ens33:  mtu 1500 qdisc pfifo_fast state UP mode DEFAULT group default qlen 1000
    link/ether 00:0c:29:44:09:ce brd ff:ff:ff:ff:ff:ff
3: docker0:  mtu 1500 qdisc noqueue state UP mode DEFAULT group default
    link/ether 02:42:6b:18:1b:43 brd ff:ff:ff:ff:ff:ff
4: dummy0:  mtu 1500 qdisc noop state DOWN mode DEFAULT group default qlen 1000
    link/ether 0a:9b:ca:3f:fc:c0 brd ff:ff:ff:ff:ff:ff
5: kube-ipvs0:  mtu 1500 qdisc noop state DOWN mode DEFAULT group default
    link/ether ce:34:a0:07:fd:88 brd ff:ff:ff:ff:ff:ff
9: vetha2bf9e3@if8:  mtu 1500 qdisc noqueue master docker0 state UP mode DEFAULT group default
    link/ether ae:94:ef:e4:4d:e2 brd ff:ff:ff:ff:ff:ff link-netnsid 0
11: vethf1b9d2e@if10:  mtu 1500 qdisc noqueue master docker0 state UP mode DEFAULT group default
    link/ether 4a:4d:83:2c:70:7a brd ff:ff:ff:ff:ff:ff link-netnsid 1
通过上面的命令可以验证我们前面提到的 bridge 模式原理。
【自定义网络】
另外我们可以通过自定义的 Docker 网络来连接多个容器,而不是使用--link命令,比如现在我们有一个新的容器想要和上面的 docker_bri 容器建立互连关系,之前我们可以使用 --link 命令:
[root@k8s-node01 ~]# docker run -tid --link docker_bri --name docker_bri1 busybox top
bd0a67e04610107b384c47f8cd530e5d92f7a97f41e586ab3eb57150ba27c133
[root@k8s-node01 ~]# docker exec -it docker_bri1 /bin/sh
/ # ping docker_bri
PING docker_bri (172.17.0.3): 56 data bytes
64 bytes from 172.17.0.3: seq=0 ttl=64 time=0.142 ms
64 bytes from 172.17.0.3: seq=1 ttl=64 time=0.087 ms
^C
--- docker_bri ping statistics ---
2 packets transmitted, 2 packets received, 0% packet loss
round-trip min/avg/max = 0.087/0.114/0.142 ms我们可以看到在新创建的容器上可以访问到我们连接的容器,但是反过来却不行了,因为--link是单方面的:
[root@k8s-node01 ~]# docker exec -it docker_bri /bin/sh
/ # ping docker_bri1
ping: bad address 'docker_bri1'
/ #
这个时候我们可以通过自定义网络的方式来实现互联互通,首先创建一个自定义的网络:
[root@k8s-node01 ~]# docker network create -d bridge my-net
7eee7c618ebcde272f087583f8ae0f50fca45c2d12ed9e65c951b5e5a5cc6399
然后我们使用自定义的网络运行一个容器:
[root@k8s-node01 ~]# docker run -it --rm --name busybox1 --network my-net busybox sh
/ #
打开终端再运行一个容器:
[root@k8s-node01 ~]# docker run -it --rm --name busybox2 --network my-net busybox sh
/ #
然后我们通过 ping 来证明 busybox1 容器和 busybox2 容器建立了互联关系。 在 busybox1 容器输入以下命令:
[root@k8s-node01 ~]# docker run -it --rm --name busybox1 --network my-net busybox sh
/ # ping busybox2
PING busybox2 (172.18.0.3): 56 data bytes
64 bytes from 172.18.0.3: seq=0 ttl=64 time=2.050 ms
64 bytes from 172.18.0.3: seq=1 ttl=64 time=0.430 ms
^C
--- busybox2 ping statistics ---
2 packets transmitted, 2 packets received, 0% packet loss
round-trip min/avg/max = 0.430/1.240/2.050 ms
/ #
用 ping 来测试连接 busybox2 容器,它会解析成 172.18.0.3。 同理在 busybox2 容器执行 ping busybox1,也会成功连接到:
[root@k8s-node01 ~]# docker run -it --rm --name busybox2 --network my-net busybox sh
/ # ping busybox1
PING busybox1 (172.18.0.2): 56 data bytes
64 bytes from 172.18.0.2: seq=0 ttl=64 time=0.106 ms
64 bytes from 172.18.0.2: seq=1 ttl=64 time=0.157 ms
^C
--- busybox1 ping statistics ---
2 packets transmitted, 2 packets received, 0% packet loss
round-trip min/avg/max = 0.106/0.131/0.157 ms
/ #
这样,busybox1 容器和 busybox2 容器建立了互联关系,如果你有多个容器之间需要互相连接,推荐使用后面的 Docker Compose。
【Host 模式】
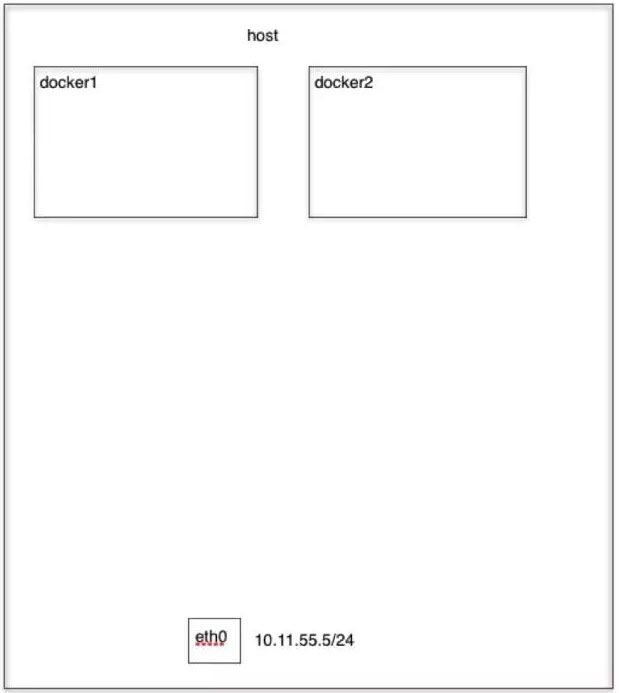
如果启动容器的时候使用 host 模式,那么这个容器将不会获得一个独立的Network Namespace,而是和宿主机共用一个 Network Namespace。容器将不会虚拟出自己的网卡,配置自己的 IP 等,而是使用宿主机的 IP 和端口。但是,容器的其他方面,如文件系统、进程列表等还是和宿主机隔离的。 Host模式如下图所示

使用 host 模式也很简单,只需要在运行容器的时候指定 --net=host 即可。
【Container 模式】
这个模式指定新创建的容器和已经存在的一个容器共享一个 Network Namespace,而不是和宿主机共享。新创建的容器不会创建自己的网卡,配置自己的 IP,而是和一个指定的容器共享 IP、端口范围等。同样,两个容器除了网络方面,其他的如文件系统、进程列表等还是隔离的。两个容器的进程可以通过 lo 网卡设备通信。 Container 模式如下图所示:

在运行容器的时候指定 --net=container:目标容器名 即可。实际上我们后面要学习的 Kubernetes 里面的 Pod 中容器之间就是通过 Container 模式链接到 pause 容器上面的,所以容器直接可以通过 localhost 来进行访问。
【None 模式】
使用 none模式,Docker 容器拥有自己的 Network Namespace,但是并不为Docker 容器进行任何网络配置。也就是说这个 Docker 容器没有网卡、IP、路由等信息。需要我们自己为 Docker 容器添加网卡、配置 IP 等。 None模式示意图如下所示:
选择这种模式,一般是用户对网络有自己特殊的需求,不希望 docker 预设置太多的东西。