写一个starter(spring boot)
前置知识
自动装配
自动装配的一个重要注解就是@SpringBootApplication。它是一个复合注解,由四个元注解和另外三个注解组成。这三个注解是:
- @Configuration
- @EnableAutoConfiguration
- @ComponentScan

@Configuration
@Configuration 是 JavaConfig 形式的基于 Spring IOC 容器的配置类使用的一种注解。所以在启动类里面标注了 @Configuration,意味着它其实也是一个 IoC 容器的配置类。
传统意义上的 Spring 应用都是基于 xml 形式来配置 bean 的依赖关系。但是从 Spring3 开始,Spring 就支持了两种 bean 的配置方式,一种是基于 xml 文件方式,另一种就是 JavaConfig,任何一个标注了@Configuration 的 Java 类定义都是一个JavaConfig 配置类。而在这个配置类中,任何标注了@Bean 的方法,它的返回值都会作为 Bean 定义注册到 Spring 的 IoC 容器,方法名默认成为这个 Bean 的 id。然后通过 spring 容器在启动的时候,把 Bean 进行初始化并且,如果 Bean 之间存在依赖关系,则分析这些已经在 IoC 容器中的 Bean 根据依赖关系进行组装。
@ComponentScan
@ComponentScan 这个注解就是扫包,相当于 xml 配置文件中的 context:component-scan 。它的主要作用就是扫描指定路径下的标识了需要装配的类,自动装配到 Spring 的 IoC 容器中。
标识需要装配的类主要是:@Component、@Repository、@Service、@Controller这类的注解标识的类。(注 @Repository、@Service、@Controller 的底层还是 @Component)。 ComponentScan 默认会扫描当前 package 下的的所有加了相关注解标识的类到 IoC 容器中。
@EnableAutoConfiguration
@EnableAutoConfiguration 是 Spring Boot 的灵魂,是重中之重。从 Spring3.1 开始,提供了一系列的 @Enable 开头的注解,它是在 JavaConfig 框架上更进一步的完善,使用户在使用 Spring 相关的框架避免配置大量的代码从而降低使用的难度。
比如常见的一些 Enable 注解:@EnableWebMvc、@EnableScheduling、@EnableAsync 等等。 每一个涉及到 Enable 开头的注解,都会带有一个 @Import 的注解, @EnableAutoConfiguration 也不例外,我们点进去发现如红框所示。

@Import 注解是什么意思呢? 它对应 XML 形式下的< import resource/ >,就是导入资源,把多个分布在不同容器下的配置合并在一个配置中。@Import 注解可以配置三种不同的 class :
- 普通 Bean 或者带有 @Configuration 的配置文件
- 实现 ImportSelector 接口进行动态注入
- 实现 ImportBeanDefinitionRegistrar 接口进行动态注入
这里导入的是第二种 importSelector,这是一种动态注入 Bean 的技术,进入 AutoConfigurationImportSelector 注解,发现它实现了 ImportSelector 接口。

找到实现方法selectImports ,该方法的作用就是找到相应的 Bean 注入到容器中。
public String[] selectImports(AnnotationMetadata annotationMetadata) {
    if (!this.isEnabled(annotationMetadata)) {
        return NO_IMPORTS;
    } else {
        AutoConfigurationEntry autoConfigurationEntry = this.getAutoConfigurationEntry(annotationMetadata);
        return StringUtils.toStringArray(autoConfigurationEntry.getConfigurations());
    }
}
再从 getAutoConfigurationEntry 方法点进去,这里面做了许多事情,就是把找到的 Bean 进行排除、过滤、去重,我们可以看到 removeDuplicates、remove、filter 等方法。

那具体这些 Bean 从哪里找呢,从 getCandidateConfigurations 方法点进去,发现了有一个 META-INF/spring.factories 文件。
protected List<String> getCandidateConfigurations(AnnotationMetadata metadata, AnnotationAttributes attributes) {
    List<String> configurations = new ArrayList(SpringFactoriesLoader.loadFactoryNames(this.getSpringFactoriesLoaderFactoryClass(), this.getBeanClassLoader()));
    ImportCandidates.load(AutoConfiguration.class, this.getBeanClassLoader()).forEach(configurations::add);
    Assert.notEmpty(configurations, "No auto configuration classes found in META-INF/spring.factories nor in META-INF/spring/org.springframework.boot.autoconfigure.AutoConfiguration.imports. If you are using a custom packaging, make sure that file is correct.");
    return configurations;
}
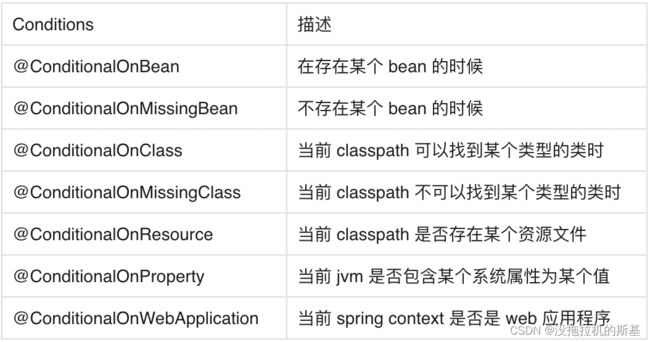
原来 SpringFactoriesLoader 的作用就是从 classpath/META-INF/spring.factories 文件中,根据 key来加载对应的类到 Spring IoC 容器中。文件中写了许多的配置项,但是并不是一次性就全部加载所有配置,Spring Boot采用的是按条件加载,主要通过Conditional开头的注解实现。
自定义一个starter
需求
写一个序列化的插件,并且可以自由的选择 fastjson 还是 gson,如果没选的情况下默认选择fastjson。
步骤
1、创建一个空的maven项目starter-test。
2、添加一个springboot项目的module,名为format-spring-boot-starter。Spring的官方的starter一般命名为spring-boot-starter-{name},第三方starter命名为{name}-spring-boot-starter。
3、pom配置
    org.springframework.boot
    spring-boot-autoconfigure


    org.springframework.boot
    spring-boot-configuration-processor
    true


    com.alibaba
    fastjson
    1.2.67_noneautotype2


    com.google.code.gson
    gson
    2.8.9
3、定义格式化接口
public interface FormatProcessor {
    <T> String format(T t);
}
4、编写Fastjson和Gson实现类
public class FastjsonProcessor implements FormatProcessor {
    @Override
    public <T> String format(T t){
        return "fastjson: " + JSON.toJSONString(t);
    }
}
public class GsonProcessor implements FormatProcessor {
    @Override
    public <T> String format(T t) {
        Gson gson = new Gson();
        String jsonStr = gson.toJson(t);
        return "gson: " + jsonStr;
    }
}
5、写一个配置类,这里用了条件注解,如果 fastjson 和 gson 类存在的情况下才加载对应的实现类,因为在 pom 文件里都引用了,所以这里都会被装载。对同一个接口,有几种不同的实现类时,@Autowired 是按类型注入的,不知道要选哪一个,按照第二点需求,用户在没选的情况下默认选择 fastjson,所以这里给 fastjson 的实现上打上 @Primary。
public class FormatAutoConfiguration {

    @ConditionalOnClass(name = "com.alibaba.fastjson.JSON")
    @Bean
    @Primary
    public FormatProcessor fastjsonProcessor(){
        return new FastjsonProcessor();
    }

    @ConditionalOnClass(name = "com.google.gson.Gson")
    @Bean
    public FormatProcessor gsonProcessor(){
        return new GsonProcessor();
    }
}
6、配置类,用来读取用户的选择,作用和 @Value 一样。
@ConfigurationProperties(prefix = "fg.format")
public class FormatProperties {
    private String type;

    public String getType() {
        return type;
    }

    public void setType(String type) {
        this.type = type;
    }
}
7、模版调用实现类,这个就是提供给用户直接调用的,例如,常用的 RedisTemplate、JdbcTemplate,构造函数的时候直接传入具体的实现。
public class FormatTemplate {
    private FormatProcessor formatProcessor;

    public FormatTemplate(FormatProcessor formatProcessor) {
        this.formatProcessor = formatProcessor;
    }

    public <T> String doFormat(T obj) {
        return formatProcessor.format(obj);
    }
}
8、主类。@Import 用来导入配置类,就是将该配置类中的 Bean 注入到容器,@EnableConfigurationProperties 这是在将属性类激活,注入到容器中,也可以用 @Bean 的方式,@Configuration 说明这是一个配置类。接下来将 FormatTemplate 注入到容器中,首先是去属性类中去读属性,如果是 fastjson 就返回 fastjson 的实现,如果是 gson 就返回 gson 的实现,如果没读取到,就用前面设置的 @Primary 的默认实现。
@Import(FormatAutoConfiguration.class)
@EnableConfigurationProperties(FormatProperties.class)
@Configuration
public class FGFormatConfiguration {
    @Bean
    public FormatTemplate getFormatTemplate(FormatProperties formatProperties, FormatProcessor formatProcessor) {
        if("fastjson".equals(formatProperties.getType())){
            return new FormatTemplate(new FastjsonProcessor());
        }
        if("gson".equals(formatProperties.getType())){
            return new FormatTemplate(new GsonProcessor());
        }
        return new FormatTemplate(formatProcessor);
    }
}
9、最后一步最关键的就是设置,在 resources 文件夹下创建 META-INF/spring.factories 文件,通过上面的知识,Spring Boot 在启动的时候就是读取该文件下的配置类,从而将 Bean 加载到容器中。
org.springframework.boot.autoconfigure.EnableAutoConfiguration= \
com.example.formatspringbootstarter.FGFormatConfiguration
10、打包 mvn install。如果出现找不到主类情形,可以在pom中进行如下配置
org.springframework.boot spring-boot-maven-plugin com.example.formatspringbootstarter.FGFormatConfiguration11、测试,新建一个spring boot项目模块,引入配置
<dependency>
    <groupId>com.examplegroupId>
    <artifactId>format-spring-boot-starterartifactId>
    <version>0.0.1-SNAPSHOTversion>
dependency>
12、编写测试类,User类可以自己定义,此处省略
@RestController
public class HelloController {
    @Autowired
    FormatTemplate formatTemplate;

    @GetMapping("/hello")
    public String sayHello() {
        User user = new User();
        user.setId(123L);
        user.setUsername("name");
        user.setPassword("abcd");
        return formatTemplate.doFormat(user);
    }
}
13、测试结果(根据application.properties配置不同,输出不同结果,不配置,默认为第一种情况)
- 第一种情形
fg.format.type=fastjson

- 第二种情形
fg.format.type=gson
