01【Git的基本使用与底层原理】
下一篇:02【Git的分支与数据恢复】
目录:【Git系列教程-目录大纲】
文章目录
- 一、Git概述
-
- 1.1 Git简介
- 1.2 集中式与分布式
-
- 1.2.1 集中式版本控制
- 1.2.2 分布式版本控制
- 1.3 Git的使用流程
-
- 1.3.1 本地仓库
- 1.3.2 协同开发
- 1.4 Git的配置
-
- 1.4.1 Git的配置等级
- 1.4.2 初始化Git配置
- 二、Git的使用
-
- 2.1 Git基本操作命令
-
- 2.1.1 初始化项目
- 2.1.2 添加操作
- 2.1.3 提交操作
- 2.1.4 修改操作
- 2.2 Git的目录状态
-
- 2.2.1 nothing to commit
- 2.2.2 Untracked files
- 2.2.3 Changes to be committed
- 2.2.4 no changes added to commit
- 2.3 Git其他操作
-
- 2.3.1 Git文件对比
-
- 1)工作空间与暂存区对比
- 2)版本库与暂存区对比
- 2.3.2 Git文件删除
-
- 1)普通方式删除
- 2)git rm命令删除
- 2.3.3 Git文件改名
-
- 1)普通改名
- 2)使用git mv改名
- 2.3.4 Git日志查询
-
- 1)git log命令
- 2)格式化日志
- 3)日期格式化
- 三、Git底层对象
-
- 3.1 Blob对象
-
- 3.1.1 Blob对象简介
- 3.1.2 Blob对象的使用
-
- 1)写入数据
- 2)读取数据
- 3)小练习
- 3.2 Tree对象
-
- 3.2.1 Tree对象简介
- 3.2.2 暂存区的概念
- 3.3.2 生成Tree对象
- 3.2.3 Tree对象小练习
-
- 1)生成第一个树对象
- 2)生成第二个树对象
- 3.2.4 读取树对象
- 3.3 Commit对象
-
- 3.3.1 Commit对象简介
- 3.3.2 生成Commit对象
- 3.3.3 指定父Commit对象提交
- 四、Git命令原理
-
- 4.1 基本操作命令原理
-
- 4.1.1 add命令原理
- 4.1.2 commit命令原理
- 4.2 Git其他命令原理
-
- 4.2.1 文件删除原理
-
- 1)普通方式删除
- 2)git rm 命令原理
- 4.2.2 文件改名原理
-
- 1)普通方式改名
- 2)git mv 命令原理
一、Git概述
1.1 Git简介
Git是一个开源的分布式版本控制系统,是由Linux之父Linus Torvalds为了帮助管理Linux内核而开发的一个版本控制软件,最后开源了。Git与常用的版本控制工具CVS、Subversion等不同,它采用了分布式版本库的方式,不必服务器端软件支持。
Git更像是一系列微型文件系统的快照。使用Git,每次提交或保存项目状态时,Git基本上都会记录当时所有文件的状态,并存储对该快照的引用。为了提高效率,如果文件没有改变,Git不会再次存储文件,只是指向它已存储的上一个相同文件的链接。Git认为它的数据更像是一个快照流,会将数据作为项目的快照存储一段时间。可以有效、高速地处理从很小到非常大的项目版本管理。
Git官网:https://git-scm.com/
1.2 集中式与分布式
1.2.1 集中式版本控制
SVN就是一个典型的集中式版本控制系统,版本库是集中放在中央服务器的;
我们开发项目时,每个人都是使用自己的电脑进行开发,而代码都是统一存储到中央服务器,各个开发人员从中央服务器拉取代码到本地进行开发,开发完功能后将代码提交到中央服务器,然后其他人又更新本地代码,达到协同开发;这样代码统一集中到中央服务器中,每个人都需要借助中央服务器进行更新、提交等操作。
- 如图:
当个开发人员开发完自身功能后,通过网络提交到中央服务器中,这个过程必须联网才能工作,如果在局域网还可以,带宽够大,速度够快,如果在互联网下,如果网速慢的话,开发效率就变得比较低。另外,在集中式版本控制系统中,如果没有网络,那么开发将会变得无法推进;
同时,在集中式环境中,非常容易出现单点故障。如果中央服务器出现故障,那么整个代码版本将会丢失,除非之前有备份,然而版本库每时每刻都在更新,就算有备份,也会丢失最近的版本,除非备份频次设置的非常频繁;
1.2.2 分布式版本控制
Git是分布式版本控制系统,每个人的电脑都是一个完整的版本库,开发人员开发完某个功能后直接将代码提交到自己本地的仓库中即可,这样就算没有网也可以进行项目开发,也不存在集中式的单点故障问题了;
Tips:SVN的客户端本地不会存储版本信息,只会存储源代码;
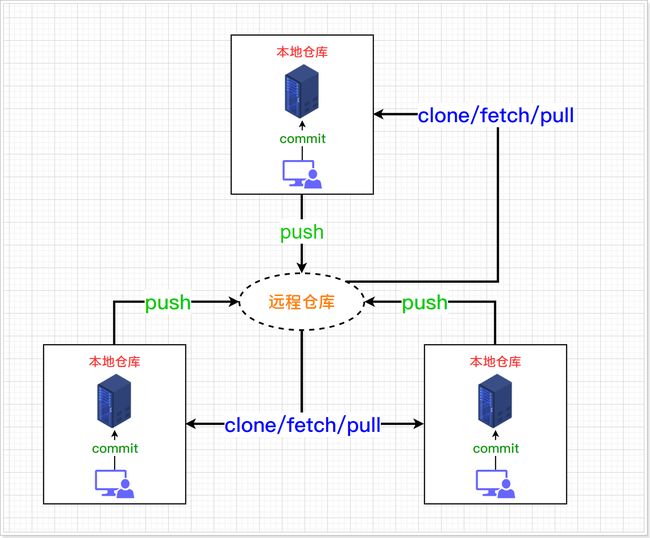
既然每个人的电脑都有一个完整的版本库,那多个人如何协作呢?在Git中,由于每个人的电脑都是一个独立的完整版本库,开发完某个功能后首先将功能提交到自身的版本库中,然后再将功能推送到远程的代码仓库中,其他开发人员如果需要获取最新的代码,只需要将远程仓库中的代码拉取到本地即可;
- 如何协同开发?
这样一看,那Git和SVN岂不是一模一样?
我们可以这样理解:Git在本地会有一个数据仓库,我们有了这个数据仓库就可以进行代码的提交、生成版本快照信息等;使用Git的项目团队的每一个成员开发项目时,如果需要产生一次版本,可以提交到本地仓库,等到需要将功能发布给团队的其他人时再发布到远程仓库,其他人通过拉取远程仓库的代码更新自身的本地库;
而在SVN中,每次功能开发完毕如果需要产生一次快照则必须提交到远程仓库,这一步肯定是需要网络的;所以说,使用SVN的开发团队离开了中央仓库则团队的每个成员都无法提交数据产生版本信息了;除非使用SVN的项目团队成员开发完某个功能后不提交到远程仓库,也就是不产生版本信息,但这已经脱离了版本控制了。
我们可以这样对比:每个Git的客户端都是一个独立的"SVN",当我们需要把"SVN"中的版本信息共享到团队其他成员时,只需要把"SVN"提交到远程仓库即可;
1.3 Git的使用流程
Git属于分布式版本控制系统,每一个开发人员都拥有一个独立的仓库;即使自身与外界环境完全隔离的情况下也是可以进行项目功能的推进,只不过自己开发的功能无法发布到远程仓库,团队的其他成员自然也就无法从远程仓库拉取你开发的功能,但这并不影响自身的开发。
我们开发完某些功能后,首先将功能提交到自身的本地仓库,然后再推送到远程仓库;
1.3.1 本地仓库
首先本地仓库的来源有两种;
- 1)项目刚开始开发,需要有人在本地创建一个本地仓库,该本地仓库包含项目的结构、基本信息等,然后将这个本地仓库推送到远程仓库中,项目的其他成员使用Git拉取远程仓库的项目结构、基本信息等到本地;
- 2)中途加入到项目开发,需要将远程仓库克隆到本地,形成一个本地仓库
本地仓库的开发流程:
- init:在本地初始化一个本地仓库;
- clone:从远程仓库中克隆一个仓库到本地;
在Git中,本地仓库=工作空间(代码)+项目版本的版本信息,因此本地仓库就包含了工作空间,我们不需要将本地仓库的代码更新到工作空间,因为每一次更新工作空间就相当于更新了本地仓库,我们将工作空间的代码提交(commit)到本地仓库的目的是需要生成一个版本快照;
- checkout:用于可以切换分支,不同的分支对应的代码、版本信息等都不一样,因此执行checkout切换分支后工作空间将会更新到新的分支状态;
暂存区:临时存储的区域,可以将操作先添加到暂存区,等到暂存到一定数量后可以一起提交,这些变更都被记录成一个版本;
1.3.2 协同开发
当项目发布到远程仓库后,团队的其他成员将远程仓库的项目克隆(clone)到本地,之后每个成员都可以独立开发了,如果需要把自己本地仓库的项目共享给其他成员则可以推送(push)到远程仓库;
协同开发流程:
远程仓库的来源:通过本地仓库推送(push)到远程仓库;
- clone:将远程仓库的所有信息克隆到本地仓库
- push:当本地开发的的功能需要发布到远程仓库时,使用push命令把本地仓库的代码、版本信息等推送到远程仓库
- fetch:将远程仓库的最新版本信息拉取到本地仓库,但是工作空间的代码并未更新到最新版本,只是本地仓库中存储的版本信息可以看到有一些版本被更新下来了,工作空间还是指向旧版本,因此使用fetch命令拉取之后通常需要将工作空间也更新到最新版本,这个动作我们叫合并(merge);
- pull:除了将远程仓库的最新版本更新到本地之后,还会将工作空间指向最新的版本(fetch+merge);
1.4 Git的配置
Git的安装参考《Git的安装与卸载》,安装完毕之后在菜单右键会有Git相关操作:
- Git GUI Here:在当前目录打开Git的GUI图形化操作面板
- Git Bash Here:在的当前目录打开Git的命令行
1.4.1 Git的配置等级
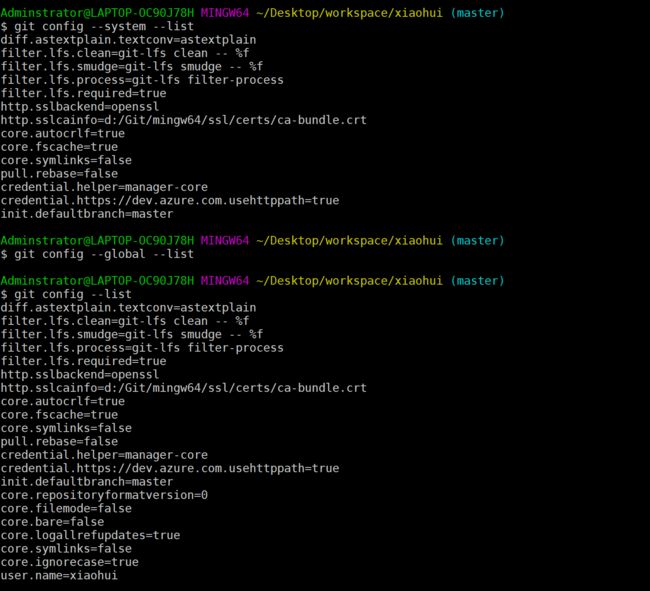
安装好Git后,我们需要对Git进行一些基本配置,在Git中配置等级分为local、global、system;
- local:低级别配置,是本项目的配置,只会在本项目的范围内生效,其他项目不生效该配置,local范围的配置需要先创建本地仓库才可以进行local配置;
- global:全局配置,作用区域是本用户范围内的所有git仓库,只要用的是同一个用户那么都可以使用这个配置
- system:最高级的配置,作用域是整个系统的所有git仓库,不管用的是什么用户,都可以使用这个配置
每个级别的配置可能重复或冲突,如果冲突,会以低级别的配置为准,也就是低级别配置覆盖高级别配置使用git config --global/–system/–local来指定操纵哪个级别的配置,针对Git的配置更改都会在.git/config下进行
1.4.2 初始化Git配置
在任意目录打开Git Bash Here,执行git config查看当前配置:
git config --system --list		# 查看system级别的配置
git config --global --list		# 查看system级别的配置
git config --list				# 查看所有配置
配置全局用户:
# 配置用户信息,如果已经配置将会覆盖
git config --global user.name "xiaohui"
git config --global user.email "[email protected]"

# 清除用户配置
git config --global --unset user.name
git config --global --unset user.email
二、Git的使用
2.1 Git基本操作命令
2.1.1 初始化项目
git init
2.1.2 添加操作
我们首次提交任何文件到服务器之前都应该先使用add命令将其添加到版本控制体系中,该命令将文件添加到暂存区;
echo "000" >> aaa.txt			# 在当前目录创建一个aaa.txt文件,内容为000

git add ./						# 将当前目录下的所有文件/文件夹都添加到暂存区
查看Git暂存区:
git ls-files -s			# 查看当前暂存区
git cat-file -p 8f087a34c80c2123f05aae01e910c871b9e23773			# 根据id查询文件内容
2.1.3 提交操作
当文件被add命令添加到暂存区后,使用commit命令将其提交到版本库;
- 格式:
git commit -m '日志信息' 文件名
- 示例:
git commit -m "第一次提交-000" ./ # 将当前目录下的所有文件提交
Tips:提交时必须写日志,否则不允许提交
2.1.4 修改操作
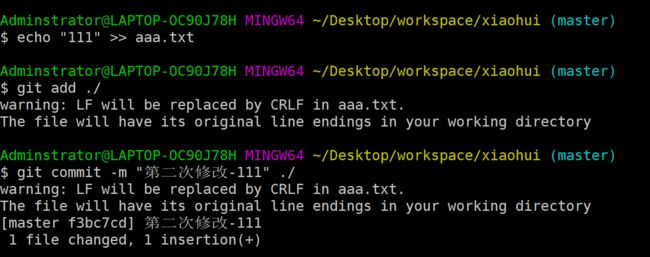
- 编辑工作空间:
echo "111" >> aaa.txt
git add ./
git commit -m "第二次修改-111" ./
Tips:文件在刚创建的时候需要使用add命令让其被git追踪,之后每次修改文件只需要提交即可,不需要再次add;
2.2 Git的目录状态
对Git的工作空间进行了不同操作会将其处于不同的状态,通过一些状态信息我们可以很好的判断Git进行了什么操作以及接下来应该进行什么操作;
- 删除之前的git仓库:
rm -rf ./*		# 删除当前目录下的所有文件
rm -rf .git		# .git是隐藏文件夹,需要单独删除
2.2.1 nothing to commit
表示当前工作空间没有还未提交的操作,属于一个干净的工作空间;
- 初始化git仓库:
git init

git status			# 查看工作空间状态
2.2.2 Untracked files
表示当前空间空间有文件文件处于"未追踪"状态,需要使用add命令添加;
echo "111" >> aaa.txt

git status
2.2.3 Changes to be committed
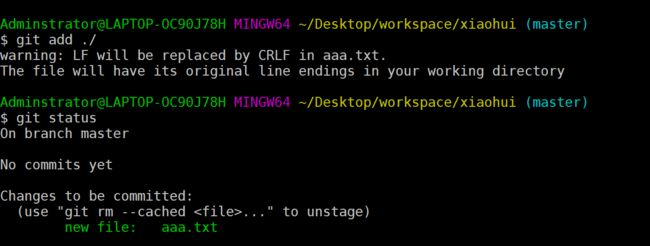
表示更改的操作已经被追踪到了,但操作还未被提交
git add ./

git status
当文件被提交后,工作空间重新回到nothing to commit状态:
git commit -m "111" ./
2.2.4 no changes added to commit
表示当前工作目录中有文件被修改了,但是还未被Git追踪到;需要使用add命令来追踪;
no changes added to commit与Untracked files不同的是:前者代表文件之前已经被Git追踪过,只是本次的操作还没有被Git追踪,可以使用commit直接提交,后者则代表文件从来没有被Git追踪,必须先试用add来追踪;
- 再次修改工作空间的文件:
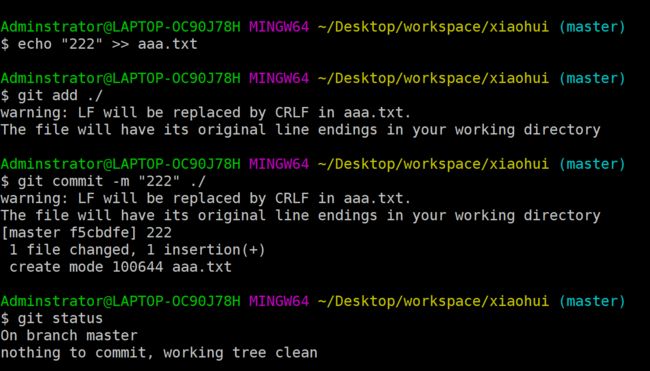
echo "222" >> aaa.txt

git status
当执行add命令后,工作空间再次回到Changes to be committed,表示文件已经被追踪(添加到暂存区),但是还未提交;
git add ./
git status
当修改被提交后,工作空间再次回到nothing to commit状态,表示当前工作空间所有的操作均已提交;
git commit -m "222" ./
2.3 Git其他操作
2.3.1 Git文件对比
1)工作空间与暂存区对比
使用git diff命令可以对比工作空间与暂存区的文件内容;
首先初始化一个新的版本库:
git init
echo "111" >> aaa.txt
git add ./
git commit -m "111" ./
- 编辑文件:
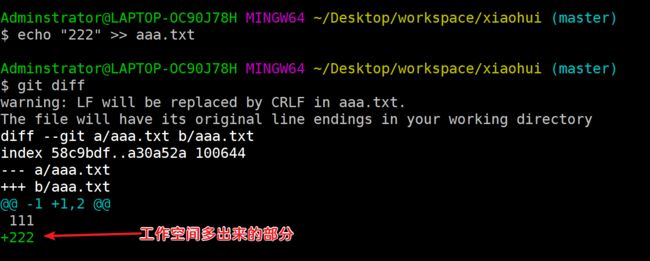
echo "222" >> aaa.txt
- 对比文件:
git diff
- 再次添加到暂存区:
git add ./			# 在文件再次添加到暂存区,此时暂存区的内容和工作空间的内容一致

git diff
Tips:文件执行add命令添加到暂存区后,此后每次提交文件都会先将文件添加到暂存区,因此文件只需要add一次即可;
2)版本库与暂存区对比
使用git diff --cached命令可以对比版本库中的文件与暂存区的文件
git diff				# 对比工作空间与暂存区

git diff --cached		# 对比版本库与暂存区
2.3.2 Git文件删除
1)普通方式删除
初始化项目库:
rm -rf .git ./*		# 删除之前的项目
git init			# 初始化新项目
echo "111" >> aaa.txt
git add ./
git commit -m "111" ./
- 直接删除工作空间的aaa.txt文件:
rm -f aaa.txt			# 直接从磁盘中删除文件
git status				# 查看状态
git ls-files -s			# 查看暂存区的内容
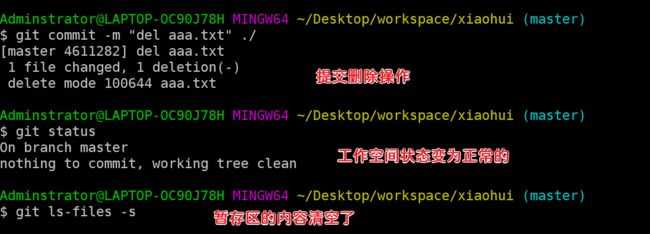
我们发现直接从磁盘中删除文件其实是不完整的,工作空间状态不对、暂存区还有残留等;
- 提交删除操作:
git commit -m "del aaa.txt" ./
2)git rm命令删除
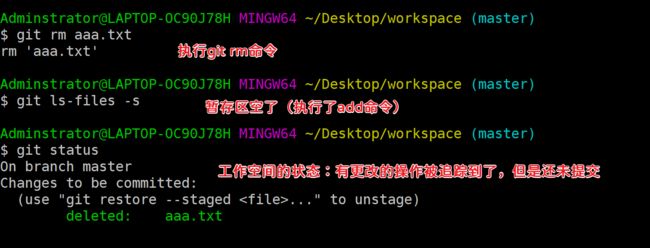
git rm 命令相当于我们先执行rm -rf命令将文件从磁盘中删除,让后在执行add命令添加到暂存区;此时工作空间的状态为Changes to be committed,即:更改的操作被Git追踪到了,但是还未提交;
重新初始化文件:
echo "111" >> aaa.txt
git add ./
git commit -m "111" ./
git status
- 删除文件:
git rm aaa.txt								# 使用rm命令删除
git commit -m "del aaa.txt 222" ./			# 提交删除操作
git status									# 查看状态
git ls-files -s								# 查看暂存区
Tips:git rm命令和我们自己从磁盘删除然后再commit的效果是一致的;
2.3.3 Git文件改名
1)普通改名
初始化项目库:
rm -rf .git ./*		# 删除之前的项目
git init			# 初始化新项目
echo "111" >> aaa.txt
git add ./
git commit -m "111" ./
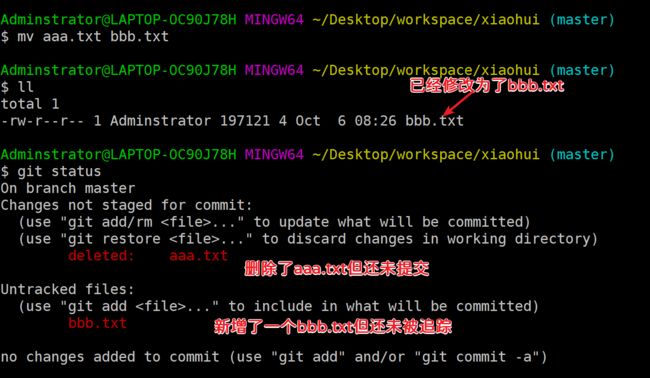
【将工作目录中的aaa.txt修改为bbb.txt,并查看工作目录状态】
mv aaa.txt bbb.txt # 修改文件名称
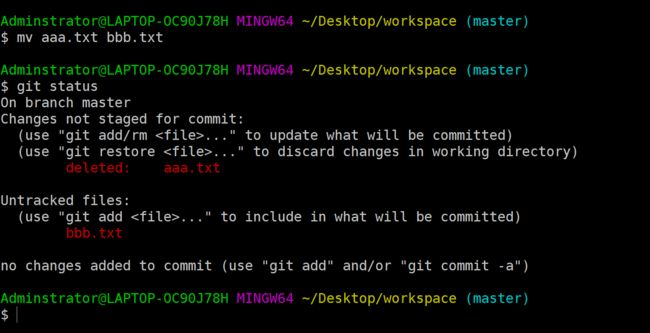
实质上是把原来的aaa.txt删除了,然后新增了一个bbb.txt"。其中,aaa.txt属于"有操作修改了,但是还未被追踪",bbb.txt属于"未追踪的操作,两个操作都需要使用add命令来追踪;
提交操作:
git commit -m "aaa->bbb" ./
提交改名操作后查看工作空间状态,发现bbb.txt处于未被追踪状态,这是因为bbb.txt还没有被执行add操作(还没有被纳入版本控制);
需要将bbb.txt执行add操作:
git add ./			# 将bbb.txt文件添加到暂存区(纳入版本控制)
git commit -m "bbb" ./
2)使用git mv改名
使用git mv命令改名:
git mv bbb.txt aaa.txt

git commit -m "bbb->ccc" ./
2.3.4 Git日志查询
1)git log命令
每一次的提交都会产生一次提交日志,我们可以通过查询日志来观察项目的进度变化;使用git log命令可以查询git的提交日志;
- 语法:
git log [options] [<file> <commit> <tag>...]
如果不加其它选项,默认情况下,这个命令按提交的先后顺序由近到远显示提交日志,包括每个提交id、作者的名字和电子邮件地址、提交时间以及提交说明等信息。
| 选项 | 说明 |
|---|---|
| -n(n为一个整数) | 指定显示最近的n次提交信息 |
| -p | 显示每次提交所引入的差异 |
| –name-status | 显示每次提交新增、修改、删除的文件清单 |
| –author | 仅显示指定作者的提交信息 |
| –committer | 仅显示指定提交者的提交信息 |
| –grep | 仅显示提交日志中包含指定字符的提交 |
| -S | 仅显示添加或删除内容匹配指定字符串的提交 |
| –oneline | 显示简略的日志信息 |
| –decorate | 显示更多关联信息 |
| –graph | 使用ASCII图形来表示提交历史中的分支关系 |
初始化项目库:
rm -rf .git ./*
git init
echo "111" >> aaa.txt
git add ./
git commit -m "111" ./
echo "222" >> aaa.txt
git commit -m "222" ./
echo "333 111" >> aaa.txt
git commit -m "333 111" ./
查询日志:
git log			# 查询所有日志
git log -2		# 查询最近的两次提交日志
git log -p		# 显示每次提交的差异信息
git log --name-status			# 显示每次提交新增、修改、删除的文件清单
git log --author xiaohui		# 查询xiaohui用户创建的文件的提交信息
git log --committer xiaohui		# 查询xiaohui用户提交的信息
git log --grep '1'				# 查询条件日志中包含有1的提交信息
git log -S '1'					# 查询添加或删除内容中包含1的提交信息
git log --oneline				# 查询简略的提交信息
git log --decorate				# 查询更多的关联信息
git log --graph					# 查询提交历史中的分支关系

git log -2 --grep '1' --oneline			# 混搭使用
2)格式化日志
使用 git log --pretty=format: 命令自定义提交历史的显示格式,
- 常用格式占位符写法如下:
| 选项 | 作用说明 |
|---|---|
| %H | 提交的完整哈希值 |
| %h | 提交的简写哈希值 |
| %T | 树的完整哈希值 |
| %t | 树的简写哈希值 |
| %P | 父提交的完整哈希值 |
| %p | 父提交的简写哈希值 |
| %an | 作者名字 |
| %ae | 作者的电子邮件地址 |
| %ad | 作者修订日期(可以用 --date=选项 来定制格式) |
| %ar | 作者修订日期,按多久以前的方式显示 |
| %cn | 提交者的名字 |
| %ce | 提交者的电子邮件地址 |
| %cd | 提交日期 |
| %cr | 提交日期(距今多长时间) |
| %s | 提交说明 |
示例:
Adminstrator@LAPTOP-OC90J78H MINGW64 ~/Desktop/workspace/xiaohui (master)
$ git log --pretty=format:'%h %t'
e1c688f 56e552e
a8ce0ef 703a392
60710c9 8f96f2f

Adminstrator@LAPTOP-OC90J78H MINGW64 ~/Desktop/workspace/xiaohui (master)
$ git log --pretty=format:'%h %an %cd %s'
e1c688f xiaohui Fri Oct 6 16:01:05 2023 +0800 333 111
a8ce0ef xiaohui Fri Oct 6 16:01:03 2023 +0800 222
60710c9 xiaohui Fri Oct 6 16:01:03 2023 +0800 111

Adminstrator@LAPTOP-OC90J78H MINGW64 ~/Desktop/workspace/xiaohui (master)
$ git log --pretty=format:'%h %an %s'
e1c688f xiaohui 333 111
a8ce0ef xiaohui 222
60710c9 xiaohui 111
3)日期格式化
当自定义显示格式里面使用 %ad 或 %cd 显示提交时间的时候,可以使用 --date=选项 指定日期的显示格式。
- 常用选项有:
| 选项 | 作用说明 |
|---|---|
| relative | 只显示相对于现在时间的天数,如 “2 weeks ago” |
| local | 显示在当前时区下的时间 |
| short | 只显示日期,以 “YYYY-MM-DD” 的形式 |
| raw | 以 “%s %z” 格式显示时间,%s 指自1970-01-01 00:00:00 以来的秒数,%z 指时区 |
| default | 显示原始时区下的时间 |
- 示例:
Adminstrator@LAPTOP-OC90J78H MINGW64 ~/Desktop/workspace/xiaohui (master)
$ git log --pretty=format:'%h %an %s %cd' --date short
e1c688f xiaohui 333 111 2023-10-06
a8ce0ef xiaohui 222 2023-10-06
60710c9 xiaohui 111 2023-10-06

Adminstrator@LAPTOP-OC90J78H MINGW64 ~/Desktop/workspace/xiaohui (master)
$ git log --pretty=format:'%h %an %s %cd' --date local
e1c688f xiaohui 333 111 Fri Oct 6 16:01:05 2023
a8ce0ef xiaohui 222 Fri Oct 6 16:01:03 2023
60710c9 xiaohui 111 Fri Oct 6 16:01:03 2023

Adminstrator@LAPTOP-OC90J78H MINGW64 ~/Desktop/workspace/xiaohui (master)
$ git log --pretty=format:'%h %an %s %cd' --date default
e1c688f xiaohui 333 111 Fri Oct 6 16:01:05 2023 +0800
a8ce0ef xiaohui 222 Fri Oct 6 16:01:03 2023 +0800
60710c9 xiaohui 111 Fri Oct 6 16:01:03 2023 +0800

Adminstrator@LAPTOP-OC90J78H MINGW64 ~/Desktop/workspace/xiaohui (master)
$ git log --pretty=format:'%h %an %s %cd' --date relative
e1c688f xiaohui 333 111 14 minutes ago
a8ce0ef xiaohui 222 14 minutes ago
60710c9 xiaohui 111 14 minutes ago
也可以使用 --date=format: 自定义时间的显示格式。比如 --date=format:"%Y-%m-%d %H:%M:%S"
- 常用的格式占位符有:
| 选项 | 作用说明 |
|---|---|
| %A | 星期的英文全称 |
| %a | 星期的英文简写 |
| %B | 月份的英文全称 |
| %b | 月份的英文简写 |
| %Y | 年份全写,如 2022 |
| %y | 年份简写,如 22 |
| %M | 分钟,00-59 |
| %m | 月份,00-12 |
| %d | 日期,00-31 |
| %H | 小时,00-23 |
| %I | 小时,00-12 |
| %S | 秒,00-59 |
| %s | 自1970-01-01 00:00:00 以来的秒数 |
| %z | 时区 |
| %W | 一年中的第几周,以周一为一周的开始 |
| %w | 一周中的第几天,0-6,周日是 0 |
| %U | 一年中的第几周,以周日为一周的开始 |
| %% | 输出一个百分号 |
- 示例:
Adminstrator@LAPTOP-OC90J78H MINGW64 ~/Desktop/workspace/xiaohui (master)
$ git log --pretty=format:'%h %an %s %cd' --date=format:'%Y-%m-%d %H:%M:%S'
e1c688f xiaohui 333 111 2023-10-06 16:01:05
a8ce0ef xiaohui 222 2023-10-06 16:01:03
60710c9 xiaohui 111 2023-10-06 16:01:03
三、Git底层对象
Git 的核心部分是一个简单的键值对数据库。你可以向该数据库插入任意类型的内容,它会返回一个键值,通过该键值可以在任意时刻再次检索该内容,我们之前使用add、commit、rm、mv等命令时其实就是在向Git这个数据库读取/添加数据。
需要注意的是,只要往Git中添加了数据,那么数据就永远不会被删除,使用git删除命令只是进行了一次新的版本的迭代。学习Git的底层命令有助于我们对Git的底层原理有一个更加清晰的认识;
在Git中存在三个元数据对象,分别为Blob对象(文本对象)、Tree对象(树对象)、Commit对象(提交对象),当我们在使用Git命令往Git中写数据时,Git会将其封装为这三种对象,三种不同的对象封装了不同的数据;其存储位置在.git/objects目录中;
3.1 Blob对象
3.1.1 Blob对象简介
Blob对象也称文本对象,当某个文本需要添加到Git中时,Git会将其包裹成一个Blob对象存储到Git数据库中,每个Blob对象都会有一个唯一的hash值,这就是Git中的最原始的版本信息。当修改文件后,需要再次将新的文件包裹成Blob对象存入Git数据库,这又是一次文件版本的更新;
3.1.2 Blob对象的使用
1)写入数据
- 语法:
git hash-object -w {文件名|目录名}
将数据写入Git:
Adminstrator@LAPTOP-OC90J78H MINGW64 ~/Desktop/workspace/xiaohui
$ git init								# 初始化git仓库
Initialized empty Git repository in C:/Users/Admin/Desktop/workspace/xiaohui/.git/

Adminstrator@LAPTOP-OC90J78H MINGW64 ~/Desktop/workspace/xiaohui (master)
$ echo "111" >> aaa.txt					# 创建文件

Adminstrator@LAPTOP-OC90J78H MINGW64 ~/Desktop/workspace/xiaohui (master)
$ git hash-object -w aaa.txt			# 将aaa.txt文件写入Git
warning: LF will be replaced by CRLF in aaa.txt.
The file will have its original line endings in your working directory
58c9bdf9d017fcd178dc8c073cbfcbb7ff240d6c
文件生成的路径默认在:.git\objects,其中生成的文件夹名称是hash值的前两位,其余的位数作为文件名
![]()
2)读取数据
- 语法:
git cat-file {-p|-t} {hash}
-p:获取文件内容-t:获取文件类型
从Git读取数据:
git cat-file -p 58c9bdf9d017fcd178dc8c073cbfcbb7ff240d6c		# 获取Git对象的内容
git cat-file -t 58c9bdf9d017fcd178dc8c073cbfcbb7ff240d6c		# 获取Git对象的类型
3)小练习
创建一个新的文件写入到Git中:
echo "Hello World" >> bbb.txt		# 创建一个新的文件
git hash-object -w bbb.txt			# 写入到Git中
查看objects目录:
读取文件内容:
git cat-file -p 557db03de997c86a4a028e1ebd3a1ceb225be238
修改文件内容,再次查看Git数据库中的数据:
echo "Hello Git" >> bbb.txt
git cat-file -p 557db03de997c86a4a028e1ebd3a1ceb225be238
重新将bbb.txt添加到Git数据库:
git hash-object -w bbb.txt		# 将bbb.txt重新添加到git数据库
find .git/objects/ -type f		# 查询objects目录下的所有文件

.git/objects/55/7db03de997c86a4a028e1ebd3a1ceb225be238				# bbb.txt  --->  HelloWorld
.git/objects/58/c9bdf9d017fcd178dc8c073cbfcbb7ff240d6c				# aaa.txt  --->  111
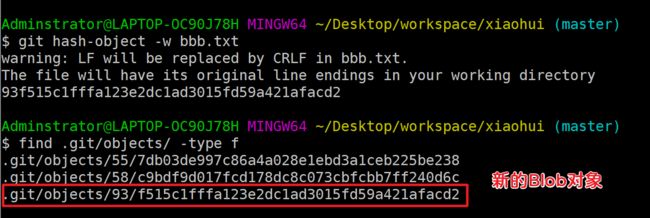
.git/objects/93/f515c1fffa123e2dc1ad3015fd59a421afacd2				# bbb.txt  --->  Hello World Hello Git
查询Git数据库,重新生成了一个Blob对象
- 读取Blob对象:
git cat-file -p 557db03de997c86a4a028e1ebd3a1ceb225be238
git cat-file -p 58c9bdf9d017fcd178dc8c073cbfcbb7ff240d6c
git cat-file -p 93f515c1fffa123e2dc1ad3015fd59a421afacd2
3.2 Tree对象
3.2.1 Tree对象简介
Blob对象中只会存储文本内容而不知道该文本的文件名称。同时,生成Blob对象代表是文件的一次版本,但是有时我们需要将多个操作归纳为一个版本。因此,在Git中,Blob对象只是代表文件的一个版本,而不是代表项目的一个版本,因为一次项目的版本可能涉及到多个文件的操作。
Tree对象也称树对象,一个树对象包含了一条或多条记录,一个Tree对象就是一次操作的版本,Tree对象中保存有该对象所涉及到的所有文件(包括文件名称)。在Git中,一个Tree对象才能称得上是一次真正意义上的版本(快照);
另外,一个Tree对象还可以包含另一个Tree对象。
3.2.2 暂存区的概念
一个Tree对象是由一条或多条记录组成的,那么如何让Tree对象包含多个记录呢?
我们在生成Tree对象之前,需要将所有的记录都存储到"暂存区",暂存区用于"暂存"一些操作,等这些操作足够成为一次版本时就将暂存区中的内容生成一个Tree对象,这样Tree对象就包含了多个记录了。
- 将记录添加到暂存区:
git update-index --add --cacheinfo {文件模式} {hash} {文件|目录}
文件模式:
- 100644:普通文件
- 100755:可执行文件
- 120000:符号链接
- 查看暂存区:
git ls-files -s
3.3.2 生成Tree对象
【语法】
git write-tree # 将当前暂存区的内容生成Tree对象
【练习】
- 1)初始化git仓库:
rm -rf ./* .git
git init
- 2)生成第一个Blob对象:
Adminstrator@LAPTOP-OC90J78H MINGW64 ~/Desktop/workspace (master)
$ echo "111" >> aaa.txt

Adminstrator@LAPTOP-OC90J78H MINGW64 ~/Desktop/workspace (master)
$ git hash-object -w aaa.txt
warning: LF will be replaced by CRLF in aaa.txt.
The file will have its original line endings in your working directory
58c9bdf9d017fcd178dc8c073cbfcbb7ff240d6c

Adminstrator@LAPTOP-OC90J78H MINGW64 ~/Desktop/workspace (master)
$ find .git/objects/ -type f
.git/objects/58/c9bdf9d017fcd178dc8c073cbfcbb7ff240d6c

Adminstrator@LAPTOP-OC90J78H MINGW64 ~/Desktop/workspace (master)
$ git cat-file -t 58c9bdf9d017fcd178dc8c073cbfcbb7ff240d6c
blob

Adminstrator@LAPTOP-OC90J78H MINGW64 ~/Desktop/workspace (master)
$ git cat-file -p 58c9bdf9d017fcd178dc8c073cbfcbb7ff240d6c
111
2)生成第二个Blob对象:
Adminstrator@LAPTOP-OC90J78H MINGW64 ~/Desktop/workspace (master)
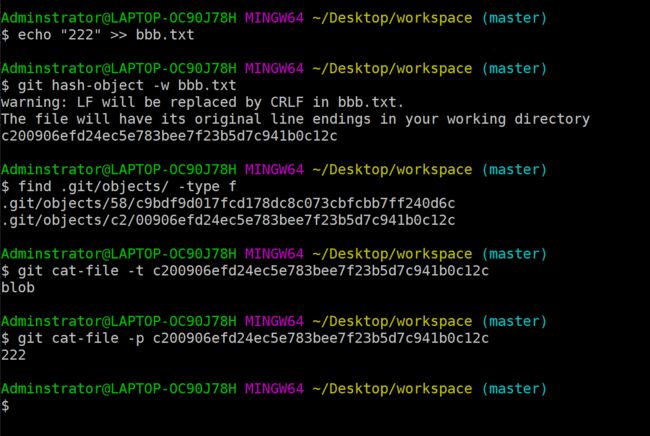
$ echo "222" >> bbb.txt

Adminstrator@LAPTOP-OC90J78H MINGW64 ~/Desktop/workspace (master)
$ git hash-object -w bbb.txt
warning: LF will be replaced by CRLF in bbb.txt.
The file will have its original line endings in your working directory
c200906efd24ec5e783bee7f23b5d7c941b0c12c

Adminstrator@LAPTOP-OC90J78H MINGW64 ~/Desktop/workspace (master)
$ find .git/objects/ -type f
.git/objects/58/c9bdf9d017fcd178dc8c073cbfcbb7ff240d6c
.git/objects/c2/00906efd24ec5e783bee7f23b5d7c941b0c12c

Adminstrator@LAPTOP-OC90J78H MINGW64 ~/Desktop/workspace (master)
$ git cat-file -t c200906efd24ec5e783bee7f23b5d7c941b0c12c
blob

Adminstrator@LAPTOP-OC90J78H MINGW64 ~/Desktop/workspace (master)
$ git cat-file -p c200906efd24ec5e783bee7f23b5d7c941b0c12c
222
3)将两个记录添加到暂存区:
git update-index --add --cacheinfo 100644 58c9bdf9d017fcd178dc8c073cbfcbb7ff240d6c aaa.txt
git update-index --add --cacheinfo 100644 c200906efd24ec5e783bee7f23b5d7c941b0c12c bbb.txt
4)查看暂存区:
git ls-files -s
5)将两次操作生成Tree对象(一次版本)
Adminstrator@LAPTOP-OC90J78H MINGW64 ~/Desktop/workspace (master)		# 将暂存区的内容生成Tree对象
$ git write-tree
32dcf33783f09530a55367ae95a221b9ee1c1eba

Adminstrator@LAPTOP-OC90J78H MINGW64 ~/Desktop/workspace (master)		# 查看objects目录中的文件
$ find .git/objects/ -type f
.git/objects/32/dcf33783f09530a55367ae95a221b9ee1c1eba
.git/objects/58/c9bdf9d017fcd178dc8c073cbfcbb7ff240d6c
.git/objects/c2/00906efd24ec5e783bee7f23b5d7c941b0c12c

Adminstrator@LAPTOP-OC90J78H MINGW64 ~/Desktop/workspace (master)		# 查看该hash对应的git类型
$ git cat-file -t 32dcf33783f09530a55367ae95a221b9ee1c1eba
tree

Adminstrator@LAPTOP-OC90J78H MINGW64 ~/Desktop/workspace (master)		# 查看该hash的内容
$ git cat-file -p 32dcf33783f09530a55367ae95a221b9ee1c1eba
100644 blob 58c9bdf9d017fcd178dc8c073cbfcbb7ff240d6c    aaa.txt
100644 blob c200906efd24ec5e783bee7f23b5d7c941b0c12c    bbb.txt
6)查看暂存区:
Adminstrator@LAPTOP-OC90J78H MINGW64 ~/Desktop/workspace (master)
$ git ls-files -s
100644 58c9bdf9d017fcd178dc8c073cbfcbb7ff240d6c 0       aaa.txt
100644 c200906efd24ec5e783bee7f23b5d7c941b0c12c 0       bbb.txt
一个Tree对象中包含多个变更的Blob对象,Blob对象对应我们实际开发中的一个个操作,当一个个操作满足了一次版本的要求时,我们就会生成对应的Tree对象来生成版本。因此,我们在实际使用Git时,一个Tree对象往往才是代表一个项目的某个版本,而非Blob对象;
3.2.3 Tree对象小练习
1)生成第一个树对象
- 1)初始化Git仓库:
Adminstrator@LAPTOP-OC90J78H MINGW64 ~/Desktop/workspace
$ git init
Initialized empty Git repository in C:/Users/Admin/Desktop/workspace/.git/

Adminstrator@LAPTOP-OC90J78H MINGW64 ~/Desktop/workspace (master)
$ echo "111" >> aaa.txt

Adminstrator@LAPTOP-OC90J78H MINGW64 ~/Desktop/workspace (master)
$ git hash-object -w aaa.txt											# 生成Blob对象
warning: LF will be replaced by CRLF in aaa.txt.
The file will have its original line endings in your working directory
58c9bdf9d017fcd178dc8c073cbfcbb7ff240d6c

Adminstrator@LAPTOP-OC90J78H MINGW64 ~/Desktop/workspace (master)
$ echo "222" >> bbb.txt

Adminstrator@LAPTOP-OC90J78H MINGW64 ~/Desktop/workspace (master)
$ git hash-object -w bbb.txt											# 生成Blob对象
warning: LF will be replaced by CRLF in bbb.txt.
The file will have its original line endings in your working directory
c200906efd24ec5e783bee7f23b5d7c941b0c12c

Adminstrator@LAPTOP-OC90J78H MINGW64 ~/Desktop/workspace (master)		# 添加到暂存区
$ git update-index --add --cacheinfo 100644 58c9bdf9d017fcd178dc8c073cbfcbb7ff240d6c aaa.txt

Adminstrator@LAPTOP-OC90J78H MINGW64 ~/Desktop/workspace (master)		# 添加到暂存区
$ git update-index --add --cacheinfo 100644 c200906efd24ec5e783bee7f23b5d7c941b0c12c bbb.txt

Adminstrator@LAPTOP-OC90J78H MINGW64 ~/Desktop/workspace (master)
$ git ls-files -s														# 查看暂存区的内容
100644 58c9bdf9d017fcd178dc8c073cbfcbb7ff240d6c 0       aaa.txt
100644 c200906efd24ec5e783bee7f23b5d7c941b0c12c 0       bbb.txt

Adminstrator@LAPTOP-OC90J78H MINGW64 ~/Desktop/workspace (master)
$ git write-tree														# 生成Tree对象
32dcf33783f09530a55367ae95a221b9ee1c1eba

Adminstrator@LAPTOP-OC90J78H MINGW64 ~/Desktop/workspace (master)
$ find .git/objects/ -type f
.git/objects/32/dcf33783f09530a55367ae95a221b9ee1c1eba			# 树对象(包含aaa.txt和bbb.txt)
.git/objects/58/c9bdf9d017fcd178dc8c073cbfcbb7ff240d6c			# aaa.txt
.git/objects/c2/00906efd24ec5e783bee7f23b5d7c941b0c12c			# bbb.txt
查看树对象的内容:
Adminstrator@LAPTOP-OC90J78H MINGW64 ~/Desktop/workspace (master)
$ git cat-file -p 32dcf33783f09530a55367ae95a221b9ee1c1eba
100644 blob 58c9bdf9d017fcd178dc8c073cbfcbb7ff240d6c    aaa.txt
100644 blob c200906efd24ec5e783bee7f23b5d7c941b0c12c    bbb.txt
2)生成第二个树对象
修改aaa.txt内容:
Adminstrator@LAPTOP-OC90J78H MINGW64 ~/Desktop/workspace (master)
$ echo "1010" >> aaa.txt

Adminstrator@LAPTOP-OC90J78H MINGW64 ~/Desktop/workspace (master)
$ git hash-object -w aaa.txt									# 生成Blob对象
warning: LF will be replaced by CRLF in aaa.txt.
The file will have its original line endings in your working directory
7b481520925a2e75716034e3c858b7ef2a9aae75

Adminstrator@LAPTOP-OC90J78H MINGW64 ~/Desktop/workspace (master)
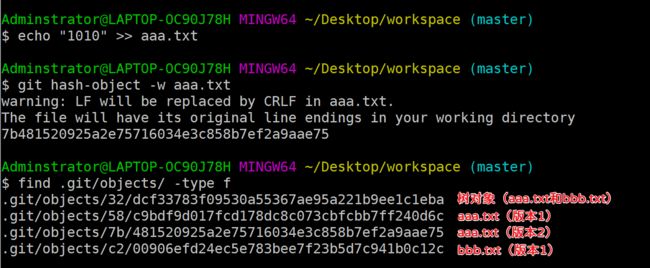
$ find .git/objects/ -type f
.git/objects/32/dcf33783f09530a55367ae95a221b9ee1c1eba			# 树对象(包含aaa.txt和bbb.txt)
.git/objects/58/c9bdf9d017fcd178dc8c073cbfcbb7ff240d6c			# aaa.txt(版本1)
.git/objects/7b/481520925a2e75716034e3c858b7ef2a9aae75			# aaa.txt(版本2)
.git/objects/c2/00906efd24ec5e783bee7f23b5d7c941b0c12c			# bbb.txt(版本1)
将aaa.txt添加到暂存区:
Adminstrator@LAPTOP-OC90J78H MINGW64 ~/Desktop/workspace (master)
$ git ls-files -s
100644 58c9bdf9d017fcd178dc8c073cbfcbb7ff240d6c 0       aaa.txt
100644 c200906efd24ec5e783bee7f23b5d7c941b0c12c 0       bbb.txt

Adminstrator@LAPTOP-OC90J78H MINGW64 ~/Desktop/workspace (master)
$ git update-index --cacheinfo 100644 7b481520925a2e75716034e3c858b7ef2a9aae75 aaa.txt

Adminstrator@LAPTOP-OC90J78H MINGW64 ~/Desktop/workspace (master)
$ git ls-files -s
100644 7b481520925a2e75716034e3c858b7ef2a9aae75 0       aaa.txt
100644 c200906efd24ec5e783bee7f23b5d7c941b0c12c 0       bbb.txt
Tips:aaa.txt文件已经添加了到了暂存区,第二次不需要再指定
--add参数了;
将当前暂存区的内容生成Tree对象:
Adminstrator@LAPTOP-OC90J78H MINGW64 ~/Desktop/workspace (master)
$ git write-tree
a24447346b4470013f38a67d14d97f975e39c037		# 本次树对象的hash值
查看所有Git对象:
Adminstrator@LAPTOP-OC90J78H MINGW64 ~/Desktop/workspace (master)
$ find .git/objects/ -type f
.git/objects/32/dcf33783f09530a55367ae95a221b9ee1c1eba			# 树对象v1(包含aaa.v1和bbb)
.git/objects/58/c9bdf9d017fcd178dc8c073cbfcbb7ff240d6c			# aaa.txt(版本1)
.git/objects/7b/481520925a2e75716034e3c858b7ef2a9aae75			# aaa.txt(版本2)
.git/objects/a2/4447346b4470013f38a67d14d97f975e39c037			# 树对象v2(包含aaa.v2和bbb)
.git/objects/c2/00906efd24ec5e783bee7f23b5d7c941b0c12c			# bbb.txt(版本1)
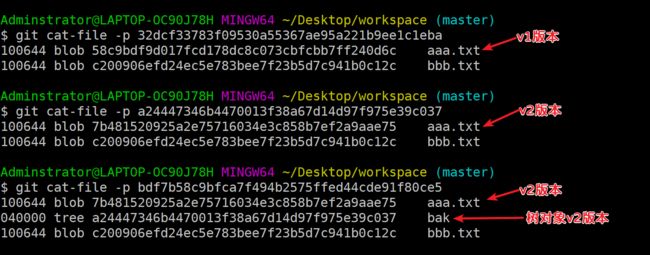
查看第2个树对象的内容:
Adminstrator@LAPTOP-OC90J78H MINGW64 ~/Desktop/workspace (master)
$ git cat-file -p 32dcf33783f09530a55367ae95a221b9ee1c1eba
100644 blob 58c9bdf9d017fcd178dc8c073cbfcbb7ff240d6c    aaa.txt			# v1版本
100644 blob c200906efd24ec5e783bee7f23b5d7c941b0c12c    bbb.txt

Adminstrator@LAPTOP-OC90J78H MINGW64 ~/Desktop/workspace (master)
$ git cat-file -p a24447346b4470013f38a67d14d97f975e39c037
100644 blob 7b481520925a2e75716034e3c858b7ef2a9aae75    aaa.txt			# v2版本
100644 blob c200906efd24ec5e783bee7f23b5d7c941b0c12c    bbb.txt
3.2.4 读取树对象
【语法】
git read-tree --prefix=bak {Tree-hash} # 根据Tree对象的hash来读取树,将读取到的内容写入暂存区
【练习】
读取树对象v2的内容到暂存区:
Adminstrator@LAPTOP-OC90J78H MINGW64 ~/Desktop/workspace (master)
$ git read-tree --prefix=bak a24447346b4470013f38a67d14d97f975e39c037		# 读取版本2的树对象(包含aaa.v2和bbb)到暂存区

Adminstrator@LAPTOP-OC90J78H MINGW64 ~/Desktop/workspace (master)
$ git ls-files -s
100644 7b481520925a2e75716034e3c858b7ef2a9aae75 0       aaa.txt				# aaa.v2(原来暂存区就有的内容)
100644 7b481520925a2e75716034e3c858b7ef2a9aae75 0       bak/aaa.txt			# 树对象.v2中的aaa
100644 c200906efd24ec5e783bee7f23b5d7c941b0c12c 0       bak/bbb.txt			# 树对象.v2中的bbb
100644 c200906efd24ec5e783bee7f23b5d7c941b0c12c 0       bbb.txt				# bbb.v1(原来暂存区就有的内容)
将暂存区中的内容生成Tree对象:
Adminstrator@LAPTOP-OC90J78H MINGW64 ~/Desktop/workspace (master)
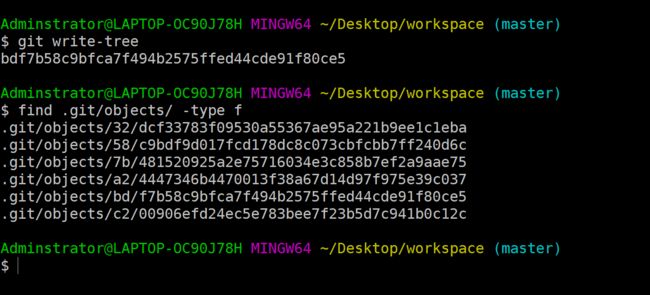
$ git write-tree
bdf7b58c9bfca7f494b2575ffed44cde91f80ce5
查看所有Git对象:
Adminstrator@LAPTOP-OC90J78H MINGW64 ~/Desktop/workspace (master)
$ find .git/objects/ -type f
.git/objects/32/dcf33783f09530a55367ae95a221b9ee1c1eba			# 树对象v1(包含aaa.v1和bbb)
.git/objects/58/c9bdf9d017fcd178dc8c073cbfcbb7ff240d6c			# aaa.txt(版本1)
.git/objects/7b/481520925a2e75716034e3c858b7ef2a9aae75			# aaa.txt(版本2)
.git/objects/a2/4447346b4470013f38a67d14d97f975e39c037			# 树对象v2(包含aaa.v2和bbb)
.git/objects/bd/f7b58c9bfca7f494b2575ffed44cde91f80ce5			# 树对象v3(树对象v2和树对象v1)
.git/objects/c2/00906efd24ec5e783bee7f23b5d7c941b0c12c			# bbb.txt(版本1)
查看三个树对象的内容:
Adminstrator@LAPTOP-OC90J78H MINGW64 ~/Desktop/workspace (master)
$ git cat-file -p 32dcf33783f09530a55367ae95a221b9ee1c1eba
100644 blob 58c9bdf9d017fcd178dc8c073cbfcbb7ff240d6c    aaa.txt			# v1版本
100644 blob c200906efd24ec5e783bee7f23b5d7c941b0c12c    bbb.txt

Adminstrator@LAPTOP-OC90J78H MINGW64 ~/Desktop/workspace (master)
$ git cat-file -p a24447346b4470013f38a67d14d97f975e39c037
100644 blob 7b481520925a2e75716034e3c858b7ef2a9aae75    aaa.txt			# v2版本
100644 blob c200906efd24ec5e783bee7f23b5d7c941b0c12c    bbb.txt

Adminstrator@LAPTOP-OC90J78H MINGW64 ~/Desktop/workspace (master)
$ git cat-file -p bdf7b58c9bfca7f494b2575ffed44cde91f80ce5
100644 blob 7b481520925a2e75716034e3c858b7ef2a9aae75    aaa.txt			# v2版本
040000 tree a24447346b4470013f38a67d14d97f975e39c037    bak				# 树对象v2版本
100644 blob c200906efd24ec5e783bee7f23b5d7c941b0c12c    bbb.txt
此时树对象(v3)包含一个树对象(v2)和两个Blob对象;
3.3 Commit对象
3.3.1 Commit对象简介
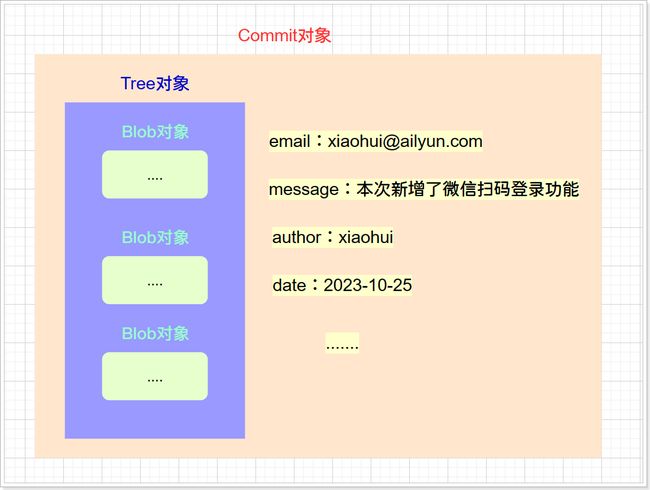
Tree对象代表了项目中的一次版本快照,但是Tree对象缺失了一些日志信息,例如本次版本快照是谁(哪个开发人员)产生的?本次的版本快照的主要内容(日志信息)是什么?等等。
Commit对象也称提交对象,Commit对象是对Tree对象的包裹添加一些注释信息。值得注意的是:虽然Tree对象代表一次项目的版本快照,但是由于缺少注释信息,我们在生成Tree对象时还会将其打包为Commit对象,就这样,项目的一次完整版本快照就生成完毕了。
3.3.2 生成Commit对象
【语法】
echo '提交注释' | git commit-tree {tree-hash} # 将指定的tree对象包裹为commit对象
查询所有Git对象:
Adminstrator@LAPTOP-OC90J78H MINGW64 ~/Desktop/workspace (master)
$ find .git/objects/ -type f
.git/objects/32/dcf33783f09530a55367ae95a221b9ee1c1eba			# 树对象v1(包含aaa.v1和bbb)
.git/objects/58/c9bdf9d017fcd178dc8c073cbfcbb7ff240d6c			# aaa.txt(版本1)
.git/objects/7b/481520925a2e75716034e3c858b7ef2a9aae75			# aaa.txt(版本2)
.git/objects/a2/4447346b4470013f38a67d14d97f975e39c037			# 树对象v2(包含aaa.v2和bbb)
.git/objects/bd/f7b58c9bfca7f494b2575ffed44cde91f80ce5			# 树对象v3(树对象v2和树对象v1)
.git/objects/c2/00906efd24ec5e783bee7f23b5d7c941b0c12c			# bbb.txt(版本1)
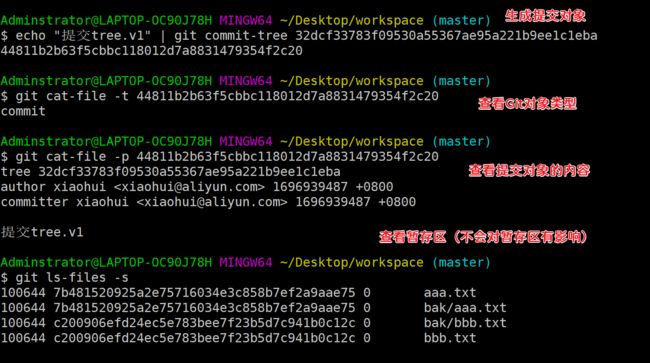
- 生成提交对象
Adminstrator@LAPTOP-OC90J78H MINGW64 ~/Desktop/workspace (master)
$ echo "提交tree.v1" | git commit-tree 32dcf33783f09530a55367ae95a221b9ee1c1eba		# 生成提交对象
44811b2b63f5cbbc118012d7a8831479354f2c20

Adminstrator@LAPTOP-OC90J78H MINGW64 ~/Desktop/workspace (master)
$ git cat-file -t 44811b2b63f5cbbc118012d7a8831479354f2c20				# 查看Git类型的类型
commit

Adminstrator@LAPTOP-OC90J78H MINGW64 ~/Desktop/workspace (master)
$ git cat-file -p 44811b2b63f5cbbc118012d7a8831479354f2c20				# 查看提交对象的内容
tree 32dcf33783f09530a55367ae95a221b9ee1c1eba		# 该提交对象所包裹的树对象
author xiaohui <[email protected]> 1696939487 +0800		# 作者信息
committer xiaohui <[email protected]> 1696939487 +0800

提交tree.v1			# 日志信息

Adminstrator@LAPTOP-OC90J78H MINGW64 ~/Desktop/workspace (master)		# 查看暂存区(生成提交对象不会对暂存区有影响)
$ git ls-files -s
100644 7b481520925a2e75716034e3c858b7ef2a9aae75 0       aaa.txt
100644 7b481520925a2e75716034e3c858b7ef2a9aae75 0       bak/aaa.txt
100644 c200906efd24ec5e783bee7f23b5d7c941b0c12c 0       bak/bbb.txt
100644 c200906efd24ec5e783bee7f23b5d7c941b0c12c 0       bbb.txt
Tips:生成Blob对象和Tree对象时,只要操作一致多次生成的Blob对象和Tree对象的编号是一样的,但是Commit对象的编号即使多次操作一致,编号也会不一样
查看所有Git对象:
Adminstrator@LAPTOP-OC90J78H MINGW64 ~/Desktop/workspace (master)
$ find .git/objects/ -type f

.git/objects/32/dcf33783f09530a55367ae95a221b9ee1c1eba			# 树对象v1(包含aaa.v1和bbb)
.git/objects/44/811b2b63f5cbbc118012d7a8831479354f2c20			# 提交对象
.git/objects/58/c9bdf9d017fcd178dc8c073cbfcbb7ff240d6c			# aaa.txt(版本1)
.git/objects/7b/481520925a2e75716034e3c858b7ef2a9aae75			# aaa.txt(版本2)
.git/objects/a2/4447346b4470013f38a67d14d97f975e39c037			# 树对象v2(包含aaa.v2和bbb)
.git/objects/bd/f7b58c9bfca7f494b2575ffed44cde91f80ce5			# 树对象v3(树对象v2和树对象v1)
.git/objects/c2/00906efd24ec5e783bee7f23b5d7c941b0c12c			# bbb.txt(版本1)
3.3.3 指定父Commit对象提交
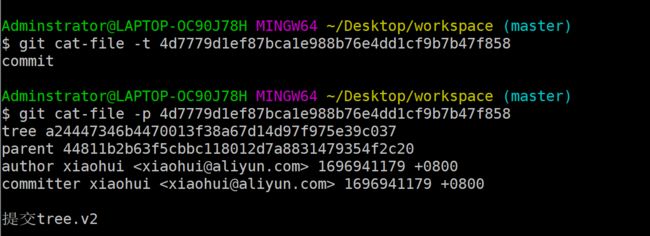
在生成Commit对象对象时,我们可以设置该Commit对象的父Commit对象,代表本次的Commit对象是基于上一次Commit的版本更新;这样就形成了一个版本更新链路,我们根据这个链路就可以进行版本穿梭。
指定父对象生成提交对象:
Adminstrator@LAPTOP-OC90J78H MINGW64 ~/Desktop/workspace (master)
$ echo "提交tree.v2" | git commit-tree a24447346b4470013f38a67d14d97f975e39c037 -p 44811b2b63f5cbbc118012d7a8831479354f2c20
4d7779d1ef87bca1e988b76e4dd1cf9b7b47f858
查询提交对象:
Adminstrator@LAPTOP-OC90J78H MINGW64 ~/Desktop/workspace (master)
$ git cat-file -t 4d7779d1ef87bca1e988b76e4dd1cf9b7b47f858
commit

Adminstrator@LAPTOP-OC90J78H MINGW64 ~/Desktop/workspace (master)
$ git cat-file -p 4d7779d1ef87bca1e988b76e4dd1cf9b7b47f858		# 查看提交对象内容
tree a24447346b4470013f38a67d14d97f975e39c037
parent 44811b2b63f5cbbc118012d7a8831479354f2c20			# 父提交对象
author xiaohui <[email protected]> 1696941179 +0800	# 作者信息
committer xiaohui <[email protected]> 1696941179 +0800

提交tree.v2		# 日志信息
查看所有的Git对象:
Adminstrator@LAPTOP-OC90J78H MINGW64 ~/Desktop/workspace (master)
$ find .git/objects/ -type f
.git/objects/32/dcf33783f09530a55367ae95a221b9ee1c1eba			# 树对象v1(包含aaa.v1和bbb)
.git/objects/44/811b2b63f5cbbc118012d7a8831479354f2c20			# 提交对象(树对象v1)
.git/objects/4d/7779d1ef87bca1e988b76e4dd1cf9b7b47f858			# 提交对象(树对象v2)
.git/objects/58/c9bdf9d017fcd178dc8c073cbfcbb7ff240d6c			# aaa.txt(版本1)
.git/objects/7b/481520925a2e75716034e3c858b7ef2a9aae75			# aaa.txt(版本2)
.git/objects/a2/4447346b4470013f38a67d14d97f975e39c037			# 树对象v2(包含aaa.v2和bbb)
.git/objects/bd/f7b58c9bfca7f494b2575ffed44cde91f80ce5			# 树对象v3(树对象v2和树对象v1)
.git/objects/c2/00906efd24ec5e783bee7f23b5d7c941b0c12c			# bbb.txt(版本1)
四、Git命令原理
4.1 基本操作命令原理
4.1.1 add命令原理
add命令实际上是做了两个步骤:
- 1)将文件添加到了暂存区(暂存区并不会清空)
- 2)生成了一个Blob对象
所以,在Git中,执行add命令后文件就已经提交到了版本库(生成了Blob对象),不过此时还没有生成Tree对象和Commit对象;
【示例】:
Adminstrator@LAPTOP-OC90J78H MINGW64 ~/Desktop/workspace
$ git init
Initialized empty Git repository in C:/Users/Admin/Desktop/workspace/.git/

Adminstrator@LAPTOP-OC90J78H MINGW64 ~/Desktop/workspace (master)
$ echo "111" >> aaa.txt

Adminstrator@LAPTOP-OC90J78H MINGW64 ~/Desktop/workspace (master)			# 添加到暂存区并生成Blob对象
$ git add ./
warning: LF will be replaced by CRLF in aaa.txt.
The file will have its original line endings in your working directory

Adminstrator@LAPTOP-OC90J78H MINGW64 ~/Desktop/workspace (master)			# 查看暂存区
$ git ls-files -s
100644 58c9bdf9d017fcd178dc8c073cbfcbb7ff240d6c 0       aaa.txt

Adminstrator@LAPTOP-OC90J78H MINGW64 ~/Desktop/workspace (master)			# 查看Git对象的类型
$ git cat-file -t 58c9bdf9d017fcd178dc8c073cbfcbb7ff240d6c
blob

Adminstrator@LAPTOP-OC90J78H MINGW64 ~/Desktop/workspace (master)			# 查看内容
$ git cat-file -p 58c9bdf9d017fcd178dc8c073cbfcbb7ff240d6c
111

Adminstrator@LAPTOP-OC90J78H MINGW64 ~/Desktop/workspace (master)			# 查看生成的Git对象
$ find .git/objects/ -type f
.git/objects/58/c9bdf9d017fcd178dc8c073cbfcbb7ff240d6c
4.1.2 commit命令原理
按照我们之前的步骤,文件执行add命令后,就可以执行commit命令将其提交了;
Tips:任何文件只有第一次需要显示的执行add操作,之后执行commit操作之前Git会自动的帮我们执行add操作,我们不需要显示的执行add操作,如果我们执行了add操作,那么Git的add操作将不会执行;
commit命令在底层做了4个步骤:
- 1)将文件添加到暂存区(默认执行的add操作)
- 2)将本次暂存区中的内容生成了Tree对象
- 3)将生成的Tree对象打包生成一个新的Commit对象
- 4)最新的提交对象的父提交对象自动设置为上一次的提交对象
【示例】
Adminstrator@LAPTOP-OC90J78H MINGW64 ~/Desktop/workspace (master)		# 查看Git中的所有Git对象
$ find .git/objects/ -type f
.git/objects/58/c9bdf9d017fcd178dc8c073cbfcbb7ff240d6c		# 只有一个Blob对象

Adminstrator@LAPTOP-OC90J78H MINGW64 ~/Desktop/workspace (master)		# 执行commit命令
$ git commit -m "第一次提交" ./
warning: LF will be replaced by CRLF in aaa.txt.
The file will have its original line endings in your working directory
[master (root-commit) eb2795c] 第一次提交
 1 file changed, 1 insertion(+)
 create mode 100644 aaa.txt

Adminstrator@LAPTOP-OC90J78H MINGW64 ~/Desktop/workspace (master)
$ find .git/objects/ -type f
.git/objects/58/c9bdf9d017fcd178dc8c073cbfcbb7ff240d6c		# Blob对象
.git/objects/8f/96f2f60c766a6a6b78591e06e6c1529c0ad9af		# Tree对象
.git/objects/eb/2795ce498f69376e382d037997d8bef83d8aab		# Commit对象

Adminstrator@LAPTOP-OC90J78H MINGW64 ~/Desktop/workspace (master)
$ git cat-file -t 8f96f2f60c766a6a6b78591e06e6c1529c0ad9af
tree

Adminstrator@LAPTOP-OC90J78H MINGW64 ~/Desktop/workspace (master)
$ git cat-file -p 8f96f2f60c766a6a6b78591e06e6c1529c0ad9af
100644 blob 58c9bdf9d017fcd178dc8c073cbfcbb7ff240d6c    aaa.txt

Adminstrator@LAPTOP-OC90J78H MINGW64 ~/Desktop/workspace (master)
$ git cat-file -t eb2795ce498f69376e382d037997d8bef83d8aab
commit

Adminstrator@LAPTOP-OC90J78H MINGW64 ~/Desktop/workspace (master)
$ git cat-file -p eb2795ce498f69376e382d037997d8bef83d8aab
tree 8f96f2f60c766a6a6b78591e06e6c1529c0ad9af
author xiaohui <[email protected]> 1697007804 +0800
committer xiaohui <[email protected]> 1697007804 +0800

第一次提交
查看暂存区,发现内容依旧没变:
$ git ls-files -s
100644 58c9bdf9d017fcd178dc8c073cbfcbb7ff240d6c 0       aaa.txt
文件只有第一次提交前需要add,后续文件更改之后直接commit即可(相当于commit之前会自动的执行一次add);
【示例】
Adminstrator@LAPTOP-OC90J78H MINGW64 ~/Desktop/workspace (master)
$ echo "1010" >> aaa.txt

Adminstrator@LAPTOP-OC90J78H MINGW64 ~/Desktop/workspace (master)			# 再次提交
$ git commit -m "追加1010" ./
warning: LF will be replaced by CRLF in aaa.txt.
The file will have its original line endings in your working directory
warning: LF will be replaced by CRLF in aaa.txt.
The file will have its original line endings in your working directory
[master 5d07f11] 追加1010
 1 file changed, 1 insertion(+)

Adminstrator@LAPTOP-OC90J78H MINGW64 ~/Desktop/workspace (master)		# 暂存区的内容更新了(因为commit之前默认执行了一次add操作)
$ git ls-files -s
100644 7b481520925a2e75716034e3c858b7ef2a9aae75 0       aaa.txt

Adminstrator@LAPTOP-OC90J78H MINGW64 ~/Desktop/workspace (master)
$ git cat-file -p 7b481520925a2e75716034e3c858b7ef2a9aae75			# 暂存区的内容已经更新
111
1010

Adminstrator@LAPTOP-OC90J78H MINGW64 ~/Desktop/workspace (master)
$ find .git/objects/ -type f
.git/objects/58/c9bdf9d017fcd178dc8c073cbfcbb7ff240d6c		# Blob对象.v1
.git/objects/5d/07f11a75f93e032f126f0f091f739f5a54e987		# Commit对象.v2
.git/objects/7b/481520925a2e75716034e3c858b7ef2a9aae75		# Blob对象.v2
.git/objects/8f/96f2f60c766a6a6b78591e06e6c1529c0ad9af		# Tree对象.v1
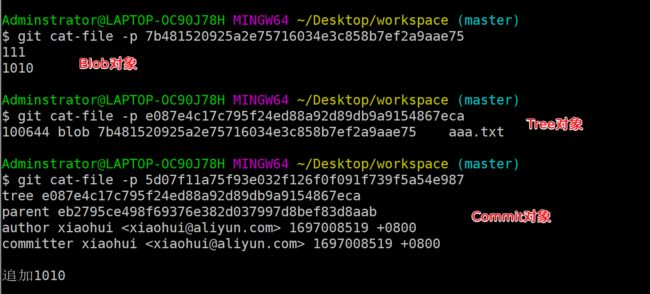
.git/objects/e0/87e4c17c795f24ed88a92d89db9a9154867eca		# Tree对象.v2
.git/objects/eb/2795ce498f69376e382d037997d8bef83d8aab		# Commit对象.v1
查看新Git对象的内容:
Adminstrator@LAPTOP-OC90J78H MINGW64 ~/Desktop/workspace (master)
$ git cat-file -p 7b481520925a2e75716034e3c858b7ef2a9aae75
111
1010

Adminstrator@LAPTOP-OC90J78H MINGW64 ~/Desktop/workspace (master)
$ git cat-file -p e087e4c17c795f24ed88a92d89db9a9154867eca
100644 blob 7b481520925a2e75716034e3c858b7ef2a9aae75    aaa.txt

Adminstrator@LAPTOP-OC90J78H MINGW64 ~/Desktop/workspace (master)
$ git cat-file -p 5d07f11a75f93e032f126f0f091f739f5a54e987
tree e087e4c17c795f24ed88a92d89db9a9154867eca						# Tree对象.v2
parent eb2795ce498f69376e382d037997d8bef83d8aab						# 父提交对象为上一次的提交对象(Commit对象.v1)
author xiaohui <[email protected]> 1697008519 +0800
committer xiaohui <[email protected]> 1697008519 +0800

追加1010
4.2 Git其他命令原理
4.2.1 文件删除原理
在Git中执行删除实质上也是文件版本的一次迭代更新,只要文件被纳入到Git中,那么该文件将永远不会被删除,Git要做的只是进行版本的迭代更新,在新版本的项目快照中"查询不到"上一次版本快照已经删除的数据;
1)普通方式删除
【初始化版本库】
rm -rf .git ./*  # 删除之前的文件
git init
echo "111" >> aaa.txt
git add ./
git commit -m '111' ./
【查看当前工作目录状态,以及暂存区】:
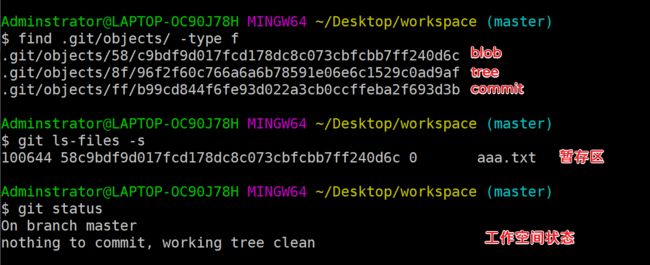
Adminstrator@LAPTOP-OC90J78H MINGW64 ~/Desktop/workspace (master)
$ find .git/objects/ -type f
.git/objects/58/c9bdf9d017fcd178dc8c073cbfcbb7ff240d6c			# Blob对象
.git/objects/8f/96f2f60c766a6a6b78591e06e6c1529c0ad9af			# Tree对象
.git/objects/ff/b99cd844f6fe93d022a3cb0ccffeba2f693d3b			# Comimt对象

Adminstrator@LAPTOP-OC90J78H MINGW64 ~/Desktop/workspace (master)		# 暂存区
$ git ls-files -s
100644 58c9bdf9d017fcd178dc8c073cbfcbb7ff240d6c 0       aaa.txt

Adminstrator@LAPTOP-OC90J78H MINGW64 ~/Desktop/workspace (master)		# 工作空间状态
$ git status
On branch master
nothing to commit, working tree clean
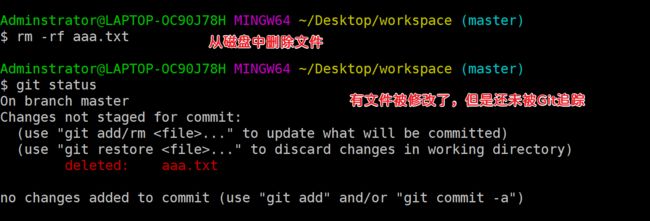
【删除磁盘文件,查看工作空间状态】
Adminstrator@LAPTOP-OC90J78H MINGW64 ~/Desktop/workspace (master)
$ rm -rf aaa.txt

Adminstrator@LAPTOP-OC90J78H MINGW64 ~/Desktop/workspace (master)
$ git status
On branch master
Changes not staged for commit:		# 表示有文件被修改了,但是还未被Git追踪到(需要执行add操作)
  (use "git add/rm ..." to update what will be committed)
  (use "git restore ..." to discard changes in working directory)
        deleted:    aaa.txt

no changes added to commit (use "git add" and/or "git commit -a")
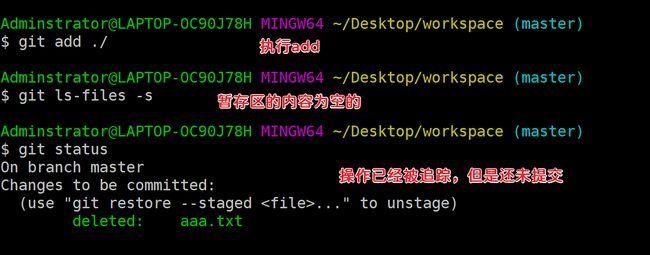
【将操作添加到暂存区,查看暂存区,并且查看当前工作状态】
Adminstrator@LAPTOP-OC90J78H MINGW64 ~/Desktop/workspace (master)
$ git add ./

Adminstrator@LAPTOP-OC90J78H MINGW64 ~/Desktop/workspace (master)
$ git ls-files -s

Adminstrator@LAPTOP-OC90J78H MINGW64 ~/Desktop/workspace (master)
$ git status
On branch master
Changes to be committed:		# 表示操作已经被Git追踪,但是还未提交
  (use "git restore --staged ..." to unstage)
        deleted:    aaa.txt
【查看Git对象,删除之后再查看Git对象】
Adminstrator@LAPTOP-OC90J78H MINGW64 ~/Desktop/workspace (master)
$ find .git/objects/ -type f
.git/objects/58/c9bdf9d017fcd178dc8c073cbfcbb7ff240d6c			# Blob对象
.git/objects/8f/96f2f60c766a6a6b78591e06e6c1529c0ad9af			# Tree对象
.git/objects/ff/b99cd844f6fe93d022a3cb0ccffeba2f693d3b			# Comimt对象

Adminstrator@LAPTOP-OC90J78H MINGW64 ~/Desktop/workspace (master)
$ git commit -m 'del aaa.txt' ./
[master 5e2f7f4] del aaa.txt
 1 file changed, 1 deletion(-)
 delete mode 100644 aaa.txt

Adminstrator@LAPTOP-OC90J78H MINGW64 ~/Desktop/workspace (master)
$ find .git/objects/ -type f
.git/objects/4b/825dc642cb6eb9a060e54bf8d69288fbee4904			# Tree对象.v2
.git/objects/58/c9bdf9d017fcd178dc8c073cbfcbb7ff240d6c			# Blob对象.v1
.git/objects/5e/2f7f40d3bd474899677d23623dfd24b4c2f68b			# Commit对象.v2
.git/objects/8f/96f2f60c766a6a6b78591e06e6c1529c0ad9af			# Tree对象.v1
.git/objects/ff/b99cd844f6fe93d022a3cb0ccffeba2f693d3b			# Comimt对象.v1

Adminstrator@LAPTOP-OC90J78H MINGW64 ~/Desktop/workspace (master)
$ git cat-file -p 5e2f7f40d3bd474899677d23623dfd24b4c2f68b
tree 4b825dc642cb6eb9a060e54bf8d69288fbee4904			# 本次Commit对象所包裹的Tree对象
parent ffb99cd844f6fe93d022a3cb0ccffeba2f693d3b
author xiaohui <[email protected]> 1697010258 +0800
committer xiaohui <[email protected]> 1697010258 +0800

del aaa.txt

Adminstrator@LAPTOP-OC90J78H MINGW64 ~/Desktop/workspace (master)
$ git cat-file -p 4b825dc642cb6eb9a060e54bf8d69288fbee4904
Git中删除文件其实也是对版本进行迭代的更新,并不是连版本(Blob对象)都删除了;,通过之前的Blob对象依旧可以找回被删除的数据:
Adminstrator@LAPTOP-OC90J78H MINGW64 ~/Desktop/workspace (master)
$ git cat-file -p 58c9bdf9d017fcd178dc8c073cbfcbb7ff240d6c
111
2)git rm 命令原理
git rm命令实质上就是相当于先执行rm -rf将文件从磁盘中删除,然后再执行add操作添加到暂存区,此时工作空间的状态为Changes to be committed,即:更改的操作已经被追踪到了,但操作还未被提交。
【示例】
初始化工作空间:
rm -rf .git ./*  # 删除之前的文件
git init
echo "111" >> aaa.txt
git add ./
git commit -m '111' ./

find .git/objects/ -type f		# 查看所有Git对象
.git/objects/09/9ea94b51e52e0ff99638b913cd9613dda7af6c			# Commit
.git/objects/58/c9bdf9d017fcd178dc8c073cbfcbb7ff240d6c			# Blob
.git/objects/8f/96f2f60c766a6a6b78591e06e6c1529c0ad9af			# Tree
执行git rm命令:
Adminstrator@LAPTOP-OC90J78H MINGW64 ~/Desktop/workspace (master)
$ git rm aaa.txt
rm 'aaa.txt'

Adminstrator@LAPTOP-OC90J78H MINGW64 ~/Desktop/workspace (master)		# 查看暂存区
$ git ls-files -s

Adminstrator@LAPTOP-OC90J78H MINGW64 ~/Desktop/workspace (master)		# 工作空间状态
$ git status
On branch master
Changes to be committed:
  (use "git restore --staged ..." to unstage)
        deleted:    aaa.txt
执行commit命令,查看Git对象:
Adminstrator@LAPTOP-OC90J78H MINGW64 ~/Desktop/workspace (master)
$ find .git/objects/ -type f
.git/objects/09/9ea94b51e52e0ff99638b913cd9613dda7af6c			# Commit.v1
.git/objects/58/c9bdf9d017fcd178dc8c073cbfcbb7ff240d6c			# Blob.v1
.git/objects/8f/96f2f60c766a6a6b78591e06e6c1529c0ad9af			# Tree.v1

Adminstrator@LAPTOP-OC90J78H MINGW64 ~/Desktop/workspace (master)
$ git commit -m "del 111" ./
[master d08d2c2] del 111
 1 file changed, 1 deletion(-)
 delete mode 100644 aaa.txt

Adminstrator@LAPTOP-OC90J78H MINGW64 ~/Desktop/workspace (master)
$ find .git/objects/ -type f
.git/objects/09/9ea94b51e52e0ff99638b913cd9613dda7af6c			# Commit.v1
.git/objects/4b/825dc642cb6eb9a060e54bf8d69288fbee4904			# Tree.v2
.git/objects/58/c9bdf9d017fcd178dc8c073cbfcbb7ff240d6c			# Blob.v1
.git/objects/8f/96f2f60c766a6a6b78591e06e6c1529c0ad9af			# Tree.v1
.git/objects/d0/8d2c252002928d6d0ac4c6f047674a947c9ad8			# Commit.v2

Adminstrator@LAPTOP-OC90J78H MINGW64 ~/Desktop/workspace (master)
$ git cat-file -t 4b825dc642cb6eb9a060e54bf8d69288fbee4904
tree
Adminstrator@LAPTOP-OC90J78H MINGW64 ~/Desktop/workspace (master)
$ git cat-file -p 4b825dc642cb6eb9a060e54bf8d69288fbee4904

Adminstrator@LAPTOP-OC90J78H MINGW64 ~/Desktop/workspace (master)
$ git cat-file -p d08d2c252002928d6d0ac4c6f047674a947c9ad8
tree 4b825dc642cb6eb9a060e54bf8d69288fbee4904		# 包裹的是Tree.v2
parent 099ea94b51e52e0ff99638b913cd9613dda7af6c		# 父提交对象是Commit.v1
author xiaohui <[email protected]> 1697012325 +0800
committer xiaohui <[email protected]> 1697012325 +0800

del 111
我们任然可以通过查询Blob对象来找到删除之前的数据:
Adminstrator@LAPTOP-OC90J78H MINGW64 ~/Desktop/workspace (master)
$ git cat-file -p 58c9bdf9d017fcd178dc8c073cbfcbb7ff240d6c
111
4.2.2 文件改名原理
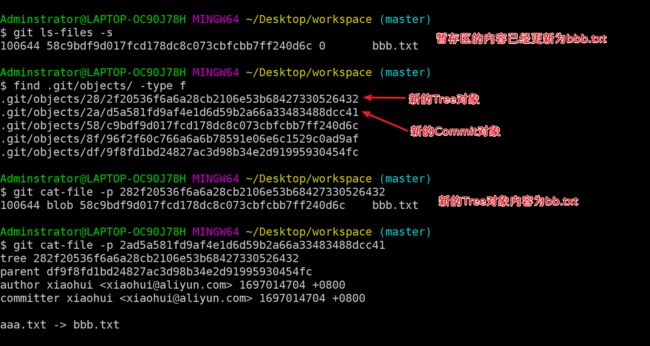
Git中改名的原理和删除的原理基本类似,在Git中对一个文件名称进行修改并将该操作提交后,实质上也是对系统版本的一个迭代更新,新版本中Tree对象的内容就是改名之后的文件;
1)普通方式改名
使用mv命令对磁盘中的文件改名,本质上是先删除之前的文件,然后再添加一个新的文件(新名称);
- 对于删除的文件状态为
no changes added to commit:我们可以直接commit,因为该文件已经被Git追踪到了,直接执行commit操作git会帮我们先执行add - 对于新增的文件状态为
Untraked files:必须先使用add先让Git追踪到该文件;然后再执行commit操作;
【初始化Git仓库】
rm -rf .git ./*  # 删除之前的文件
git init
echo "111" >> aaa.txt
git add ./
git commit -m '111' ./

find .git/objects/ -type f			# 查看所有Git对象
.git/objects/df/9f8fd1bd24827ac3d98b34e2d91995930454fc			# Commit
.git/objects/58/c9bdf9d017fcd178dc8c073cbfcbb7ff240d6c			# Blob
.git/objects/8f/96f2f60c766a6a6b78591e06e6c1529c0ad9af			# Tree
【将aaa.txt改为bbb.txt,并查看工作空间状态】
Adminstrator@LAPTOP-OC90J78H MINGW64 ~/Desktop/workspace (master)
$ mv aaa.txt bbb.txt

Adminstrator@LAPTOP-OC90J78H MINGW64 ~/Desktop/workspace (master)
$ git status
On branch master
Changes not staged for commit:		# 删除了aaa.txt
  (use "git add/rm ..." to update what will be committed)
  (use "git restore ..." to discard changes in working directory)
        deleted:    aaa.txt

Untracked files:					# 新增了一个bbb.txt
  (use "git add ..." to include in what will be committed)
        bbb.txt

no changes added to commit (use "git add" and/or "git commit -a")
【添加到暂存区】
Adminstrator@LAPTOP-OC90J78H MINGW64 ~/Desktop/workspace (master)			# 相当于把两个文件都执行了add操作
$ git add ./
warning: LF will be replaced by CRLF in bbb.txt.
The file will have its original line endings in your working directory

Adminstrator@LAPTOP-OC90J78H MINGW64 ~/Desktop/workspace (master)
$ git status
On branch master
Changes to be committed:
  (use "git restore --staged ..." to unstage)
        renamed:    aaa.txt -> bbb.txt


Adminstrator@LAPTOP-OC90J78H MINGW64 ~/Desktop/workspace (master)
$ git commit -m "aaa.txt -> bbb.txt" ./
warning: LF will be replaced by CRLF in bbb.txt.
The file will have its original line endings in your working directory
[master 2ad5a58] aaa.txt -> bbb.txt
 1 file changed, 0 insertions(+), 0 deletions(-)
 rename aaa.txt => bbb.txt (100%)

Adminstrator@LAPTOP-OC90J78H MINGW64 ~/Desktop/workspace (master)
$ git status
On branch master
nothing to commit, working tree clean
![]()
【查看Git对象和暂存区】
Adminstrator@LAPTOP-OC90J78H MINGW64 ~/Desktop/workspace (master)
$ git ls-files -s				# 查看暂存区
100644 58c9bdf9d017fcd178dc8c073cbfcbb7ff240d6c 0       bbb.txt

Adminstrator@LAPTOP-OC90J78H MINGW64 ~/Desktop/workspace (master)
$ find .git/objects/ -type f
.git/objects/28/2f20536f6a6a28cb2106e53b68427330526432			# Tree.v2
.git/objects/2a/d5a581fd9af4e1d6d59b2a66a33483488dcc41			# Commit.v2
.git/objects/58/c9bdf9d017fcd178dc8c073cbfcbb7ff240d6c			# Blob.v1
.git/objects/8f/96f2f60c766a6a6b78591e06e6c1529c0ad9af			# Tree.v1
.git/objects/df/9f8fd1bd24827ac3d98b34e2d91995930454fc			# Commit.v1

Adminstrator@LAPTOP-OC90J78H MINGW64 ~/Desktop/workspace (master)
$ git cat-file -p 282f20536f6a6a28cb2106e53b68427330526432		# 新的Tree对象的内容已经变为bbb.txt
100644 blob 58c9bdf9d017fcd178dc8c073cbfcbb7ff240d6c    bbb.txt

Adminstrator@LAPTOP-OC90J78H MINGW64 ~/Desktop/workspace (master)
$ git cat-file -p 2ad5a581fd9af4e1d6d59b2a66a33483488dcc41
tree 282f20536f6a6a28cb2106e53b68427330526432			# 该Commit对象包裹的是Tree.v2
parent df9f8fd1bd24827ac3d98b34e2d91995930454fc
author xiaohui <[email protected]> 1697014704 +0800
committer xiaohui <[email protected]> 1697014704 +0800

aaa.txt -> bbb.txt
2)git mv 命令原理
git mv命令实质上就是先执行mv命令将文件先更改为最新的名称,然后再使用add命令将操作添加到暂存区,此时工作空间的状态为Changes to be committed,即:更改的操作已经被追踪到了,但操作还未提交,接下来我们只需要执行commit命令将操作提交即可。
【初始化Git仓库】
rm -rf .git ./*  # 删除之前的文件
git init
echo "111" >> aaa.txt
git add ./
git commit -m '111' ./

find .git/objects/ -type f			# 查看所有Git对象
.git/objects/fa/b47cbbeb5b6a5a49ff6ad1b2872d4778cff967			# Commit
.git/objects/58/c9bdf9d017fcd178dc8c073cbfcbb7ff240d6c			# Blob
.git/objects/8f/96f2f60c766a6a6b78591e06e6c1529c0ad9af			# Tree
【使用git mv修改文件名称】
Adminstrator@LAPTOP-OC90J78H MINGW64 ~/Desktop/workspace (master)
$ git mv aaa.txt bbb.txt

Adminstrator@LAPTOP-OC90J78H MINGW64 ~/Desktop/workspace (master)
$ git ls-files -s
100644 58c9bdf9d017fcd178dc8c073cbfcbb7ff240d6c 0       bbb.txt		# 暂存区的内容已经变为bbb.txt

Adminstrator@LAPTOP-OC90J78H MINGW64 ~/Desktop/workspace (master)
$ git status
On branch master
Changes to be committed:
  (use "git restore --staged ..." to unstage)
        renamed:    aaa.txt -> bbb.txt
【查看所有Git对象】
Adminstrator@LAPTOP-OC90J78H MINGW64 ~/Desktop/workspace (master)
$ git commit -m "aaa.txt -> bbb.txt" ./				# 执行提交操作
warning: LF will be replaced by CRLF in bbb.txt.
The file will have its original line endings in your working directory
[master 9a23c32] aaa.txt -> bbb.txt
 1 file changed, 0 insertions(+), 0 deletions(-)
 rename aaa.txt => bbb.txt (100%)

Adminstrator@LAPTOP-OC90J78H MINGW64 ~/Desktop/workspace (master)
$ find .git/objects/ -type f
.git/objects/28/2f20536f6a6a28cb2106e53b68427330526432			# Tree.v2
.git/objects/58/c9bdf9d017fcd178dc8c073cbfcbb7ff240d6c			# Blob.v1
.git/objects/8f/96f2f60c766a6a6b78591e06e6c1529c0ad9af			# Tree.v1
.git/objects/9a/23c32ffe86d236878eabffe6135dfd462e422d			# Commit.v2
.git/objects/fa/b47cbbeb5b6a5a49ff6ad1b2872d4778cff967			# Commit.v1

Adminstrator@LAPTOP-OC90J78H MINGW64 ~/Desktop/workspace (master)			# 查看Tree.v2的内容
$ git cat-file -p 282f20536f6a6a28cb2106e53b68427330526432
100644 blob 58c9bdf9d017fcd178dc8c073cbfcbb7ff240d6c    bbb.txt

Adminstrator@LAPTOP-OC90J78H MINGW64 ~/Desktop/workspace (master)			# 查看Commit.v2的内容
$ git cat-file -p 9a23c32ffe86d236878eabffe6135dfd462e422d
tree 282f20536f6a6a28cb2106e53b68427330526432			# 该Commit对象是对Tree.v2的包裹
parent fab47cbbeb5b6a5a49ff6ad1b2872d4778cff967			# 父Commit对象是Commit.v1
author xiaohui <[email protected]> 1697018131 +0800
committer xiaohui <[email protected]> 1697018131 +0800

aaa.txt -> bbb.txt

