渲染4——第一盏灯
原文网址:https://catlikecoding.com/unity/tutorials/rendering/part-4/
渲染第4节 第一盏灯
将法线从local转到world
使用一个平行光
计算漫反射和镜面反射
保持能量守恒
使用金属工作流
使用unity的PBS算法
本节为渲染得第4节课程,前一小节介绍的是如何使用贴图,本节将学习如何计算光照。
本节课程使用unity 5.4.0b17(我使用的是2017.1.3.f1)。
1 法线
我之所以能看到物体,是因为我们的眼睛可以侦测到电磁辐射。光线的每个量子quanta就是俗称为光子。我们可以看到有限的电磁光谱,这就是所谓的可见光,剩余的一部分光谱对于我们是不可见的。
什么是整个的电磁光谱?
光谱被分为光谱带。从低频到高频,如:无线电波,微波,红外线,可见光,紫外线,x射线,gamma射线。
由光源发出的光,一部分照射到物体,一部分照射到物体之后又反弹出去。如果反弹出去的光线最终射到我们的眼睛或者是摄像机的镜头,那么此时我们就看到了物体。
为了解决这个问题,我们必须知道物体的表面。而目前我们只知道物体的位置,但是不知道朝向。所以,需要知道物体表面的法线。
1.1 使用mesh的法线
复制我们第一个shader,使它作为我们第一个光照shader。为整个shader创建一个材质,然后把它指派给一些立方体和球体。给与物体不同的旋转和缩放,使他们互相有些不同。
项目的下载地址为:
https://pan.baidu.com/s/1HsUmGgZ72eRwRAqwpSIoog
初始的时候自然是删除shader的内容,然后一步一步往里面加东西。首先是编写一个空的shader,如下:

unity自己的立方体和球体网格包含了顶点法线。我们可以利用他们然后直接将他们传递给片元着色器。
struct VertexData {
				float4 position : POSITION;
				float3 normal : NORMAL;
				float2 uv : TEXCOORD0;
			};

			struct Interpolators {
				float4 position : SV_POSITION;
				float2 uv : TEXCOORD0;
				float3 normal : TEXCOORD1;
			};

			Interpolators MyVertexProgram (VertexData v) {
				Interpolators i;
				i.uv = TRANSFORM_TEX(v.uv, _MainTex);
				i.position = mul(UNITY_MATRIX_MVP, v.position);
				i.normal = v.normal;
				return i;
			}
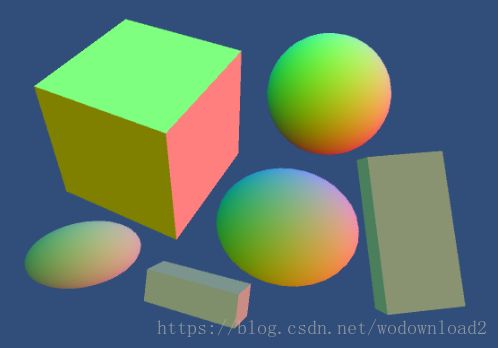
此时我们可以显示化法线到底是啥样子:
float4 MyFragmentProgram (Interpolators i) : SV_TARGET
{
		return float4(i.normal * 0.5 + 0.5, 1);
}
效果如下:

这些就是原始的法线,直接来自于网格。立方体的表面法线看起来是平的,因为每个面只有四个顶点形成一个块。所有这些顶点的法线都指向一个方向。相反,球体的顶点法线都指向不同的方向,形成一个平滑的差值。
1.2 动态批处理
对于立方体的法线看起来有些奇怪。我们希望每个立方体显示相同的颜色,但是事实并非如此。甚至很奇怪,立方体会因为我们的视角不同,而变化颜色。
https://thumbs.gfycat.com/AfraidRashAlbertosaurus-mobile.mp4
这是因为动态合批所致。unity动态的将小的网格合并了,减少了draw call。球体的网格太大了,所以不受影响,但是立方体被合批很正常。
为了合并网格,他们必须从自己的本地空间转换到世界空间。物体是否和怎样被合批,取决于其他物体,以及他们怎么存储。以为这些转换会影响法线,所以进而你会看到法线可视化之后的颜色变化。
如果你愿意,你可以关闭掉动态合批,在player settings中设置,在File->Build Settings->Player Settings->Other Settings->Dynamic Batching

勾选动态合批的Frame Debug查看结果:

此时物体渲染效果为:

不勾选动态合批的Frame Debug:

此时物体渲染效果为:

红色圈住的物体略微颜色有点颜色的不同。
除了动态合批,unity还会静态合批。这个是针对静态物体而言的,但依然包含了到世界坐标的转换,它发生在编译的阶段。尽管你需要注意动态合批,但是你无需担心。事实上,我们也要对法线做同样的合并处理,所以你把这个动态合批打开即可。
1.3 世界坐标系下的法线求法
第一种做法是:使用local转world的矩阵乘以法线,得到世界坐标系的法线,具体如下:
Interpolators MyVertexProgram(VertexData v)
{
		Interpolators i;
		i.position = UnityObjectToClipPos(v.position);
		i.normal = mul(unity_ObjectToWorld, float4(v.normal, 0));
		return i;
}
其渲染结果如下:
可以看到法线转到世界坐标系之后,物体的颜色有些变化了。

然后我们要再做的就是把世界坐标系的法线规格化之后,看其效果:
Interpolators MyVertexProgram(VertexData v)
{
		Interpolators i;
		i.position = UnityObjectToClipPos(v.position);
		i.normal = mul(unity_ObjectToWorld, float4(v.normal, 0));
		i.normal = normalize(i.normal);
		return i;
}
紧接着我们还要注意一个问题,就是对于没有按照一比一缩放的物体,其法线转到世界坐标系之后,物体所对应的颜色有点奇怪,比如sphere球体的颜色。
于是我们可以参考:https://blog.csdn.net/pizi0475/article/details/7932913
介绍如何求得世界法线。
其正确的求法,是利用本地到世界的矩阵的逆矩阵的转置矩阵左乘以局部法线得到世界法线。
于是我们修正我们的shader如下:
Interpolators MyVertexProgram(VertexData v)
{
		Interpolators i;
		i.position = UnityObjectToClipPos(v.position);
		i.normal = mul(
		transpose((float3x3)unity_WorldToObject),v.normal);
		i.normal = normalize(i.normal);
		return i;
}
我们可以选择在vertex shader中对法线进行规格化,也可以选择在fragment shader中进行规格化,前者效率更高一点。
2 漫反射
我们之所以能看到物体,是因为反射了光线,而漫反射是光线射到物体表面,然后渗透到物体里面去,进行物理的碰撞,最后部分光线又再次窜出表面最终到达我们的眼睛。而反射多少光呢?这与如入射光的角度有关系,根据Lamber定律,当入射光的角度与法线的越小,那么反射就越大,具体我们可以使用入射光向量点乘以法线向量,如果值越大则反射越强,这样我们就得到一个漫反射系数。
此时我们需要知道入射光的方向向量,主要我们要计算点乘,这个入射光的方向存储在unity自己提供的变量中,_WorldSpaceLightPos0。这个变量不仅仅表示光源的位置,而且还能表示光源的方向,当且仅当时平行光的时候,这个变量就表示了平行光的方向。然后我们已经知道物体表面的法线了,于是可以求得一个点乘系数:
float factor = dot(_WorldSpaceLightPos0.xyz, i.normal);
有了这个系数,我们还要知道光源的颜色,然后用这个颜色乘以这个系数就得到了最终的结果:
Shader "Custom/My First Lighting Shader"
{
	SubShader
	{
		Pass
		{
			CGPROGRAM

			#pragma vertex MyVertexProgram
			#pragma fragment MyFragmentProgram

			#include "UnityCG.cginc"
			#include "UnityLightingCommon.cginc"


			struct VertexData
			{
				float4 position : POSITION;
				float3 normal : NORMAL;
			};

			struct Interpolators
			{
				float4 position : SV_POSITION;
				float3 normal : TEXCOORD0;
			};

			Interpolators MyVertexProgram(VertexData v)
			{
				Interpolators i;
				i.position = UnityObjectToClipPos(v.position);
				i.normal = mul(transpose((float3x3)unity_WorldToObject), v.normal);
				i.normal = normalize(i.normal);
				return i;
			}

			float4 MyFragmentProgram(Interpolators i) : SV_TARGET
			{
				float diffuseFactor = dot(_WorldSpaceLightPos0.xyz, i.normal);
				float3 diffuse = _LightColor0.rgb * diffuseFactor;
				return float4(diffuse, 1);
			}

			ENDCG
		}
	}
}
此时我们要指定我们的pass的light mode为forwardbase。以及摄像机的渲染模式:
首先在上面的shader中加入:

其次是更改camera的rendering path为forward。

2.3 光源模式
为了得到正确的结果,我们必须告诉unity我们需要什么样的光照数据。所以我们需要在shader中加入LightMode标签。
我们如何去渲染场景,就需要什么样的灯光模式。我们可以选择使用向前渲染也可以使用延迟渲染。有两个比较老一点的模式,我们这里不会考虑使用它们。在player settings中设置渲染路径。
我们必须使用forwardbase通道。这个是使用forward 渲染路径所必须的一个渲染通道。这个通道允许我们去访问一个主要的平行光。当然在这个通道你还可以做其他的事情,后面会有涉及到。
Pass {
			Tags {
				"LightMode" = "ForwardBase"
			}

			CGPROGRAM

			…

			ENDCG
		}
2.4 光源的颜色
光的颜色不总是白色的。每个光源都有他自己的颜色,我们可以使用_LightColor0来得到,这个变量定义在UnityLightingCommon中。这个变量是光的颜色和强度的乘积。虽然他提供了四个通道,但是我们只需要RGB三个通道。
	float4 MyFragmentProgram (Interpolators i) : SV_TARGET {
				i.normal = normalize(i.normal);
				float3 lightDir = _WorldSpaceLightPos0.xyz;
				float3 lightColor = _LightColor0.rgb;
				float3 diffuse = lightColor * DotClamped(lightDir, i.normal);
				return float4(diffuse, 1);
			}
2.5 反射率
大多数的材质吸收一部分的电磁光子。这样才给与他们颜色。比如所有的红色光谱都被吸收了,那么逃出的颜色将会是cyan色。
对于那些没有跑掉的光去哪里了?
光的能量储存在物体中,典型的就是热量。这就是为啥黑色的物体变得更暖一些,比起白色的物体来说。
一个材质的漫反射率叫做albedo。是一个材质对光的反射情况。它是一个拉丁文,是白色。用它来表示对红绿蓝三个通道的反射情况,剩余部分则被吸收。在unity中通常使用一张贴图和一个tint颜色来表示。
float4 MyFragmentProgram (Interpolators i) : SV_TARGET {
				i.normal = normalize(i.normal);
				float3 lightDir = _WorldSpaceLightPos0.xyz;
				float3 lightColor = _LightColor0.rgb;
				**float3 albedo = tex2D(_MainTex, i.uv).rgb * _Tint.rgb;**
				float3 diffuse =
					albedo * lightColor * DotClamped(lightDir, i.normal);
				return float4(diffuse, 1);
			}
3 镜面反射
除了漫反射之外,另外一种反射就是镜面反射,它与漫反射最大的区别就是光打到物体表面,直接以入射角度以向法线的另外一次进行反射,而我们的眼睛或者相机的注视方向如果与这个反射向量越靠近那么就越觉得刺眼,这就是镜面反射的特点。所以这里需要注意三个向量:入射向量、法线、注视向量。我们根据入射向量和法线求得反射向量,然后与注视向量点乘。这是Blinn反射模型,后面还有有一个Blinn-Phong模型,它利用的是半角向量,也就是入射向量和注视向量的半角向量与法线的点乘。
Blinn反射模型:
Shader "Custom/My First Lighting Shader"
{
	SubShader
	{
		Pass
		{
			Tags{"LightMode" = "ForwardBase"}
			CGPROGRAM

			#pragma vertex MyVertexProgram
			#pragma fragment MyFragmentProgram

			#include "UnityCG.cginc"
			#include "UnityStandardBRDF.cginc"

			struct VertexData
			{
				float4 position : POSITION;
				float3 normal : NORMAL;
			};

			struct Interpolators
			{
				float4 position : SV_POSITION;
				float3 normal : TEXCOORD1;
				float3 worldPos: TEXCOORD2;
			};

			Interpolators MyVertexProgram (VertexData v)
			{
				Interpolators i;
				i.position = UnityObjectToClipPos(v.position);
				i.normal = UnityObjectToWorldNormal(v.normal);
				i.normal = normalize(i.normal);
				i.worldPos = mul(unity_ObjectToWorld, v.position);
				return i;
			}

			float4 MyFragmentProgram (Interpolators i) : SV_TARGET
			{
				float3 viewDir = normalize(_WorldSpaceCameraPos - i.worldPos);
				float3 reflectionDir = reflect(-_WorldSpaceLightPos0.xyz, i.normal);
				float3 reflectFactor = dot(viewDir, reflectionDir);
				float3 reflect = _LightColor0.rgb * reflectFactor;
				return float4(reflect, 1);
			}

			ENDCG
		}
	}
}
相机的位置在变量_WorldSpaceCameraPos中可以拿到,此变量在UnityShaderVariables中定义。
float4 MyFragmentProgram (Interpolators i) : SV_TARGET {
				i.normal = normalize(i.normal);
				float3 lightDir = _WorldSpaceLightPos0.xyz;
				float3 viewDir = normalize(_WorldSpaceCameraPos - i.worldPos);

				float3 lightColor = _LightColor0.rgb;
				float3 albedo = tex2D(_MainTex, i.uv).rgb * _Tint.rgb;
				float3 diffuse =
					albedo * lightColor * DotClamped(lightDir, i.normal);
				return float4(diffuse, 1);
			}
3.1 计算反射向量
为了计算入射光线的反射向量,可以使用reflect函数。如下所示:
float3 reflectionDir = reflect(-lightDir, i.normal);

return float4(reflectionDir * 0.5 + 0.5, 1);
在一个完美的光滑的镜面上,我们的视角只有和入射光的反射方向重合才能看到的反射光。但是在大多数情况下,我们会错过镜面反射光,此时表面对于我们来说是黑色的。但是物体不是绝对的光滑,它们表面还有些微弱的凹凸,也就是物体表面的法线是互不相同的。
所以即使我们的视角没有和反射光重合也能够看到一点颜色,视角里反射光越远就看到的越少,我们可以用视角和反射光点乘得到一个系数:
return DotClamped(viewDir, reflectionDir);
3.2 光滑度
我们看到的高光(也就是镜面反射)的区域有多大,取决于物体表面的光滑度。物体表面越光滑,其高光范围越小,高光越明显。我们可以给材质加一个属性,用于控制其光滑度。这个属性的值在0到1范围内,可以制成一个滑动条的形式来控制。
可以都注视向量与反射向量的点乘之后再进行幂次方处理,如下所示:
Properties {
		_Tint ("Tint", Color) = (1, 1, 1, 1)
		_MainTex ("Texture", 2D) = "white" {}
		_Smoothness ("Smoothness", Range(0, 1)) = 0.5
	}

		…

	float _Smoothness;
我们可通过把视角和入射光线的反射向量的点积值,做一个幂次方,这样就可以把高光的区域减小。这里还有做一个放大处理,就是光滑度属性的值在0到1范围,所以要将其放大100倍,这样在做pow的时候,这个值才会变得越小。
return pow(
					DotClamped(viewDir, reflectionDir),
					_Smoothness * 100
				);
完整shader代码如下:
Shader "Custom/My First Lighting Shader"
{
	Properties
	{
		_Smoothness("Smoothness", Range(0,1)) = 0.5
	}

	SubShader
	{
		Pass
		{
			Tags{"LightMode" = "ForwardBase"}
			CGPROGRAM

			#pragma vertex MyVertexProgram
			#pragma fragment MyFragmentProgram

			#include "UnityCG.cginc"
			#include "UnityStandardBRDF.cginc"

			float _Smoothness;

			struct VertexData
			{
				float4 position : POSITION;
				float3 normal : NORMAL;
			};

			struct Interpolators
			{
				float4 position : SV_POSITION;
				float3 normal : TEXCOORD1;
				float3 worldPos: TEXCOORD2;
			};

			Interpolators MyVertexProgram (VertexData v)
			{
				Interpolators i;
				i.position = UnityObjectToClipPos(v.position);
				i.normal = UnityObjectToWorldNormal(v.normal);
				i.normal = normalize(i.normal);
				i.worldPos = mul(unity_ObjectToWorld, v.position);
				return i;
			}

			float4 MyFragmentProgram (Interpolators i) : SV_TARGET
			{
				float3 viewDir = normalize(_WorldSpaceCameraPos - i.worldPos);
				float3 reflectionDir = reflect(-_WorldSpaceLightPos0.xyz, i.normal);
				float3 reflectFactor = dot(viewDir, reflectionDir);
				reflectFactor = pow(reflectFactor, _Smoothness * 100);
				float3 reflect = _LightColor0.rgb * reflectFactor;
				return float4(reflect, 1);
			}

			ENDCG
		}
	}
}
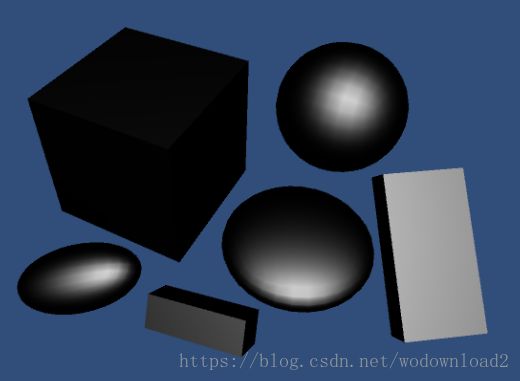
当_Smoothness为0.04的时候,效果为:

当_Smoothness为0.5的时候,效果为:

可见_Smoothness越大,其对光的反射范围越小,也就越聚焦在一点上。
3.3 Blinn-Phong模型
目前使用使用Blinn模型计算反射。但是我们经常使用的是Blinn-Phong模型。它是使用半角向量,也就是入射光方向和视角方向的和的一半,然后让这个半角向量和法线点积,来决定最终的镜面反射的系数。
代码如下:
float4 MyFragmentProgram (Interpolators i) : SV_TARGET
{
		float3 viewDir = normalize(_WorldSpaceCameraPos - i.worldPos);
		float3 halfDir = normalize(_WorldSpaceLightPos0.xyz + viewDir);
		float reflectFactor = pow(dot(halfDir, i.normal),_Smoothness * 100);
		float3 reflect = _LightColor0.rgb * reflectFactor;
		return float4(reflect, 1);
}
效果为:

这种方法会得到更大的高光区域,但是我们可以通过控制光滑度来控制高光区域的大小。这模型计算出来的高光效果要比Phong模型效果要真实。
3.4 镜面反射颜色
反射颜色当然要和光源的颜色匹配,所以上面计算的系数要乘以光源的颜色,就是镜面反射的颜色了。
	float3 halfVector = normalize(lightDir + viewDir);
				float3 specular = lightColor * pow(
					DotClamped(halfVector, i.normal),
					_Smoothness * 100
				);

				return float4(specular, 1);
但是这样还没有结束,反射的颜色依然要受材质的影响。这个和漫反射不同。金属材质漫反射很少,但是有很强的镜面反射。相反,非金属有较强的漫反射,而镜面反射则很弱。
我们可以增加一个贴图和一个tint颜色来定义镜面反射颜色,就好像和满反射的做法一样。但是我们这里就不额外增加一个贴图了,仅仅使用一个tint颜色来控制。
在fragment中进行乘以这个颜色。
Properties {
		_Tint ("Tint", Color) = (1, 1, 1, 1)
		_MainTex ("Albedo", 2D) = "white" {}
		_SpecularTint ("Specular", Color) = (0.5, 0.5, 0.5)
		_Smoothness ("Smoothness", Range(0, 1)) = 0.1
	}

	…

			float4 _SpecularTint;
			float _Smoothness;

			…

			float4 MyFragmentProgram (Interpolators i) : SV_TARGET {
				…

				float3 halfVector = normalize(lightDir + viewDir);
				float3 specular = _SpecularTint.rgb * lightColor * pow(
					DotClamped(halfVector, i.normal),
					_Smoothness * 100
				);

				return float4(specular, 1);
			}
我们可以通过控制这个tint颜色属性来控制镜面反射的强度和颜色。
3.5 漫反射+镜面反射
上面我们分别计算了漫反射颜色和镜面反射,那么我们需要把两个效果叠加起来,是图片更加的完整。
Shader "Custom/My First Lighting Shader"
{
	Properties
	{
		_MainTex("Texture", 2D) = "white"{}
		_diffuseTint("DiffuseTint", Color) = (1, 1, 1, 1)
		_Smoothness("Smoothness", Range(0,1)) = 0.5
		_specularTint("SpecularTint", Color) = (1, 1, 1, 1)
	}

	SubShader
	{
		Pass
		{
			Tags{"LightMode" = "ForwardBase"}
			CGPROGRAM

			#pragma vertex MyVertexProgram
			#pragma fragment MyFragmentProgram

			#include "UnityCG.cginc"
			#include "UnityStandardBRDF.cginc"

			float4 _diffuseTint;
			float _Smoothness;
			float4 _specularTint;
			sampler2D _MainTex;
			float4 _MainTex_ST;

			struct VertexData
			{
				float4 position : POSITION;
				float3 normal : NORMAL;
				float2 uv: TEXCOORD0;
			};

			struct Interpolators
			{
				float4 position : SV_POSITION;
				float2 uv: TEXCOORD0;
				float3 normal : TEXCOORD1;
				float3 worldPos: TEXCOORD2;
			};

			Interpolators MyVertexProgram (VertexData v)
			{
				Interpolators i;
				i.position = UnityObjectToClipPos(v.position);
				i.uv = TRANSFORM_TEX(v.uv, _MainTex);
				i.normal = UnityObjectToWorldNormal(v.normal);
				i.normal = normalize(i.normal);
				i.worldPos = mul(unity_ObjectToWorld, v.position);
				return i;
			}

			float4 MyFragmentProgram (Interpolators i) : SV_TARGET
			{
				float3 albedo = tex2D(_MainTex, i.uv).rgb;
				float diffuseFactor = dot(_WorldSpaceLightPos0.xyz, i.normal);
				float3 diffuse = _diffuseTint * albedo * _LightColor0.rgb * diffuseFactor;

				float3 viewDir = normalize(_WorldSpaceCameraPos - i.worldPos);
				float3 reflectionDir = reflect(-_WorldSpaceLightPos0.xyz, i.normal);
				float3 reflectFactor = dot(viewDir, reflectionDir);
				reflectFactor = pow(reflectFactor, _Smoothness * 100);
				float3 reflect = _specularTint * _LightColor0.rgb * reflectFactor;

				return float4(diffuse + reflect, 1);
			}
			ENDCG
		}
	}
}
发现有黑色立方体,我们将dot换为DotClamped之后得到:
float4 MyFragmentProgram (Interpolators i) : SV_TARGET
{
	float3 albedo = tex2D(_MainTex, i.uv).rgb;
	float diffuseFactor = DotClamped(_WorldSpaceLightPos0.xyz, i.normal);
	float3 diffuse = _diffuseTint * albedo * _LightColor0.rgb * diffuseFactor;

	float3 viewDir = normalize(_WorldSpaceCameraPos - i.worldPos);
	float3 reflectionDir = reflect(-_WorldSpaceLightPos0.xyz, i.normal);
	float3 reflectFactor = DotClamped(viewDir, reflectionDir);
	reflectFactor = pow(reflectFactor, _Smoothness * 100);
	float3 reflect = _specularTint * _LightColor0.rgb * reflectFactor;

	return float4(diffuse + reflect, 1);
}
4 能量守恒
简单的将漫反射和镜面反射加起来会出现一个问题。其结果可能比光源还要亮。如果镜面反射的颜色为白色,然后其光滑度很低,那么这个问题会更加的明显。

当光照亮了物体表面,一部分反射形成镜面反射光。其余一部分穿透物体表面,这部分一部分会被吸收,一部分会再次出来,这个出来的部分就是漫反射。但是目前,我们不考虑这些。而现在,我们都是全部的镜面反射和漫反射,所以我们得到的是原来光能量的两倍。
我们必须保证材质的漫反射和镜面反射额叠加起来不能超过1。这样就能保证我们不会创建不存在的光源。如果叠加起来不超过1是比较好的结果。因为这样意味着,一部分的光被吸收了,比较符合上面的光的吸收和反射的结果。
因为我们使用了一个常量的镜面反射提示specular tint,这样我们就可以使用1减去这个specular,然后乘以albedo即可。但是这个如果手动做不是很方便,特别是我们想使用特定的反射率的时候,所以下面用代码实现:
float3 albedo = tex2D(_MainTex, i.uv).rgb * _Tint.rgb;
albedo *= 1 - _SpecularTint.rgb;

漫反射和镜面反射的贡献现在是相互关联的了。镜面反射越强,那么漫反射就会弱一些。当镜面反射的系数为黑色,那么就会得到0反射。此时我们看到全是漫反射。一个白色镜面反色会形成镜子效果,此时漫反射会消失。
4.1 单调
当镜面反射是一个灰色的时候,这种方法会表现的很好。但是其他的颜色,则会产生奇怪的效果。比如,当镜面反射的tint为红色,它将只会减少漫反射的红色分量,这样就会导致下面的结果:

为了阻止这个颜色错误,我们可以使用单色的能量守恒。这就意味着,我们可以使用镜面反射颜色的最强的那个分量来减少漫反射。
albedo *= 1 - max(_SpecularTint.r, max(_SpecularTint.g, _SpecularTint.b));
4.2 unity提供的函数
正如你所期待的那样,unity也有考虑到能量守恒的问题。在UnityStandardUtils中的EnergyConservationBetweenDiffuseAndSpecular 则负责处理这个问题的。
#include "UnityStandardBRDF.cginc"
#include "UnityStandardUtils.cginc"
这个函数接收漫反射和镜面反射颜色作为输入,输出一个调整后的漫反射。但是还需要第三个参数,称之为1减镜面反射率。这个就是1减去镜面反射强度,这个系数乘以albedo即可。它是一个额外的输出,因为镜面反射率在计算其他光照的时候需要。
	float3 albedo = tex2D(_MainTex, i.uv).rgb * _Tint.rgb;
//				albedo *= 1 -
//					max(_SpecularTint.r, max(_SpecularTint.g, _SpecularTint.b));

	float oneMinusReflectivity;
	albedo = EnergyConservationBetweenDiffuseAndSpecular(albedo, _SpecularTint.rgb, oneMinusReflectivity);
4.3 metallic workflow
there are basically two kinds of materials that we are concerned with. there are metal, and there are nonmetals. the latter are also known as dielectric materials.
let’s see the shader in unity.

the standard setting up:

the standard specular setup

the big difference between first and second setup is that the first has a slider which denotes whether a material is metal or nonmetal. however, the second use a color tint to show the what kind of the material is.
the same feature of the two setup is that there is a texture to supply the detail of the material. this texture in the first setup is called metallic while in the second it is called specular.
currently, we can create metals by using a strong specular tint. and we can create dielectrics by using a weak monochrome specular. this is the specular workflow.
it would be much simpler if we could just toggle between metal and nonmetal. s metals do not have albedo, we could use that color data for their specular tint instead. and nonmetals do not have a colored specular anyway, so we do not need a separate specular tint at all. this is known as the metallic workflow. let us go with that.
which is the better workflow???
both approaches are fine. that is why unity has a standard shader for each. the metallic workflow is simpler, because u have only one color source plus a slider. this is sufficient to create realistic materials. the specular workflow can produce the same results, but because u have more control, unrealistic materials are also possible.
we can use another slider property as a metallic toggle, to replace the specular tint. typically, it should be set to either 0 or 1, because sth. is either a metal or not. a value between represents a material that has a mix of metal and nonmetal components.
Properties
{
	_Tint("Tint", Color) = (1,1,1,1)
	_MainTex("Albedo", 2D) = "white"{}
	//		_SpecularTint ("Specular", Color) = (0.5, 0.5, 0.5)
		_Metallic ("Metallic", Range(0, 1)) = 0
		_Smoothness ("Smoothness", Range(0, 1)) = 0.1
	}

	…

//			float4 _SpecularTint;
			float _Metallic;
			float _Smoothness;
}
now we can derive the specular tint from the albedo and metallic properties. 我们可以从漫反射和金属值属性推导出镜面反射颜色。the albedo can then simply be multiplied by one minus the metallic value.
float3 specularTint = albedo * _Metallic;
float oneMinusReflectivity = 1 - _Metallic;
albedo *= oneMinusReflectivity;
float3 diffuse = albedo * lightColor * DotClamped(lightDir, i.normal);
float3 halfVector = normalize(lightDir + viewDir);
				float3 specular = specularTint * lightColor * pow(
					DotClamped(halfVector, i.normal),
					_Smoothness * 100
				);
however, this is an oversimplification. even pure dielectrics still have some specular reflection. so the specular strength and reflection values do not exactly match the metallic slider’s value. and this also influenced by the color space. fortunately, UnityStandardUtils also has the DiffuseAndSpecularFromMetallic function, which takes care of this for us.
float3 specularTint; // = albedo * _Metallic;
float oneMinusReflectivity; // = 1 - _Metallic;
//				albedo *= oneMinusReflectivity;
albedo = DiffuseAndSpecularFromMetallic(albedo, _Metallic, specularTint, oneMinusReflectivity);
one detail is that the metallic slider itself is supposed to be in gamma space. but single values are not automatically gamma corrected by Unity, when rendering in linear space. we can use the Gamma attribute to tell unity that it should also apply gamma correction to our metallic slider.
[Gamma] _Metallic ("Metallic", Range(0, 1)) = 0
unfortunately, by now the specular reflections have now become rather 相当地,非常地 vague for nonmetals. to improve this, we need a better way to compute the lighting.
5 physically- based shading
blinn-phong has long been the workhorse of the game industry, but nowdays physically-based shading-- known as PBS-- is all the rage. 风靡一时 and for good reason, because it is a lot more realistic and predictable. ideally, game engines and modeling tools all use the same shading algorithms. This makes content creation much easier. The industry is slowly converging on a standard PBS implementation.
unity’s standard shaders use a PBS approach as well unity actually has multiple implementations. it decides which to used based on the target platform, hardware, and api level. the algorithm is accessible via the UNITY_BRDF_PBS macro, which is defined in UnityPBSLighting. BRDF stands for bidirectional reflectance distribution function.
#include "UnityPBSLighting.cginc"
these functions are quite math-intensive, so i will not go into the details. they still compute diffuse and specular reflections, just in a different way than blinn-phong. besides that, there also is a Fresnel reflection component. this adds the reflections that u get when viewing objects at grazing angles. those will become obvious once we include environmental reflections.
to make sure that unity selects the best BRDF function, we have to target at least shader level 3.0. we do this with a pragma statement.
CGPROGRAM

#pragma target 3.0

#pragma vertex MyVertexProgram
#pragma fragment MyFragmentProgram
unity’s BRDF functions return an RGBA color, with the alpha component always set to 1. so we can directly have our fragment program return its result.
return UNITY_BRDF_PBS();
of course we have to invoke it with arguments. the functions each have eight parameters. the first two are the diffuse and specular colors of the material. we already have those.
return UNITY_BRDF_PBS(
					albedo, specularTint
				);
the next two arguments have to be the reflectivity and the roughness. these parameters must be in one-minus form, which is an optimization. we already got oneMinusReflectivity out of DiffuseAndSpecularFromMetallic. and smoothness is the opposite of roughness, so we can directly use that.
return UNITY_BRDF_PBS(
					albedo, specularTint,
					oneMinusReflectivity, _Smoothness
				);
of course the surface normal and view direction are also required. these become the fifth and sixth arguments.
return UNITY_BRDF_PBS(
					albedo, specularTint,
					oneMinusReflectivity, _Smoothness,
					i.normal, viewDir
				);
the last two arguments must be the direct and indirect light.
5.1 light structures
UnityLightingCommon defines a simple UnityLight structure which unity shaders use to pass light data around. it contains a light’s color, its direction, and an ndotl value, which is the diffuse term. remember, these structures are purely for our convenience. it does not affect the compiled code.
we have all this information, so all we have to do is put it in a light structure and pass it as the seventh argument.
UnityLight light;
light.color = lightColor;
light.dir = lightDir;
light.ndotl = DotClamped(i.normal, lightDir);

return UNITY_BRDF_PBS(
	albedo, specularTint,
	oneMinusReflectivity, _Smoothness,
	i.normal, viewDir,
	light
);
the final argument is for the indirect light. we have to use the UnityIndirect structure for that, which is also defined in UnityLightingCommon. it contains two colors, a diffuse and a specular one. the diffuse color represents the ambient light, while the specular color represents environmental reflections.
we will cover indirect light later, so simply set these colors to black for now.
float4 MyFragmentProgram (Interpolators i) : SV_TARGET {
				i.normal = normalize(i.normal);
				float3 lightDir = _WorldSpaceLightPos0.xyz;
				float3 viewDir = normalize(_WorldSpaceCameraPos - i.worldPos);

				float3 lightColor = _LightColor0.rgb;
				float3 albedo = tex2D(_MainTex, i.uv).rgb * _Tint.rgb;

				float3 specularTint;
				float oneMinusReflectivity;
				albedo = DiffuseAndSpecularFromMetallic(
					albedo, _Metallic, specularTint, oneMinusReflectivity
				);

				UnityLight light;
				light.color = lightColor;
				light.dir = lightDir;
				light.ndotl = DotClamped(i.normal, lightDir);
				UnityIndirect indirectLight;
				indirectLight.diffuse = 0;
				indirectLight.specular = 0;

				return UNITY_BRDF_PBS(
					albedo, specularTint,
					oneMinusReflectivity, _Smoothness,
					i.normal, viewDir,
					light, indirectLight
				);
			}


