Python图形绘制——TKinter的Canvas组件快速入门(二)
继上一篇:https://blog.csdn.net/Nole_/article/details/106971764
继续说明其他绘制函数
create_line() 绘制线条
同样,create_line()函数只能对Canvas对象使用
from tkinter import *

windows = TK()
test_line = Canvas( (x1, y1, x2, y2), 选项)

'''
x1, y1 x2, y2 都是线段的端点坐标,其中x1, y1 是起始点坐标 x2, y2是终点端点坐标
常用选项:
width: 线段的宽度
arrow:时候使用箭头标识  其中arrow=‘first'表示起点存在箭头
						    arrow='last'表示结尾存在箭头
						    arrow='none'表示无箭头存在
						    arrow=’both‘表示两段都存在箭头
注意:注意箭头的朝向位置

fill:线段颜色
dash:线段设置为虚线(整数值确定虚线的样式)
示例:
from tkinter import *			#导入tkinter库
windows = Tk()		 			#实例化一个窗口对象

test_line = Canvas(windows, bg='black')		#实例化一个Canvas对象
arrows = ['none','both','first','last']		#了解箭头类型,分别为:无 ,都 ,起 ,终
for arrow in arrows:
    test_line.create_line((10,10+30*(arrows.index(arrow)),100,100+30*(arrows.index(arrow))), width=3, fill='red', arrow=arrow)

test_line.create_line((130,10,300,10), dash=20, fill='white', width=3)   #画一条宽度为3的白色虚线

test_line.pack()     	#显示画布
windows.mainloop()		#显示窗口

create_rectangle()绘制矩形
from tkinter import *
windows = TK()

test_rectangle = Canvas(windows, bg='black)
test_rectangel.create_rectangle( (x1, y1, x2, y2), 选项)

'''
x1, y1, x2, y2 分别为矩形的左上角与右下角的坐标

常用选项:
outline:  边框颜色
fill:  矩形的填充色
dash:  指定边框为虚线
width : 指定边线的宽度
'''
示例:
from tkinter import *
windows = Tk()

test_rectangle = Canvas(windows, bg='black')
test_rectangle.create_rectangle((20, 20, 100, 200), fill='white', dash=5, width=3, outline='red')

test_rectangle.pack()
windows.mainloop()

create_polygon()绘制多边形
from tkinter import *
windows = TK()

test_polygon = Canvas(windows, bg='black)
test_polygon.create_rectangle( (x1, y1, x2, y2....), 选项)

'''
x1, y1, x2, y2 ... 分别为多边形顶点的坐标

常用选项:
outline:  边框颜色
fill:  矩形的填充色
width : 指定边线的宽度
smooth: 只当多边形的光滑程度.(0表示多边形的边框为折现,1表示多边形的边框为平滑的曲线)

'''
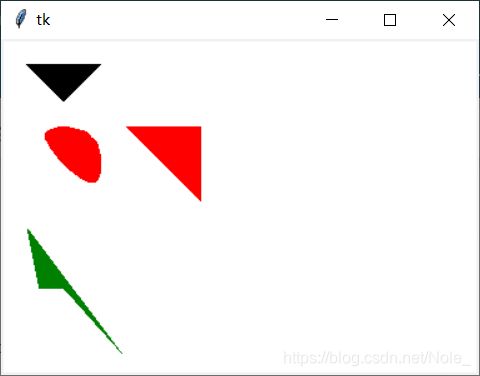
示例:
from tkinter import *
windows = Tk()

test_polygon = Canvas(windows, bg='white')

test_polygon.create_polygon((20,20, 80,20, 50,50), smooth=0, fill='black', width=3)
test_polygon.create_polygon((20,70, 80,70, 80,130), smooth=1, fill='red', width=3)
test_polygon.create_polygon((100,70, 160,70, 160,130), smooth=0, fill='red', width=3)
test_polygon.create_polygon((20,150, 30,200, 50,200, 100,256), smooth=0, fill='green', width=3)

test_polygon.pack()
windows.mainloop()