探索spring事件机制源码实现的全过程
1、事件机制的实现方式
网上一搜,就能知道事件机制是基于观察者模式实现的。观察者模式具体是什么,它的一般实现网上很多,我就不再重复造轮子了,这里贴一下其他文章里面对观察者模式的总结(拿来吧你)。
观察者模式还有很多其他的称谓,如发布-订阅(Publish/Subscribe)模式、模型-视图(Model/View)模式、源-监听器(Source/Listener)模式或从属者(Dependents)模式。观察者模式定义了一种一对多的依赖关系,让多个观察者对象同时监听某一个主题对象。这个主题对象在状态上发生变化时,会通知所有观察者对象,使它们能够自动更新自己。
2、JDK、Spring的事件机制的使用
限于篇幅,具体案例实现就不讲了,大家可以去spring-boot-test获取,在com.lee.jdkevent/springenvent下,里面注释写的很详细了。当然,这也是别人造好的参考轮子(拿来吧你)。
PS:特别是对于观察者模式处于懵懂状态的同学们一定要去看!你对目标的作用都不了解,谈何去看他的实现原理!
3、Spring事件机制源码实现
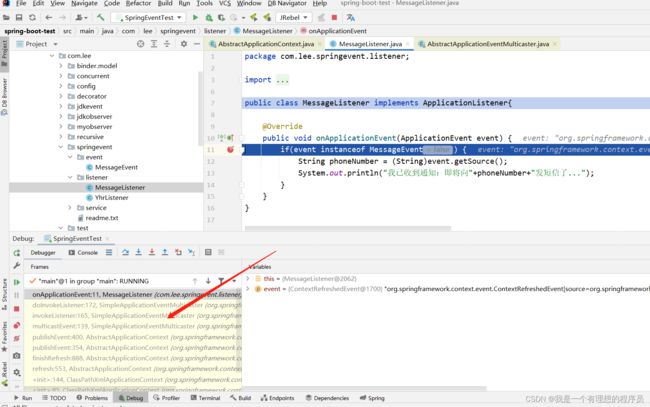
有了上面两步基础后,我们可以进入他的源码环节了。看源码,其实最重要的是得找到入口,这次入口很好找

从上面的图例中,我们可以分析出来,spring的事件还是会把发生的变化封装成一个事件,然后通过spring最重要的东西applicationContext容器去发布这个事件。我们进publishEvent这个方法看一下。
protected void publishEvent(Object event, @Nullable ResolvableType eventType) {
		Assert.notNull(event, "Event must not be null");
		if (logger.isTraceEnabled()) {
			logger.trace("Publishing event in " + getDisplayName() + ": " + event);
		}

		// Decorate event as an ApplicationEvent if necessary
		ApplicationEvent applicationEvent;
		if (event instanceof ApplicationEvent) {
			applicationEvent = (ApplicationEvent) event;
		}
		else {
			applicationEvent = new PayloadApplicationEvent<>(this, event);
			if (eventType == null) {
				eventType = ((PayloadApplicationEvent) applicationEvent).getResolvableType();
			}
		}

		// Multicast right now if possible - or lazily once the multicaster is initialized
		if (this.earlyApplicationEvents != null) {
			this.earlyApplicationEvents.add(applicationEvent);
		}
		else {
			getApplicationEventMulticaster().multicastEvent(applicationEvent, eventType);
		}

		// Publish event via parent context as well...
		if (this.parent != null) {
			if (this.parent instanceof AbstractApplicationContext) {
				((AbstractApplicationContext) this.parent).publishEvent(event, eventType);
			}
			else {
				this.parent.publishEvent(event);
			}
		}
	}
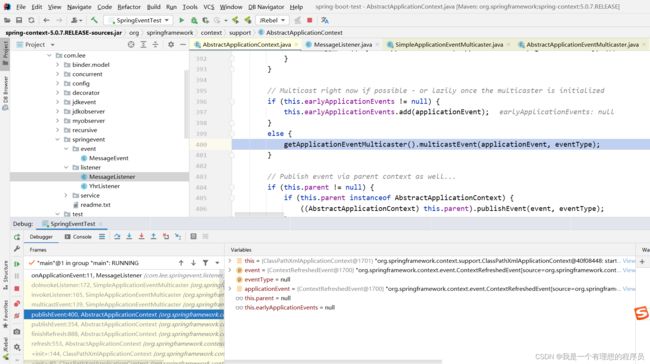
几番周转后我们找到了这个方法,但是这个方法看着也比较庞大啊,我们只关心他什么时候调用的监听器的方法(这个思路在看源码的时候很重要,你得找准你想看什么,顺着主线走,就跟玩游戏先做主线任务一样),这个时候,必须得上断点了,我把断点打在了他的必经之路上,然后观察他的调用栈,如下图

很快就能发现publishEvent中的这个方法getApplicationEventMulticaster().multicastEvent(applicationEvent, eventType);

进入multicastEvent这个方法
	@Override
	public void multicastEvent(final ApplicationEvent event, @Nullable ResolvableType eventType) {
		ResolvableType type = (eventType != null ? eventType : resolveDefaultEventType(event));
		for (final ApplicationListener<?> listener : getApplicationListeners(event, type)) {
			Executor executor = getTaskExecutor();
			if (executor != null) {
				executor.execute(() -> invokeListener(listener, event));
			}
			else {
				invokeListener(listener, event);
			}
		}
	}
我们终于看到了监听器上场了,他会去取监听器列表,然后循环调用每一个监听器的方法,看到这我就有个疑问了,他这个监听器是会根据事件类取对应的监听器,还是取所有注入给容器的监听器呢。想到这,我做了一个实验。我新增了一个监听器,代码如下,看是否会打印就知道结果了。
public class YhrListener implements ApplicationListener{

    @Override
    public void onApplicationEvent(ApplicationEvent event) {
        System.out.println("进入了YHR监听器判断!!");
        if(event instanceof ApplicationFailedEvent) {
            String phoneNumber = (String)event.getSource();
            System.out.println("YHR...");
        }
    }
}
最后实验结果如下:

本着对代码的严谨性,我再跟了一下multicastEvent方法中的getApplicationListeners方法,想看下他根据什么逻辑取的监听器。
protected Collection<ApplicationListener<?>> getApplicationListeners(
			ApplicationEvent event, ResolvableType eventType) {

		//省略部分代码...
		if (this.beanClassLoader == null ||
				(ClassUtils.isCacheSafe(event.getClass(), this.beanClassLoader) &&
						(sourceType == null || ClassUtils.isCacheSafe(sourceType, this.beanClassLoader)))) {
			synchronized (this.retrievalMutex) {
				retriever = this.retrieverCache.get(cacheKey);
				if (retriever != null) {
					return retriever.getApplicationListeners();
				}
				retriever = new ListenerRetriever(true);

				//这里重点关注下,从这里取的listeners然后返回
				Collection<ApplicationListener<?>> listeners =
						retrieveApplicationListeners(eventType, sourceType, retriever);
				this.retrieverCache.put(cacheKey, retriever);
				return listeners;

			}
		}
		else {
			// No ListenerRetriever caching -> no synchronization necessary
			return retrieveApplicationListeners(eventType, sourceType, null);
		}
	}
只关注返回值listeners,继续进retrieveApplicationListeners方法
private Collection<ApplicationListener<?>> retrieveApplicationListeners(
			ResolvableType eventType, @Nullable Class<?> sourceType, @Nullable ListenerRetriever retriever) {

		LinkedList<ApplicationListener<?>> allListeners = new LinkedList<>();
		Set<ApplicationListener<?>> listeners;
		Set<String> listenerBeans;
		synchronized (this.retrievalMutex) {
			listeners = new LinkedHashSet<>(this.defaultRetriever.applicationListeners);
			listenerBeans = new LinkedHashSet<>(this.defaultRetriever.applicationListenerBeans);
		}
		for (ApplicationListener<?> listener : listeners) {
			if (supportsEvent(listener, eventType, sourceType)) {
				if (retriever != null) {
					retriever.applicationListeners.add(listener);
				}
				allListeners.add(listener);
			}
		}
		if (!listenerBeans.isEmpty()) {
			BeanFactory beanFactory = getBeanFactory();
			for (String listenerBeanName : listenerBeans) {
				try {
					Class<?> listenerType = beanFactory.getType(listenerBeanName);
					if (listenerType == null || supportsEvent(listenerType, eventType)) {
						ApplicationListener<?> listener =
								beanFactory.getBean(listenerBeanName, ApplicationListener.class);
						if (!allListeners.contains(listener) && supportsEvent(listener, eventType, sourceType)) {
							if (retriever != null) {
								retriever.applicationListenerBeans.add(listenerBeanName);
							}
							allListeners.add(listener);
						}
					}
				}
				catch (NoSuchBeanDefinitionException ex) {
					// Singleton listener instance (without backing bean definition) disappeared -
					// probably in the middle of the destruction phase
				}
			}
		}
		AnnotationAwareOrderComparator.sort(allListeners);
		return allListeners;
	}
又是这么大一段代码,先看返回值allListeners是一个数组,然后看什么时候添加的数据。自然而然关注到了这一步
for (ApplicationListener<?> listener : listeners) {
			if (supportsEvent(listener, eventType, sourceType)) {
				if (retriever != null) {
					retriever.applicationListeners.add(listener);
				}
				allListeners.add(listener);
			}
		}
然后再自然而然的进去了supportsEvent方法,好了,真相大白,其实根据方法名就能看得出来,这里就是匹配对应监听器的方法,具体什么匹配逻辑呢,感兴趣的同学就自己进去看吧。
至此,本次探索结束!