| ID | 姓名 | 邮箱 | 性别 | 部门 | 生日 | 操作 |
|---|---|---|---|---|---|---|
7. springBoot-web开发——案例demo
1. 引入静态资源文件
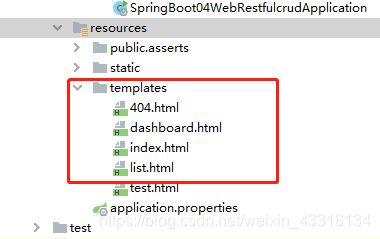
注意:我们前面在public目录下放置了一个index.html的文件,所以默认访问的首页文件会是public目录下的index.html文件,那么我们需要访问template目录下的index.html文件,该怎么处理了?
1.1 设置首页
1.1.1 Controller跳转到首页
我们可以在Controller中定义一个映射,跳转到index.html页面。
@RequestMapping({"/","/index.html"})
public String toIndex(){
	return "index";
}
但是,我们仅仅是为了跳转一个页面,就写一个地址映射方法,有点麻烦
1.1.2 通过视图映射到首页
因为所有的WebMvcConfigurerAdapter组件都会一起起作用,所以我们可以定义一个WebMvcConfigurerAdapter,然后使用@Bean将该组件注册在容器中。
package com.bjc.config;
import org.springframework.context.annotation.Configuration;
import org.springframework.web.servlet.config.annotation.ViewControllerRegistry;
import org.springframework.web.servlet.config.annotation.WebMvcConfigurerAdapter;
@Configuration
public class MyMvcConfig extends WebMvcConfigurerAdapter {
/** 视图解析器 */
@Override
public void addViewControllers(ViewControllerRegistry registry) {
// super.addViewControllers(registry);
// 浏览器发送 /bjc 请求,跳转到success页面
registry.addViewController("/bjc").setViewName("test");
}
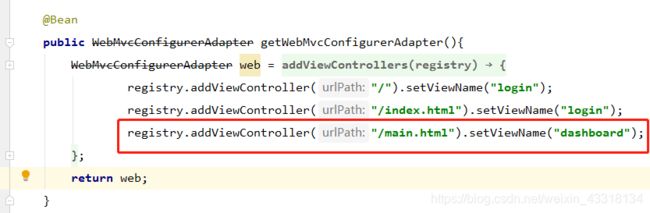
public WebMvcConfigurerAdapter getWebMvcConfigurerAdapter(){
WebMvcConfigurerAdapter web = new WebMvcConfigurerAdapter(){
@Override
public void addViewControllers(ViewControllerRegistry registry) {
registry.addViewController("/").setViewName("index");
registry.addViewController("/index.html").setViewName("index");
}
};
return web;
}
}
1.2 引入bootstrap
这里咱们使用webjars引入bootstrap,在官网找到bootstrap的maven依赖,粘贴到pom.xml文件中
    org.webjars
    bootstrap
    4.0.0
修改login.html的插件地址
2. 国际化
2.1 默认国际化
操作步骤:
2.1.1 国际化配置文件配置
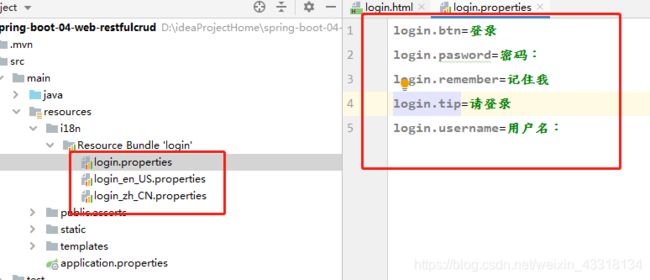
1)在resources目录下新建目录i18n
2)新建配置文件login.properties文件
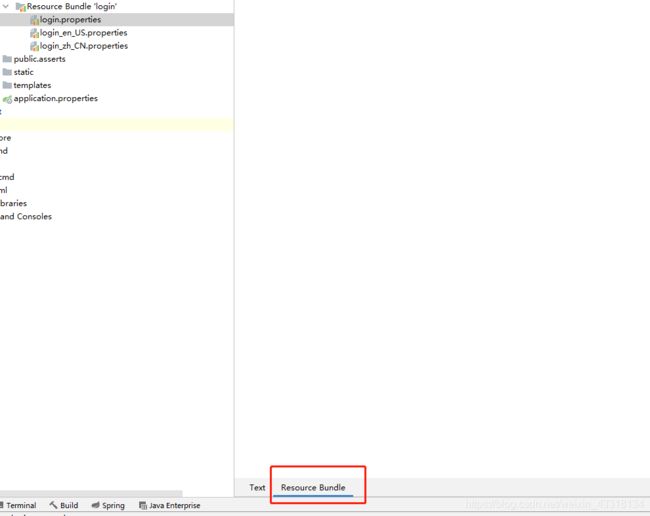
3)新建login_zh_CN.properties文件,这时候idea工具会自动识别i18n目录为国际化目录,同时生成资源目录“Resource Bundle ‘login’”目录
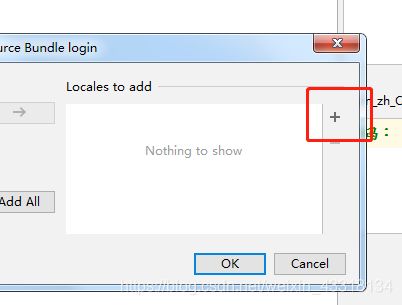
4)鼠标右键该目录,新建英文版的配置文件,如图:

在弹窗中点击加号,如图:
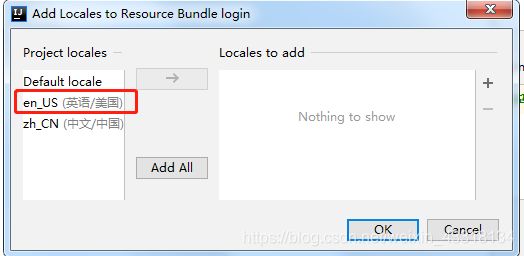
在输入框中输入需要国际化的语言,例如,如图:

点击ok,如图:
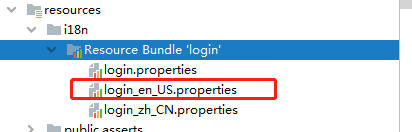
点击ok,在i18n目录下就生成了一个新的文件login_en_US.properties,如图:
5)添加国际化内容
鼠标单击login.properties文件,点击Resource Bundle,如图:
再点击加号,如图:
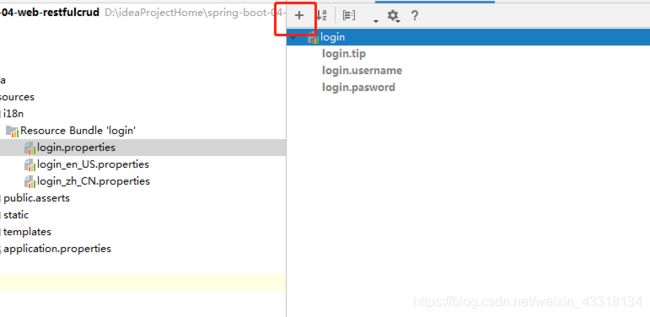
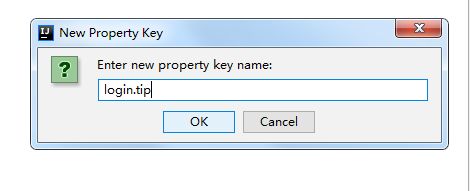
在弹窗中输入关键信息,如图:
点击ok,然后输入提示信息,如图:
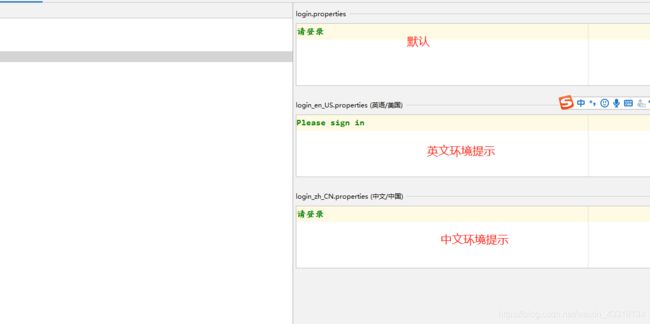
配置后最终效果如下:
2.1.2 配置国际化路径
在全局配置文件中配置如下代码
spring.messages.basename=i18n.login原理:SpringBoot自动配置好了管理国家化资源文件的组件
@Conditional({MessageSourceAutoConfiguration.ResourceBundleCondition.class})
@EnableConfigurationProperties
public class MessageSourceAutoConfiguration {
在MessageSourceAutoConfiguration.ResourceBundleCondition.class中有相关的配置,如图:
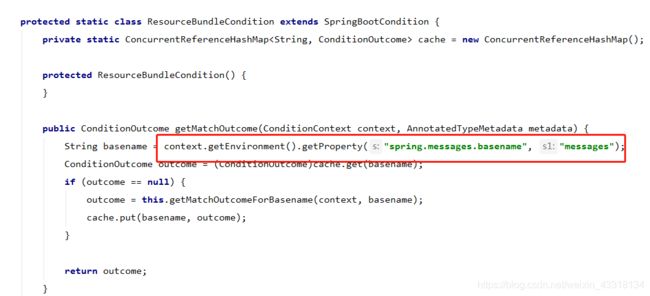
在该类中有个组件,用于设置国际化的基础路径
@Bean
public MessageSource messageSource(MessageSourceProperties properties) {
	ResourceBundleMessageSource messageSource = new ResourceBundleMessageSource();
	if (StringUtils.hasText(properties.getBasename())) {
	    // 设置国际化基础名(去掉语言国家代码的)
	    messageSource.setBasenames(StringUtils.commaDelimitedListToStringArray(StringUtils.trimAllWhitespace(properties.getBasename())));
	}

	if (properties.getEncoding() != null) {
	    messageSource.setDefaultEncoding(properties.getEncoding().name());
	}

	messageSource.setFallbackToSystemLocale(properties.isFallbackToSystemLocale());
	Duration cacheDuration = properties.getCacheDuration();
	if (cacheDuration != null) {
	    messageSource.setCacheMillis(cacheDuration.toMillis());
	}

	messageSource.setAlwaysUseMessageFormat(properties.isAlwaysUseMessageFormat());
	messageSource.setUseCodeAsDefaultMessage(properties.isUseCodeAsDefaultMessage());
	return messageSource;
}
2.1.3 页面获取国际化的值
在thymeleaf模板文件中,获取国际化的内容可以通过#{}的方式来获取
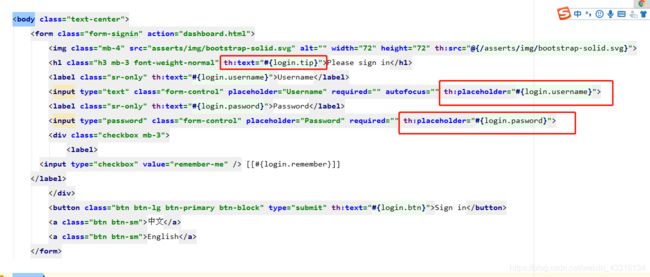
现在的效果是:浏览器语言是中文就显示中文,浏览器语言是英文就显示英文
2.2 选择国际化
我们现在希望可以用户点击中文显示中文,点击英文显示英文。前面我们的国际化是根据浏览器语言来完成的国际化,该实现的原理是通过自动配置类获取浏览器请求头中的区域语言信息来设置的,现在我们根据这个原理,只需要让boot在加载的时候,使用我们自己的区域解析器即可。这里用到了两个类国际化Locale(区域信息对象)和LocaleResolver(获取区域信息对象)
Boot在WebMvcAutoConfiguration中定义区域解析器定义如下:
@Bean
@ConditionalOnMissingBean
@ConditionalOnProperty(
    prefix = "spring.mvc",
    name = {"locale"}
)
public LocaleResolver localeResolver() {
    if (this.mvcProperties.getLocaleResolver() == org.springframework.boot.autoconfigure.web.servlet.WebMvcProperties.LocaleResolver.FIXED) {
	return new FixedLocaleResolver(this.mvcProperties.getLocale());
    } else {
	AcceptHeaderLocaleResolver localeResolver = new AcceptHeaderLocaleResolver();
	localeResolver.setDefaultLocale(this.mvcProperties.getLocale());
	return localeResolver;
    }
}
该解析器有个注解@ConditionalOnMissingBean,表示容器不存在LocaleResolver的时候,才执行该代码,所以我们只需要将自定义的区域解析器注入到容器中即可。
操作步骤:
2.2.1 自定义区域解析器
package com.bjc.commponent;

import lombok.val;
import org.springframework.util.StringUtils;
import org.springframework.web.servlet.LocaleResolver;

import javax.servlet.http.HttpServletRequest;
import javax.servlet.http.HttpServletResponse;
import java.util.Locale;

public class MyLoaderResolver implements LocaleResolver {
	@Override
	public Locale resolveLocale(HttpServletRequest request) {
		String code = request.getParameter("l");
		Locale local = Locale.getDefault();
		if(!StringUtils.isEmpty(code)){
			String[] codes = code.split("_");
			local = new Locale(codes[0],codes[1]);
		}
		return local;
	}

	@Override
	public void setLocale(HttpServletRequest httpServletRequest, HttpServletResponse httpServletResponse, Locale locale) {

	}
}
2.2.2 注册区域解析器到容器
@Bean
public LocaleResolver localeResolver(){
return new MyLoaderResolver();
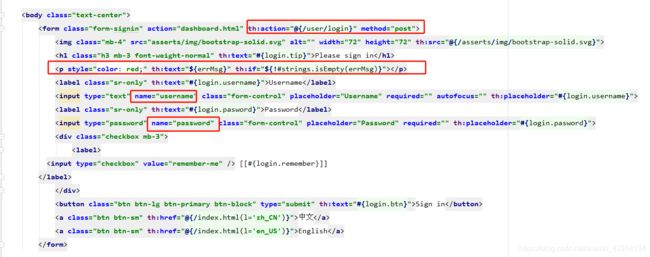
}2.2.3 修改页面链接
中文
English
2. 登录
2.1 控制层代码编写
package com.bjc.controller;

import org.springframework.stereotype.Controller;
import org.springframework.ui.Model;
import org.springframework.util.StringUtils;
import org.springframework.web.bind.annotation.PostMapping;

@Controller
public class UserController {
	@PostMapping(value="/user/login")
	public String login(Model model, String username, String password){
		if(!StringUtils.isEmpty(username) && !StringUtils.isEmpty(password) && "123456".equals(password)){
			return "dashboard";
		}
		model.addAttribute("errMsg","用户名或密码不正确!");
		return "login";
	}
}
2.2 设置模板引擎修改实时生效
2.2.1 禁用模板引擎缓存
spring.thymeleaf.cache=false2.2.2 页面修改完成以后ctrl+f9:重新编译
2.3 修改login.html文件
2.4 防止表单重复提交
我们在前台可以正确的实现登录功能,但是,当页面登录成功之后,刷新,表单会重复提交,我们可以使用重定向的方式来防止表单重复提交。
2.4.1 添加视图解析器
2.4.2 修改登录控制层
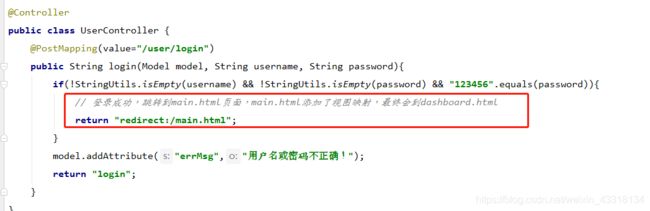
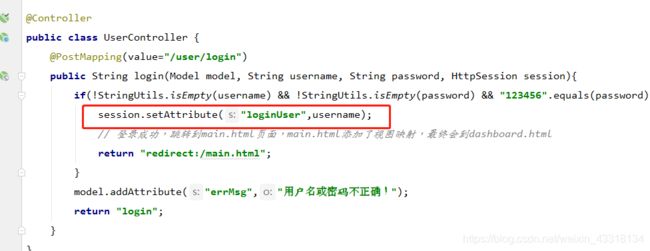
@Controller
public class UserController {
	@PostMapping(value="/user/login")
	public String login(Model model, String username, String password){
		if(!StringUtils.isEmpty(username) && !StringUtils.isEmpty(password) && "123456".equals(password)){
			// 登录成功,跳转到main.html页面,main.html添加了视图映射,最终会到dashboard.html
			return "redirect:/main.html";
		}
		model.addAttribute("errMsg","用户名或密码不正确!");
		return "login";
	}
}
2.5 登录拦截器
2.5.1 定义拦截器
package com.bjc.intecepter;

import lombok.val;
import org.springframework.web.servlet.HandlerInterceptor;

import javax.servlet.http.HttpServletRequest;
import javax.servlet.http.HttpServletResponse;

public class LoginInteceptor implements HandlerInterceptor {
	@Override
	public boolean preHandle(HttpServletRequest request, HttpServletResponse response, Object handler) throws Exception {
		Object loginUser = request.getSession().getAttribute("loginUser");
		if(null == loginUser){
			//未登陆,返回登陆页面
			request.setAttribute("errMsg","没有权限请先登陆!");
			request.getRequestDispatcher("/index.html").forward(request,response);
			return false;
		}
		return true;
	}
}
2.5.2 配置拦截器
在配置类中重写方法
public void addInterceptors(InterceptorRegistry registry) {
	registry
			.addInterceptor(new LoginInteceptor()) // 添加拦截器
			.addPathPatterns("/**")					// 指定拦截路径  /** 表示拦截所有请求
			.excludePathPatterns("/index.html","/","/user/login","/asserts/**","/webjars/**");					// 指定不需要拦截的路径
}
完整的配置类
package com.bjc.config;

import com.bjc.commponent.MyLoaderResolver;
import com.bjc.intecepter.LoginInteceptor;
import org.springframework.context.annotation.Bean;
import org.springframework.context.annotation.Configuration;
import org.springframework.web.servlet.LocaleResolver;
import org.springframework.web.servlet.config.annotation.InterceptorRegistry;
import org.springframework.web.servlet.config.annotation.ViewControllerRegistry;
import org.springframework.web.servlet.config.annotation.WebMvcConfigurerAdapter;

@Configuration
public class MyMvcConfig extends WebMvcConfigurerAdapter {

	/** 视图解析器 */
	@Override
	public void addViewControllers(ViewControllerRegistry registry) {
		// super.addViewControllers(registry);
		// 浏览器发送 /bjc 请求,跳转到success页面
		registry.addViewController("/bjc").setViewName("test");
	}

	@Bean
	public WebMvcConfigurerAdapter getWebMvcConfigurerAdapter(){
		/*WebMvcConfigurerAdapter web = new WebMvcConfigurerAdapter(){
			@Override
			public void addViewControllers(ViewControllerRegistry registry) {
				registry.addViewController("/").setViewName("login");
				registry.addViewController("/index.html").setViewName("login");
				registry.addViewController("/main.html").setViewName("dashboard");
			}
		};*/
		WebMvcConfigurerAdapter adapter = new WebMvcConfigurerAdapter(){
			@Override
			public void addInterceptors(InterceptorRegistry registry) {
				registry
						.addInterceptor(new LoginInteceptor()) // 添加拦截器
						.addPathPatterns("/**")					// 指定拦截路径  /** 表示拦截所有请求
						.excludePathPatterns("/index.html","/","/user/login","/asserts/**","/webjars/**");					// 指定不需要拦截的路径
			}

			@Override
			public void addViewControllers(ViewControllerRegistry registry) {
				registry.addViewController("/").setViewName("login");
				registry.addViewController("/index.html").setViewName("login");
				registry.addViewController("/main.html").setViewName("dashboard");
			}
		};
		return adapter;
	}

	@Bean
	public LocaleResolver localeResolver(){
		return new MyLoaderResolver();
	}
}
2.5.3 session添加loginUser
3. 员工列表展示
3.1 Controller层
@GetMapping("/emps")
public String list(Model model){
	Collection all = employeeDao.getAll();
	model.addAttribute("emps",all);
	return "emp/list";
}
3.2 前端列表展示
4. 员工添加
4.1 跳转到添加页面
4.1.1 controller
@GetMapping("/emp")
public String toAddEmp(Model model){
	Collection deps = departmentDao.getDepartments();
	model.addAttribute("deps",deps);
	return "emp/add";
}
4.1.2 页面
Dashboard Template for Bootstrap
4.2 保存数据
@PostMapping("/emp")
public String save(Employee employee){
	System.out.println(employee);
	employeeDao.save(employee);
	return "redirect:/emps";
}
注意:springboot中默认的日期格式是dd/mm/yyyy,我们需要更改我们自己的时间转换格式,只需要在application.properties配置文件中配置一下即可。
spring.mvc.format.date=yyyy-mm-dd5. 员工修改
5.1 跳转到编辑页面
5.1.1 controller
@GetMapping("/emp/{id}")
public String edit(@PathVariable("id") Integer id,Model model){
	Employee employee = employeeDao.get(id);
	model.addAttribute("emp",employee);
	Collection deps = departmentDao.getDepartments();
	model.addAttribute("deps",deps);
	return "emp/add";
}
5.1.2 页面
复用add.html页面做一些修改即可
注意:修改需要发送Put请求,但是form表单支持的提交方式只有get和POST两种方式,为此,我们需要更改提交方式
发送Put请求的操作步骤:
1)SpringMVC中配置HiddenHttpMethodFilter;(SpringBoot自动配置好的)
2)页面创建一个post表单
3)创建一个input项,name="_method";值就是我们指定的请求方式
例如:
完整的页面
Dashboard Template for Bootstrap
5.2 保存
@PutMapping("/emp")
public String updateEmp(Employee employee){
	employeeDao.save(employee);
	return "redirect:/emps";
}
6. 员工删除
6.1 controller
@DeleteMapping("/emp/{id}")
public String delEmp(@PathVariable("id") Integer id){
	employeeDao.delete(id);
	return "redirect:/emps";
}
6.2 前端
1)修改删除按钮
2)添加form表单,修改请求方式为delete
3)js提交表单
注意:SpringBoot 2.x默认不支持==put,delete等请求方式的。所以,该请求会在后台打印如下信息
Resolved [org.springframework.web.HttpRequestMethodNotSupportedException: Request method 'DELETE' not supported]解决办法:启用hiddenMethod过滤器
# 启用hiddenMethod过滤器
spring.mvc.hiddenmethod.filter.enabled=true