 请选择
请选择
一些vue功能和css样式
目录
跳转传参
分页
element 的 Select 选择器实现懒加载
css文本内容超出显示省略号
设置<table>表格固定列宽
点击加载更多数据
美化滚动条,可以直接复制粘贴
swiper技巧:定义属性判断是否触发轮播图(代码没用,记思路)
element表单验证
自制表单验证
element ui下拉框实现默认选择
点击此元素的以外元素自动隐藏此元素编辑
解决父组件与子组件数据不同步问题
切换分类
多选卡片
配合日历组件传递选中时间
时间转换,毫秒转为时间
内阴影
css缓慢执行hover
鼠标移上变色(切换图片)
el-select下拉框懒加载实现
用正则查找并替换字符串中文字
图片撑起的高度比盒子小
防止图片挤压变形
图片居中显示,超出部分隐藏
选取子元素
vue Element canvas画图
跳转传参
跳转时,路径前面最好加上一个 “ / ”,这样即使写了多个跳转也不会因路径拼接错误而跳转 404
。。。
editBooth(id) {
this.$router.push('/model-select?id=' + id + '&path=' + 0)
},
。。。
// 普通跳转
this.$router.push('/catalogue/' + this.curCategory)
// 判断跳转
checkModelJump() {
if (this.curCategory !== this.modelNameData[0].manualId) {
return
} else {
this.$router.push('/catalogue/' + this.curCategory)
}
},
分页
element 的 Select 选择器实现懒加载
html
data数据
// 分页
page: {
num: 1,
size: 10
},
liveArr: [],//所有直播间数据
自定义指令(与methods同级)
// 懒加载自定义指定
directives: {
"el-select-lazyloading": {
bind(el, binding) {
let SELECT_DOM = el.querySelector(
".el-select-dropdown .el-select-dropdown__wrap"
);
SELECT_DOM.addEventListener("scroll", function () {
let condition =
this.scrollHeight - this.scrollTop <= this.clientHeight;
if (condition) {
binding.value();
}
});
},
},
},
方法
methods: {
// 下拉框懒加载
lazyloading() {
this.page.num++;
this.getLiveList();
},
// 获取直播间列表 (这里我封装了请求接口,只要能获取直播间列表即可)
getLiveList() {
// clearTimeout(this.time);
getLiveList({
pageNo: this.page.num,
pageSize: this.page.size
}).then(res => {
if(this.page.num == 1){
this.liveArr = res.data.datas;
}else{
this.liveArr = [...this.liveArr, ...res.data.datas];
}
this.pageCount = res.data.pageCount;
})
},
}
css文本内容超出显示省略号
// 单行文本
p{
overflow: hidden;/*超出部分隐藏*/
text-overflow:ellipsis;/* 超出部分显示省略号 */
white-space: nowrap;/*规定段落中的文本不进行换行 */
width: 250px;/*需要配合宽度来使用*/
}
// 多行文本
p{
display: -webkit-box;
-webkit-box-orient: vertical;
-webkit-line-clamp: 3;
overflow: hidden;
width: 250px;
}
设置<table>表格固定列宽
给table设置宽度并且超出文字用省略号显示
要给table设置宽度,然后给td分别设置宽度,最后在css中写隐藏并显示省略号即可
李四
张三张三张三张三张三张三张三张三张三张三张三张三张三张三张三张三张三张三张三张三张三张三
李四
张三张三张三张三张三张三张三张三张三三张三张三
李四
张三张三张张三张三张三张三张张三张三
td{
white-space:nowrap;
overflow:hidden;
text-overflow: ellipsis;
}
点击加载更多数据
// 点击加载更多
点击加载更多
没有更多了
。。。。
data() {
return {
// 数据
page: {
// 默认每页10条数据
pageSize: 11,
// 默认展示第一页
pageIndex: 1
},
// 没有数据时为false
disable: false
}
},
。。。
// 逻辑代码
methods: {
// 点击加载更多,给后台传后一页的数据,并调用
loadMore() {
this.page.pageSize += 1
this.page.pageIndex += 1
this.getQueryMyBooth()
},
// 获取数据
getQueryMyBooth() {
// 请求数据
getQueryMyBooth({
// 给后台传当前页
pageNo: this.page.pageIndex,
// 给后台传每页条数
pageSize: this.page.pageSize,
// 除了第一页,其他页请求数据时传-1
pageOffset: this.page.pageIndex === 1 ? 0 : -1
})
.then((res) => {
// 分页数据
this.page = res.data
console.log(this.page)
// 循环追加数据,concat是合并数组
this.boothCard = this.boothCard.concat(res.data.datas.map((item) => {
// console.log(item)
// const splitstr = item.boothBanner.split(',')
const bannerList = [
'https://weshape-dev-1302217173.cos.ap-beijing.myqcloud.com/model/0/banner1.png',
'https://weshape-dev-1302217173.cos.ap-beijing.myqcloud.com/model/0/banner2.png',
'https://weshape-dev-1302217173.cos.ap-beijing.myqcloud.com/model/0/banner3.png'
]
item.boothBanner = item.boothBanner
? item.boothBanner.split(',')
: bannerList
item.choose = false
item.showBannerOrNo = false
// 右下角完成进度角标
// item.finish = false
// if (item.progress < 31) {
// item.finish = true
// }
return item
}))
// $nextTick 是在下次 DOM 更新循环结束之后执行延迟回调,在修改数据之后使用$nextTick,则可以在回调中获取更新后的 DOM。
this.$nextTick(() => {
console.log(res.data.totalCount)
console.log(this.boothCard.length)
if (res.data.totalCount === this.boothCard.length) {
this.disable = true
}
})
})
.catch()
},
}
美化滚动条,可以直接复制粘贴
/* 隐藏滚动条 */
.element {
width: 100%;
height: 72px;
box-sizing: border-box;
padding-top: 16px;
overflow-x: scroll; /* 设置溢出滚动 */
white-space: nowrap;
overflow-y: hidden;
/* 隐藏滚动条 */
scrollbar-width: none; /* firefox */
-ms-overflow-style: none; /* IE 10+ */
}
.element::-webkit-scrollbar {
display: none; /* Chrome Safari */
}
/*定义滚动条高宽及背景 高宽分别对应横竖滚动条的尺寸*/
::-webkit-scrollbar{
width: 7px;
height: 7px;
background-color: #F5F5F5;
}
/*定义滚动条轨道 内阴影+圆角*/
::-webkit-scrollbar-track {
box-shadow: inset 0 0 6px rgba(0, 0, 0, 0.3);
-webkit-box-shadow: inset 0 0 6px rgba(0, 0, 0, 0.3);
border-radius: 10px;
background-color: #F5F5F5;
}
/*定义滑块 内阴影+圆角*/
::-webkit-scrollbar-thumb{
border-radius: 10px;
box-shadow: inset 0 0 6px rgba(0, 0, 0, .1);
-webkit-box-shadow: inset 0 0 6px rgba(0, 0, 0, .1);
background-color: #c8c8c8;
}
swiper技巧:定义属性判断是否触发轮播图(代码没用,记思路)
使用swiper时做了一个鼠标放在轮播图上自动轮播的效果,点击跳转时滚动条会跑到上面去,鼠标会触发轮播图,但是页面跳转后swiper就被销毁了,所以会报找不到swiper的错误,解决方法是定义一个属性来判断是否触发轮播图
。。。。。。
data() {
return {
swiperDisable: false
}
}
// 我的展台点击跳转编辑
editBooth(modelId, boothId) {
// 跳转给属性赋值为真,让鼠标划入轮播图不触发轮播
this.swiperDisable = true
this.$router.push(
'/model-select?modelId=' + modelId + '&boothId=' + boothId
)
},
// 鼠标移入展示卡片banner
showBanner(item, index) {
// 如果属性为真那么返回return 不触发
if (this.swiperDisable) return
if (this.showNow === true) {
// 鼠标离开,轮播图隐藏或停止
item.showBannerOrNo = false
} else {
// 鼠标进入,轮播图显示或开启
item.showBannerOrNo = true
this.$refs['mySwiper2' + index][0].$swiper.slideNext(1000, true)
this.$refs['mySwiper2' + index][0].$swiper.autoplay.start()
}
},
// 鼠标移出隐藏卡片banner
hideBanner(item, index) {
// 如果属性为真那么返回return 不触发
if (this.swiperDisable) return
item.showBannerOrNo = false
this.$refs['mySwiper2' + index][0].$swiper.autoplay.stop()
this.$refs['mySwiper2' + index][0].$swiper.slideTo(0, 1000, true)
},
element表单验证
 。。。。。。
onAddTag(item) {
// 这里和官网写的不太一样
this.$refs['ruleForm'].validate((valid) => {
if (valid) {
// 成功后做什么
addUsertag(item).then(res => {
if (res.status == "SUCCESS") {
this.$message({
type: 'success',
message: '添加标签成功'
})
this.options.push(item)
this.getTagList();
}
})
} else {
return false;
}
});
},
自制表单验证
长度不超过 32 个字
。。。。。。
data() {
return {
error: false
}
},
。。。。。。
check() {
var error = false
if(this.inputValue.length>32){
error = true
} else if (this.inputValue.length === 0){
this.$message("内容不能为空")
error = true
}else{
error = false
}
this.error = error
return error
}
element按钮组件根据条件隐藏
:disabled="role == '112'" // 根据条件禁用按钮
:style="{visibility:(role == '112') ? 'hidden' : 'visible'}" // 根据条件隐藏按钮
创建
element ui下拉框实现默认选择
html
v-model 中的 value 是默认选中值
数据
data() {
return {
value:''
}
},
created() {
// 给data赋值
this.data = this.$route.query.item
// 进入页面默认选中data中的需要选中的数据名称
this.value = this.data.liveInfoTheme
}
点击此元素的以外元素自动隐藏此元素
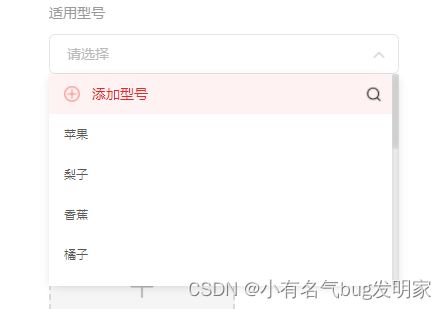
{{ item.label }}
 请选择
请选择

-
 添加型号
添加型号

-
{{ item.label }}

。。。。。。
data() {
return {
visible: false,
}
},
methods: {
// 点击其他地方隐藏下拉列表
selsctShow() {
var that = this;
this.visible = true;
function emojiDisShow(){
//改变数据 重要的是在body上绑定事件, 让数据变成false, 最重要的是阻止点击emoji标签时候禁止冒泡到body上,所以用stop,
that.visible = false;
document.body.removeEventListener('click',emojiDisShow)//消失后,为了性能,取消body这个事件就可以了
}
document.body.addEventListener('click',emojiDisShow);
},
// 点击输入框也隐藏
clickbox() {
this.visible = !this.visible
}
}
解决父组件与子组件数据不同步问题
当父组件的数据已经消失但子组件旧数据依然存在,可以在父组件中将子组件销毁,这样每次打开都是空白的
比如父组件调用子组件的输入框,父组件已经将输入框的信息删除,但是下次打开输入框时,子组件输入框信息依然存在,就可以在父组件中判断,一旦弹窗消失则整个子组件销毁
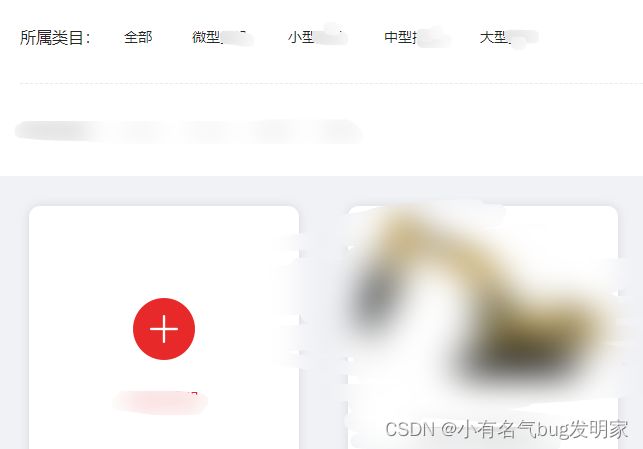
切换分类
{{item.name}}
data() {
return {
categoryData: [
{
index: 0,
name: '全部'
}, {
index: 0,
name: '微型'
}, {
index: 0,
name: '小型'
}, {
index: 0,
name: '中型'
}, {
index: 0,
name: '大型'
}
],
curCategory: 0, // 选中第几个分类
productClassId: '', // 分类id
className: '', // 选中的class
mescrollUp: {
page: {
num: 0,
size: 20
},
callback: this.getProductList,
auto: true,
htmlNodata: '-- 无更多数据 --
',
scrollbar: false
}
}
}
methods: {
// 切换分类
changeNav(val, index) {
// 点击分类时做的事
this.curCategory = index
// console.log(this.curCategory)
if (val.className !== '全部') {
this.className = val.className
this.productClassId = val.productClassId
} else {
this.productClassId = ''
}
this.mescrollUp.page = {
num: 1,
size: 20
}
var page = {
num: 1,
size: 20
}
this.getProductList(page) // 给后端传值
// this.$forceUpdate()
}
}
.active {
padding: 0 12px;
background: #FF0002;
color: #fff;
}
多选卡片
想要点击哪个卡片选中哪个卡片的功能,用图片来模拟选中状态,在接口返回的数据中给每个卡片循环添加一个属性,用这个属性的 true 和 false 来判断是否选中

// 导入api
import { gitManualTable } from '../../../src/api/dashboard'
data() {
return {
manualData: [], // 数据表
}
},
methods: {
// 获取所有手册
gitManualTableData() {
gitManualTable({}).then((res) => {
// 循环追加数据
this.manualData = res.data.map((item) => {
item.select = false
return item
})
// this.manualData = res.data
})
},
// 是否点击选中卡片按钮
click_select(val, id) {
// 1.找到点击的那个项
var index = this.manualData.findIndex(item => item.manualId === id)
// 2.修改选中属性
val['select'] = !val['select']
// 3. splice可以触发视图更新
this.manualData.splice(index, 1, val)
},
// 编辑
edit() {
// 编辑时,取消所有卡片选中状态
this.manualData.filter((item) => {
item.select = false
})
},
}
第二种方法
可以将所有选中的卡片的id放进一个数组中,这样后续操作很方便
// 是否点击选中卡片按钮
click_select(val, id) {
// 在 selectManual 中找这个 id,如果没有返回-1则表示有该 id,那么就把这个 id 删掉
if (this.selectManual.indexOf(id) !== -1) {
// 用 indexOf 找到这个 id 的位置,然后删除
this.selectManual.splice(this.selectManual.indexOf(id), 1)
} else {
// 如果数组中没有这个id则加进去
this.selectManual.push(id)
}
// 1.找到点击的那个项
// var index = this.manualData.findIndex(item => item.manualId === id)
// // 2.修改选中属性
// val['select'] = !val['select']
// // 3. splice可以触发视图更新
// this.manualData.splice(index, 1, val)
// // console.log(index)
// // console.log(val)
},
配合日历组件传递选中时间
今日
昨日
7日
30日
查询
data() {
return {
time: 0
}
}
。。。
methods: {
selectTime(time) {
this.time = time
this.$message(String(time))
},
// 转换日期格式
formatDateValue(now) {
var year = this.dateZero(now.getFullYear()) // 取得4位数的年份
var month = this.dateZero(now.getMonth() + 1) // 取得日期中的月份,其中0表示1月,11表示12月
var date = this.dateZero(now.getDate()) // 返回日期月份中的天数(1到31)
var hour = this.dateZero(now.getHours()) // 返回日期中的小时数(0到23)
var minute = this.dateZero(now.getMinutes()) // 返回日期中的分钟数(0到59)
var second = this.dateZero(now.getSeconds()) // 返回日期中的秒数(0到59)
return year + '-' + month + '-' + date + ' ' + hour + ':' + minute + ':' + second
},
// 日期前面加0
dateZero(time) {
if (time < 10) {
time = '' + '0' + time
}
return time
},
// 开始查询手册信息
select() {
// this.$message('开始查询' + String(this.time))
this.getManualAccess({
manualId: this.value,
beginDate: this.formatDateValue(new Date(this.time[0])),
endDate: this.formatDateValue(new Date(this.time[1]))
})
},
// 获取手册统计接口
getManualAccess(data) {
// 给接口传值,需要传id,开始时间与结束时间
manualAccess(data).then((res) => {
this.manualAccessData = res.data
})
}
}
时间转换,毫秒转为时间
使用时只需要调用方法即可
time = this.timeChange(数字)
timeChange(data) {
let value = data
let hour, minute, second
if (value >= 3600) {
hour = Math.floor(value / 3600)
minute = Math.floor((value - hour * 3600) / 60)
second = value - hour * 3600 - minute * 60
} else if (value >= 60) {
hour = 0
minute = Math.floor(value / 60)
second = value - minute * 60
} else {
hour = 0
minute = 0
second = value
}
hour = hour >= 10 ? hour : '0' + hour
minute = minute >= 10 ? minute : '0' + minute
second = second >= 10 ? second : '0' + second
value = `${hour}:${minute}:${second}`
return value
},
内阴影
div: {
box-shadow: inset 2px -21px 44px 9px rgba(255,255,255,1);
}
css缓慢执行hover
.cardBox {
width: 100%;
height: 420px;
cursor: pointer;
transition: all 0.1s linear 0.1s; // 缓慢恢复
}
.cardBox:hover {
margin-top: -6px;
box-shadow: 0 10px 20px 0 rgba(12, 22, 52, 0.1); // 缓慢执行
transition: all 0.1s linear 0.1s;
}
多行文字溢出隐藏
.cardTitle2 {
display: -webkit-box;
ovefrlow: hidden;
text-overflow: ellipsis;
-webkit-line-clamp: 2; //多行在这里修改数字即可
-webkit-box-orient: vertical;
}
鼠标移上变色(切换图片)
![]() downLoadFn(e, item.projectId)}
className="downLoad downLoadBlue"
src={require('../../assets/dashboard/downLoadBlue.png')}
/>
downLoadFn(e, item.projectId)}
className="downLoad downLoadBlue"
src={require('../../assets/dashboard/downLoadBlue.png')}
/>
![]() downLoadFn(e, item.projectId)}
className="downLoad downLoadGrey"
src={require('../../assets/dashboard/downLoad.png')}
/>
.downLoadBox {
width: 40px;
height: 40px;
margin: 30px auto 0 auto;
.downLoad {
width: 100%;
height: 100%;
cursor: pointer;
}
.downLoadBlue {
display: none;
}
}
.downLoadBox:hover {
.downLoadGrey {
display: none;
}
.downLoadBlue {
display: block;
}
}
downLoadFn(e, item.projectId)}
className="downLoad downLoadGrey"
src={require('../../assets/dashboard/downLoad.png')}
/>
.downLoadBox {
width: 40px;
height: 40px;
margin: 30px auto 0 auto;
.downLoad {
width: 100%;
height: 100%;
cursor: pointer;
}
.downLoadBlue {
display: none;
}
}
.downLoadBox:hover {
.downLoadGrey {
display: none;
}
.downLoadBlue {
display: block;
}
}
el-select下拉框懒加载实现
要通过自定义指令来实现,自定义指令和data、created等同级
。。。
data() {
return {
options: [], // 选择器数据
// 分页(懒加载使用)
listData: {
limit: 10,
page: 0
},
totalCount: true // 判断是否还有未加载出来数据的属性
}
},
// 懒加载自定义指令
directives: {
'el-select-lazyloading': {
bind(el, binding) {
binding.value()
var SELECT_DOM = el.querySelector(
'.el-select-dropdown .el-select-dropdown__wrap'
)
SELECT_DOM.addEventListener('scroll', function () {
var condition =
this.scrollHeight - this.scrollTop <= this.clientHeight
if (condition) {
binding.value()
}
})
}
}
},
methods: {
// 懒加载
knowledgeLazyLoading() {
// 如果 totalCount=true 说明还有未加载数据
if (this.totalCount === true) {
this.listData.page++
this.getKnowledgeData()
}
},
// 获取知识点
getKnowledgeData() {
getKnowledge({
pageNo: this.listData.page,
pageSize: this.listData.limit
}).then(res => {
this.options = this.options.concat(res.data.datas)
// 如果接口返回的所有长度等于现有长度,那么让 totalCount=false 停止请求
if (res.data.totalCount === this.options.length) {
this.totalCount = false
}
// 第一次进入页面时候,默认选中id为第一个,同时请求下方图表
if (this.listData.page === 1) {
this.value = res.data.datas[0].knowledgeId
// 下方图表
this.getTotalQueryKnowledgeAccessDataFn({
knowledgeId: this.value,
beginDate: '',
endDate: ''
})
}
}).catch(err => {
this.$message.error('出错了' + err)
})
},
// 知识点总统计
getTotalQueryKnowledgeAccessDataFn(data) {
getQueryKnowledgeAccess(data).then((res) => {
this.totalQueryKnowledgeAccessData = res.data
})
},
用正则查找并替换字符串中文字
实现:如果这个字符串中包含括号中的文字,那么就被替换为 ‘ ’
注意:必须是字符串才可以,/g是全局查找
// 获取
queryManualRegionAccessFn(data) {
queryManualRegionAccess(data).then((res) => {
res.data.forEach(item => {
item.address = item.address.toString().replace(/查找替换字|查找替换字/g, '')
})
this.queryManualRegionAccessData = res.data
})
},
图片撑起的高度比盒子小
可以给父盒子加“font-size: 0;”
防止图片挤压变形
img {
width: 100%;
height: 100%;
object-fit: cover;
}
图片居中显示,超出部分隐藏
.imgBox{
max-width: 582px;
width: 580px;
padding: 1px;
overflow: hidden;
font-size: 0;
display: flex;
flex-direction: column;
justify-content: center;
align-items: center;
img {
width: 100%;
}
}
选取子元素
// 选择第2个元素
.imgBox:nth-child(2){
width: 581px;
}
// 选择第3个以后的所有元素
.imgBox:nth-child(n + 3){
width: 290px;
height: 290px;
}
// 选择前4个元素
.imgBox:nth-child(-n + 4){
width: 193px;
height: 193px;
}
// 选择偶数元素
.imgBox:nth-child(2n){
width: 387px;
height: 387px;
}
// 选择奇数元素
.imgBox:nth-child(2n+1){
width: 387px;
height: 387px;
}
// 选择第3个和第6个元素 注意先后顺序,选中的是3456元素
.imgBox:nth-child(-n + 6):nth-child(n + 3){
width: 193px;
height: 193px;
}
vue Element canvas画图
canvas的drawImage的参数
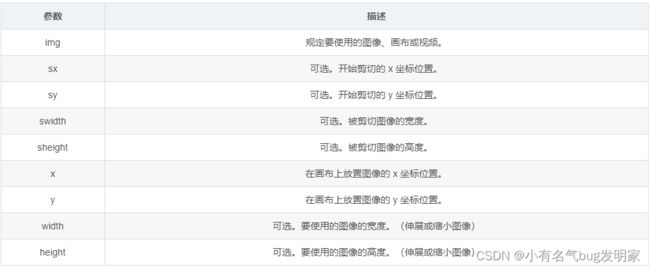
drawImage() 方法用于在canvas画布上绘制图像、画布或视频。
context.drawImage(img,sx,sy,swidth,sheight,x,y,width,height);
drawImage方法的参数数量只能是3,5,9
1、参数数量为3时
img、x、y为必填参数
x、y为在canvas画布上的起始坐标点,默认使用整个canvas画布
2、参数数量为5时
参数依次为img、x、y、width、height
width和height为要绘制的canvas画布的长宽
3、参数数量为9时
所有参数都使用
所绘制的图像源的起始坐标、长宽
案例
// dom部分
// js部分
// 画图
drowCanvas() {
const myCanvas = this.$refs.myCanvas
//画布的宽高
const Cwidth = 220
const CHeight = 330
// 创建一个画布上绘图的环境
var ctx = myCanvas.getContext('2d')
// 画布的最底端-这样就可以有个背景颜色
ctx.fillStyle = '#fff'
ctx.fillRect(0, 0, Cwidth * 2, CHeight * 2)
// 创建图片对象
const imgObj = new Image()
const qcode = new Image()
// 设置图片的src
imgObj.src = this.spuImg// this.extensionInfo.img
qcode.src = this.qcode
// 解决域名跨域问题
imgObj.setAttribute("crossOrigin",'Anonymous')
// 获取到图片在进行绘制
imgObj.onload = () => {
//
ctx.drawImage(imgObj, 0, 0, Cwidth * 2, 220 * 2)
ctx.fillStyle = '#DD212D'
ctx.font = 'normal bold 26px Arial,sans-serif '
ctx.fillText( '¥' , 10 * 2, 270 * 2)
ctx.fillStyle = '#DD212D'
ctx.font = 'normal bold 36px Arial,sans-serif '
ctx.fillText(this.extensionInfo.origin_price, 18 * 2, 276 * 2)
ctx.fillStyle = '#969799'
ctx.font = '20px Arial'
this.drawtext(ctx,this.extensionInfo.name,10 * 2,280 * 2,130 * 2)
ctx.drawImage(qcode, 155 * 2, 250 * 2, 55 * 2, 55 * 2)
ctx.fillStyle = '#969799'
ctx.font = '16px Arial'
ctx.fillText( '长按识别二维码', 155 * 2, 310 * 2)
// 生成图片(图片的格式)
this.imageUrl = myCanvas.toDataURL('image/png', 1.0)
}
},
// 下载图片地址和图片名
downloadImagge(src, name) {
const image = new Image()
// 解决跨域 Canvas 污染问题
image.setAttribute('crossOrigin', 'anonymous')
image.onload = function() {
const canvas = document.createElement('canvas')
canvas.width = image.width
canvas.height = image.height
const context = canvas.getContext('2d')
context.drawImage(image, 0, 0, image.width, image.height)
const url = canvas.toDataURL('image/png') // 得到图片的base64编码数据
const a = document.createElement('a') // 生成一个a元素
const event = new MouseEvent('click') // 创建一个单击事件
a.download = name || 'photo' // 设置图片名称
a.href = url // 将生成的URL设置为a.href属性
a.dispatchEvent(event) // 触发a的单击事件
}
image.src = src
},
自己优化后代码
// 画图
drowCanvas() {
const myCanvas = this.$refs.myCanvas
//画布的宽高
const Cwidth = 1920
const CHeight = 1080
// 创建一个画布上绘图的环境
var ctx = myCanvas.getContext('2d')
// 创建图片对象
const imgObj = new Image()
// 设置图片的src
imgObj.src = this.form.coverImg
// 获取到图片在进行绘制
imgObj.onload = (e) => {
// 这里是最重要的尺寸
ctx.drawImage(imgObj, 0, (Cwidth - CHeight*(CHeight/Cwidth))/2, CHeight, CHeight*(CHeight/Cwidth), 0, 0, Cwidth, CHeight)
// 生成图片(图片的格式)
this.form.endImg = myCanvas.toDataURL('image/png', 1.0)
}
},
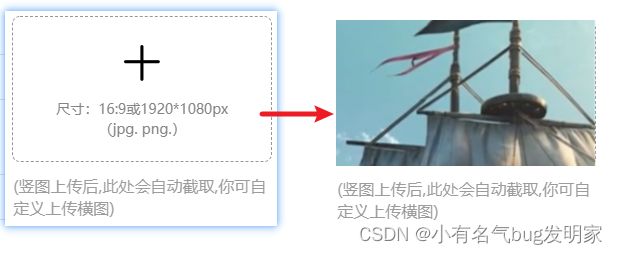
效果


