Sentinel使用Nacos存储限流规则
上篇的整合,不能完美地满足我们日常的生产需求。其中,非常重要的一点就是限流规则的持久化问题。接下来我们来说说Sentinel的规则持久化如何实现。
Sentinel自身就支持了多种不同的数据源来持久化规则配置,本文使用Spring Cloud Alibaba中整合的配置中心Nacos存储限流规则
Sentinel 改造
第一步,下载Sentinel 源代码 https://github.com/alibaba/Sentinel/archive/1.7.2.zip
,用intellij idea打开,然后对sentinel-dashboard模块做改造:
1、修改pom.xml
,找到:
  <dependency>
    <groupId>com.alibaba.cspgroupId>
    <artifactId>sentinel-datasource-nacosartifactId>
    <scope>testscope>
  dependency>
将
<dependency>
  <groupId>com.alibaba.cspgroupId>
  <artifactId>sentinel-datasource-nacosartifactId>

dependency>
2、修改java代码
找到
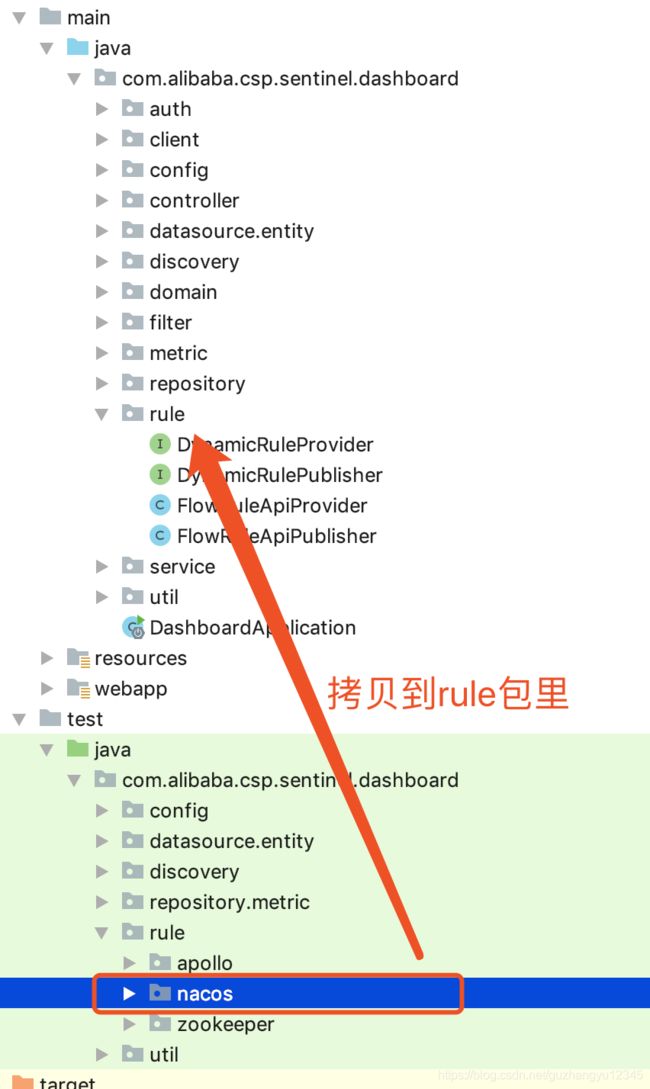
sentinel-dashboard/src/test/java/com/alibaba/csp/sentinel/dashboard/rule/nacos
目录,将整个目录拷贝到
sentinel-dashboard/src/main/java/com/alibaba/csp/sentinel/dashboard/rule/nacos
如图:

修改com.alibaba.csp.sentinel.dashboard.controller.v2.FlowControllerV2,找到
@Autowired
@Qualifier("flowRuleDefaultProvider")
private DynamicRuleProvider<List<FlowRuleEntity>> ruleProvider;
@Autowired
@Qualifier("flowRuleDefaultPublisher")
private DynamicRulePublisher<List<FlowRuleEntity>> rulePublisher;
修改为:
@Autowired
@Qualifier("flowRuleNacosProvider")
private DynamicRuleProvider<List<FlowRuleEntity>> ruleProvider;
@Autowired
@Qualifier("flowRuleNacosPublisher")
private DynamicRulePublisher<List<FlowRuleEntity>> rulePublisher;
3、修改页面
修改sentinel-dashboard/src/main/webapp/resources/app/scripts/directives/sidebar.html,找到:
将注释打开,即改为:
<li ui-sref-active="active">
  <a ui-sref="dashboard.flow({app: entry.app})">
    <i class="glyphicon glyphicon-filter">i>  流控规则 V1a>
li>
把流控规则改造成推模式持久化。
4、编译&启动
mvn clean package -DskipTests
在项目的target目录下找到sentinel-dashboard.jar,执行 java -jar sentinel-dashboard.jar 启动控制台
应用配置
第一步:在pom.xml中引入Sentinel模块和Nacos存储扩展:
<dependencies>
        <dependency>
            <groupId>org.springframework.bootgroupId>
            <artifactId>spring-boot-starter-webartifactId>
        dependency>

        <dependency>
            <groupId>org.springframework.cloudgroupId>
            <artifactId>spring-cloud-starter-alibaba-sentinelartifactId>
            <version>0.2.2.RELEASEversion>
        dependency>

        <dependency>
            <groupId>com.alibaba.cspgroupId>
            <artifactId>sentinel-datasource-nacosartifactId>
            <version>1.7.2version>
        dependency>
    dependencies>
第二步:在Spring Cloud应用中添加配置信息:
spring:
  application:
    name: demo-sentinel
  cloud:
    sentinel:
      transport:
        dashboard: localhost:8080
      datasource:
        ds:
          nacos:
            server-addr: localhost:8848
            data-id: ${spring.application.name}-sentinel
            group-id: DEFAULT_GROUP
            rule-type: flow

server:
  port: 8866
第三步:创建应用主类,并提供一个rest接口,比如:
@SpringBootApplication
public class TestApplication {

    public static void main(String[] args) {
        SpringApplication.run(TestApplication.class, args);
    }

    @Slf4j
    @RestController
    static class TestController {

        @GetMapping("/hello")
        public String hello() {
            return "didispace.com";
        }

    }

}
第四步:Nacos中创建限流规则的配置,比如:

其中,Data ID、Group就是上面第二步中配置的内容。配置格式选择JSON,并在配置内容中填入下面的内容:
[
    {
        "resource": "/hello",
        "limitApp": "default",
        "grade": 1,
        "count": 5,
        "strategy": 0,
        "controlBehavior": 0,
        "clusterMode": false
    }
]
可以看到上面配置规则是一个数组类型,数组中的每个对象是针对每一个保护资源的配置对象,每个对象中的属性解释如下:
- resource: 资源名,即限流规则的作用对象
- limitApp: 流控针对的调用来源,若为default则不区分调用来源
- grade: 限流阈值类型(QPS或并发线程数);0代表根据并发数量来限流,1代表根据QPS来进行限流控制
- count: 限流阈值
- strategy: 调用关系限流策略
- controlBehavior: 流量控制效果(直接拒绝、Warm Up、匀速排队)
- clusterMode: 是否为集群模式
这里我们只做简单的配置解释,以便于理解这里的配置作用。实际上这里还有非常多可配置选项和规则。
第五步:启动应用。
通过curl访问几下 localhost:8866/hello接口:
curl localhost:8866/hello
didispace.com
此时,在Sentinel Dashboard中就可以看到我们启动的demo-sentinel服务。点击左侧菜单中的流程规则,可以看到已经存在一条记录了,具体如下:

这条记录就是上面我们在Nacos中配置的限流规则。
测试
在完成了上面的整合之后,对于接口流控规则的修改就存在两个地方了: Sentinel控制台、Nacos控制台。
启动Nacos: http://localhost:8848
- 测试1:用Sentinel控制台推送流控规则,规则会存储到Nacos;
- 测试2:直接在Nacos上修改流控规则,然后刷新Sentinel控制台,控制台上的显示也会被修改;
- 测试3:重启Sentinel控制台,并重启微服务;刷新控制台,可以发现规则依然存在。