【换脸详细教程】手把手教你进行AI换脸:换脸流程及源码详解
目录
- 1. 换脸基本原理
- 2 人脸检测及可视化
- 3. 人脸轮廓点检测及可视化
- 4. 人脸图像变换--仿射变换
- 5. 生成遮罩并直接替换人脸
- 6. 人脸颜色校正
最近AI换脸貌似比较火爆,就稍微研究了一下相关了内容。AI换脸是一个娱乐性比较强的应用,这种错位感让人觉得非常有趣。很多人都以为这是什么黑科技,但这里想告诉大家,AI换脸其实很简单。只需要你会一点Python基础,就可以实现自己的AI换脸程序。
本文将详细介绍图片换脸的基本原理以及实际的换脸过程。感兴趣的小伙伴可以一起试试哦~所有内容均已经打包好,获取方式如下:
关注GZH:阿旭算法与机器学习,回复:“换脸”即可获取本文源码、测试文件等内容,欢迎共同学习交流
1. 换脸基本原理
为了做人脸相关的工作,首先我们需要获得人脸的轮廓点。通常轮廓点检测也被称为 Face Alignment。本文的AI换脸实现就是建立在68个人脸轮廓点(Landmarks)的基础之上。而 Face Alignment 必须依赖一个人脸检测器提供人脸位置的矩形框,即 Face Detection。也就是说,本文所介绍的换脸或者其他精细化人脸操作的基础是 Face Detection + Face Alignment。但是,这两个技术并不需要我们亲自开发,dlib已经提供了效果不错、使用简便的第三方库。
我们想要将源图像B中的人脸放置到目标图像A中,这就需要将B中的人脸变换到A中人脸所在位置,然后截取对应区域并替换。如上图所示,这一步骤可以由OpenCV支持完成。最后,由于两张图像的人脸可能存在光照、色相等方面的不一致,为了替换后更加逼真,所以需要对图像B的颜色进行一些调整。
2 人脸检测及可视化
目标检测(Object Detection)一直都是计算机视觉应用的基础,这也是每次出现新的目标检测算法总能引起很大轰动的原因。完成人脸相关的任务,那自然就是需要人脸检测了。dlib提供了一个人脸检测器,可以使用如下方式获取:
face_detector = dlib.get_frontal_face_detector()
对输入的两幅带有人脸的图像进行 Face Detection,就可以获得其中人脸位置的矩形框,代码如下:
# coding:utf-8
import os, sys
import numpy as np
import cv2, dlib

img1_path = 'imgs/2.jpg'
img2_path = 'imgs/1.jpg'

face_detector = dlib.get_frontal_face_detector()
img1 = cv2.imread(img1_path, cv2.IMREAD_COLOR)
img2 = cv2.imread(img2_path, cv2.IMREAD_COLOR)
face1 = face_detector(img1, 1)
face2 = face_detector(img2, 1)
print(face1, face2)
输出结果:
rectangles[[(171, 201) (438, 468)]] rectangles[[(171, 231) (438, 498)]]
fig = plt.figure(figsize=(9.6, 5.4))
plt.subplot(1,2,1)
plt.imshow(img1)
rect = face1[0]
plt.plot([rect.left(), rect.right(), rect.right(), rect.left(), rect.left()],
         [rect.top(), rect.top(), rect.bottom(), rect.bottom(), rect.top()])
plt.subplot(1,2,2)
plt.imshow(img2)
rect = face2[0]
plt.plot([rect.left(), rect.right(), rect.right(), rect.left(), rect.left()],
         [rect.top(), rect.top(), rect.bottom(), rect.bottom(), rect.top()])
plt.show()
3. 人脸轮廓点检测及可视化
此处直接使用dlib提供的模型文件shape_predictor_68_face_landmarks。下载解压之后,就可以使用以下代码载入
landmark_detector = dlib.shape_predictor(LANDMARK_MODEL_PATH)
关于dlib.shape_predictor更多的使用方法,可以访问官网的检测说明。对输入的这两幅图像检测人脸轮廓点的代码及检测效果如下:
LANDMARK_MODEL_PATH = os.path.expanduser('models/shape_predictor_68_face_landmarks.dat')
landmark_detector = dlib.shape_predictor(LANDMARK_MODEL_PATH)
pts1 = landmark_detector(img1, face1[0])
pts1 = np.array([[pt.x,pt.y] for pt in pts1.parts()])
pts2 = landmark_detector(img2, face2[0])
pts2 = np.array([[pt.x,pt.y] for pt in pts2.parts()])
fig = plt.figure(figsize=(9.6, 5.4))
plt.subplot(1,2,1)
plt.imshow(img1)
rect = face1[0]
plt.plot([rect.left(), rect.right(), rect.right(), rect.left(), rect.left()],
         [rect.top(), rect.top(), rect.bottom(), rect.bottom(), rect.top()])
plt.scatter(np.squeeze(pts1[:, 0]), np.squeeze(pts1[:, 1]), linewidths=1)
plt.subplot(1,2,2)
plt.imshow(img2)
rect = face2[0]
plt.plot([rect.left(), rect.right(), rect.right(), rect.left(), rect.left()],
         [rect.top(), rect.top(), rect.bottom(), rect.bottom(), rect.top()])
plt.scatter(np.squeeze(pts2[:, 0]), np.squeeze(pts2[:, 1]), linewidths=1)
plt.show()
4. 人脸图像变换–仿射变换
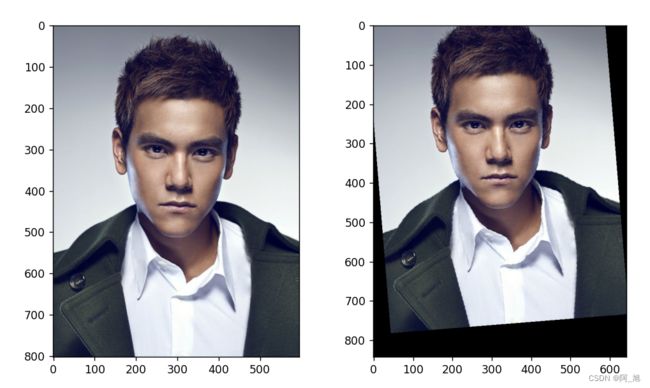
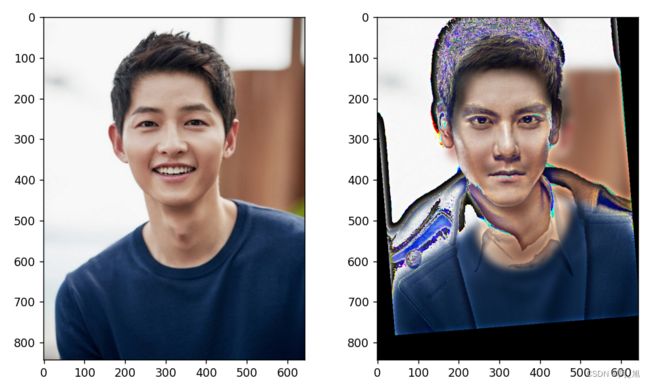
现在我们需要将上图中右边的人脸放到左边图像的人脸处,但很显然,两张人脸的大小和位置都不一样。无法直接操作,所以需要进行图像变换,才能将第二幅图中的人脸投影到第一幅中人脸的位置。
现在,我们已经得到了两张人脸上的landmark坐标,那么求解变换就不是一个很难的问题。第一,我们可以在这68个点中选择三个稳定的点构成3个匹配点对,然后利用OpenCV中的接口求解一个仿射变换矩阵。当然,这种方式会导致对轮廓点的利用率很低,而且结果常常不是太稳定。第二,我们可以假设一个特殊的仿射变换 —— 相似变换可以达到目的,那么就能够利用这68个点对完成普氏分析。其流程是,先计算缩放因子,然后求解一个旋转变换,最后再求解平移变换,这样就可以构成一个完整的相似变换,变换的代码与结果如下:
def compute_affine_param(pts1, pts2):
    pts1, pts2 = np.mat(pts1), np.mat(pts2)
    pts1, pts2 = pts1.astype(np.float64), pts2.astype(np.float64)
    # centrallize
    center1 = np.mean(pts1, axis=0)
    center2 = np.mean(pts2, axis=0)
    pts1 -= center1
    pts2 -= center2
    print()
    # normalize
    std1 = np.std(pts1)
    std2 = np.std(pts2)
    pts1 /= std1
    pts2 /= std2
    # compute rotation param by svd
    U, S, V = np.linalg.svd(pts1.transpose() * pts2)
    R = (U * V).transpose()
    # concat affine tranformation matrix
    tmp = (std2/std1)*R
    T = center2.transpose() - tmp*(center1.transpose())
#     print(T, tmp, T.shape, tmp.shape, center1.shape, center2.shape)
    affine = np.vstack([np.hstack([tmp, T]), np.matrix([0.0, 0.0, 1.0])])
    return affine
affine_params = compute_affine_param(pts1, pts2)

# 仿射变换
w_img2 = np.zeros(img1.shape, dtype=img2.dtype)
cv2.warpAffine(img2, affine_params[:2], (w_img2.shape[1], w_img2.shape[0]),
               dst=w_img2, flags=cv2.WARP_INVERSE_MAP, borderMode=cv2.BORDER_TRANSPARENT)

fig = plt.figure(figsize=(9.6, 5.4))
plt.subplot(1,2,1)
plt.imshow(img2)
plt.subplot(1,2,2)
plt.imshow(w_img2)
5. 生成遮罩并直接替换人脸
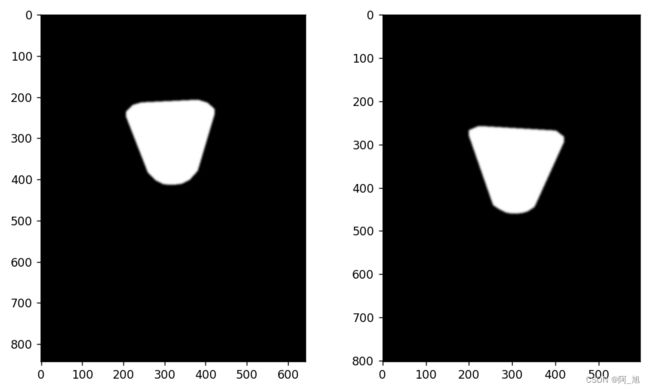
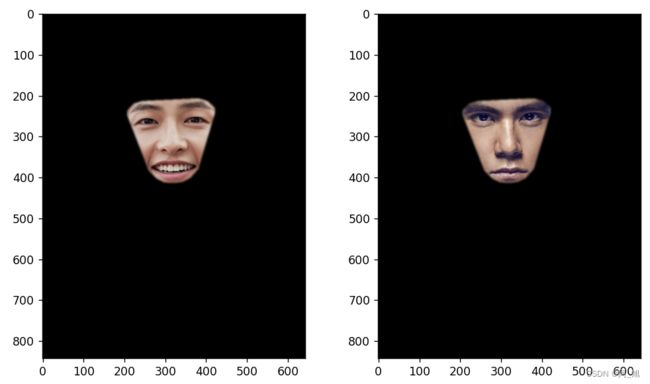
可以选择人脸的一些部位轮廓点生成遮罩,这里选择两只眼睛、眉毛、鼻子和嘴巴这几部分组成一个遮罩的区域。生成遮罩的算法可以直接调用OpenCV中的cv2.fillConvexPoly()函数完成。在两张原始图像上直接生成的遮罩思的代码与效果如下:
JAW_IDX = list(range(0, 17))
FACE_IDX = list(range(17, 68))
RIGHT_BROW_IDX = list(range(17, 22))
LEFT_BROW_IDX = list(range(22, 27))
NOSE_IDX = list(range(27, 35))
RIGHT_EYE_IDX = list(range(36, 42))
LEFT_EYE_IDX = list(range(42, 48))
MOUTH_IDX = list(range(48, 61))

COVER_IDX = [LEFT_BROW_IDX + RIGHT_EYE_IDX + LEFT_EYE_IDX
             + RIGHT_BROW_IDX + NOSE_IDX + MOUTH_IDX]
def get_mask(img_shape, pts):
    img = np.zeros(img_shape[:2], dtype=np.float64)
    for idx in COVER_IDX:
        cv2.fillConvexPoly(img, cv2.convexHull(pts[idx]), color=1)
    img = np.array([img, img, img]).transpose([1,2,0])
    img = (cv2.GaussianBlur(img, (13, 13), 0) > 0) * 1.0
    img = cv2.GaussianBlur(img, (13, 13), 0)
    return img

mask1 = get_mask(img1.shape, pts1)
mask2 = get_mask(img2.shape, pts2)
fig = plt.figure(figsize=(9.6, 5.4))
plt.subplot(1,2,1)
plt.imshow(mask1)
plt.subplot(1,2,2)
plt.imshow(mask2)
plt.show()
fig = plt.figure(figsize=(9.6, 5.4))
plt.subplot(1,2,1)
plt.imshow((mask1*img1).astype(np.uint8))
plt.subplot(1,2,2)
plt.imshow((mask2*img2).astype(np.uint8))
plt.show()
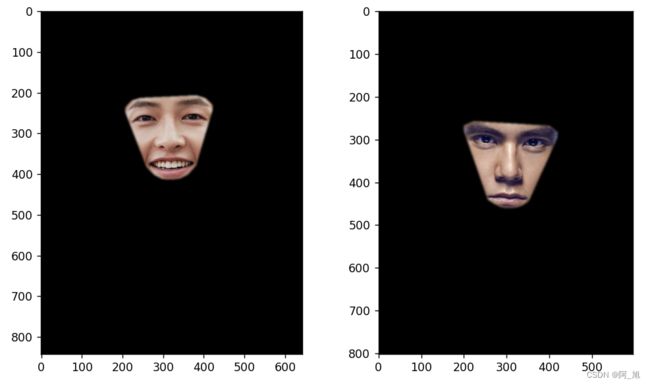
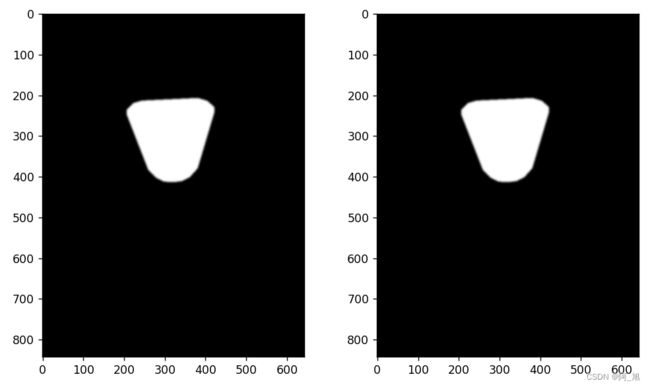
从上图中可以看出,这就是我们需要替换的区域,但是很明显,这样的遮罩是不能够直接使用的,因为人脸的位置没有对齐。所以需要对源人脸图像B的遮罩作上面已经求解的相似变换。然后对比图像A和warp图像B的遮罩,取并集形成一个统一的遮罩,这样就能保证遮罩操作的区域是在两幅图像中相同的位置。
目标图像A的遮罩与统一遮罩的对比效果图如下:
w_mask2 = np.zeros(img1.shape, dtype=img2.dtype)
cv2.warpAffine(mask2, affine_params[:2], (w_img2.shape[1], w_img2.shape[0]),
               dst=w_img2, flags=cv2.WARP_INVERSE_MAP, borderMode=cv2.BORDER_TRANSPARENT)
mix_mask = np.max([mask1, w_mask2], axis=0)
fig = plt.figure(figsize=(9.6, 5.4))
plt.subplot(1,2,1)
plt.imshow(mask1)
plt.subplot(1,2,2)
plt.imshow(mix_mask)
plt.show()
fig = plt.figure(figsize=(9.6, 5.4))
plt.subplot(1,2,1)
plt.imshow((mix_mask*img1).astype(np.uint8))
plt.subplot(1,2,2)
plt.imshow((mix_mask*w_img2).astype(np.uint8))
plt.show()
rough_dst_img = img1 * (1.0 - mix_mask) + w_img2 * mix_mask
fig = plt.figure(figsize=(9.6, 5.4))
plt.subplot(1,2,1)
plt.imshow(img1)
plt.subplot(1,2,2)
plt.imshow(rough_dst_img.astype(np.uint8))
plt.show()

从结果可以发现:人脸确实给替换上了,但是脸色就太诡异了。这种状况很常见,因为很难保证任意的两个人脸图像的光照、色相以及对比度等状况完全一致。因此需要对人脸图像B进行颜色调整。
6. 人脸颜色校正
这里使用一种比较简单的颜色平衡方法。矫正图像B的颜色之后,效果如下:
def adjust_color(img1, img2, pts, blur_factor=0.5):
    mean_le = np.mean(pts[LEFT_EYE_IDX], axis=0)
    mean_re = np.mean(pts[RIGHT_EYE_IDX], axis=0)
    blur_degree = int(blur_factor * np.linalg.norm(mean_le - mean_re))
    print(blur_degree)
    if blur_degree % 2 == 0:
        blur_degree += 1
    blur_img1 = cv2.GaussianBlur(img1, (blur_degree, blur_degree), 0)
    blur_img2 = cv2.GaussianBlur(img2, (blur_degree, blur_degree), 0)
    blur_img1 = blur_img1.astype(np.float64)
    blur_img2 = blur_img2.astype(np.float64)
    blur_img2 += (blur_img2 <= 1.0) * 128
    img2 = img2.astype(np.float64)
    return img2 * blur_img1 / blur_img2

adjust_img = adjust_color(img1, w_img2, pts1, blur_factor=0.5)
fig = plt.figure(figsize=(9.6, 5.4))
plt.subplot(1,2,1)
plt.imshow(img1)
plt.subplot(1,2,2)
plt.imshow(adjust_img.astype(np.uint8))
plt.show()
对颜色矫正之后的图像B使用已经生成的统一遮罩,并得到最终的换脸结果:
dst_img = img1 * (1.0 - mix_mask) + adjust_img * mix_mask
fig = plt.figure(figsize=(9.6, 5.4))
plt.subplot(1,2,1)
plt.imshow(img1)
plt.subplot(1,2,2)
plt.imshow(dst_img.astype(np.uint8))
plt.show()
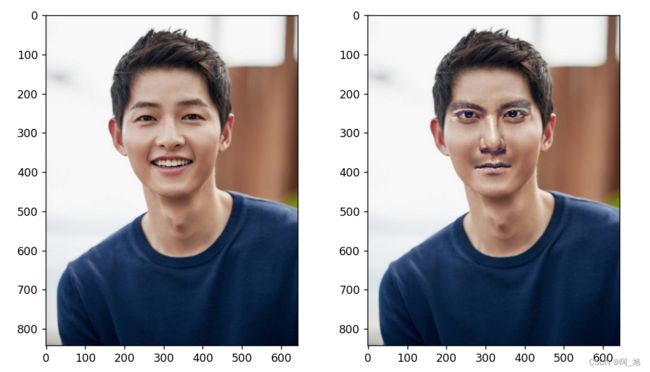
上面换脸的结果整体看起来只能说勉强凑活,比没进行颜色矫正后的结果好了一点。但是还是需要说明,这里使用的颜色平衡的方式仍然非常粗糙。如果想要让融合之后的效果更加逼真,可能需要考虑在这方面花费更多的功夫。
本文所有内容均已经打包好,获取方式如下:
关注下方GZH:【阿旭算法与机器学习】,回复:【换脸】
即可获取本文源码、测试文件等内容,欢迎共同学习交流
如果文章对你有帮助,感谢点赞+关注!
好啦,以上便是换脸的整个流程,小伙伴们一起实操起来吧,欢迎共同学习交流~
小伙伴们有什么想法欢迎评论区留言交流!


