Spring学习_day10
文章目录
- SSM整合
SSM整合
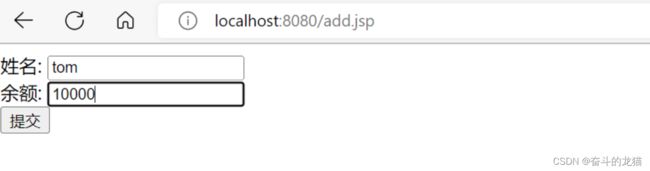
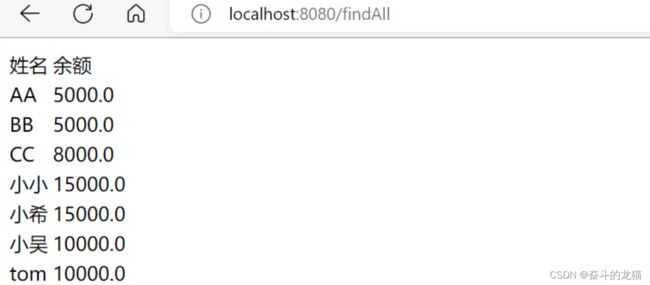
ssm就是spring + spring MVC + mybatis的首字母的组合。所以我们要整合三者进行测试。我们以下图为例,当来到添加页面的时候,添加Account成功之后,就会重定向到查询所有的Account的界面:
所以对应的步骤为:
-
导入对应的依赖
<dependency> <groupId>org.springframeworkgroupId> <artifactId>spring-contextartifactId> <version>5.3.20version> dependency> <dependency> <groupId>org.springframeworkgroupId> <artifactId>spring-txartifactId> <version>5.3.19version> dependency> <dependency> <groupId>org.aspectjgroupId> <artifactId>aspectjweaverartifactId> <version>1.9.6version> dependency> <dependency> <groupId>mysqlgroupId> <artifactId>mysql-connector-javaartifactId> <version>8.0.29version> dependency> <dependency> <groupId>org.mybatisgroupId> <artifactId>mybatisartifactId> <version>3.5.6version> dependency> <dependency> <groupId>org.mybatisgroupId> <artifactId>mybatis-springartifactId> <version>1.3.2version> dependency> <dependency> <groupId>junitgroupId> <artifactId>junitartifactId> <version>4.11version> dependency> <dependency> <groupId>log4jgroupId> <artifactId>log4jartifactId> <version>1.2.17version> dependency> <dependency> <groupId>com.github.pagehelpergroupId> <artifactId>pagehelperartifactId> <version> 3.5.0version> dependency> <dependency> <groupId>com.github.jsqlparsergroupId> <artifactId>jsqlparserartifactId> <version>0.9.5version> dependency> <dependency> <groupId>org.springframeworkgroupId> <artifactId>spring-webmvcartifactId> <version>5.3.8version> dependency> <dependency> <groupId>javax.servletgroupId> <artifactId>javax.servlet-apiartifactId> <version>3.1.0version> <scope>providedscope> dependency> <dependency> <groupId>javax.servlet.jspgroupId> <artifactId>jsp-apiartifactId> <version>2.1version> <scope>providedscope> dependency> <dependency> <groupId>taglibsgroupId> <artifactId>standardartifactId> <version>1.1.2version> dependency> <dependency> <groupId>javax.servletgroupId> <artifactId>jstlartifactId> <version>1.2version> dependency> <dependency> <groupId>c3p0groupId> <artifactId>c3p0artifactId> <version>0.9.1.2version> dependency> <dependency> <groupId>org.springframeworkgroupId> <artifactId>spring-jdbcartifactId> <version>5.3.10version> <scope>compilescope> dependency> -
创建实体类Account,对应于数据库中的account表
public class Account { private int id; private String name; private double balance; public int getId() { return id; } public void setId(int id) { this.id = id; } public String getName() { return name; } public void setName(String name) { this.name = name; } public double getBalance() { return balance; } public void setBalance(double balance) { this.balance = balance; } @Override public String toString() { return "Account{" + "id=" + id + ", name='" + name + '\'' + ", balance=" + balance + '}'; } } -
创建对应的接口AccountMapper,用于mybatis中用代理的方式来实现dao层的操作,这样就可以不需要再定义这个接口的实现类了
public interface AccountMapper { List<Account> findAll(); void insert(Account account); } -
创建对应的AccountService接口以及实现类AccountServiceImpl
public interface AccountService { List<Account> findAll(); void insert(Account account); }@Service("accountService") public class AccountServiceImpl implements AccountService { public List<Account> findAll() { List<Account> accountList = null; try { //读取核心配置文件 InputStream resource = Resources.getResourceAsStream("SqlConfig.xml"); //获取session工厂对象 SqlSessionFactory sqlSessionFactory = new SqlSessionFactoryBuilder().build(resource); //获取session会话对象 SqlSession sqlSession = sqlSessionFactory.openSession(true);//自动提交事务 //获取代理对象 AccountMapper accountMapper = sqlSession.getMapper(AccountMapper.class); //获取所有的account accountList = accountMapper.findAll(); //释放资源 sqlSession.close(); } catch (IOException e) { e.printStackTrace(); } return accountList; } public void insert(Account account) { try { //读取核心配置文件 InputStream resource = Resources.getResourceAsStream("SqlConfig.xml"); //获取session工厂对象 SqlSessionFactory sqlSessionFactory = new SqlSessionFactoryBuilder().build(resource); //获取session会话对象 SqlSession sqlSession = sqlSessionFactory.openSession(true);//自动提交事务 //获取代理对象 AccountMapper accountMapper = sqlSession.getMapper(AccountMapper.class); //执行插入操作 accountMapper.insert(account); //释放资源 sqlSession.close(); } catch (IOException e) { e.printStackTrace(); } } } -
创建对应AccountController层对象
@Controller public class AccountController { @Autowired private AccountService accountService; @RequestMapping("/findAll") public ModelAndView findAll(){ ModelAndView modelAndView = new ModelAndView(); //获取所有的account List<Account> accountList = accountService.findAll(); //将数据封装到model中 modelAndView.addObject("accountList",accountList); //设置视图名字 modelAndView.setViewName("list.jsp"); return modelAndView; } @RequestMapping("/insert") public String insert(Account account){ //将account添加到数据库中 accountService.insert(account); //重定向到查询所有的界面 return "redirect:/findAll"; } } -
配置spring-mvc.xml,applicationContext.xml等配置文件
applicationContext.xml:
<beans xmlns="http://www.springframework.org/schema/beans"
       xmlns:xsi="http://www.w3.org/2001/XMLSchema-instance"
       xmlns:context="http://www.springframework.org/schema/context"
       xsi:schemaLocation="http://www.springframework.org/schema/beans http://www.springframework.org/schema/beans/spring-beans.xsd
                          http://www.springframework.org/schema/context http://www.springframework.org/schema/context/spring-context.xsd">

    <context:component-scan base-package="com.demo">
        <context:include-filter type="annotation" expression="org.springframework.stereotype.Controller"/>
    context:component-scan>
beans>
spring-mvc.xml:
<beans xmlns="http://www.springframework.org/schema/beans" xmlns:xsi="http://www.w3.org/2001/XMLSchema-instance" xmlns:context="http://www.springframework.org/schema/context" xmlns:mvc="http://www.springframework.org/schema/mvc" xmlns:aop="http://www.springframework.org/schema/aop" xmlns:tx="http://www.springframework.org/schema/tx" xsi:schemaLocation="http://www.springframework.org/schema/beans http://www.springframework.org/schema/beans/spring-beans.xsd http://www.springframework.org/schema/context http://www.springframework.org/schema/context/spring-context.xsd http://www.springframework.org/schema/mvc http://www.springframework.org/schema/mvc/spring-mvc.xsd http://www.springframework.org/schema/aop http://www.springframework.org/schema/aop/spring-aop.xsd http://www.springframework.org/schema/tx http://www.springframework.org/schema/tx/spring-tx.xsd "> <context:property-placeholder location="classpath:jdbc.properties"/> <context:component-scan base-package="com.demo.controller"/> <mvc:annotation-driven/> <mvc:default-servlet-handler/> <bean id="dataSource" class="com.mchange.v2.c3p0.ComboPooledDataSource"> <property name="driverClass" value="${jdbc.driver}">property> <property name="jdbcUrl" value="${jdbc.url}">property> <property name="user" value="${jdbc.username}">property> <property name="password" value="${jdbc.password}">property> bean> <bean id="transactionManager" class="org.springframework.jdbc.datasource.DataSourceTransactionManager"> <property name="dataSource" ref="dataSource"/> bean> <tx:advice id="txAdvice" transaction-manager="transactionManager"> <tx:attributes> <tx:method name="*"/> tx:attributes> tx:advice> <aop:config> <aop:advisor advice-ref="txAdvice" pointcut="execution(* com.demo..*.*(..))"/> aop:config> beans> -
配置web.xml文件,来配置spring mvc的前端控制器,以及编码的过滤器等
<web-app version="2.4" xmlns="http://java.sun.com/xml/ns/j2ee" xmlns:xsi="http://www.w3.org/2001/XMLSchema-instance" xsi:schemaLocation="http://java.sun.com/xml/ns/j2ee http://java.sun.com/xml/ns/j2ee/web-app_2_4.xsd"> <context-param> <param-name>contextConfigLocationparam-name> <param-value>classpath:applicationContext.xmlparam-value> context-param> <filter> <filter-name>CharacterEncodingFilterfilter-name> <filter-class>org.springframework.web.filter.CharacterEncodingFilterfilter-class> <init-param> <param-name>encodingparam-name> <param-value>UTF-8param-value> init-param> filter> <filter-mapping> <filter-name>CharacterEncodingFilterfilter-name> <url-pattern>/*url-pattern> filter-mapping> <listener> <listener-class>org.springframework.web.context.ContextLoaderListenerlistener-class> listener> <servlet> <servlet-name>DispatcherServletservlet-name> <servlet-class>org.springframework.web.servlet.DispatcherServletservlet-class> <init-param> <param-name>contextConfigLocationparam-name> <param-value>classpath:spring-mvc.xmlparam-value> init-param> <load-on-startup>2load-on-startup> servlet> <servlet-mapping> <servlet-name>DispatcherServletservlet-name> <url-pattern>/url-pattern> servlet-mapping> web-app> -
配置SqlConfig.xml这个mybatis的配置文件
DOCTYPE configuration PUBLIC "-//mybatis.org//DTD Config 3.0//EN" "http://mybatis.org/dtd/mybatis-3-config.dtd">
<configuration>

    <properties resource="jdbc.properties">properties>

    <typeAliases>


        <package name="com.demo.domain"/>
    typeAliases>

    <environments default="develop">
        <environment id="develop">
            <transactionManager type="JDBC">transactionManager>
            <dataSource type="POOLED">
                <property name="driver" value="${jdbc.driver}"/>
                <property name="url" value="${jdbc.url}"/>
                <property name="username" value="${jdbc.username}"/>
                <property name="password" value="${jdbc.password}"/>
            dataSource>
        environment>
    environments>


    <mappers>
        <mapper resource="com/demo/mapper/AccountMapper.xml">mapper>
    mappers>
configuration>
因为需要配置数据库,所以需要利用properties标签来加载外部的properties文件,对应的jdbc.properties文件为:
jdbc.driver=com.mysql.cj.jdbc.Driver jdbc.url=jdbc:mysql://localhost:3306/db1?serverTimezone=Asia/Shanghai jdbc.username=root jdbc.password=root -
配置AccountMapper.xml这个映射文件
DOCTYPE mapper PUBLIC "-//mybatis.org/DTD Mapper 3.0" "http://mybatis.org/dtd/mybatis-3-mapper.dtd"> <mapper namespace="com.demo.mapper.AccountMapper"> <insert id="insert" parameterType="account"> insert into account (name,balance) values (#{name},#{balance}) insert> <select id="findAll" resultType="account"> select * from account select> mapper> -
创建对应的页面,例如查询页面,以及添加的页面
添加页面add.jsp:
<%@ page contentType="text/html;charset=UTF-8" language="java" %>添加界面 查询界面list.jsp:
<%@ page contentType="text/html;charset=UTF-8" language="java" %> <%@ taglib prefix="c" uri="http://java.sun.com/jsp/jstl/core" %>查询界面 姓名 余额 ${account.name} ${account.balance} 测试结果:


但是我们在service的实现类中可以看到的是,每一个方法中都要重新执行下面的几步:
//读取核心配置文件
InputStream resource = Resources.getResourceAsStream("SqlConfig.xml");
//获取session工厂对象
SqlSessionFactory sqlSessionFactory = new SqlSessionFactoryBuilder().build(resource);
//获取session会话对象
SqlSession sqlSession = sqlSessionFactory.openSession(true);//自动提交事务
//获取代理对象
AccountMapper accountMapper = sqlSession.getMapper(AccountMapper.class);

//释放资源
//sqlSession.commit();这一步是因为调用openSession的时候,传递了参数true,那么就会自动事务,否则如果传递的是false,或者没有传递,那么就需要我们手动提交事务
sqlSession.close();
这样代码的重复率就会很高。那么我们要怎么做才可以降低代码的重复率呢?
这时候我们需要将sqlFactoryBean导入到spring容器中,那么我们只要从容器中取出SqlSessionFactory即可。但是我们知道的是,SqlSessionFactory是一个接口,所以我们需要将SqlSessionFactoryBean(它是工厂的实现类)导入到spring容器即可,前提时我们要导入了mybatis-spring依赖.所以这一部分代码为:
    <bean id="dataSource" class="com.mchange.v2.c3p0.ComboPooledDataSource">
        <property name="driverClass" value="${jdbc.driver}">property>
        <property name="jdbcUrl" value="${jdbc.url}">property>
        <property name="user" value="${jdbc.username}">property>
        <property name="password" value="${jdbc.password}">property>
    bean>


    <bean id="sqlSessionFactory" class="org.mybatis.spring.SqlSessionFactoryBean">
        <property name="dataSource" ref="dataSource">property>

        <property name="configLocation" value="classpath:SqlConfig.xml">property>
    bean>
那么这时候对应的mybatis的核心配置文件中的
但是尽管我们已经注入了SqlSessionFactory,但是我们还是需要每次都需要通过这个对象来获取SqlSession对象,然后再获取它的代理对象。这时候我们可以通过spring来将对应的mapper接口添加到spring容器中的。我们需要通过将MapperScannerConfigurer添加到spring容器中,并且设置它的basePackage的值是我们对应的Mapper接口的路径即可,那么这时候就会创建这个包下面的所有mapper接口的动态代理类,并且自动添加到了sprng容器中。这时候我们就可以直接获取对应的mapper代理对象了,这时候我们的mybatis核心配置文件就不需要在利用
<bean class="org.mybatis.spring.mapper.MapperScannerConfigurer">
    <property name="basePackage" value="com.demo.mapper"/>
bean>
但是如果mybatis中的映射文件中有使用到了别名,那么这时候是没有办法交给spring来完成的,所以mybatis的核心配置文件是有存在的意义的。
所以修改之后的spring-mvc.xml为:
<beans xmlns="http://www.springframework.org/schema/beans"
       xmlns:xsi="http://www.w3.org/2001/XMLSchema-instance"
       xmlns:context="http://www.springframework.org/schema/context"
       xmlns:mvc="http://www.springframework.org/schema/mvc"
       xmlns:aop="http://www.springframework.org/schema/aop"
       xmlns:tx="http://www.springframework.org/schema/tx"
       xsi:schemaLocation="http://www.springframework.org/schema/beans http://www.springframework.org/schema/beans/spring-beans.xsd
                          http://www.springframework.org/schema/context http://www.springframework.org/schema/context/spring-context.xsd
                          http://www.springframework.org/schema/mvc http://www.springframework.org/schema/mvc/spring-mvc.xsd
                          http://www.springframework.org/schema/aop http://www.springframework.org/schema/aop/spring-aop.xsd
                          http://www.springframework.org/schema/tx http://www.springframework.org/schema/tx/spring-tx.xsd
                           ">

       <context:property-placeholder location="classpath:jdbc.properties"/>

       <context:component-scan base-package="com.demo.controller"/>

       <mvc:annotation-driven/>

       <mvc:default-servlet-handler/>

       <bean id="dataSource" class="com.mchange.v2.c3p0.ComboPooledDataSource">
              <property name="driverClass" value="${jdbc.driver}">property>
              <property name="jdbcUrl" value="${jdbc.url}">property>
              <property name="user" value="${jdbc.username}">property>
              <property name="password" value="${jdbc.password}">property>
       bean>


        <bean id="sqlSessionFactory" class="org.mybatis.spring.SqlSessionFactoryBean">
            <property name="dataSource" ref="dataSource">property>

            <property name="configLocation" value="classpath:SqlConfig.xml">property>
        bean>


        <bean class="org.mybatis.spring.mapper.MapperScannerConfigurer">
            <property name="basePackage" value="com.demo.mapper"/>
        bean>


       <bean id="transactionManager" class="org.springframework.jdbc.datasource.DataSourceTransactionManager">
              <property name="dataSource" ref="dataSource"/>
       bean>

       <tx:advice id="txAdvice" transaction-manager="transactionManager">
              <tx:attributes>
                     <tx:method name="*"/>
              tx:attributes>
       tx:advice>


       <aop:config>

              <aop:advisor advice-ref="txAdvice" pointcut="execution(* com.demo..*.*(..))"/>
       aop:config>
beans>
对应的AccountServiceImpl的代码就变成了:
package com.demo.service.impl;

import com.demo.mapper.AccountMapper;
import com.demo.domain.Account;
import com.demo.service.AccountService;
import org.apache.ibatis.session.SqlSession;
import org.apache.ibatis.session.SqlSessionFactory;
import org.mybatis.spring.SqlSessionFactoryBean;
import org.springframework.beans.factory.annotation.Autowired;
import org.springframework.stereotype.Service;

import java.util.List;
@Service("accountService")
public class AccountServiceImpl implements AccountService {
    /*
    如上面说看到的代码,每步都要重新读取mybatis的配置文件,
    来获取session会话对象,因此我们是否可以通过spring来直接
    获取这个session对象呢?答案是肯定的,可以将这个SqlFactory
    添加到spring容器中,不过因为它是一个接口,所以需要先导入
    依赖mybatis-spring,它里面存在一个类SqlFactoryBean,可以将
    SqlFactory实现了。
    然后我们需要将对应的Mapper接口同样的添加到spring容器
     */
    @Autowired
    private AccountMapper accountMapper;

    public List<Account> findAll() {
        List<Account> accountList = null;
        accountList = accountMapper.findAll();
        return accountList;
    }
    public void insert(Account account) {
        //执行插入操作
        accountMapper.insert(account);
    }
}
对应的mybatis的核心配置文件变成了:
DOCTYPE configuration PUBLIC "-//mybatis.org//DTD Config 3.0//EN" "http://mybatis.org/dtd/mybatis-3-config.dtd">
<configuration>

    <typeAliases>


        <package name="com.demo.domain"/>
    typeAliases>
configuration>
但是我们运行的时候,就提示找不到对应的mapper,提示Unsatisfied dependency expressed through field 'accountMapper'; nested exception is org.springframework.beans.factory.NoSuchBeanDefinitionException: No qualifying bean of type 'com.demo.mapper.AccountMapper' available: expected at least 1 bean which qualifies as autowire candidate. Dependency annotations: {@org.springframework.beans.factory.annotation.Autowired(required=true)},表示我们在AccountServiceImpl中利用注解@Autowired来获取AccountMapper时候因为没有找到这个类型的Bean对象,从而发生错误。所以可以知道我们没有将对应的mapper接口对应的动态代理对象注入到sprng容器中。
但是仔细检查上面的spring-mvc.xml,没有找到对应的错误信息。那么这时候应该怎么解决呢?这时候我们需要将上面的新增加的代码添加到applicationConfig.xml中,而不是添加到spring-mvc.xml中,那么修改之后的代码变成了:
applicationConfig.xml:
<beans xmlns="http://www.springframework.org/schema/beans"
       xmlns:xsi="http://www.w3.org/2001/XMLSchema-instance"
       xmlns:context="http://www.springframework.org/schema/context"
       xmlns:aop="http://www.springframework.org/schema/aop" xmlns:tx="http://www.springframework.org/schema/tx"
       xsi:schemaLocation="http://www.springframework.org/schema/beans http://www.springframework.org/schema/beans/spring-beans.xsd
                          http://www.springframework.org/schema/context http://www.springframework.org/schema/context/spring-context.xsd http://www.springframework.org/schema/aop https://www.springframework.org/schema/aop/spring-aop.xsd http://www.springframework.org/schema/tx http://www.springframework.org/schema/tx/spring-tx.xsd">


    <context:component-scan base-package="com.demo">
        <context:include-filter type="annotation" expression="org.springframework.stereotype.Controller"/>
    context:component-scan>


    <context:property-placeholder location="classpath:jdbc.properties"/>


    <bean id="dataSource" class="com.mchange.v2.c3p0.ComboPooledDataSource">
        <property name="driverClass" value="${jdbc.driver}">property>
        <property name="jdbcUrl" value="${jdbc.url}">property>
        <property name="user" value="${jdbc.username}">property>
        <property name="password" value="${jdbc.password}">property>
    bean>


    <bean id="sqlSessionFactory" class="org.mybatis.spring.SqlSessionFactoryBean">
        <property name="dataSource" ref="dataSource">property>

        <property name="configLocation" value="classpath:SqlConfig.xml">property>
    bean>


    <bean class="org.mybatis.spring.mapper.MapperScannerConfigurer">
        <property name="basePackage" value="com.demo.mapper"/>
    bean>


    <bean id="transactionManager" class="org.springframework.jdbc.datasource.DataSourceTransactionManager">
        <property name="dataSource" ref="dataSource"/>
    bean>

    <tx:advice id="txAdvice" transaction-manager="transactionManager">
        <tx:attributes>
            <tx:method name="*"/>
        tx:attributes>
    tx:advice>


    <aop:config>

        <aop:advisor advice-ref="txAdvice" pointcut="execution(* com.demo..*.*(..))"/>
    aop:config>
beans>
对应的spring-mvc.xml:
<beans xmlns="http://www.springframework.org/schema/beans"
       xmlns:xsi="http://www.w3.org/2001/XMLSchema-instance"
       xmlns:context="http://www.springframework.org/schema/context"
       xmlns:mvc="http://www.springframework.org/schema/mvc"
       xmlns:aop="http://www.springframework.org/schema/aop"
       xmlns:tx="http://www.springframework.org/schema/tx"
       xsi:schemaLocation="http://www.springframework.org/schema/beans http://www.springframework.org/schema/beans/spring-beans.xsd
                          http://www.springframework.org/schema/context http://www.springframework.org/schema/context/spring-context.xsd
                          http://www.springframework.org/schema/mvc http://www.springframework.org/schema/mvc/spring-mvc.xsd
                          http://www.springframework.org/schema/aop http://www.springframework.org/schema/aop/spring-aop.xsd
                          http://www.springframework.org/schema/tx http://www.springframework.org/schema/tx/spring-tx.xsd
                           ">

       <context:property-placeholder location="classpath:jdbc.properties"/>

       <context:component-scan base-package="com.demo.controller"/>

       <mvc:annotation-driven/>

       <mvc:default-servlet-handler/>

beans>
这时候就可以正常运行成功了,这是因为什么呢?原来是加载顺序的原因,当tomcat服务器启动的时候,首先来到web.xml,这时候因为存在了启动监听器ContextLoarderListener,那么就会先初始化context-param中的applicationContext.xml文件,然后就会注入bean对象了。这时候就可以注入mapper对象。但是令我疑惑的是,在加载web.xml的时候,不是也加载了DispatcherServlet吗?那么也会读取它的初始参数configLocation,值为spring-mvc.xml文件,这样也可以将mapper接口注入到spring容器中,但是实际却不可以,而在applicationContex.xml中却可以将mapper接口注入到spring容器中,关于这一部分原因,有大佬知道的话,请指教哈!!!,参考文章:ssm中mapper注入失败的传奇经历,对应的结果为: