Linux下等待队列、定时器、中断综合应用——按键控制LED

本文通过按键控制LED的亮灭,按键每按一次,LED的状态就发生一次变化。
等待队列是为了在按键有动作发生时再读取按键值,而不是一直读取按键的值,使得CPU的占用率很高。
定时器在本实验中引入是为了按键消抖,在键值稳定了之后再通过内核读出键值到用户端,用户端得知键值之后再将键值写入LED,LED根据写入的值就会有相应的亮或灭状态。
之前按键的实验就是通过按键按下或者松开给按键对应的GPIO赋值,本例中的按键是通过中断来实现的,按键每次有动作就会触发中断,然后在中断里完成按键值的翻转。
本文的LED驱动代码就是文章Linux下设备树、pinctrl和gpio子系统、LED灯驱动实验中使用的代码。
按键驱动代码中使用了中断,简单介绍一下和中断有关的概念和函数。
每个中断都有一个中断号,通过中断号即可区分不同的中断,在Linux内核中使用一个int变量表示中断号。
在Linux内核中要想使用某个中断是需要申请的,request_irq函数用于申请中断,request_irq函数可能会导致睡眠,因此不能在中断上下文或者其他禁止睡眠的代码段中使用request_irq函数。request_irq函数会激活(使能)中断,request_irq 函数原型如下。

int request_irq(unsigned int irq,irq_handler_t handler,unsigned long flags,const char *name,void *dev)

irq:要申请的中断号。
handler:中断处理函数,当中断发生时,执行该函数。
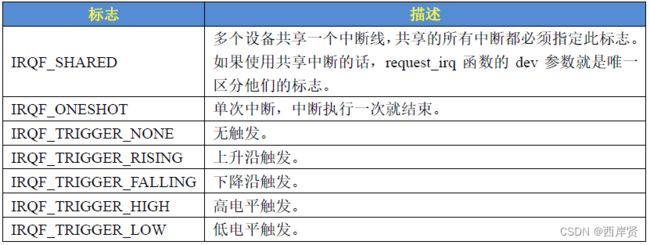
flags:中断标志,常用的有以下几个。
Linux下等待队列、定时器、中断综合应用——按键控制LED_第1张图片
name:中断名字,设置后在/proc/interrupts目录下可以查看。
dev:如果flags设置为IRQF_SHARED,dev用来区分不同的中断,一般情况下,dev设置为设备结构体,它会传给中断处理函数irq_handler_t第二个参数。
free_irq函数用于释放掉相应的中断,其原型如下。

void free_irq(unsigned int irq,void *dev)

int:要释放的中断号。
dev:如果flags设置为IRQF_SHARED,dev用来区分不同的中断。
使用request_irq函数申请中断的时候需要设置中断处理函数,中断处理函数的原型如下。

irqreturn_t (*irq_handler_t) (int, void *)

第一个参数是中断号。第二个参数是一个指向void 的指针,是个通用指针,需要与request_irq函数的dev参数保持一致。用于区分共享中断的不同设备,dev也可以指向设备数据结构。中断处理函数的返回值为irqreturn_t 类型,irqreturn_t 类型定义如下。

enum irqreturn {
	IRQ_NONE = (0 << 0),
	IRQ_HANDLED = (1 << 0),
	IRQ_WAKE_THREAD = (1 << 1),
};

typedef enum irqreturn irqreturn_t;

一般中断服务函数返回值使用如下形式。

return IRQ_RETVAL(IRQ_HANDLED)

按键的驱动代码如下。

#include 
#include 
#include 
#include 
#include 
#include 
#include 
#include 
#include 
#include 
#include 
#include 
#include 
#include 
#include 
#include 
#include 
#include  
#include 
#include 
#include 

#define KEY_CNT			    1		 /* 设备号个数 */
#define KEY_NAME		"gpio_key"	/* 名字 */

dev_t devid;			  /* 设备号 	 */
struct cdev cdev;		  /* cdev 	*/
struct class *class;	  /* 类 */
struct device *device;	  /* 设备 	 */
int major;				  /* 主设备号	  */
int minor;				  /* 次设备号   */
struct device_node	*nd;   /* 设备节点 */
int key_gpio;			   /* key所使用的GPIO编号*/

int irq;
int value = 0;
int wq_flags = 0;  //标志位
int key_count = 0;
static void timer_function(unsigned long data);
DEFINE_TIMER(key_timer,timer_function,0,0); //静态定义结构体变量并且初始化function,expires,data成员
DECLARE_WAIT_QUEUE_HEAD(key_wq);   // 定义并初始化等待队列头

static void timer_function(unsigned long data)
{
	++key_count;
	printk("key trigger count: %d\r\n",key_count);
}

static ssize_t key_read(struct file *filp, char __user *buf, size_t cnt, loff_t *offt)
{
	wait_event_interruptible(key_wq,wq_flags);   //等待按键触发
    if(copy_to_user(buf,&value,sizeof(value))!=0)
    {
        printk("copy_to_user error!\n");
        return -1;
    }
    wq_flags = 0;
    return 0;
}

static struct file_operations key_fops = {
	.owner = THIS_MODULE,
	.read = key_read
};

irqreturn_t key_led(int irq, void *args)
{
	mod_timer(&key_timer,jiffies + msecs_to_jiffies(10));
	value = !value;
	printk("key_value = %d\n", value);
	wq_flags = 1;  //这里只有先置1,下面的函数才能唤醒
	wake_up(&key_wq);  //唤醒
	return IRQ_RETVAL(IRQ_HANDLED);
}

const struct of_device_id of_match_table_key[] = {
	{.compatible = "gpio_bus_key"},        //与设备树中的compatible属性匹配
	{}
};

struct platform_driver dts_device = {    
	.driver = {
		.owner = THIS_MODULE,
		.name = "keygpio",
		.of_match_table = of_match_table_key
	}
};

static int __init gpio_key_init(void)
{
	int ret;
	nd = of_find_node_by_path("/key");
	if (nd == NULL) 
		return -EINVAL;
	printk("Find node key!\n");
	key_gpio = of_get_named_gpio(nd,"key-gpio",0);
	if (key_gpio < 0) 
	{
		printk("of_get_named_gpio failed!\r\n");
		return -EINVAL;
	}
	printk("key_gpio = %d\r\n", key_gpio);
	
	gpio_request(key_gpio,KEY_NAME);	    //申请gpio
	gpio_direction_input(key_gpio);   	//将gpio设置为输入

	/*获得gpio中断号*/
	//irq = gpio_to_irq(gpio_num); 
	irq = irq_of_parse_and_map(nd,0); //与上面这句代码的作用相同
	printk("irq = %d\r\n", irq);

	/*申请中断*/
	ret = request_irq(irq,key_led,IRQF_TRIGGER_RISING,"key_led_test", NULL); 
	if(ret < 0)
	{
		printk("request_irq error!\n");
		return -1;
	}

	if (major)
	{		
		devid = MKDEV(major, 0);
		register_chrdev_region(devid, KEY_CNT, KEY_NAME);
	}
	else 
	{						
		alloc_chrdev_region(&devid,0,KEY_CNT,KEY_NAME);	//申请设备号
		major = MAJOR(devid);	   //获取分配号的主设备号 
		minor = MINOR(devid);	
	}
	printk("gpiokey major=%d,minor=%d\r\n",major,minor);	

	cdev.owner = THIS_MODULE;
	cdev_init(&cdev, &key_fops);
	cdev_add(&cdev, devid, KEY_CNT);

	class = class_create(THIS_MODULE, KEY_NAME);
	if (IS_ERR(class))
		return PTR_ERR(class);

	device = device_create(class,NULL,devid,NULL,KEY_NAME);
	if (IS_ERR(device))
		return PTR_ERR(device);
	
	platform_driver_register(&dts_device); 
	return 0;
}

static void __exit gpio_key_exit(void)
{
	gpio_free(key_gpio);
	cdev_del(&cdev);
	unregister_chrdev_region(devid,KEY_CNT); 
	device_destroy(class, devid);
	class_destroy(class);
	free_irq(irq,NULL);
	del_timer(&key_timer);
	platform_driver_unregister(&dts_device);
	printk("driver exit!\n");
}

module_init(gpio_key_init);
module_exit(gpio_key_exit);
MODULE_LICENSE("GPL");

测试代码如下。

#include 
#include 
#include 
#include 
#include 

int main(int argc, char *argv[])
{
    int fd_r,fd_w;
    char value[1];
    fd_r = open("/dev/gpio_key",O_RDWR);
    fd_w = open("/dev/gpioled",O_RDWR); 
    if(fd_r < 0)
    {
        perror("open key error\n"); 
        return fd_r;
    }
     if(fd_w < 0)
    {
        perror("open led error\n"); 
        return fd_w;
    }
    while(1)
    {
        read(fd_r,value,sizeof(value));
        write(fd_w,value,sizeof(value));
    }
    return 0;
}

测试代码完成的工作就是从按键的内核中读取键值到用户端,然后将读取到的键值写入到LED的内核中。
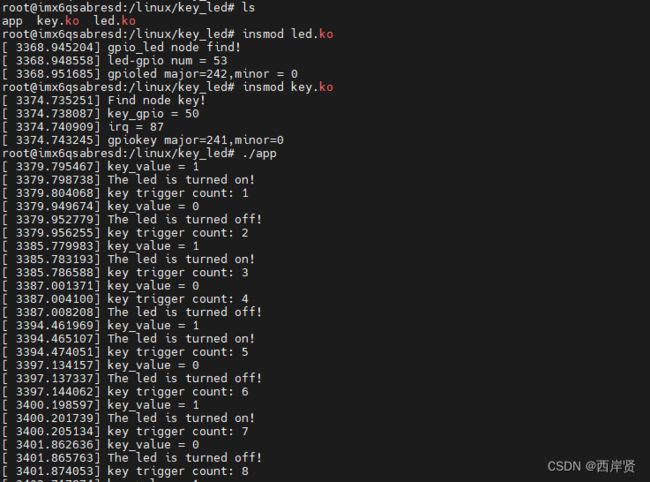
通过上面的代码编译出LED的驱动和按键的驱动,然后用交叉编译器编译测试文件生成一个可执行文件,将这三个文件发送到开发板进行验证。
Linux下等待队列、定时器、中断综合应用——按键控制LED_第2张图片
通过实验结果可知,LED的亮灭是配合按键的动作的。
本文参考文档:
I.MX6U嵌入式Linux驱动开发指南V1.5——正点原子

你可能感兴趣的:(Linux,linux,驱动开发)