展锐平台的温控策略介绍
这里以UDX710为例介绍下展锐平台的温控策略,展锐其他平台也类似。
1. UDX710芯片内部有6颗 Thermal sensor,相关位置信息如表 1-1。

2. 温度读取:
在控制台下通过 cat命令获取每个sensor的温度,各个sensor路径如路径如表1-2。

例如下面命令获取apcpu0的温度,结果为 34.652℃。注意单位为 0.0001℃。
 # cat /sys/class/thermal/thermal_zone1/temp
34652
Senosr name也可能通过命令确认,读取 sensor目录的type节点即可。
# cat /sys/class/thermal/thermal_zone1/type
apcpu0-thmzone
3. 虚拟sensor soc-thmzone
通过软件查看sensor的文件节点,会发现有一个 thermal_zone0,type是 soc-thmzone。soc-thmzone 是 IPA(Intelligent Power Allocation智能功率分配)通过 ap cpu的所有sensor计算出来的一个温度,用来做cpu温控的。
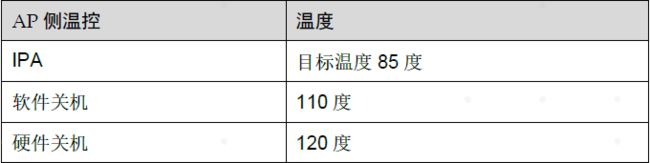
4. AP温控措施
AP侧的温控主要是控制cpu,软件上使用的是IPA策略,根据目标控制温度以PID(Proportional Integral Derivative比例积分微分)算法来降频拔核。
除此之外还有高温关机。 详细控制温度如表 2-1。
AP侧没有在xml中配置相关策略,而是直接使用dts中默认的配置。
以dts的如下配置为例,70度(soc_threshold下的temperature = <70000>)是ipa的switch_on_temp,
85度(soc_target下的temperature = <85000>)是control_temp。
                soc_thmzone: soc-thmzone {
                        polling-delay-passive = <100>;
                        polling-delay = <1000>;
                        sustainable-power = <1000>;
                        thermal-sensors = <&soc_sensor  17>;
                        trips {
                                soc_threshold: trip-point@0 {
                                        temperature = <70000>;    //IPA开启温度
                                        hysteresis = <1000>;
                                        type = "passive";
                                };
                                soc_target: trip-point@1 {
                                        temperature = <85000>;   //IPA控制温度
                                        hysteresis = <1000>;
                                        type = "passive";
                                };
                                soc_crit: soc_crit {
                                        temperature = <113000>;  //重启温度适当提高 --> 113
                                        hysteresis = <2000>;
                                        type = "critical";
                                };
                        };
   						……
   				}
验证在85°C以上会降频的:
temp: cpu0-89430 nrcp-91570 cpu1-88811
freq: cpu0-1352000 1-1352000
Time : -----Wed Mar 9 18:45:56 CST 2022-----
temp: cpu0-90710 nrcp-92865 cpu1-90106
freq: cpu0-768000 1-768000
Time : -----Wed Mar 9 18:45:59 CST 2022-----
temp: cpu0-90710 nrcp-92347 cpu1-90106
freq: cpu0-768000 1-768000
Time : -----Wed Mar 9 18:46:02 CST 2022-----
5.CP侧降温措施
5.1 4G功率回退

5.2 5G功率回退

5.3 5G降速

配置文件thermalSensorsConfig.xml在代码中的路径:
layers/meta-unisoc/recipes-core/thermal/files/udx710-module/thermalSensorsConfig.xml
在设备中的路径: /etc/thermalSensorsConfig.xml
调试时可以直接修改这个文件。由于/etc为只读文件系统,不能直接替换该文件进行调试。可以把配置文件push到 /home/root/ 目录下,需要重启thermal进程,并且设备重新开机后失效,要重新启动thermald。命令如下:
adb push D:\thermalSensorsConfig.xml /home/root/
root@udx710-module:/ # /etc/init.d/thermald-init.sh restart
文件thermalSensorsConfig.xml如下:
<?xml version='1.0' encoding='utf-8' standalone='yes' ?>
<ThermalConfig>
	<sensor>
		<sensor_type>pa-thmzone</sensor_type>
		<polling_delay>2000</polling_delay>
		<DroPeriod>30000</DroPeriod>
		<AvgPeriod>30000</AvgPeriod>
		<zone_level id="1" type="active">
			<temp>105000</temp>
			<trip id="0" >
				<action name="powerback" arg="AT+SPTPPB=0" file="" />
			</trip>
			<trip id="1" >
				<action name="powerback" arg="AT+SPTPPB=2" file="" />
			</trip>
			<trip id="2" >
				<action name="powerback" arg="AT+SPTPPB=4" file="" />
			</trip>
			<trip id="3" >
				<action name="powerback" arg="AT+SPTPPB=6" file="" />
			</trip>
			<trip id="4" >
				<action name="powerback" arg="AT+SPTPPB=8" file="" />
			</trip>
			<trip id="5" >
				<action name="powerback" arg="AT+SPTPPB=10" file="" />
			</trip>
		</zone_level>
	</sensor>
	<sensor>
		<sensor_type>pa5g-thmzone</sensor_type>
		<polling_delay>2000</polling_delay>
		<DroPeriod>30000</DroPeriod>
		<AvgPeriod>30000</AvgPeriod>
		<zone_level id="1" type="active">
			<temp>105000</temp>
			<trip id="0" >
				<action name="powerback" arg='AT+SP5GCMDS="set nr power_control",0,0' file="" />
			</trip>
			<trip id="1" >
				<action name="powerback" arg='AT+SP5GCMDS="set nr power_control",0,2' file="" />
			</trip>
			<trip id="2" >
				<action name="powerback" arg='AT+SP5GCMDS="set nr power_control",0,4' file="" />
			</trip>
			<trip id="3" >
				<action name="powerback" arg='AT+SP5GCMDS="set nr power_control",0,6' file="" />
			</trip>
			<trip id="4" >
				<action name="powerback" arg='AT+SP5GCMDS="set nr power_control",0,8' file="" />
			</trip>
			<trip id="5" >
				<action name="powerback" arg='AT+SP5GCMDS="set nr power_control",0,10' file="" />
			</trip>
		</zone_level>
	</sensor>
</ThermalConfig>
温度上升过程中的执行策略( Action):
- 在同一个 Level 里,如果这次的温度大于等于这个 Level 的温度,则跳到该 Level 里的下一个 Trip。
- 如果当前 Trip 已经是该 Level 的最后一个 Trip,并且温度小于下一个 Level 的温度,则没有变化。
- 如果当前 Trip 已经是该 Level 的最后一个 Trip,并且温度大于等于下一个 Level 的温度,则跳到下一个Level 的第一个Trip。
温度下降过程中的执行策略( Action):
- 在同一个 Level 里,如果这次的温度小于这个 Level 的温度,则跳到该 Level 里的前一个 Trip。
- 如果当前 Trip 已经是该 Level 的第一个 Trip,并且温度小于该 Level 的温度,则跳到前一个 Level 的 最后一个 Trip。
CP侧策略用到的sensor type是pa-thmzone,pa5g-thmzone。需要在设备树中添加:
&thm_zone {
	pa_thmzone: pa-thmzone {
		polling-delay-passive = <0>;
		polling-delay = <0>;
		thermal-sensors = <&pa_thermistor>;
	};

	pa5g_thmzone: pa5g-thmzone {
		polling-delay-passive = <0>;
		polling-delay = <0>;
		thermal-sensors = <&pa5g_thermistor>;
	};

	bd_thmzone: board-thmzone {
		polling-delay-passive = <0>;
		polling-delay = <0>;
		thermal-sensors = <&board_thermistor>;
	};
};
在控制台下可以读到这几个sensor的名字以及温度:
cat /sys/class/thermal/thermal_zone7/type
pa-thmzone
cat /sys/class/thermal/thermal_zone8/type
pa5g-thmzone
cat /sys/class/thermal/thermal_zone9/type
board-thmzone
cat /sys/class/thermal/thermal_zone7/temp
30126
验证cp侧温控策略可以用风枪给模块加热,让其温度达到xml中设置的温度,导出yocto.log:
adb pull /mnt/data/yocto.log d:\123.log
检查log中应该有类似如下功率回退的命令:
Mar 9 18:14:55.985 (none) user.info thermald[4100]: do,===>powerback, mArg:AT+SPTPPB=2, mFileNode:
就表示CP侧的策略生效了。