Bootstrap的表单组件相关知识
01-最基本的表单组件使用示例
示例代码如下:
DOCTYPE html>
<html>
<head>
    <meta charset="UTF-8">
    <title>使用表单组件title>
    <meta name="viewport" content="width=device-width,initial-scale=1, shrink-to-fit=no">
    <link rel="stylesheet" href="bootstrap-4.5.3-dist/css/bootstrap.css">
    <script src="jquery-3.5.1.slim.js">script>
    <script src="bootstrap-4.5.3-dist/js/bootstrap.min.js">script>
head>
<body class="container">
<h2 align="center">使用表单组件h2>
<form>
    <div class="form-group">
        <label for="formGroup1">账户名称label>
        <input type="text" class="form-control" id="formGroup1" placeholder="Name">
    div>
    <div class="form-group">
        <label for="formGroup2">账户密码label>
        <input type="password" class="form-control" id="formGroup2" placeholder="Password">
    div>
form>
body>
html>
02-设置表单组件的大小
示例代码如下:
DOCTYPE html>
<html>
<head>
    <meta charset="UTF-8">
    <title>设置表单控件的大小title>
    <meta name="viewport" content="width=device-width,initial-scale=1, shrink-to-fit=no">
    <link rel="stylesheet" href="bootstrap-4.5.3-dist/css/bootstrap.css">
    <script src="jquery-3.5.1.slim.js">script>
    <script src="bootstrap-4.5.3-dist/js/bootstrap.min.js">script>
head>
<body class="container">
<h2 align="center">设置表单控件的大小h2>
<form>
    <input class="form-control form-control-lg" type="text" placeholder="大尺寸(form-control-lg)"><br/>
    <input class="form-control" type="text" placeholder="默认大小"><br/>
    <input class="form-control form-control-sm" type="text" placeholder="小尺寸(form-control-sm)">
form>
body>
html>
03-1设置表单组件为只读属性(只能复制)
有些时候我们希望表单组件的内容只能读或复制,不能修改,那此时就需要将表单组件设为只读属性了。
示例代码如下:
DOCTYPE html>
<html>
<head>
    <meta charset="UTF-8">
    <title>设置表单控件只读title>
    <meta name="viewport" content="width=device-width,initial-scale=1, shrink-to-fit=no">
    <link rel="stylesheet" href="bootstrap-4.5.3-dist/css/bootstrap.css">
    <script src="jquery-3.5.1.slim.js">script>
    <script src="bootstrap-4.5.3-dist/js/bootstrap.min.js">script>
head>
<body class="container">
<h2 align="center">设置表单控件只读h2>
<form>
    <input class="form-control" type="text" placeholder="只读表单" readonly value="昊虹AI笔记">
form>
body>
html>
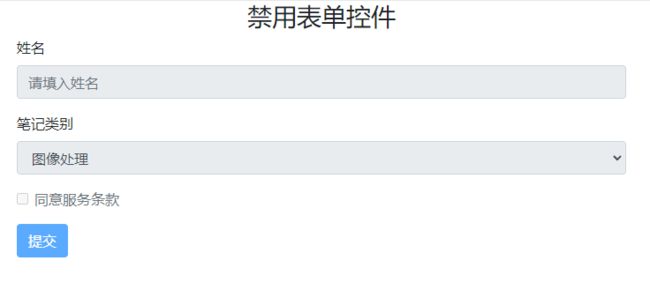
03-2-禁用表单
可以利用标签 fieldset 设置把某个区域内的表单禁用。
示例代码如下:
DOCTYPE html>
<html>
<head>
    <meta charset="UTF-8">
    <title>禁用表单控件title>
    <meta name="viewport" content="width=device-width,initial-scale=1, shrink-to-fit=no">
    <link rel="stylesheet" href="bootstrap-4.5.3-dist/css/bootstrap.css">
    <script src="jquery-3.5.1.slim.js">script>
    <script src="bootstrap-4.5.3-dist/js/bootstrap.min.js">script>
head>
<body class="container">
<h3 align="center">禁用表单控件h3>
<form>
    <fieldset disabled>
        <div class="form-group">
            <label for="testInput">姓名label>
            <input type="text" id="testInput" class="form-control" placeholder="请填入姓名">
        div>
        <div class="form-group">
            <label for="testSelect">笔记类别label>
            <select id="testSelect" class="form-control">
                <option>图像处理option>
				<option>后端开发option>
            select>
        div>
        <div class="form-group">
            <div class="form-check">
                <input class="form-check-input" type="checkbox" id="testCheck" disabled>
                <label class="form-check-label" for="testCheck">
                    同意服务条款
                label>
            div>
        div>
        <button type="submit" class="btn btn-primary">提交button>
    fieldset>
form>
body>
html>
04-滑动条范围输入
示例代码如下:
DOCTYPE html>
<html>
<head>
    <meta charset="UTF-8">
    <title>范围输入title>
    <meta name="viewport" content="width=device-width,initial-scale=1, shrink-to-fit=no">
    <link rel="stylesheet" href="bootstrap-4.5.3-dist/css/bootstrap.css">
    <script src="jquery-3.5.1.slim.js">script>
    <script src="bootstrap-4.5.3-dist/js/bootstrap.min.js">script>
head>
<body class="container">
<h3 align="center">范围输入h3>
<form>
    <input type="range" class="form-control-range">
form>
body>
html>
05-复选框和单选框型表单
Bootstrap的类 以下是一些常用于 这些类使得创建和定制表单中的复选框和单选按钮变得更加容易,而不必从头开始编写所有的样式。Bootstrap还提供了其他类和选项,以允许进一步的自定义和调整表单控件的样式。 垂直排列的示例代码如下: 网格系统的基础知识见我之前写的博文:https://blog.csdn.net/wenhao_ir/article/details/132667178 当然,也可把表单置于网格系统中,从而实现复杂的页面布局。 以下是一个简单的”利用网格系统来设置表单布局“的例子: 当使用Bootstrap来构建网页表单时,类 例如,以下是一个使用 以下是一个使用 总之, 示例代码如下: 如上面的两个例子所示,网络系统允许在类row或form-row中放置任意数量的 col-*类,所以我们可以通过 要给表单添加帮助文本,需要用到类form-group,类form-group的介绍如下: 以下是一个使用 示例代码如下: 关上面代码中的 small标签的介绍,请参见我的另一篇博文:https://blog.csdn.net/wenhao_ir/article/details/133926552form-check是用于创建表单中的复选框(checkbox)和单选按钮(radio button)的样式类。这个类通常与其他类一起使用,以创建具有一致外观和排列方式的表单控件。form-check类通常用于form-check的类和示例:
form-check:这是基本的form-check类,用于定义复选框和单选按钮的外观。<div class="form-check">
<input class="form-check-input" type="checkbox" id="exampleCheckbox">
<label class="form-check-label" for="exampleCheckbox">Check this checkboxlabel>
div>
form-check-input:这个类用于标记实际的复选框或单选按钮输入元素。form-check-label:这个类用于标记与复选框或单选按钮相关联的标签,以提供可点击的标签文本。form-check-inline:这个类可以与form-check一起使用,以创建内联的复选框或单选按钮,使它们在同一行显示。<div class="form-check form-check-inline">
<input class="form-check-input" type="checkbox" id="inlineCheckbox1">
<label class="form-check-label" for="inlineCheckbox1">Option 1label>
div>
<div class="form-check form-check-inline">
<input class="form-check-input" type="checkbox" id="inlineCheckbox2">
<label class="form-check-label" for="inlineCheckbox2">Option 2label>
div>
DOCTYPE html>
<html>
<head>
<meta charset="UTF-8">
<title>默认垂直排列方式title>
<meta name="viewport" content="width=device-width,initial-scale=1, shrink-to-fit=no">
<link rel="stylesheet" href="bootstrap-4.5.3-dist/css/bootstrap.css">
<script src="jquery-3.5.1.slim.js">script>
<script src="bootstrap-4.5.3-dist/js/bootstrap.min.js">script>
head>
<body class="container">
<h2 align="center">复选框和单选框——默认垂直排列方式h2>
<h5>请选择您要学习的技术:h5>
<form>
<p>只能选择一种的技术:p>
<div class="form-check">
<input class="form-check-input" type="radio" name="it" id="it1" >
<label class="form-check-label" for="fruit1">
网站开发技术
label>
div>
<div class="form-check">
<input class="form-check-input" type="radio" name="it" id="it2">
<label class="form-check-label" for="fruit2">
人工智能技术
label>
div>
<div class="form-check">
<input class="form-check-input" type="radio" name="it" id="it3" disabled>
<label class="form-check-label" for="fruit3">
网络安全技术(禁选)
label>
div>
form>
<form>
<p class="mt-4">可以多选的技术:p>
<div class="form-check">
<input class="form-check-input" type="checkbox" id="fruit4">
<label class="form-check-label" for="fruit4">
网站开发技术
label>
div>
<div class="form-check">
<input class="form-check-input" type="checkbox" value="" id="fruit5">
<label class="form-check-label" for="fruit5">
人工智能技术
label>
div>
<div class="form-check">
<input class="form-check-input" type="checkbox" id="fruit6" disabled>
<label class="form-check-label" for="fruit6">
网络安全技术(禁选)
label>
div>
form>
body>
html>
DOCTYPE html>
<html>
<head>
<meta charset="UTF-8">
<title>水平排列方式title>
<meta name="viewport" content="width=device-width,initial-scale=1, shrink-to-fit=no">
<link rel="stylesheet" href="bootstrap-4.5.3-dist/css/bootstrap.css">
<script src="jquery-3.5.1.slim.js">script>
<script src="bootstrap-4.5.3-dist/js/bootstrap.min.js">script>
head>
<body class="container">
<h3 align="center">水平排列方式h3>
<h5>请选择您要学习的技术:h5>
<form>
<p>只能选择一种的技术:p>
<div class="form-check form-check-inline">
<input class="form-check-input" type="radio" name="fruits" id="fruit1" >
<label class="form-check-label" for="fruit1">
网站开发技术
label>
div>
<div class="form-check form-check-inline">
<input class="form-check-input" type="radio" name="fruits" id="fruit2">
<label class="form-check-label" for="fruit2">
人工智能技术
label>
div>
<div class="form-check form-check-inline">
<input class="form-check-input" type="radio" name="fruits" id="fruit3" disabled>
<label class="form-check-label" for="fruit3">
网络安全技术(禁选)
label>
div>
form>
<form>
<p class="mt-4">可以多选的技术:p>
<div class="form-check form-check-inline">
<input class="form-check-input" type="checkbox" id="fruit4">
<label class="form-check-label" for="fruit4">
网站开发技术
label>
div>
<div class="form-check form-check-inline">
<input class="form-check-input" type="checkbox" value="" id="fruit5">
<label class="form-check-label" for="fruit5">
人工智能技术
label>
div>
<div class="form-check form-check-inline">
<input class="form-check-input" type="checkbox" id="fruit6" disabled>
<label class="form-check-label" for="fruit6">
网络安全技术(禁选)
label>
div>
form>
body>
html>
06-用网格系统来设置表单的布局
DOCTYPE html>
<html>
<head>
<meta charset="UTF-8">
<title>用网格系统来设置表单的布局title>
<meta name="viewport" content="width=device-width,initial-scale=1, shrink-to-fit=no">
<link rel="stylesheet" href="bootstrap-4.5.3-dist/css/bootstrap.css">
<script src="jquery-3.5.1.slim.js">script>
<script src="bootstrap-4.5.3-dist/js/bootstrap.min.js">script>
head>
<body class="container">
<h2 align="center">表单网格h2>
<form>
<div class="row">
<div class="col">
<input type="text" class="form-control" placeholder="Name">
div>
<div class="col">
<input type="password" class="form-control" placeholder="Password">
div>
div>
form>
body>
html>
07-利用
form-row类和form-group类网格系统设计“注册信息填写表”form-row和类form-group是两个常用的类,它们用于控制表单布局和样式。以下是它们的介绍:
form-row类:
form-row是用于创建水平排列表单元素的Bootstrap类。它将包裹在一组表单控件周围,使这些控件在同一行上水平排列。form-row类可以帮助确保表单元素在各种屏幕尺寸上都能够自动调整并适应响应式设计。form-row内,然后根据需要添加列(col-*)类以控制列的宽度。form-row的示例:<form>
<div class="form-row">
<div class="form-group col-md-6">
<label for="inputFirstName">First Namelabel>
<input type="text" class="form-control" id="inputFirstName">
div>
<div class="form-group col-md-6">
<label for="inputLastName">Last Namelabel>
<input type="text" class="form-control" id="inputLastName">
div>
div>
form>
form-group类:
form-group类用于包装单个表单控件(如输入字段、文本区域、选择框等),为其添加一些样式和布局特性。),以及可选的帮助文本和错误消息,以提供更好的可读性和用户体验。form-group还可以与form-row结合使用,以创建水平排列的表单控件组。form-group的示例:<form>
<div class="form-group">
<label for="inputEmail">Email addresslabel>
<input type="email" class="form-control" id="inputEmail" placeholder="Enter email">
div>
<div class="form-group">
<label for="inputPassword">Passwordlabel>
<input type="password" class="form-control" id="inputPassword" placeholder="Password">
div>
form>
form-row和form-group类是Bootstrap中用于创建表单的有用工具,它们帮助您轻松地构建具有良好布局和样式的表单元素。DOCTYPE html>
<html>
<head>
<meta charset="UTF-8">
<title>复杂的表单网格布局title>
<meta name="viewport" content="width=device-width,initial-scale=1, shrink-to-fit=no">
<link rel="stylesheet" href="bootstrap-4.5.3-dist/css/bootstrap.css">
<script src="jquery-3.5.1.slim.js">script>
<script src="bootstrap-4.5.3-dist/js/bootstrap.min.js">script>
head>
<body class="container">
<h2 align="center">员工注册表h2>
<form>
<div class="form-row">
<div class="form-group col-md-6">
<label for="name">账户名称label>
<input type="text" class="form-control" id="name" placeholder="Name">
div>
<div class="form-group col-md-6">
<label for="password">账户密码label>
<input type="password" class="form-control" id="password" placeholder="Password">
div>
div>
<div class="form-group">
<label for="email">电子邮箱label>
<input type="email" class="form-control" id="email" placeholder="[email protected]">
div>
<div class="form-group">
<label for="address">学籍label>
<input type="text" class="form-control" id="address" placeholder="大学名称和专业">
div>
<div class="form-row">
<div class="form-group col-md-4">
<label for="inputCity">目前上班情况label>
<input type="text" class="form-control" id="inputCity" placeholder="现在所在的部门">
div>
<div class="form-group col-md-4">
<label for="inputState">职位label>
<select id="inputState" class="form-control">
<option selected>经理option>
<option>业务员option>
select>
div>
<div class="form-group col-md-4">
<label for="inputZip">待遇label>
<input type="text" class="form-control" id="inputZip" placeholder="例如:2800元">
div>
div>
<div class="form-group">
<div class="form-check">
<input class="form-check-input" type="checkbox" id="gridCheck">
<label class="form-check-label" for="gridCheck">
记住信息
label>
div>
div>
<button type="submit" class="btn btn-primary">注册button>
form>
body>
html>
col-*类来设置列的宽度。
示例代码如下:DOCTYPE html>
<html>
<head>
<meta charset="UTF-8">
<title>设置列的宽度title>
<meta name="viewport" content="width=device-width,initial-scale=1, shrink-to-fit=no">
<link rel="stylesheet" href="bootstrap-4.5.3-dist/css/bootstrap.css">
<script src="jquery-3.5.1.slim.js">script>
<script src="bootstrap-4.5.3-dist/js/bootstrap.min.js">script>
head>
<body class="container">
<h3 align="center">设置列的宽度h3>
<form>
<div class="form-row">
<div class="col-6">
<input type="text" class="form-control" placeholder="姓名">
div>
<div class="col">
<input type="text" class="form-control" placeholder="部门">
div>
<div class="col">
<input type="text" class="form-control" placeholder="职位">
div>
<div class="col">
<input type="text" class="form-control" placeholder="薪资">
div>
div>
form>
body>
html>
08-设置表单中的帮助文本
form-group类:
form-group类用于包装单个表单控件(如输入字段、文本区域、选择框等),为其添加一些样式和布局特性。),以及可选的帮助文本和错误消息,以提供更好的可读性和用户体验。form-group还可以与form-row结合使用,以创建水平排列的表单控件组。form-group的示例:<form>
<div class="form-group">
<label for="inputEmail">Email addresslabel>
<input type="email" class="form-control" id="inputEmail" placeholder="Enter email">
div>
<div class="form-group">
<label for="inputPassword">Passwordlabel>
<input type="password" class="form-control" id="inputPassword" placeholder="Password">
div>
form>
DOCTYPE html>
<html>
<head>
<meta charset="UTF-8">
<title>帮助文本title>
<meta name="viewport" content="width=device-width,initial-scale=1, shrink-to-fit=no">
<link rel="stylesheet" href="bootstrap-4.5.3-dist/css/bootstrap.css">
<script src="jquery-3.5.1.slim.js">script>
<script src="bootstrap-4.5.3-dist/js/bootstrap.min.js">script>
head>
<body class="container">
<h3 align="center">帮助文本h3>
<form>
<div class="form-group row">
<label for="password">密码label>
<input type="password" id="password" class="form-control">
<small class="form-text text-muted">
密码必须有8-18个字符,包含字母和数字,并且不能包含空格、特殊字符或表情符号。
small>
div>
form>
body>
html>
运行效果如下:


