揭秘ServerBootstrap神秘面纱(服务端ServerBootstrap)
课前准备
我在读源码的过程中,有些问题会经常浮现在脑海里。根本原因是自己对于Netty的组件和运行过程不熟悉,所以我把这些问题贴在这里:
- 服务端openServerSocketChannel()和客户端openSocketChannel()的区别?
- 服务端newSafe()和客户端newSafe()有什么不一样?
- Channel的传入参数是OP_ACCEPT,客户端是OP_READ。
- EventLoopGroup和EventLoop之间的关系是什么?
- 到底什么是多路复用?
- reactor,redis 是reactor单线程模式?
- reactor模式有三种,我们现在的demo用的是主从模式,还是多线程
- bossGroup和workGroup分别是在哪关联的
- ServerBootstrapAcceptor的作用?
- childLoop如何绑定请求过来的channel
- 我们知道selector轮询服务端是轮询的,客户端轮询吗?
- 服务端特有参数:
childHandler / childOption / childAttr 方法(只有服务端ServerBootstrap才有child类型的方法)。
——对于服务端而言,有两种通道需要处理, 一种是ServerSocketChannel:用于处理用户连接的accept操作, 另一种是SocketChannel,表示对应客户端连接。而对于客户端,一般都只有一种channel,也就是SocketChannel。客户端和服务端使用的都是NioEventLoop吗?服务端workGroup中的EventLoop是可以绑定客户端来的Channel,那客户端的EventLoop是用来干啥的? - 三种reactor模型的区别:
单线程:acceptor和nio共用一个线程
多线程:acceptor是单个线程,nio是一个线程池
主从:acceptor是线程池,nio也是线程池 - selector的for循环部分,是我们所说的select、epoll中的select模式的代码实现吗?
一、ServerBootstrap惊鸿一瞥
在客户端的代码中,我们对Bootstrap有了一个基本的了解,接下来我们来分析ServerBootstrap。ServerBootstrap和Bootstrap有很多地方是相同的,但我们要尤其注意两者不同的地方。首先来看看服务端的启动代码:
public class RpcRegistry {
    private int port;
    public RpcRegistry(int port) {
        this.port = port;
    }


    private void start() {
        //1.创建对象
        EventLoopGroup bossGroup = new NioEventLoopGroup();
        EventLoopGroup workerGroup = new NioEventLoopGroup();

        try {
            //2.配置参数
            ServerBootstrap server = new ServerBootstrap();
            server.group(bossGroup, workerGroup)
                    .channel(NioServerSocketChannel.class)
                    .childHandler(new ChannelInitializer() {
                        @Override
                        protected void initChannel(Channel ch) throws Exception {
                            //接收课客户端请求的处理流程
                            ChannelPipeline pipeline = ch.pipeline();

                            int fieldLength = 4;
                            //通用解码器设置
                            pipeline.addLast(new LengthFieldBasedFrameDecoder(Integer.MAX_VALUE,0,fieldLength,0,fieldLength));
                            //通用编码器
                            pipeline.addLast(new LengthFieldPrepender(fieldLength));
                            //对象编码器
                            pipeline.addLast("encoder",new ObjectEncoder());
                            //对象解码器
                            pipeline.addLast("decoder",new ObjectDecoder(Integer.MAX_VALUE, ClassResolvers.cacheDisabled(null)));

                            pipeline.addLast(new RegistryHandler());
                        }
                    })
                    .option(ChannelOption.SO_BACKLOG, 128)
                    .childOption(ChannelOption.SO_KEEPALIVE, true);
            //3.启动
            ChannelFuture future = server.bind(this.port).sync();
            System.out.println("GP RPC registry is start,listen at " + this.port);
            future.channel().closeFuture().sync();
        }catch (Exception e){
            e.printStackTrace();
        }finally {
            bossGroup.shutdownGracefully();
            workerGroup.shutdownGracefully();
        }
    }

    public static void main(String[] args) {
        new RpcRegistry(8080).start();
    }

}
和客户端的启动代码相比, 区别不大, 基本上也是进行了如下几个部分的初始化:
- EventLoopGroup: 不论是服务器端还是客户端, 都必须指定 EventLoopGroup. 在这个例子中, 指定了 NioEventLoopGroup, 表示一个 NIO 的EventLoopGroup, 不过服务器端需要指定两个 EventLoopGroup, 一个是 bossGroup, 用于处理客户端的连接请求; 另一个是 workerGroup, 用于处理与各个客户端连接的 IO 操作.
- ChannelType: 指定 Channel 的类型. 因为是服务器端, 因此使用了 NioServerSocketChannel.
- Handler: 设置数据的处理器。
二、NioServerSocketChannel的创建
我们在分析客户端的 Channel 初始化过程时, 已经提到, Channel 是对 Java 底层 Socket 连接的抽象, 并且知道了客户端的 Channel 的具体类型是 NioSocketChannel, 那么自然的, 服务器端的 Channel 类型就是 NioServerSocketChannel 了。接下来我们分析一下服务端启动代码,顺便对比一下服务器端和客户端有哪些不一样的地方。
我们已经知道了, 在客户端中, Channel 的类型其实是在初始化时, 通过 Bootstrap.channel() 方法设置的, 服务器端自然也不例外.在服务器端, 我们调用了 ServerBootstarap.channel(NioServerSocketChannel.class), 传递了一个 NioServerSocketChannel Class 对象. 这样的话, 按照和分析客户端代码一样的流程, 我们就可以确定, NioServerSocketChannel 的实例化是通过 BootstrapChannelFactory 工厂类来完成的, 而 BootstrapChannelFactory 中的 clazz 字段被设置为了 NioServerSocketChannel.class, 因此当调用 BootstrapChannelFactory.newChannel() 时:
@Override
    public T newChannel() {
        try {
            return clazz.newInstance();
        } catch (Throwable t) {
            throw new ChannelException("Unable to create Channel from class " + clazz, t);
        }
    }
我们来总结一下:
- ServerBoostrap的ChannelFactory的实现类是ReflectiveChannelFactory类。
- 创建的Channel的具体类型是NioServerSocketChannel。
和客户端的代码一样,Channel的实例过程其实就是调用ChannelFactory.newChannel()方法,而实例化的具体类型就是初始化过程中我们传给channel()方法的实参。因此上面服务端实例化出来的Channel类型是NioServerSocketChannel实例。具体过程可以参考前面一篇客户端代码分析。
三、服务端Channel(NioServerSocketChannel)的初始化
在分析NioServerSocketChannel初始化之前,先看下NioServerSocketChannel的类图:
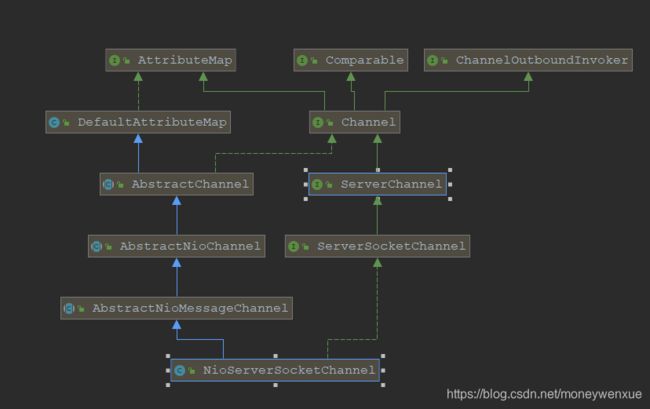
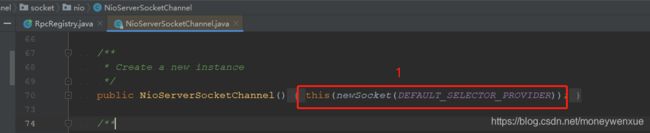
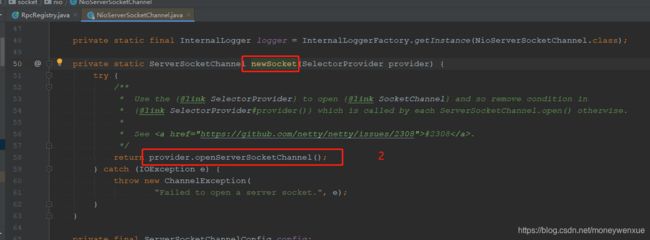
首先,我们在追踪NioServerSocketChannel的默认构造,和NioSocketChannel类似,构造器都是构造newSocket()来打开一个Java的NIO Socket。不过不同的是:客户端的newSocket()调用的是openSocketChannel(),而服务端的newSocket()调用的是openServerSocketChannel()。我们来看看代码:
接着调用调用构造方法的重载方法:

我们可以看到在上述方法中,传入的参数是SelectionKey.OP_ACCEPT。还记得客户端传的是什么吗?——是SelectionKey.OP_READ。在服务启动后需要监听客户端连接请求,因此在这里我们设置SelectionKey.OP_ACCEPT,也就是通知selector我们对客户端的连接请求感兴趣。
接着和客户端的分析一下, 会逐级地调用父类的构造器 NioServerSocketChannel <- AbstractNioMessageChannel <- AbstractNioChannel <- AbstractChannel.同样的, 在 AbstractChannel 中会实例化一个 unsafe 和 pipeline:
protected AbstractChannel(Channel parent) {
        this.parent = parent;
        id = newId();
        unsafe = newUnsafe();
        pipeline = newChannelPipeline();
    }
不过, 这里有一点需要注意的是, 客户端的 unsafe 是一个 AbstractNioByteChannel#NioByteUnsafe 的实例, 而在服务器端时, 因为 AbstractNioMessageChannel 重写了newUnsafe 方法:
@Override
    protected AbstractNioUnsafe newUnsafe() {
        return new NioMessageUnsafe();
    }
因此在服务器端, unsafe 字段其实是一个 AbstractNioMessageChannel#AbstractNioUnsafe 的实例。
最后总结一下,在NioServerSocketChannel实例化过程中的执行逻辑:
- 调用 NioServerSocketChannel.newSocket(DEFAULT_SELECTOR_PROVIDER) 打开一个新的 Java NIO ServerSocketChannel
-
AbstractChannel(Channel parent) 中初始化 AbstractChannel 的属性:
parent:属性置为 null
unsafe:通过newUnsafe() 实例化一个 unsafe 对象, 它的类型是 AbstractNioMessageChannel#AbstractNioUnsafe 内部类 -
AbstractNioChannel 中的属性:
ch:赋值为Java NIO的ServerSocketChannel,调用NioServerSocketChannel的newSocket()方法获取。
readInterestOp:默认赋值为SelectionKey.OP_ACCEPT。
ch设置为非阻塞,调用ch.configureBlocking(false)方法。 -
NioSeverSocketChannel中被赋值的属性:
ServerSocketChannelConfig config = new NioServerSocketChannelConfig(this, javaChannel().socket())
四、ChannelPipeline初始化
服务器端和客户端的 ChannelPipeline 的初始化一致, 此处不作单独分析了。
五、服务端注册到Selector
服务器端和客户端的 Channel 的注册过程一致, 此处不作单独分析了。
六、bossGroup与workGroup
在客户端的时候,我们只初始化了一个EventLoopGroup 对象,但是在服务端,我们设置了两个EventLoopGroup对象,一个bossGroup,一个workrGroup。他们两个的作用分别是什么呢?我们接下来分析一下。
bossGroup只用于服务端的accept,也就是用于处理客户端的连接请求。下面我们看一下bossGroup和workerGroup之间的关系,如下图:
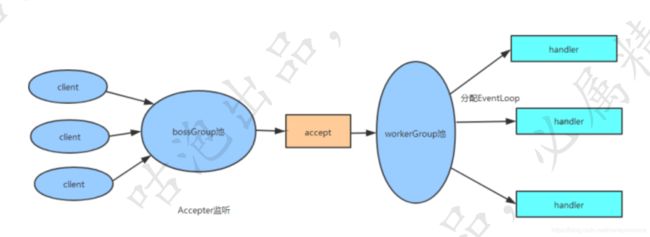
首先, 服务器端 bossGroup 不断地监听是否有客户端的连接, 当发现有一个新的客户端连接到来时, bossGroup 就会为此连接初始化各项资源, 然后从 workerGroup 中选出一个 EventLoop 绑定到此客户端连接中. 那么接下来的服务器与客户端的交互过程就全部在此分配的 EventLoop 中了。接下来看源码。
首先在ServerBootstrap 初始化时, 调用了 b.group(bossGroup, workerGroup) 设置了两个 EventLoopGroup, 我们跟踪进去看一下:
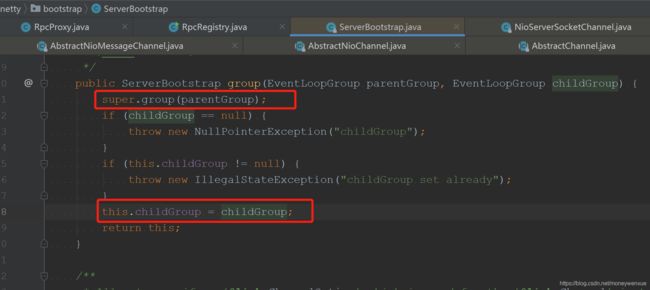
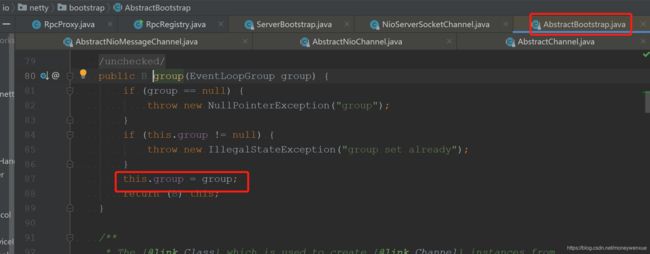
显然, 这个方法初始化了两个字段, 一个是 group = parentGroup, 它是在 super.group(parentGroup) 也就是上图中AbstractBootstrap中初始化的, 另一个是childGroup = childGroup。接着从应用程序的启动代码来看,调用了 b.bind()方法来监听一个本地端口。bind()方法会触发如下的调用链:
AbstractBootstrap.bind -> AbstractBootstrap.doBind -> AbstractBootstrap.initAndRegister
AbstractBootstrap#initAndRegister方法我们已经很熟悉了,在分析客户端代码的时候就跟他打过交道,现在再回顾下吧:
final ChannelFuture initAndRegister() {
    final Channel channel = channelFactory().newChannel();
    ... 省略异常判断
    init(channel);
    ChannelFuture regFuture = group().register(channel);
    return regFuture;
}
这里 group() 方法返回的是上面我们提到的 bossGroup, 而这里的 channel 我们也已经分析过了, 它是一个NioServerSocketChannel 实例, 因此我们可以知道,group().register(channel) 将 bossGroup 和 NioServerSocketChannsl 关联起来了.
那么 workerGroup 是在哪里与 NioSocketChannel 关联的呢?
我们继续看 init(channel) 方法:
@Override
void init(Channel channel) throws Exception {
final Map, Object> options = options0();
synchronized (options) {
channel.config().setOptions(options);
}
final Map, Object> attrs = attrs0();
synchronized (attrs) {
for (Entry, Object> e: attrs.entrySet()) {
@SuppressWarnings("unchecked")
AttributeKey init()方法被ServerBootstrap重写了,在上面代码中,我们需要关注一个点——ServerBootstrapAcceptor。
上面代码为pipeline中添加了一个ChannelInitializer,而这个ChannelInitializer中添加了一个非常关键ServerBootstrapAcceptor的handler。现在我们关注一下ServerBootstrapAcceptor类。在ServerBootstrapAcceptor中重写了channelRead()方法,其主要代码如下:

ServerBootstrapAcceptor 中的 childGroup就是我们的workerGroup, 而 Channel 是一个 NioSocketChannel 的实例, 因此这里的 childGroup.register 就是将 workerGroup 中的摸个 EventLoop 和 NioSocketChannel 关联了。既然这样, 那么现在的问题是,ServerBootstrapAcceptor.channelRead()方法是怎么被调用的呢? 其实当一个 client 连接到 server 时, Java 底层的 NIO ServerSocketChannel 会有一个 SelectionKey.OP_ACCEPT 就绪事件, 接着就会调用到 NioServerSocketChannel.doReadMessages()方法:
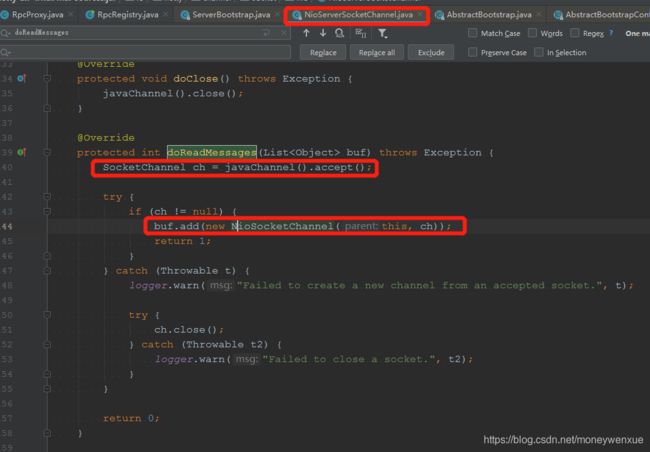
在 doReadMessages 中, 通过 javaChannel().accept() 获取到客户端新连接的 SocketChannel, 接着就实例化一个NioSocketChannel, 并且传入 NioServerSocketChannel 对象(即 this), 由此可知, 我们创建的这个 NioSocketChannel 的父 Channel 就是 NioServerSocketChannel 实例 。
接下来就经由 Netty 的 ChannelPipeline 机制,将读取事件逐级发送到各个 handler 中, 于是就会触发前面我们提到的 ServerBootstrapAcceptor.channelRead()方法。
七、handler 的添加过程
客户端handler我们知道是在初始化的时候通过启动代码的.handler()添加的。但是服务端有两个group,那么我们就要弄清楚.handler()是设置bossGroup的还是workerGroup的。
一个是通过 handler() 方法设置 handler 字段, 另一个是通过 childHandler() 设置 childHandler 字段. 通过前面的 bossGroup 和 workerGroup 的分析, 其实我们在这里可以大胆地猜测: handler 字段与 accept 过程有关, 即这个 handler 负责处理客户端的连接请求; 而 childHandler 就是负责和客户端的连接的 IO 交互。实际就是这样的,我们后续的篇章中会讲解到。在我们的demo示例中:只有childHandler() 方法,如果要对bossGroup添加handler,我们可以使用.handler()方式在启动代码处添加。
八、服务端Selector事件轮询
再回到ServerBootstrap的启动代码,是从bind()方法开始的。ServerBootstrap的bind()方法实际上就是其父类AbstractBootstrap的bind()方法,来看代码:
private static void doBind0(
            final ChannelFuture regFuture, final Channel channel,
            final SocketAddress localAddress, final ChannelPromise promise) {

        // This method is invoked before channelRegistered() is triggered.  Give user handlers a chance to set up
        // the pipeline in its channelRegistered() implementation.
        channel.eventLoop().execute(new Runnable() {
            @Override
            public void run() {
                if (regFuture.isSuccess()) {
                    channel.bind(localAddress, promise).addListener(ChannelFutureListener.CLOSE_ON_FAILURE);
                } else {
                    promise.setFailure(regFuture.cause());
                }
            }
        });
    }
在doBind0()方法中,调用的是EventLoop的execute()方法,继续跟进:

在execute()主要是创建线程,将线程添加到EventLoop的无锁化串行任务队列。我们重点关注startThread()方法,继续看源码:

我们发现startThread()最终调用的是SingleThreadEventExecutor.this.run()方法,这个this就是NioEventLoop对象:
 @Override
    protected void run() {
        for (;;) {
            try {
                switch (selectStrategy.calculateStrategy(selectNowSupplier, hasTasks())) {
                    case SelectStrategy.CONTINUE:
                        continue;
                    case SelectStrategy.SELECT:
                        select(wakenUp.getAndSet(false));
                        //select的唤醒逻辑
                        if (wakenUp.get()) {
                            selector.wakeup();
                        }
                    default:
                        // fallthrough
                }

                cancelledKeys = 0;
                needsToSelectAgain = false;
                final int ioRatio = this.ioRatio;
                if (ioRatio == 100) {
                    try {
                        processSelectedKeys();
                    } finally {
                        // Ensure we always run tasks.
                        runAllTasks();
                    }
                } else {
                    final long ioStartTime = System.nanoTime();
                    try {
                        processSelectedKeys();
                    } finally {
                        // Ensure we always run tasks.
                        final long ioTime = System.nanoTime() - ioStartTime;
                        runAllTasks(ioTime * (100 - ioRatio) / ioRatio);
                    }
                }
            } catch (Throwable t) {
                handleLoopException(t);
            }
            // Always handle shutdown even if the loop processing threw an exception.
            try {
                if (isShuttingDown()) {
                    closeAll();
                    if (confirmShutdown()) {
                        return;
                    }
                }
            } catch (Throwable t) {
                handleLoopException(t);
            }
        }
    }
终于看到了似曾相识的代码, 上面的代码主要是用一个死循环不断的轮询SelectionKey。select()方法主要用来解决JDK空轮询bug,而processSelectedKeys()就是针对不同的轮询事件进行处理。如果客户端有数据写入,最终也会调用AbstractNioMessageChannel的doReadMessage()方法。总结一下:
- Netty的select事件轮询是从EventLoop的execute()方法开始的。
- 在EventLoop的execute()方法中,会为每一个事件创建一个独立的线程,并保存到无锁化串行任务队列。
- 线程任务队列的每个任务实际调用的是NioEventLoop的run()方法。
- 在run()方法中调用processSelectKeys()处理轮询事件。
八、Netty解决JDK空轮询bug
8.1 jdk空轮询bug表现及原因:
bug表现:
 epoll bug
- 正常情况下,
selector.select()操作是阻塞的,只有被监听的fd有读写操作时,才被唤醒 - 但是,在这个bug中,没有任何fd有读写请求,但是
select()操作依旧被唤醒 - 很显然,这种情况下,
selectedKeys()返回的是个空数组 - 然后按照逻辑执行到
while(true)处,循环执行,导致死循环。
bug原因:
JDK bug列表中有两个相关的bug报告:
- JDK-6670302 : (se) NIO selector wakes up with 0 selected keys infinitely
- JDK-6403933 : (se) Selector doesn't block on Selector.select(timeout) (lnx)
JDK-6403933的bug说出了实质的原因:
This is an issue with poll (and epoll) on Linux. If a file descriptor for a connected socket is polled with a request event mask of 0, and if the connection is abruptly terminated (RST) then the poll wakes up with the POLLHUP (and maybe POLLERR) bit set in the returned event set. The implication of this behaviour is that Selector will wakeup and as the interest set for the SocketChannel is 0 it means there aren't any selected events and the select method returns 0.
具体解释为:在部分Linux的2.6的kernel中,poll和epoll对于突然中断的连接socket会对返回的eventSet事件集合置为POLLHUP,也可能是POLLERR,eventSet事件集合发生了变化,这就可能导致Selector会被唤醒。
这是与操作系统机制有关系的,JDK虽然仅仅是一个兼容各个操作系统平台的软件,但很遗憾在JDK5和JDK6最初的版本中(严格意义上来将,JDK部分版本都是),这个问题并没有解决,而将这个帽子抛给了操作系统方,这也就是这个bug最终一直到2013年才最终修复的原因,最终影响力太广。
8.2 Netty解决方法
在Netty最终解决方法是:创建一个新的Selector,将可用事件重新注册到新的Selector中来终止空轮询。回顾事件轮询的关键代码:
protected void run() {
        for (;;) {
            try {
                switch (selectStrategy.calculateStrategy(selectNowSupplier, hasTasks())) {
                    case SelectStrategy.CONTINUE:
                        continue;
                    case SelectStrategy.SELECT:
                        select(wakenUp.getAndSet(false));
                        //省略select唤醒逻辑
                    default:

                }

               //省略事件轮询处理逻辑
        }
    }
前面我们提到select()方法解决了JDK空轮询bug,它到底是如何解决的呢?下面我们来一探究竟,进入select()方法的源码:
long currentTimeNanos = System.nanoTime();
for (;;) {
    // 1.定时任务截止事时间快到了,中断本次轮询
    ...
    // 2.轮询过程中发现有任务加入,中断本次轮询
    ...
    // 3.阻塞式select操作
    selector.select(timeoutMillis);
    // 4.解决jdk的nio bug
    long time = System.nanoTime();
    if (time - TimeUnit.MILLISECONDS.toNanos(timeoutMillis) >= currentTimeNanos) {
        selectCnt = 1;
    } else if (SELECTOR_AUTO_REBUILD_THRESHOLD > 0 &&
            selectCnt >= SELECTOR_AUTO_REBUILD_THRESHOLD) {

        rebuildSelector();
        selector = this.selector;
        selector.selectNow();
        selectCnt = 1;
        break;
    }
    currentTimeNanos = time;
    ...
 }
netty 会在每次进行 selector.select(timeoutMillis) 之前记录一下开始时间currentTimeNanos,在select之后记录一下结束时间,判断select操作是否至少持续了timeoutMillis秒(这里将time - TimeUnit.MILLISECONDS.toNanos(timeoutMillis) >= currentTimeNanos改成time - currentTimeNanos >= TimeUnit.MILLISECONDS.toNanos(timeoutMillis)或许更好理解一些),如果持续的时间大于等于timeoutMillis,说明就是一次有效的轮询,重置selectCnt标志,否则,表明该阻塞方法并没有阻塞这么长时间,可能触发了jdk的空轮询bug,当空轮询的次数超过一个阀值的时候,默认是512,就开始重建selector。
本节参考自:https://www.jianshu.com/p/3ec120ca46b2