SpringMvc集成WebSocket 利用flash兼容IE Redis订阅发布解决多实例问题
SpringMVC集成WebSocket (利用flash兼容IE Redis订阅发布解决多实例问题)
- WebSocket协议是什么
-
- 1.WebSocket是应用层协议
- WebSocket与Http的区别
- 为什么要使用WebSocket
-
- 1.客户端定时查询
- 2.长轮训机制
- 3.HTTP Streaming
- 如何使用WebSocket
-
- 第一步:在工程pom文件中加入webSocket所依赖的jar包,添加maven配置:
- 第二步:修改springMVC工程中的web.xml文件,定义webSocket的nameSpace版本。
- 第三步:添加webSoket拦截配置
- 第四步:添加webSocket握手拦截配置类
- 第五步:添加具体的webSocket消息处理类
- 第六步:前端添加webSocket的web_socket.js文件
- 第七步:前端实现webSocket连接
- WebSocket实现IE低版本兼容
-
- 首先:引入swfobject.js文件,和WebSocketMain.swf文件。
- 第二步:页面加载使用swf文件
- 第三步:后台添加843端口的监听,和策略文件的返回程序
- 第四步:服务开通843端口。
- 通过redis的消息订阅功能,解决webSocket多实例推送问题。
-
- 首先,工程启动时,通过redis订阅对应渠道
- 第二步,添加redis监听程序,实现onMessage方法
- 第三步,在需要发送消息时,往redis对应渠道推送消息
- 加入心跳检测,解决连接自动断开现象
- 结论
WebSocket协议是什么
1.WebSocket是应用层协议
WebSocket 是 HTML5 开始提供的一种在单个 TCP 连接上进行全双工通讯的协议,是基于TCP的应用层协议,用于在C/S架构的应用中实现双向通信.
需要特别注意的是:虽然WebSocket协议在建立连接时会使用HTTP协议,但这并不意味着WebSocket协议是基于HTTP协议实现的。

WebSocket与Http的区别
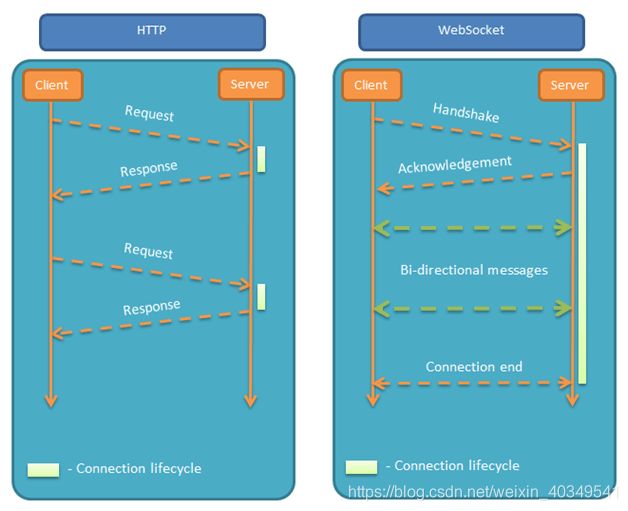
WebSocket 协议在2008年诞生,2011年成为国际标准。现在所有浏览器都已经支持了。WebSocket 的最大特点就是,服务器可以主动向客户端推送信息,客户端也可以主动向服务器发送信息,是真正的双向平等对话。
HTTP 有 1.1 和 1.0 之说,也就是所谓的 keep-alive ,把多个 HTTP 请求合并为一个,但是 Websocket 其实是一个新协议,跟 HTTP 协议基本没有关系,只是为了兼容现有浏览器,所以在握手阶段使用了 HTTP 。
下面一张图说明了 HTTP 与 WebSocket 的主要区别:
WebSocket 的其他特点:
- 建立在 TCP 协议之上,服务器端的实现比较容易。
- 与 HTTP 协议有着良好的兼容性。默认端口也是80和443,并且握手阶段采用 HTTP 协议, 因此握手时不容易屏蔽,能通过各种 HTTP 代理服务器。
- 数据格式比较轻量,性能开销小,通信高效。
- 可以发送文本,也可以发送二进制数据。
- 没有同源限制,客户端可以与任意服务器通信。
- 协议标识符是ws(如果加密,则为wss),服务器网址就是 URL。
为什么要使用WebSocket
随着Web应用的发展,特别是动态网页的普及,越来越多的场景需要实现数据动态刷新。
在早期的时候,实现数据刷新的方式通常有如下3种:
1.客户端定时查询
客户端定时查询(如:每隔10秒钟查询一次)是最原始也是最简单的实现数据刷新的方法,服务端不用做任何改动,只需要在客户端添加一个定时器即可。但是这种方式的缺点也很明显:大量的定时请求都是无效的,因为服务端的数据并没有更新,相应地也导致了大量的带宽浪费。
2.长轮训机制
长轮训机制是对客户端定时查询的一种改进,即:客户端依旧保持定时发送请求给服务端,但是服务端并不立即响应,而是等到真正有数据更新的时候才发送给客户端。实际上,并不是当没有数据更新时服务端就永远都不响应客户端,而是需要在等待一个超时时间之后结束该次长轮训请求。相对于客户端定时查询方式而言,当数据更新频率不确定时长轮训机制能够很明显地减少请求数。但是,在数据更新比较频繁的场景下,长轮训方式的优势就没那么明显了。
在Web开发中使用得最为普遍的长轮训实现方案为Comet(Comet (web技术)),Tomcat和Jetty都有对应的实现支持,详见:WhatIsComet,Why Asynchronous Servlets。
3.HTTP Streaming
不论是长轮训机制还是传统的客户端定时查询方式,都需要客户端不断地发送请求以获取数据更新,而HTTP Streaming则试图改变这种方式,其实现机制为:客户端发送获取数据更新请求到服务端时,服务端将保持该请求的响应数据流一直打开,只要有数据更新就实时地发送给客户端。
虽然这个设想是非常美好的,但这带来了新的问题:
- HTTP Streaming的实现机制违背了HTTP协议本身的语义,使得客户端与服务端不再是“请求-响应”的交互方式,而是直接在二者建立起了一个单向的“通信管道”。
- 在HTTP Streaming模式下,服务端只要得到数据更新就发送给客户端,那么就需要客户端与服务端协商如何区分每一个更新数据包的开始和结尾,否则就可能出现解析数据错误的情况。
- 另外,处于客户端与服务端的网络中介(如:代理)可能会缓存响应数据流,这可能会导致客户端无法真正获取到服务端的更新数据,这实际上与HTTP Streaming的本意是相违背的。 鉴于上述原因,在实际应用中HTTP Streaming并没有真正流行起来,反之使用得最多的是长轮训机制。
显然,上述几种实现数据动态刷新的方式都是基于HTTP协议实现的,或多或少地存在这样那样的问题和缺陷;而WebSocket是一个全新的应用层协议,专门用于Web应用中需要实现动态刷新的场景。
相比起HTTP协议,WebSocket具备如下特点:
- 支持双向通信,实时性更强。
- 更好的二进制支持。
- 较少的控制开销:连接创建后,WebSockete客户端、服务端进行数据交换时,协议控制的数据包头部较小。
- 支持扩展。
如何使用WebSocket
下面是我在工作中,将WebSocket集成至一个springMVC工程中的过程,以及在其中遇到过的各种坑。
首先,实现都是取决于业务要求,此次改造主要是为了实现一个站内信的实时通知,将新的消息推送至前端页面。之前项目实现此功能都是采用页面公共函数刷新(公共页面加js,每次刷新页面都请求一次),或者ajax定时刷新来实现,但这两种方式都特别耗费资源,对页面的流畅度也有较大影响,所以此次改造选择采用webSocket技术来实现。下面是具体的springMVC集成WebSocket流程:
第一步:在工程pom文件中加入webSocket所依赖的jar包,添加maven配置:
        <dependency>
            <groupId>org.springframeworkgroupId>
            <artifactId>spring-websocketartifactId>
        dependency>
        <dependency>
            <groupId>org.springframeworkgroupId>
            <artifactId>spring-messagingartifactId>
        dependency>
        <dependency>
            <groupId>com.google.code.gsongroupId>
            <artifactId>gsonartifactId>
        dependency>
此处要注意你使用的spring版本和webSocket兼容性。我这边websocket版本都4.1.2.RELEASE版本,spring版本是4.1.4.RELEASE
第二步:修改springMVC工程中的web.xml文件,定义webSocket的nameSpace版本。
<beans xmlns="http://www.springframework.org/schema/beans"
       xmlns:xsi="http://www.w3.org/2001/XMLSchema-instance"
       xmlns:context="http://www.springframework.org/schema/context"
       xmlns:mvc="http://www.springframework.org/schema/mvc"
	   xmlns:websocket="http://www.springframework.org/schema/websocket"
		xsi:schemaLocation="
		http://www.springframework.org/schema/websocket http://www.springframework.org/schema/websocket/spring-websocket-4.0.xsd
		http://www.springframework.org/schema/mvc http://www.springframework.org/schema/mvc/spring-mvc-4.0.xsd
		http://www.springframework.org/schema/beans http://www.springframework.org/schema/beans/spring-beans-4.0.xsd
		http://www.springframework.org/schema/context http://www.springframework.org/schema/context/spring-context-4.0.xsd">
第三步:添加webSoket拦截配置
/**
 * 只有一个实例对象,哪怕手动创建也只有一个; 系统会创建对象,如果手动创建,这两个不同
 * @EnableWebMvc 需要以编程的方式指定视图文件相关配置
 */
@Component
@Configuration
@EnableWebMvc
@EnableWebSocket
public class WebSocketConfig extends WebMvcConfigurerAdapter implements WebSocketConfigurer {

    @Override
    public void registerWebSocketHandlers(WebSocketHandlerRegistry registry) {
        //注册处理拦截器,拦截url为socketServer的请求
        registry.addHandler(socketHandler(), "/socketServer").addInterceptors(new WebSocketInterceptor());

        //注册SockJs的处理拦截器,拦截url为/sockjs/socketServer的请求
        registry.addHandler(socketHandler(), "/sockjs/socketServer").addInterceptors(new WebSocketInterceptor()).withSockJS();
    }

    @Bean
    public SocketHandler socketHandler(){
        return new SocketHandler();
    }

}
第四步:添加webSocket握手拦截配置类
/**
 *  websocket拦截器
 *
 * HandshakeInterceptor
 * WebSocket握手请求的拦截器. 检查握手请求和响应, 对WebSocketHandler传递属性
 */
public class WebSocketInterceptor  extends HttpSessionHandshakeInterceptor {

    private final Logger logger = LoggerFactory.getLogger(this.getClass());

    @Override
    public void afterHandshake(ServerHttpRequest request, ServerHttpResponse response,
                               WebSocketHandler handler, Exception exception) {

        super.afterHandshake(request,response,handler,exception);

    }

    /**
     *  将HttpSession中对象放入WebSocketSession中
     */
    @Override
    public boolean beforeHandshake(ServerHttpRequest request,
                                   ServerHttpResponse response, WebSocketHandler handler,
                                   Map<String, Object> map) throws Exception {
        //区分socket连接以定向发送消息
        if(request != null){
            Admin admin = null;
            try {
                admin = CacheUtil.getCacheUser().getAdmin();
                map.put("user",admin.getAdminName());
            } catch (Exception e) {
                logger.error("webSocket hander get cache user error!");
            }
            if(admin == null){
                HttpServletRequest servletRequest = ((ServletServerHttpRequest) request).getServletRequest();
                map.put("user", servletRequest.getParameter("operator"));
            }
        }
        return super.beforeHandshake(request, response, handler, map);
    }

}
第五步:添加具体的webSocket消息处理类
此类继承了TextWebSocketHandler方法,实际就是对各种消息处理做自己个性的设置。其中方法根据自己的要求来随意书写。
/**
 * @desp Socket处理类
 *
 */
@Service
public class SocketHandler extends TextWebSocketHandler {

    private final Logger logger = LoggerFactory.getLogger(this.getClass());
    private static final ArrayList<WebSocketSession> users = new ArrayList<WebSocketSession>();;

    @Resource
    private SocketBlackService socketBlackService;


    @Override
    public void afterConnectionEstablished(WebSocketSession session)
            throws Exception {
        logger.error("成功建立socket连接");
        users.add(session);
//        String username = session.getAttributes().get("user").toString();
//        if(username != null){
//            session.sendMessage(new TextMessage("我们已经成功建立socket通信了"));
//        }
    }


    @Override
    public void handleTransportError(WebSocketSession session, Throwable error)
            throws Exception {
        if(session.isOpen()){
            session.close();
        }
        logger.info("连接出现错误:"+error.toString());
        users.remove(session);
    }

    @Override
    public void afterConnectionClosed(WebSocketSession session, CloseStatus arg1)
            throws Exception {
        logger.info("连接已关闭");
        users.remove(session);
    }

    @Override
    public boolean supportsPartialMessages() {
        return false;
    }

    /**
     * 在UI在用js调用websocket.send()时候,会调用该方法
     */
    @Override
    protected void handleTextMessage(WebSocketSession session, TextMessage message) throws Exception {
//        sendMessageToUsers(message);

        String username = session.getAttributes().get("user").toString();


    }
}
第六步:前端添加webSocket的web_socket.js文件
WebSocket 事件
以下是 WebSocket 对象的相关事件。
| 事件 | 事件处理程序 | 描述 |
|---|---|---|
| open | Socket.onopen | 连接建立时触发 |
| message | Socket.onmessage | 客户端接收服务端数据时触发 |
| error | Socket.onerror | 通信发生错误时触发 |
| close | Socket.onclose | 连接关闭时触发 |
WebSocket 方法
以下是 WebSocket 对象的相关方法。
| 方法 | 描述 |
|---|---|
| Socket.send() | 使用连接发送数据 |
| Socket.close() | 关闭连接 |
第七步:前端实现webSocket连接
<script>
	function socketLink() {
		// 首先判断是否 支持 WebSocket
		<#--if ('WebSocket' in window) {-->
		<#--    websocket = new WebSocket("ws://"+host+base+"/socketServer");-->
		<#--    console.log('zhengchangdi')-->
		<#--} else if ('MozWebSocket' in window) {-->
		<#--    websocket = new MozWebSocket("ws://"+host+base+"/socketServer");-->
		<#--} else {-->
		<#--    websocket = new SockJS("${base}/sockjs/socketServer");-->
		<#--    console.log('IE8')-->
		<#--}-->

		<#--window.WEB_SOCKET_SWF_LOCATION = "${base}/res/js/webSocket/WebSocketMain.swf";-->
		// window.WEB_SOCKET_DEBUG = true;
		var websocket;
		<#--var host = "${callcenterIp}";-->
		var host = window.location.host;
		var base = "${base}";

		WEB_SOCKET_DEBUG = true;
		// WEB_SOCKET_DEBUG = true;

		websocket = new WebSocket("wss://" + host + base + "/socketServer?operator=" +<@shiro.principal/>);

		// 打开时
		websocket.onopen = function (evnt) {
			// console.log("socket open")
		};
		// 处理消息时
		websocket.onmessage = function (evnt) {
			inmail.push(evnt.data);
			if(inmail.length===1){
				showTips();
			}
		};
		websocket.onerror = function (evnt) {
			// console.log("socker error");
			// socketLink();
		};
		websocket.onclose = function (evnt) {
			// console.log("socker close");
			socketLink();
		};
		// 发送消息的响应事件
		// websocket.send(JSON.stringify(msg));
	}

</script>

<script>
	$(window).load(function () {
		setTimeout(function () {
			socketLink()
		},1000)
	});
</script>
到这一步,webSocket的基本功能基本都已经实现了,在谷歌浏览器上,本地测试成功了。但是当发到环境上时,确出现了协议报错。

原因是当前环境都是采用的https协议,首先页面访问要使用wss开头,然后根据系统的配置做https的配置处理,像我这边是通过nginx做了请求转发。
再就是还有一个很郁闷的问题,websocket的握手请求,在请求时不会携带当前的cookie信息,这就导致通过上下文无法获取当前登录的用户信息,也就导致了无法确认当前连接的标识。这块我是通过在第一次握手请求时,直接在请求链接上加入当前登录人id来解决的。
WebSocket实现IE低版本兼容
当以为万事大吉的时候,突然发现功能在ie8上竟然完全不生效,然后发现webSocket协议不支持IE10以下的版本,要实现的话只能曲线救国。
搜索了网上的各种解决方法,主要分为两种,
- 一种是通过js模拟实现,本质其实还是http请求方式,只是做了封装,让其看起来就是后台推送。这种方式直接略过,因为其和当时采用websocket的初衷违和了。
- 第二种就是采用flash插件实现,此次就是采用了这种方式。
首先:引入swfobject.js文件,和WebSocketMain.swf文件。
第二步:页面加载使用swf文件
        window.WEB_SOCKET_SWF_LOCATION = "${base}/res/js/webSocket/WebSocketMain.swf";
        window.WEB_SOCKET_DEBUG = true;
第三步:后台添加843端口的监听,和策略文件的返回程序
/**
* 这个socket主要还是为了flash的socket
*/
@Service
public class SocketService {
private ServerSocket serverSocket = null;
private static Object locker = new Object();
// 线程池
private static ExecutorService executorService = null;
public synchronized void initSocketServer() {
try {
if (executorService == null) {
executorService = Executors.newFixedThreadPool(Runtime.getRuntime().availableProcessors() * 20);
} else {
return;
}
//启动843端口
serverSocket = new ServerSocket(843);
Runnable runnable = new Server();
Thread thread = new Thread(runnable);
thread.start();
} catch (Exception e) {
e.printStackTrace();
}
}
public void closeServer() {
locker = null;
if (serverSocket != null && !serverSocket.isClosed()) {
try {
serverSocket.close();
} catch (IOException e) {
e.printStackTrace();
}
}
}
class Server implements Runnable {
@Override
public void run() {
try {
while (locker != null) {
if (serverSocket == null || serverSocket.isClosed()) {
continue;
}
//接收客户端的连接
Socket incoming = serverSocket.accept();
Runnable runnable = new ThreadClient(incoming);
executorService.execute(runnable);
}
} catch (Exception e) {
//此处有一种异常,当关掉Tomcat时,会去关闭ServerSocket对象,
//从而抛出异常java.net.SocketException: socket closed,
//原因是ServerSocket对象正在等待客户端连接或正在连接中
e.printStackTrace();
}
}
}
static class ThreadClient implements Runnable {
private final Socket incoming;
private ThreadClient(Socket socket) {
incoming = socket;
}
public void run() {
InputStreamReader isr = null;
BufferedReader br = null;
OutputStreamWriter osw = null;
BufferedWriter bw = null;
try {
isr = new InputStreamReader(incoming.getInputStream(), StandardCharsets.UTF_8);
br = new BufferedReader(isr);
osw = new OutputStreamWriter(incoming.getOutputStream(), StandardCharsets.UTF_8);
bw = new BufferedWriter(osw);
//读取客户端发送的数据
StringBuilder sb = new StringBuilder();
int c;
while ((c = br.read()) != -1) {
if (c != '\0') {
sb.append((char) c);
} else {
break;
}
}
String info = sb.toString();
System.out.println(String.format("客户端发送的数据:%s", info));
//接收到客户端请求之后,将策略文件发送出去
if (info.contains("第四步:服务开通843端口。
然后进行测试,ie8上终于可以正常使用了。
通过redis的消息订阅功能,解决webSocket多实例推送问题。
发到生产之后,经过测试,消息时不时出现发送不成功的现象,经过排查,原来是由于生产环境一个工程可能会开了多个实例的原因,归根结底,一个websocket连接,其实就是一个请求,当一个工程开通多个实例的时候,其中一个实例建立了连接,在另一个实例上并不能看到此链接,这就导致了消息时常发送不成功的现象。正好,工程已经提前集成了redis,而此次我们解决这个问题,采用的是redis的消息订阅发布功能。
首先,工程启动时,通过redis订阅对应渠道
    /**
     * 开启redis订阅
     */
    @PostConstruct
    public void subscribe() {
        cachedThreadPool.execute(() -> {
            Jedis jedis = null;
            try {
                jedis = JedisUtils.getResource();
                logger.debug("jedis subscribe {}",Constants.WEBSOCKET_INMAIL_CHANNEL);
                jedis.subscribe(redisSubscriber,Constants.WEBSOCKET_INMAIL_CHANNEL);
            } catch (Exception e) {
                logger.warn("jedis subscribe {}",  Constants.WEBSOCKET_INMAIL_CHANNEL, e);
            } finally {
                JedisUtils.returnResource(jedis);
            }
        });
    }
第二步,添加redis监听程序,实现onMessage方法
到收到渠道消息的时候,都会调用此方法。
@Service
public class RedisSubscriber extends JedisPubSub {

    private final Logger logger = LoggerFactory.getLogger(this.getClass());

    @Resource
    private SocketHandler socketHandler;

    @Resource
    private InmailService inmailService;

    @Override
    public void onMessage(String channel, String messages) {
        logger.error("收到{}渠道,消息内容:{}",channel,messages);
        try {
            Inmail inmail = inmailService.findById(Integer.valueOf(messages));
            socketHandler.sendInmailMessage(inmail);
        } catch (NumberFormatException e) {
            logger.error("收到redis订阅消息后,发送socket消息失败",e);
        }
    }

    @Override
    public void onPMessage(String s, String s1, String s2) {

    }

    @Override
    public void onSubscribe(String s, int i) {

    }

    @Override
    public void onUnsubscribe(String s, int i) {

    }

    @Override
    public void onPUnsubscribe(String s, int i) {

    }

    @Override
    public void onPSubscribe(String s, int i) {

    }
}
第三步,在需要发送消息时,往redis对应渠道推送消息
//发送实时消息
JedisUtils.publish(渠道名称,发送内容);
这样就顺利解决了工程多实例发布websocket消息推送问题,其实此问题通过任何一个中间件都可以进行解决,例如利用kafka,或者rabbitMQ都可以进行解决。此处只是将此次采用的方式写出,可不照搬。
加入心跳检测,解决连接自动断开现象
最后经过测试,发现如果一段时间(默认一分钟)没有消息发送,连接会自动断开,所以前端在实现时,最后做了优化,加入了心跳检测功能。
没有利用websocket自带的心跳功能(会被大多数浏览器拦截),而是通过js代码加入了定时轮询,每隔一段时间发送一次消息,如果没有回应,认定连接断开,进行重连。
最终前端实现逻辑如下:
<script>
    function socketLink() {
        // 首先判断是否 支持 WebSocket
        <#--if ('WebSocket' in window) {-->
        <#--    websocket = new WebSocket("ws://"+host+base+"/socketServer");-->
        <#--    console.log('zhengchangdi')-->
        <#--} else if ('MozWebSocket' in window) {-->
        <#--    websocket = new MozWebSocket("ws://"+host+base+"/socketServer");-->
        <#--} else {-->
        <#--    websocket = new SockJS("${base}/sockjs/socketServer");-->
        <#--    console.log('IE8')-->
        <#--}-->
        window.WEB_SOCKET_DEBUG = true;
        var websocket;
        var host = window.location.host;
        var base = "${base}";
        var maxTryNum = 20;//尝试重新连接最大次数
        var curTryNum = 0;//当前已尝试重新连接次数
        var connect = function () {
            websocket = new WebSocket("wss://" + host + base + "/socketServer?operator=" +<@shiro.principal/>);
            // 打开时
            websocket.onopen = function (evnt) {
                //连接成功时将当前已重连次数归零
                curTryNum = 0;
                // console.log("心跳检测启动");
                heartCheck.start();

            };
            // 处理消息时
            websocket.onmessage = function (evnt) {
                //无论收到什么信息,说明当前连接正常,将心跳检测的计时器重置
                heartCheck.reset();
                if (evnt.data !== 'hb_ok') {
                //不处理心跳检测的消息
                }
            };
            websocket.onerror = function (evnt) {

            };
            websocket.onclose = function (evnt) {
                // console.log("socker close");
                if (curTryNum <= maxTryNum) {
                    // 10秒后重新连接,实际效果:每10秒重连一次,直到连接成功
                    setTimeout(function () {
                        // console.log("oncloe 执行重连机制!");
                        connect();
                    }, 10000);
                }
            };
            // 发送消息的响应事件
            // websocket.send(JSON.stringify(msg));

        }


        /**
         * 心跳检测
         * 若60秒内没有接收到任何来自服务器的信息,则向服务器发起一个ping包
         * @type {{timeout: number, timeoutObj: null, serverTimeoutObj: null, reset: reset, start: start}}
         */
        var heartCheck = {
            timeout: 60000, //计时器设定为60s
            timeoutObj: null,
            serverTimeoutObj: null,
            reset: function () {
                clearTimeout(this.timeoutObj);
                clearTimeout(this.serverTimeoutObj);
                this.start();
            },
            start: function () {
                var self = this;
                this.timeoutObj = setTimeout(function () {
                    //向服务器发送ping消息
                    pingToServer();
                    //计算答复的超时时间
                    self.serverTimeoutObj = setTimeout(function () {
                        //如果调用onclose会执行reconnect,导致重连两次,因此直接调用close()关闭连接
                        // console.log("心跳无回应,进行重连机制");
                        websocket.close();
                    }, self.timeout);
                }, this.timeout);
            }
        };

        /**
         * 向服务器发送一个ping包
         */
        var pingToServer = function () {
            websocket.send(JSON.stringify("ping"));
        };

        //启动socket 入口
        connect();
    }

</script>
结论
以上,就是springMVC集成websocket的全过程,过程略坎坷,但幸好都顺利通过不同的方式解决了,如果有其他建议,欢迎评论。再就是本文章只是针对于使用和集成,并没有深入研究websocket的底层,如有错误,欢迎批判。