@Autowired注解的原理、源码
文章目录
- 前言
- 一、@Autowired怎么使用?
- 二、注入干了啥
-
- 1.查找一个类的所有注入点
-
- 1.1 在Spring中Bean的生态位置
- 1.2 detail,源码解读
- 2.注入
-
- 2.1 在Spring中bean的生态的位置
- 2.2 cut crap, show me the code
-
- AutowiredFieldElement的inject方法:
- AutowiredMethodElement的inject方法:
- 三、@Resource和@Autowired注解的区别:
- 总结
前言
@Resource注解和@Autowired注解是咱们使用Spring的两大利器,用来进行属性注入。在上一篇文章中,我们解析了@Resource的源码,同时在总结里解释了下为什么@Resource被称为先按byName后按byType进行依赖注入。今天咱们来分析下@Autowired注解的源码和原理。
一、@Autowired怎么使用?
so easy,当然也可以在方法上加,此处咱们只展示字段的示例
@Service
public class TestService {
    @Autowired
    ResourceLockDAO testDao;
}
大家会发现Spring针对@Autowired注解进行的解析和管理和针对@Resource注解是一样的模式
二、注入干了啥
1.查找一个类的所有注入点
1.1 在Spring中Bean的生态位置
和在这篇解析@Resource注解逻辑是一样的,此处不再赘言。
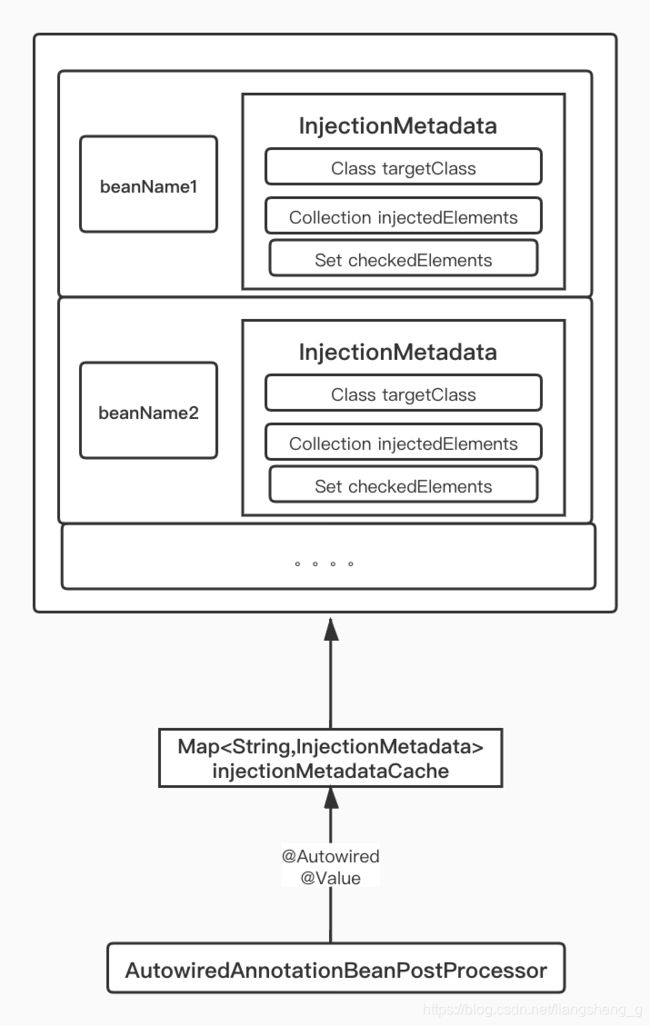
只不过此处咱们调用的是AutowiredAnnotationBeanPostProcessor的postProcessMergedBeanDefinition方法
1.2 detail,源码解读
@Override
public void postProcessMergedBeanDefinition(RootBeanDefinition beanDefinition, Class<?> beanType, String beanName) {
	InjectionMetadata metadata = findAutowiringMetadata(beanName, beanType, null);
	metadata.checkConfigMembers(beanDefinition);
}
不可不说Spring的方法命名也很规范,此处查找依赖注入点的方法名叫findAutowiringMetadata,@Resource注解的时候,对应方法名叫findResourceMetadata。
该方法的代码和findResourceMetadata方法也大面积重合,都拥有属性injectionMetadataCache,然后调用buildAutowiringMetadata方法来进行真正的metadata组建。
private InjectionMetadata buildAutowiringMetadata(final Class<?> clazz) {
	List<InjectionMetadata.InjectedElement> elements = new ArrayList<>();
	Class<?> targetClass = clazz;

	do {
		final List<InjectionMetadata.InjectedElement> currElements = new ArrayList<>();

		// 处理属性上面的@Autiwored注解
		ReflectionUtils.doWithLocalFields(targetClass, field -> {
			AnnotationAttributes ann = findAutowiredAnnotation(field);
			if (ann != null) {
				// do something with log
				boolean required = determineRequiredStatus(ann);
				currElements.add(new AutowiredFieldElement(field, required));
			}
		});

		// 处理方法上的@Autowired注解
		ReflectionUtils.doWithLocalMethods(targetClass, method -> {
			Method bridgedMethod = BridgeMethodResolver.findBridgedMethod(method);
			if (!BridgeMethodResolver.isVisibilityBridgeMethodPair(method, bridgedMethod)) {
				return;
			}
			AnnotationAttributes ann = findAutowiredAnnotation(bridgedMethod);
			if (ann != null && method.equals(ClassUtils.getMostSpecificMethod(method, clazz))) {
				// do something with log
				if (method.getParameterCount() == 0) {
				// 参数个数为0,仅仅是log
				}
				boolean required = determineRequiredStatus(ann);
				PropertyDescriptor pd = BeanUtils.findPropertyForMethod(bridgedMethod, clazz);
				currElements.add(new AutowiredMethodElement(method, required, pd));
			}
		});

		elements.addAll(0, currElements);
		targetClass = targetClass.getSuperclass();
	}
	while (targetClass != null && targetClass != Object.class);

	return new InjectionMetadata(clazz, elements);
}
最后把找到的InjectionMetadata也放到InjectMetadataCache中

2.注入
2.1 在Spring中bean的生态的位置
此处由于逻辑和这篇介绍@Resource注解原理的文章类似,所以不再赘言,直接总结,对于@Autowired注解,使用的AutowiredAnnotationBeanPostProcessor的postProcessProperties方法。
2.2 cut crap, show me the code
@Override
public PropertyValues postProcessProperties(PropertyValues pvs, Object bean, String beanName) {
	InjectionMetadata metadata = findAutowiringMetadata(beanName, bean.getClass(), pvs);
	try {
		metadata.inject(bean, beanName, pvs);
	}
	catch (BeanCreationException ex) {
		throw ex;
	}
	catch (Throwable ex) {
		throw new BeanCreationException(beanName, "Injection of autowired dependencies failed", ex);
	}
	return pvs;
}
- findAutowiringMetadata(beanName, bean.getClass(), pvs)方法找到该bean的所有注入点
- metadata.inject(bean, beanName, pvs)方法是真正的注入实现逻辑
- 此处是和@Resource实现不同的地方了,@Resource在调用inject进行注入时,使用的是InjectionMetadata的inject方法,而@Autowired在寻找注入点的时候,保存的注入点的类分别是AutowiredFieldElement和AutowiredMethodElement,所以在真正注入的时候,调用的是他俩的inject方法
AutowiredFieldElement的inject方法:
@Override
protected void inject(Object bean, @Nullable String beanName, @Nullable PropertyValues pvs) throws Throwable {
	Field field = (Field) this.member;
	Object value;
	if (this.cached) {
		value = resolvedCachedArgument(beanName, this.cachedFieldValue);
	}
	else {
		DependencyDescriptor desc = new DependencyDescriptor(field, this.required);
		// 设置容器类型
		desc.setContainingClass(bean.getClass());
		Set<String> autowiredBeanNames = new LinkedHashSet<>(1);
		TypeConverter typeConverter = beanFactory.getTypeConverter();
		try {
			value = beanFactory.resolveDependency(desc, beanName, autowiredBeanNames, typeConverter);
		}
		catch (BeansException ex) {
			//
		}
		synchronized (this) {
			if (!this.cached) {
				// 下面这个判断,代表如果想要注入的属性为空或required=false时才不进行属性注入
				// 所以如果某个环境某个bean我们不想实例化,那么就可以在注入该bean的类里面使用@Autowired(required=false)
				if (value != null || this.required) {
					this.cachedFieldValue = desc;
					registerDependentBeans(beanName, autowiredBeanNames);
					if (autowiredBeanNames.size() == 1) {
						String autowiredBeanName = autowiredBeanNames.iterator().next();
						if (beanFactory.containsBean(autowiredBeanName) &&
								beanFactory.isTypeMatch(autowiredBeanName, field.getType())) {
							this.cachedFieldValue = new ShortcutDependencyDescriptor(
									desc, autowiredBeanName, field.getType());
						}
					}
				}
				else {
					this.cachedFieldValue = null;
				}
				this.cached = true;
			}
		}
	}
	if (value != null) {
		ReflectionUtils.makeAccessible(field);
		field.set(bean, value);
	}
}
resolveDependency这个方法也上一篇文章中也进行过分析 了,此处不再赘言,主要逻辑就是:根据注入属性的类的class,找到其class对象,如果class是接口,就找到所有实现类的class对象。
如果找到的class对象有多个,就根据属性名再从所有class对象中找到名字相同的那个class对象
这个逻辑也就是所谓的@Autowired注解先根据byType再根据byName来注入
根据class对象去容器中查找对应的Bean对象,当然又是调用的BeanFactory.getBean来实现的;找到之后返回头再调用反射进行set。
AutowiredMethodElement的inject方法:
@Override
protected void inject(Object bean, @Nullable String beanName, @Nullable PropertyValues pvs) throws Throwable {
	if (checkPropertySkipping(pvs)) {
		return;
	}
	Method method = (Method) this.member;
	Object[] arguments;
	if (this.cached) {
		// Shortcut for avoiding synchronization...
		arguments = resolveCachedArguments(beanName);
	}
	else {
		Class<?>[] paramTypes = method.getParameterTypes();
		arguments = new Object[paramTypes.length];
		DependencyDescriptor[] descriptors = new DependencyDescriptor[paramTypes.length];
		Set<String> autowiredBeans = new LinkedHashSet<>(paramTypes.length);
		TypeConverter typeConverter = beanFactory.getTypeConverter();
		for (int i = 0; i < arguments.length; i++) {
			MethodParameter methodParam = new MethodParameter(method, i);
			DependencyDescriptor currDesc = new DependencyDescriptor(methodParam, this.required);
			currDesc.setContainingClass(bean.getClass());
			descriptors[i] = currDesc;
			try {
				Object arg = beanFactory.resolveDependency(currDesc, beanName, autowiredBeans, typeConverter);
				if (arg == null && !this.required) {
					arguments = null;
					break;
				}
				arguments[i] = arg;
			}
			catch (BeansException ex) {
				throw new UnsatisfiedDependencyException(null, beanName, new InjectionPoint(methodParam), ex);
			}
		}
		synchronized (this) {
			if (!this.cached) {
				if (arguments != null) {
					Object[] cachedMethodArguments = new Object[paramTypes.length];
					System.arraycopy(descriptors, 0, cachedMethodArguments, 0, arguments.length);
					registerDependentBeans(beanName, autowiredBeans);
					if (autowiredBeans.size() == paramTypes.length) {
						Iterator<String> it = autowiredBeans.iterator();
						for (int i = 0; i < paramTypes.length; i++) {
							String autowiredBeanName = it.next();
							if (beanFactory.containsBean(autowiredBeanName) &&
									beanFactory.isTypeMatch(autowiredBeanName, paramTypes[i])) {
								cachedMethodArguments[i] = new ShortcutDependencyDescriptor(
										descriptors[i], autowiredBeanName, paramTypes[i]);
							}
						}
					}
					this.cachedMethodArguments = cachedMethodArguments;
				}
				else {
					this.cachedMethodArguments = null;
				}
				this.cached = true;
			}
		}
	}
	if (arguments != null) {
		try {
			ReflectionUtils.makeAccessible(method);
			method.invoke(bean, arguments);
		}
		catch (InvocationTargetException ex) {
			throw ex.getTargetException();
		}
	}
}
可以看到比FieldElement多出来的逻辑就是遍历方法的参数,然后调用resolveDependency获取实际参数的bean对象,最终通过反射进行方法调用;同时针对方法参数列表进行了缓存。
三、@Resource和@Autowired注解的区别:
1. 两者的处理类不同,一个是CommonAnnotationBeanPostProcessor,一个是AutowiredAnnotationBeanPostProcessor
2. 对于@Resource注解,在调用resloveDependency之前会先在从容器里通过判断beanName是否存在,如果存在,会直接通过name和Type去调用getBean,否则再调用doResolveDependency方法;而@Autowired会直接调用doResolveDependency方法。对外表现为@Resource直接是先byName后byType;而@Autowired先byType后byName
总结
以上介绍了@Autowired注解的源码,进行了一些分析。并在最后进行了和@Resource注解的区别分析。
这一段是重点,再贴一遍:
对于@Resource注解,在调用resloveDependency之前会先在从容器里通过判断beanName是否存在,如果存在,会直接通过name和Type去调用getBean,否则再调用doResolveDependency方法;而@Autowired会直接调用doResolveDependency方法。最终对外表现为@Resource直接是先byName后byType;而@Autowired先byType后byName