有关VScode 配置MinGW32_9.2.0+OpenGL+GLFW+GLAD
为防止自己忘记,特此记录。
第一次写文章 若有侵权请联系删除,多多包涵。。。
首先你得先有个MinGW32_9.2.0
1.下载GLFW 官网: Download | GLFW
选择32-bit Windows binaries
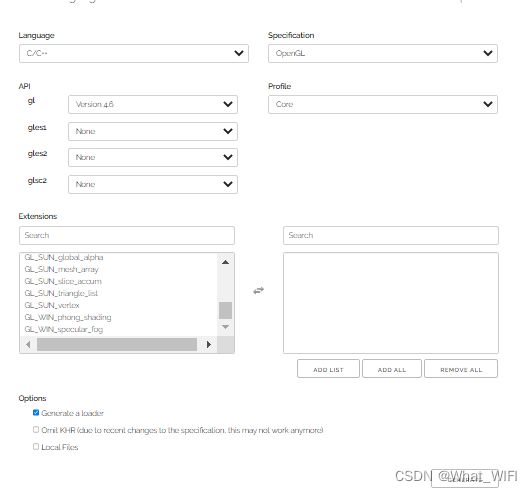
2. 下载glad 官网:https://glad.dav1d.de/
选项如下
最后 Generate
选择glad.zip 下载
3.配置vscode C++(不详细教程)
4.
在工作目录下新建文件夹
5.根据这位大佬的教程VsCode下配置OpenGL开发环境_哔哩哔哩_bilibili
得到:
放入Lib文件夹下
6.配置Include文件夹
解压glad.zip 和 glfw的下载压缩文件
glad的头文件和glfw的include下的文件放入Include(之前新建的文件夹)
7.配置lunch.json 和 tasks.json
在"configurations": 下添加如下
{

            "name": "C/C++ 9.2.0 x86 - OpenGL",

            "type": "cppdbg",

            "request": "launch",

            "program": "${fileDirname}\\${fileBasenameNoExtension}.exe",

            "args": [],

            "stopAtEntry": false,

            "cwd": "${fileDirname}",

            "environment": [],

            "externalConsole": true,

            "MIMode": "gdb",

            "miDebuggerPath": "D:/MinGW/MinGW/bin/gdb.exe",//此处填写本机的gdb.exe绝对位置

            "setupCommands": [

                {

                    "description": "为 gdb 启用整齐打印",

                    "text": "-enable-pretty-printing",

                    "ignoreFailures": true

                },

                {

                    "description": "将反汇编风格设置为 Intel",

                    "text": "-gdb-set disassembly-flavor intel",

                    "ignoreFailures": true

                }

            ],

            "preLaunchTask": "C/C++ 9.2.0 tasks -OpenGL"

        }
tasks.json:
在"tasks":下添加如下:
        {

            "type": "cppbuild",

            "label": "C/C++ 9.2.0 tasks -OpenGL",

            "command": "D:\\MinGW\\MinGW\\bin\\g++.exe",//此处填写本机g++.exe绝对路径

            "args": [

                "-g",

                    "${file}",


                    "-o",

                    "${fileDirname}\\${fileBasenameNoExtension}.exe",

                    "-I", //将开始 include

                    "../Include",

                    "-L",

                    "../Lib",

                    "-lglfw3dll",

                    " -lopengl32",

                    " -lglad"


            ],

            "options": {

                "cwd": "${fileDirname}"

            },

            "problemMatcher": [

                //"$gcc"

            ],

            "group": {

                "kind": "build",

                "isDefault": true

            },

            "detail": "调试器生成的任务。"

        }
8.新建Project文件夹,正式写代码了!!
在Project下新建一个main.cpp
添加如下代码:
#include
#include

#include

void framebuffer_size_callback(GLFWwindow* window, int width, int height);
void processInput(GLFWwindow *window);

// settings
const unsigned int SCR_WIDTH = 800;
const unsigned int SCR_HEIGHT = 600;

int main()
{
    // glfw: initialize and configure
    // ------------------------------
    glfwInit();
    glfwWindowHint(GLFW_CONTEXT_VERSION_MAJOR, 3);
    glfwWindowHint(GLFW_CONTEXT_VERSION_MINOR, 3);
    glfwWindowHint(GLFW_OPENGL_PROFILE, GLFW_OPENGL_CORE_PROFILE);

#ifdef __APPLE__
    glfwWindowHint(GLFW_OPENGL_FORWARD_COMPAT, GL_TRUE);
#endif

    // glfw window creation
    // --------------------
    GLFWwindow* window = glfwCreateWindow(SCR_WIDTH, SCR_HEIGHT, "LearnOpenGL", NULL, NULL);
    if (window == NULL)
    {
        std::cout << "Failed to create GLFW window" << std::endl;
        glfwTerminate();
        return -1;
    }
    glfwMakeContextCurrent(window);
    glfwSetFramebufferSizeCallback(window, framebuffer_size_callback);

    // glad: load all OpenGL function pointers
    // ---------------------------------------
    if (!gladLoadGLLoader((GLADloadproc)glfwGetProcAddress))
    {
        std::cout << "Failed to initialize GLAD" << std::endl;
        return -1;
    }

    // render loop
    // -----------
    while (!glfwWindowShouldClose(window))
    {
        // input
        // -----
        processInput(window);

        // glfw: swap buffers and poll IO events (keys pressed/released, mouse moved etc.)
        // -------------------------------------------------------------------------------
        glfwSwapBuffers(window);
        glfwPollEvents();
    }

    // glfw: terminate, clearing all previously allocated GLFW resources.
    // ------------------------------------------------------------------
    glfwTerminate();
    return 0;
}

// process all input: query GLFW whether relevant keys are pressed/released this frame and react accordingly
// ---------------------------------------------------------------------------------------------------------
void processInput(GLFWwindow *window)
{
    if(glfwGetKey(window, GLFW_KEY_ESCAPE) == GLFW_PRESS)
        glfwSetWindowShouldClose(window, true);
}

// glfw: whenever the window size changed (by OS or user resize) this callback function executes
// ---------------------------------------------------------------------------------------------
void framebuffer_size_callback(GLFWwindow* window, int width, int height)
{
    // make sure the viewport matches the new window dimensions; note that width and
    // height will be significantly larger than specified on retina displays.
    glViewport(0, 0, width, height);
}
最后选择
![]()
按下F5便可运行!
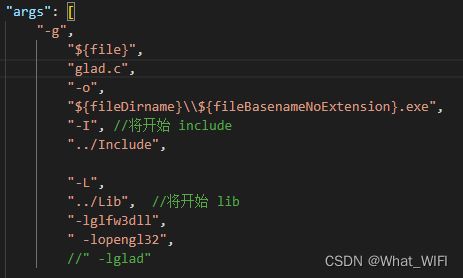
另外在提出一个新的glad.c的方法:
在源文件的同级目录下将glad.c粘贴,
添加#include"glad.c"
或者在tasks.json在配置如下
也可以通过F5运行!
还有:
VScode 读取相对路径文件失败的问题
将lunch.json的配置的"cwd"改为
成功解决!


