Shiro原理及源码分析
一、原理分析
1.Shiro 的简介是:好用的 Java 安全框架,可执行身份验证、授权、密码和会话管理,它有三个核心组件:Subject, SecurityManager 和 Realm。
Subject 在 Shiro 中指当前”用户”,是框架执行认证、授权功能的门户。
SecurityManager,安全管理器,所有与安全有关的操作都需要通过它,它是整个 Shiro 框架的功能核心。
让你觉得 Shiro 的认证、授权、会话管理等这些功能的完成都是 SecurityManager 自己在干?实际上,基于责任分离的原则,SecurityManager 本身也并不完成具体的功能,它只负责需求调度,具体的功能完成都分配到具体的功能组件,比如登录认证就找登录认证组件(Authentication),授权找授权组件(Authorization),会话找会话组件(Session Manager),数据比对就找数据源组件(Realm)等等。是的,Shiro 中的 SecurityManager 就是保证应用程序启动的时候,能够创建出全局唯一的安全管理器实例,让该实例在幕后帮我们完成安全有关的认证、授权和会话管理等工作。
安全管理器的创建是依赖于认证、授权,缓存、数据源等诸多组件的,你可以各自创建功能组件对象然后交给 SecurityManger ,配置的方式,选择很多,比如你可以通过 Spring XML 配置,也可以用 YAML 文件或者 Properties文件配置等,
Realm:领域对象,在 Shiro 和你的应用程序安全数据(比如登录的用户名、密码,用户的权限等)之间架起一座沟通的桥梁,安全管理器要验证用户身份,或者要获取用户对应的权限,是分别通过认证组件(Authentication)和授权组件(Authorization)来具体完成的,但是这两个组件要完成认证或授权的实际功能,又需要与安全有关的数据做支撑,这个时候,他们就要从 Realm 那里获取相应的用户数据进行比较以确定登录用户身份是否合法,或者从 Realm 那里得到用户相应的角色 / 权限以验证用户是否能进行某些操作操作。
二、初始化配置流程
1.准备工作,引入POM包
		   org.apache.shiro
		   shiro-spring-boot-web-starter
2.securityManager
使用DefaultWebSecurityManager,并且Realm数据源组件使用自定义的ClientRealm(从数据库中读取账号信息),SessionManager会话管理器使用自定义的MyDefaultWebSessionManager(将会话信息保存到REDIS)。
	@Bean(name = "securityManager")
	public DefaultWebSecurityManager securityManager(
			@Qualifier("sessionManager") MyDefaultWebSessionManager sessionManager,
			@Qualifier("clientRealm") ClientRealm clientRealm) {
		DefaultWebSecurityManager securityManager = new DefaultWebSecurityManager();
		securityManager.setRealm(clientRealm);
		securityManager.setSessionManager(sessionManager);
		return securityManager;
	}
3.SessionManager会话管理器,从外部注入RedisSessionDAO会话存储器,SimpleCookie-COOKIE操作器(shiro自带)。
	@Bean(name = "sessionManager")
	public MyDefaultWebSessionManager sessionManager(@Qualifier("redisSessionDAO") RedisSessionDAO redisSessionDAO,
			@Qualifier("sessionIdCookie") SimpleCookie sessionIdCookie) {
		MyDefaultWebSessionManager myDefaultWebSessionManager = new MyDefaultWebSessionManager();
		myDefaultWebSessionManager.setSessionIdCookie(sessionIdCookie);
		myDefaultWebSessionManager.setDeleteInvalidSessions(false);
		myDefaultWebSessionManager.setSessionIdCookieEnabled(true);
		myDefaultWebSessionManager.setSessionValidationSchedulerEnabled(false);
		myDefaultWebSessionManager.setSessionDAO(redisSessionDAO);
		return myDefaultWebSessionManager;
	}
RedisSessionDAO 使用redis存储SESSION。
public class RedisSessionDAO extends CachingSessionDAO {
	private static Logger logger = LoggerFactory.getLogger(RedisSessionDAO.class);

	@Override
	protected void doDelete(Session session) {
		if (session == null || session.getId() == null) {
			logger.error("session or session id is null");
			return;
		}
		AuthCacheFactory.PENSION_AUTH_SESSION.delete(session.getId().toString());
	}

	@Override
	protected void doUpdate(Session session) {
		saveSession(session);
	}

	@Override
	protected Serializable doCreate(Session session) {
		if (session == null) {
			logger.error("session is null");
			throw new UnknownSessionException("session is null");
		}
		Serializable sessionId = this.generateSessionId(session);
		this.assignSessionId(session, sessionId);
		saveSession(session);
		return sessionId;
	}

	@Override
	protected Session doReadSession(Serializable sessionId) {
		if (sessionId == null) {
			logger.error("session id is null");
			return null;
		}
		return AuthCacheFactory.PENSION_AUTH_SESSION.getBlob(sessionId.toString(), Session.class);
	}

	private void saveSession(Session session) throws UnknownSessionException {
		if (session == null || session.getId() == null) {
			logger.error("session or session id is null");
			throw new UnknownSessionException("session or session id is null");
		}
		session.setTimeout(14400 * 1000);// 默认四个小时
		AuthCacheFactory.PENSION_AUTH_SESSION.setBlob(session.getId().toString(), session);
	}
}
4.MyDefaultWebSessionManager
DefaultWebSessionManager为默认的web应用Session管理器,主要是涉及到Session和Cookie
具备了SessionIdCookie、SessionIdCookie启用开关,涉及到的行为:添加、删除SessionId到Cookie、读取Cookie获得SessionId。
其实就是
// 给浏览器添加Cookie:response.addHeader("Set-Cookie", "JSESESSIONIDCOOKIE=UUID666777888; Path=/; HttpOnly");
MyDefaultWebSessionManager为对HEADER要自定义写入和读取方式,如根据不同的HOST写入不同的HEADER。
public class MyDefaultWebSessionManager extends DefaultWebSessionManager {
private static final Logger log = LoggerFactory.getLogger(MyDefaultWebSessionManager.class);
@Override
protected void onStart(Session session, SessionContext context) {
if (!WebUtils.isHttp(context)) {
log.debug("SessionContext argument is not HTTP compatible or does not have an HTTP request/response "
+ "pair. No session ID cookie will be set.");
return;
}
HttpServletRequest request = WebUtils.getHttpRequest(context);
HttpServletResponse response = WebUtils.getHttpResponse(context);
if (isSessionIdCookieEnabled()) {
Serializable sessionId = session.getId();
storeCookieSessionId(sessionId, request, response);
} else {
log.debug("Session ID cookie is disabled. No cookie has been set for new session with id {}",
session.getId());
}
request.removeAttribute(ShiroHttpServletRequest.REFERENCED_SESSION_ID_SOURCE);
request.setAttribute(ShiroHttpServletRequest.REFERENCED_SESSION_IS_NEW, Boolean.TRUE);
}
private void storeCookieSessionId(Serializable sessionId, HttpServletRequest request,
HttpServletResponse response) {
if (sessionId == null) {
String msg = "sessionId cannot be null when persisting for subsequent requests.";
throw new IllegalArgumentException(msg);
}
String host = MySimpleCookie.getHost(request);
log.info("请求头host为:{}",host);
request.getHeader("Host");
String pre = "";
if (host.startsWith("pre.")) {
pre = "pre_";
}
Cookie template = getSessionIdCookie();
synchronized (MyDefaultWebSessionManager.class) {
// set prefix
String cookieName = !"".equals(pre) && template.getName().startsWith(pre) ? template.getName()
: pre + template.getName();
template.setName(cookieName);
}
setSessionIdCookie(template);
Cookie cookie = new MySimpleCookie(template);
String idString = sessionId.toString();
// String domain = "";
// if (host.split(":")[0].equals("localhost")){
// domain = "localhost";
// }else {
// String[] split = host.split(".");
// domain=split[1]+"."+split[2];
// }
// cookie.setDomain(domain);
cookie.setDomain(null);
cookie.setValue(idString);
cookie.saveTo(request, response);
log.trace("Set session ID cookie for session with id {}", idString);
}
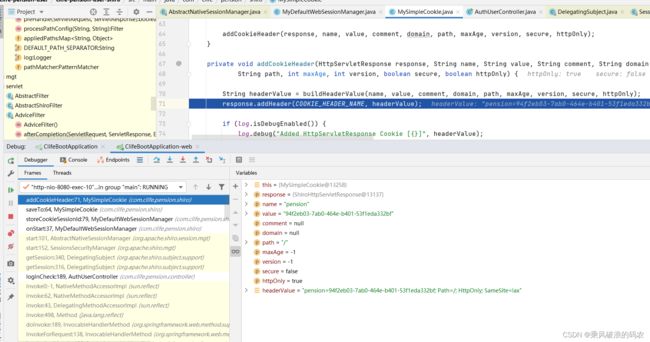
}5.MySimpleCookie cookie会话保存器。
public class MySimpleCookie extends SimpleCookie {
	private static final transient Logger log = LoggerFactory.getLogger(MySimpleCookie.class);

	public MySimpleCookie(String name) {
		super(name);
	}

	public MySimpleCookie(Cookie cookie) {
		setName(cookie.getName());
		setValue(cookie.getValue());
		setComment(cookie.getComment());
		setDomain(cookie.getDomain());
		setPath(cookie.getPath());
		setMaxAge(Math.max(DEFAULT_MAX_AGE, cookie.getMaxAge()));
		setVersion(Math.max(DEFAULT_VERSION, cookie.getVersion()));
		setSecure(cookie.isSecure());
		setHttpOnly(cookie.isHttpOnly());
	}

	@Override
	public void saveTo(HttpServletRequest request, HttpServletResponse response) {
		String name = getName();
		String value = getValue();
		String comment = getComment();
		String domain = getDomain();

		Enumeration e = request.getHeaderNames();
		while (e.hasMoreElements()) {
			String name1 = (String) e.nextElement();
			if ("host".equalsIgnoreCase(name1)) {
				String value1 = request.getHeader(name1);
				log.debug(name1 + ":" + value1);
			}
		}
		String host = getHost(request);
		log.debug("host:" + host);
		if (!StringUtils.isEmpty(host)) {
			if (host.indexOf("default.coding.clife.net") != -1) {
				domain = ".clife.cn";
			}else if (host.indexOf("lz-itest.coding.clife.net") != -1 || host.indexOf("lz-dev.coding.clife.net") != -1){
				domain = ".clife.net";
			}
		}
		log.debug("domain:" + domain);
		String path = ROOT_PATH;
		int maxAge = getMaxAge();
		int version = getVersion();
		boolean secure = isSecure();
		boolean httpOnly = isHttpOnly();

		addCookieHeader(response, name, value, comment, domain, path, maxAge, version, secure, httpOnly);
	}

	private void addCookieHeader(HttpServletResponse response, String name, String value, String comment, String domain,
			String path, int maxAge, int version, boolean secure, boolean httpOnly) {

		String headerValue = buildHeaderValue(name, value, comment, domain, path, maxAge, version, secure, httpOnly);
		response.addHeader(COOKIE_HEADER_NAME, headerValue);

		if (log.isDebugEnabled()) {
			log.debug("Added HttpServletResponse Cookie [{}]", headerValue);
		}
	}

	public static String getHost(HttpServletRequest request) {
		String host = request.getHeader("Host");
		if (host == null || host.equals("")) {
			host = request.getHeader("host");
		}
		return host;
	}

} 

6.权限过滤器配置,控制认证过滤器,和角色过滤器,三大过滤器配置,用来判断URL过滤,登录,和角色权限。
shiroFilterFactoryBean实现FactoryBean,说明它是ShiroFilter的工厂类。它是怎么初始化让Shiro能很好的工作的呢,该类的入口方法是createInstance(),该方法实现了几个功能
6.1.创建了一个过滤器管理类FilterChainManager,该类主要管理shiro里的过滤器,里面有2个重要的属性
6.1.1 filters:管理全部过滤器,包括默认的关于身份验证和权限验证的过滤器,这些过滤器分为两组,一组是认证过滤器,有anon,authcBasic,auchc,user,一组是授权过滤器,有perms,roles,ssl,rest,port。同时也包含在xml里filters配置的自定义过滤器。在其它地方使用时都是从过滤器管理类里filters里拿的。且过滤器是单例的,整个Shiro框架只维护每种类型过滤器的单例。
6.1.2 filterChains:过滤链。它是我们重点关注的东西,是一个Map对象,其中key就是我们请求的url,value是一个NamedFilterList对象,里面存放的是与url对应的一系列过滤器。这后面会详细讲解。
6.2.ShiroFilterFactoryBean工程FILTER,为构建ShiroFilterFactoryBean.SpringShiroFilter
查看初始化FILTER过程。
ShiroFilterFactoryBean
protected AbstractShiroFilter createInstance() throws Exception {
        log.debug("Creating Shiro Filter instance.");
        SecurityManager securityManager = this.getSecurityManager();
        String msg;
        if (securityManager == null) {
            msg = "SecurityManager property must be set.";
            throw new BeanInitializationException(msg);
        } else if (!(securityManager instanceof WebSecurityManager)) {
            msg = "The security manager does not implement the WebSecurityManager interface.";
            throw new BeanInitializationException(msg);
        } else {
            FilterChainManager manager = this.createFilterChainManager();
            PathMatchingFilterChainResolver chainResolver = new PathMatchingFilterChainResolver();
            chainResolver.setFilterChainManager(manager);
            return new ShiroFilterFactoryBean.SpringShiroFilter((WebSecurityManager)securityManager, chainResolver);
        }
} 

6.3.将过滤器管理类设置到PathMatchingFilterChainResolver类里,该类负责路径和过滤器链的解析与匹配。根据url找到过滤器链。
我们以如下的xml配置为例讲解,如下:
                /login.jsp = anon
                /login = authc
                /logout = logout
                /authenticated = authc
                /views/**=anon
                /** = authc, perms
	@Bean(name = "shiroFilterFactoryBean")
	public ShiroFilterFactoryBean shirFilter(@Qualifier("securityManager") SecurityManager securityManager) {
		ClientShiroFilterFactoryBean shiroFilterFactoryBean = new ClientShiroFilterFactoryBean();
		shiroFilterFactoryBean.setSecurityManager(securityManager);
		// 自定义拦截器
		Map filters = new LinkedHashMap<>();
		filters.put("authRoles", getAuthRolesFilter());
		filters.put("authc", getClientAuthenticationFilter());
		shiroFilterFactoryBean.setFilters(filters);
		shiroFilterFactoryBean.setFilterChainDefinitionsStr(filterChainDefinitions);
		shiroFilterFactoryBean.setLoginUrl(domainName + frontLoginUrl);
		shiroFilterFactoryBean.setUnauthorizedUrl(domainName + frontLoginUrl);
		return shiroFilterFactoryBean;
	}

	public ClientAuthenticationFilter getClientAuthenticationFilter() {
		ClientAuthenticationFilter clientAuthenticationFilter = new ClientAuthenticationFilter();
		return clientAuthenticationFilter;
	}

	@Bean
	public AuthRolesFilter getAuthRolesFilter() {
		AuthRolesFilter authRolesFilter = new AuthRolesFilter();
		return authRolesFilter;
	}
protected FilterChainManager createFilterChainManager() {
DefaultFilterChainManager manager = new DefaultFilterChainManager();
//获得shiro默认的过滤器,同时将xml里配置的loginUrl,successUrl,unauthorizedUrl设置到不同过滤器里
Map defaultFilters = manager.getFilters();
//apply global settings if necessary:
for (Filter filter : defaultFilters.values()) {
applyGlobalPropertiesIfNecessary(filter);
}
//将自定义过滤器添加到filters里让管理器管理,注意,filters是Map,所以key同名的会被覆盖。
//Apply the acquired and/or configured filters:
Map filters = getFilters();
if (!CollectionUtils.isEmpty(filters)) {
for (Map.Entry entry : filters.entrySet()) {
String name = entry.getKey();
Filter filter = entry.getValue();
applyGlobalPropertiesIfNecessary(filter);
if (filter instanceof Nameable) {
((Nameable) filter).setName(name);
}
//'init' argument is false, since Spring-configured filters should be initialized
//in Spring (i.e. 'init-method=blah') or implement InitializingBean:
manager.addFilter(name, filter, false);
}
}
//build up the chains:
//获得xml里filterChainDefinitions配置
Map chains = getFilterChainDefinitionMap();
if (!CollectionUtils.isEmpty(chains)) {
for (Map.Entry entry : chains.entrySet()) {
String url = entry.getKey();
String chainDefinition = entry.getValue();
//根据url创建url对应的过滤链**重点**重点**重点,每个配置过的url都对应一个过滤链
manager.createChain(url, chainDefinition);
}
}
return manager;
} 6.4 讲解:
6.4.1.applyGlobalPropertiesIfNecessary(filter);方法是将配置的loginUrl,successUrl,unauthorizedUrl设置到不同过器里。其中loginUrl赋值到所以继承自AccessControlFilter的过滤器里,successUrl赋值到所以继承自AuthenticationFilter的过滤器里,unauthorizedUrl赋值到所以继承自AuthorizationFilter的过滤器里。
当然其实过滤器可以自己设置loginUrl,successUrl,unauthorizedUrl,自定义赋值的也覆盖全局指定的。
6.4.2.读取filters配置的自定义过滤器,将它们纳入到过滤器管理器里。
6.4.3.最后读取filterChainDefinitions配置,根据配置设置每个url对应的过滤链,filterChains保存这些配置,它是一个Map集合,key就是url,value就是过滤器组成的NamedFilterList集合。其实当请求过来时,解析出请求路径,会从filterChains里找到url对应的过滤链,按过滤器的策略一个一个执行下去。
同时会调用PathMatchingFilter的processPathConfig()方法做些赋值操作。下面会专门讲将从PathMatchingFilter开始工作的过程。
6.4.4.一步一步分析下来过滤器管理器里的过滤链filterChains如下:
{
    /login.jsp=org.apache.shiro.web.filter.mgt.SimpleNamedFilterList@6ed97422,
    /login=org.apache.shiro.web.filter.mgt.SimpleNamedFilterList@592dbd8,
    /logout=org.apache.shiro.web.filter.mgt.SimpleNamedFilterList@1141badb,
    /authenticated=org.apache.shiro.web.filter.mgt.SimpleNamedFilterList@2d1b876e,
    /views/**=org.apache.shiro.web.filter.mgt.SimpleNamedFilterList@31106774,
    /**=org.apache.shiro.web.filter.mgt.SimpleNamedFilterList@14cd7d10,
    /index.jsp=org.apache.shiro.web.filter.mgt.SimpleNamedFilterList@712384a,
    /admin.jsp=org.apache.shiro.web.filter.mgt.SimpleNamedFilterList@7643ef31
可以看到每个url对应一个SimpleNamedFilterList对象,SimpleNamedFilterList是个List子类对象,保存的是过滤器集。

6.4.5.查看FILTER初始化过程。
三、运行流程
1.登陆认证控制器接口
	UsernamePasswordToken token = new UsernamePasswordToken(username, password);
		try {
			// 先销毁之前会话
			if (subject.isAuthenticated()) {
				log.debug("to log out first....");
				subject.getSession().stop(); // 主动调用退出
			}
			// 登录,即身份验证
			subject.login(token);
			SecurityUtils.getSubject().getSession().removeAttribute(username);
			saveUserToSession(username);
			return JsonResult.success(map);
		} catch (UnknownAccountException e) {
			ResultStatus status = new ResultStatus(GlobalResultStatus.USER_NOT_EXIST.getCode(), "用户名或者密码错误!");
			return JsonResult.fail(status);
		} catch (IncorrectCredentialsException e) {
			// 登录错误
			Integer errorCount = AccountCacheFactory.PENSION_LOGIN.get(username, Integer.class);
			return JsonResult.fail(new ResultStatus(errorCount, "用户名/密码错误"));
		} catch (LockedAccountException e) {
			log.error("user login error ", e);
			return JsonResult.fail(GlobalResultStatus.USER_LOCKED);
		} catch (DisabledAccountException e) {
			ResultStatus status = new ResultStatus(GlobalResultStatus.ACCOUNT_NOT_INVITE.getCode(), "用户名或者密码错误!");
			return JsonResult.fail(status);
		} catch (ExcessiveAttemptsException e) {
			ResultStatus status = new ResultStatus(GlobalResultStatus.USER_LOGIN_FAILED.getCode(), e.getMessage());
			return JsonResult.fail(status);
		} catch (AuthenticationException e) {
			log.error("user Login auth error", e);
			return JsonResult.fail(GlobalResultStatus.ERROR);
		} catch (Exception e) {
			log.error("user Login error", e);
			ResultStatus status = new ResultStatus(GlobalResultStatus.ERROR.getCode(),
					"账号异常,请联系管理员([email protected])!");
			return JsonResult.fail(status);
		}
2.ClientRealm 认证账号数据源
public class ClientRealm extends AuthorizingRealm {
	@Reference(check = false)
	private AuthUserService authUserService;

	@Override
	protected AuthorizationInfo doGetAuthorizationInfo(PrincipalCollection principals) {
		log.info("....doGetAuthorizationInfo");
		return null;
	}

	/**
	 * 登录校验
	 */
	@Override
	protected AuthenticationInfo doGetAuthenticationInfo(AuthenticationToken token) throws AuthenticationException {
		log.info("登录校验开始....doGetAuthenticationInfo");
		String username = (String) token.getPrincipal();
		AuthUser user = new AuthUser();
		user.setUserName(username);
		user.setStatus(UserContant.ONE);
		AuthUser userResult = authUserService.get(user);
		if (userResult == null) {
			throw new UnknownAccountException();
		}
		if (userResult.getStatus() == 0 || userResult.getStatus().equals(UserContant.TWO)) {
			throw new LockedAccountException("账号被冻结或失效");
		}
		SimpleAuthenticationInfo authenticationInfo = new SimpleAuthenticationInfo(userResult.getUserName(), // 用户名
				userResult.getPassword(), // 密码
				ByteSource.Util.bytes(userResult.getCredentialsSalt()), // salt=username+salt
				getName() // realm name
		);
		return authenticationInfo;
	}
}
注意此时只是根据客户端传入的登录凭证信息查找数据源的账号信息,还未进行校验。
3.密码校验
RetryLimitHashedCredentialsMatcher
前端传入的密码,先取密码的UTF8字节流进行MD5,然后BASE64传入。
数据库中存储的密码就是MD5值,所以对前端参数进行BASE64解码校验是否相等即可。
public class RetryLimitHashedCredentialsMatcher extends HashedCredentialsMatcher {

	@Override
	public boolean doCredentialsMatch(AuthenticationToken token, AuthenticationInfo info) {

		String username = (String) token.getPrincipal();
		log.info("username:{}", username);
		UsernamePasswordToken upToken = (UsernamePasswordToken) token;
		String password = String.valueOf(upToken.getPassword());
		String passwordMd5 = new String(Base64.decodeBase64(password));
		String dbpassword = (String) info.getCredentials();
		Integer errorCount = AccountCacheFactory.PENSION_LOGIN.get(username, Integer.class);
		if (errorCount == null){
			errorCount = 0;
		}
		if (StringUtil.isEmpty(dbpassword)) {
			return false;
		}
		return dbpassword.equals(passwordMd5);
	}
}

在登录第一次创建session时,会往 客户端的cookie中写入key名称为pension的sessionId.
4.鉴权FILTER,自定义未登录返回结果。
ClientAuthenticationFilter检测是否登陆。未登陆返回401
@Slf4j
public class ClientAuthenticationFilter extends AuthenticationFilter {
	/**
	 * 处理认证失败时调用(未登录时)
	 */
	@Override
	protected boolean onAccessDenied(ServletRequest request, ServletResponse response) throws Exception {
		HttpServletRequest httpRequest = (HttpServletRequest) request;
		HttpServletResponse httpServletResponse = (HttpServletResponse) response;
		String xRequestedwith = httpRequest.getHeader("X-Requested-With");
		log.info("xRequestedwith:{}", xRequestedwith);
		// ajax请求
		if ("XMLHttpRequest".equalsIgnoreCase(xRequestedwith)) {
			httpServletResponse.setCharacterEncoding("UTF-8");
			httpServletResponse.setContentType(MediaType.APPLICATION_JSON_VALUE);
			PrintWriter out = httpServletResponse.getWriter();
			out.write("{\"code\":" + GlobalResultStatus.USER_LOGIN_SESSION_TIME_OUT.getCode() + ",\"msg\":\""
					+ GlobalResultStatus.USER_LOGIN_SESSION_TIME_OUT.getMsg() + "\",\"loginUrl\":\"" + getLoginUrl()
					+ "\"}");
			out.flush();
			out.close();
		} else {
			httpServletResponse.setCharacterEncoding("UTF-8");
			httpServletResponse.setContentType(MediaType.APPLICATION_JSON_VALUE);
			PrintWriter out = httpServletResponse.getWriter();
			out.write("{\"code\":" + GlobalResultStatus.USER_LOGIN_SESSION_TIME_OUT.getCode() + ",\"msg\":\""
					+ GlobalResultStatus.USER_LOGIN_SESSION_TIME_OUT.getMsg() + "\",\"loginUrl\":\"" + getLoginUrl()
					+ "\"}");
			out.flush();
			out.close();
			//redirectToLogin(request, response);
		}
		return false;
	}

}
4.1.鉴权FILTER执行过程
4.2. 我们查看FILTER拦截正常请求的流程。

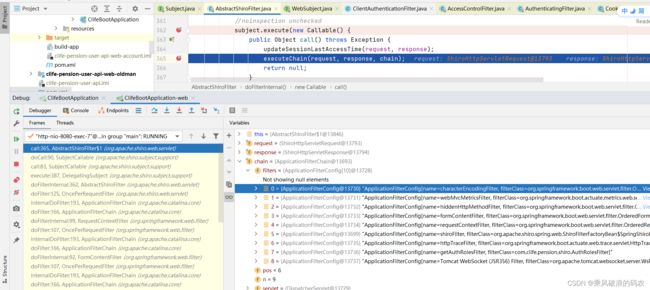
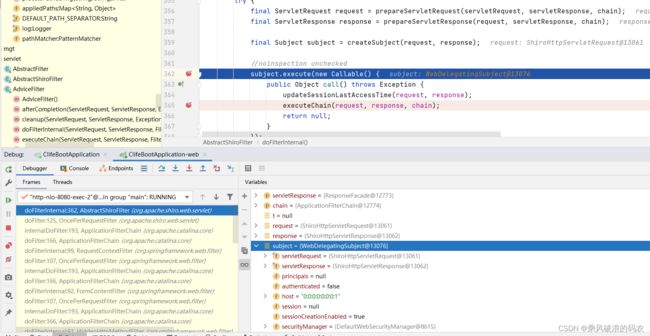
AbstractShiroFilter首先会从请求头信息中生成subject主题登录对象进行构造,然后再进行过滤器责任链执行。
我们知道DelegatingFilterProxy过滤器的代理类来实现拦截的,任何请求都会先经过shiro先过滤,直到成功才会执行javaweb本身的过滤器。
一个请求过来时,先到达AbstractShiroFilter.executeChain()方法,去根据request解析出来的url找到对应的过滤链,然后执行过滤器链。
executeChain()方法如下:
protected void executeChain(ServletRequest request, ServletResponse response, FilterChain origChain)
            throws IOException, ServletException {
            //得到过滤器链
        FilterChain chain = getExecutionChain(request, response, origChain);
        chain.doFilter(request, response);
进入getExecutionChain()方法:
protected FilterChain getExecutionChain(ServletRequest request, ServletResponse response, FilterChain origChain) {
        FilterChain chain = origChain;

        //resolver即是前面说的PathMatchingFilterChainResolver对象。里面保存有过滤器管理器实例
        FilterChainResolver resolver = getFilterChainResolver();
        if (resolver == null) {
            log.debug("No FilterChainResolver configured.  Returning original FilterChain.");
            return origChain;
        }

        //进入PathMatchingFilterChainResolver对象里,根据解析出来的requestURI找到对应的过滤器链并返回
        FilterChain resolved = resolver.getChain(request, response, origChain);
        if (resolved != null) {
            log.trace("Resolved a configured FilterChain for the current request.");
            chain = resolved;
        } else {
            log.trace("No FilterChain configured for the current request.  Using the default.");
        }

        return chain;
从这里面可以看到/**是找到了三个内部filter.


最终执行authc的第一个filter的onPreHandler


如果isAccessAllowed返回TRUE,则直接返回TRUE,则可以执行FILTER过滤器链的下一个过滤器。如果isAccessAllowed返回FALSE,则请求onAccessDenied方法,如果它返回TRUE,则也会通过,如果返回FALSE,则直接终止过滤器链的请求,确认未登录。
AccessControlFilter
public boolean onPreHandle(ServletRequest request, ServletResponse response, Object mappedValue) throws Exception {
        return isAccessAllowed(request, response, mappedValue) || onAccessDenied(request, response, mappedValue);
    }
protected Subject getSubject(ServletRequest request, ServletResponse response) {
    return SecurityUtils.getSubject();
}
正常登陆下, isAccessAllowed会去获取当前的subject是否存在,并且已认证成功,和当前认证的主体为正常的账号。
4.3.我们查看FILTER拦截携带非法TOKEN请求的流程。
由于是异常未登录的TOKEN,所以获取到的subject为未认证。
isAccessAllowed返回FALSE,会执行onAccessDenied方法。
onAccessDenied方法自定义向RESPONSE写入异常结果,并返回FALSE.

由于上面的方法最终返回FALSE,所以整个过滤器执行链不再向下执行,终止执行,返回结果。

5.AuthRolesFilter过滤器判断是否有相应接口URL的访问权限。
5.1 登陆成功后,向当前session存入一个sessionUser对象,里面包含了当前用户能访问的权限列表。
5.2 正常业务接口访问时,则从session中获取sessionUser对象,对比是否有权限,没有则返回FALSE,终止过滤器链访问。
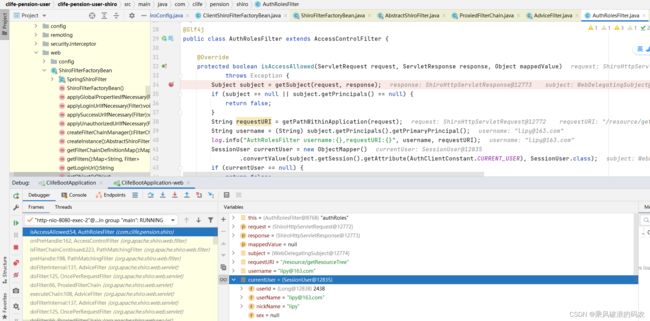
5.3 在isAccessAllowed返回FALSE后,在执行onAccessDenied会自定义返回值。
如果 isAccessAllowed返回TRUE,则即使执行onAccessDenied,过滤器链也会向下执行。

6.我们补充一个,从HTTP请求头的COOKIE中获取sessionId以及生成 subject主体的流程。
6.1 这是在abstractShiroFilter拦截前,先生成subject的流程,首先从请求信息中构建session,然后再构建Principals鉴权信息,最后再构建subject.
6.2 我们查看构建session的过程,其实就是从HTTP请求信息中先构建DefaultSessionManager中生成的session.
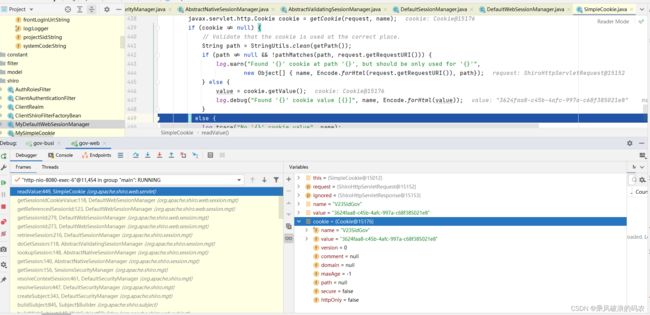
6.3 我们可以看到,其实就是从HTTP的REQUEST的请求头中寻找cookie的值列表,并且找到
SimpleCookie的name属性对应的cookie值。
SimpleCookie
private static javax.servlet.http.Cookie getCookie(HttpServletRequest request, String cookieName) {
        javax.servlet.http.Cookie cookies[] = request.getCookies();
        if (cookies != null) {
            for (javax.servlet.http.Cookie cookie : cookies) {
                if (cookie.getName().equals(cookieName)) {
                    return cookie;
                }
            }
        }
        return null;
    }
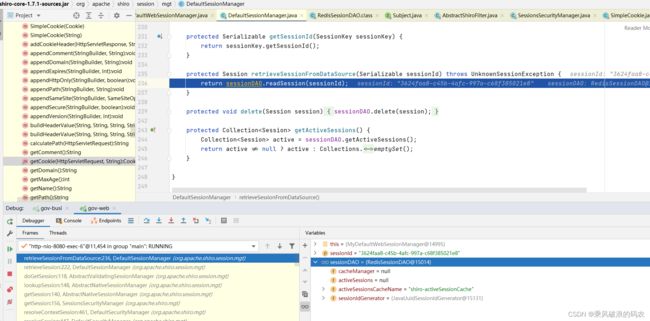
6.4 现在获取到sessionId,我们现在看构建session的过程。其实就是人sessionDao(RedisSessionDao)中获取sessionId为COOKIE的值session内容。
DefaultSessionManager
 protected Session retrieveSession(SessionKey sessionKey) throws UnknownSessionException {
        Serializable sessionId = getSessionId(sessionKey);
        if (sessionId == null) {
            log.debug("Unable to resolve session ID from SessionKey [{}].  Returning null to indicate a " +
                    "session could not be found.", sessionKey);
            return null;
        }
        Session s = retrieveSessionFromDataSource(sessionId);
        if (s == null) {
            //session ID was provided, meaning one is expected to be found, but we couldn't find one:
            String msg = "Could not find session with ID [" + sessionId + "]";
            throw new UnknownSessionException(msg);
        }
        return s;
    }

  protected Session retrieveSessionFromDataSource(Serializable sessionId) throws UnknownSessionException {
        return sessionDAO.readSession(sessionId);
    }
6.5 最后从redisSessionDao中获取Session对象的所有BLOG数据。

我们查看SESSION中的数据内容

6.6 接下来我们开始来构建认证信息principals。resolvePrincipals
DefaultSubjectContext

  public PrincipalCollection resolvePrincipals() {
        PrincipalCollection principals = getPrincipals();

        if (isEmpty(principals)) {
            //check to see if they were just authenticated:
            AuthenticationInfo info = getAuthenticationInfo();
            if (info != null) {
                principals = info.getPrincipals();
            }
        }

        if (isEmpty(principals)) {
            Subject subject = getSubject();
            if (subject != null) {
                principals = subject.getPrincipals();
            }
        }

        if (isEmpty(principals)) {
            //try the session:
            Session session = resolveSession();
            if (session != null) {
                principals = (PrincipalCollection) session.getAttribute(PRINCIPALS_SESSION_KEY);
            }
        }

        return principals;
    }
我们可以看到,当前面没有解析过认证对象时,会从session中的PRINCIPALS_SESSION_KEY属性去取认证对象。

可以看到在session的属性中存储了当前登录的用户信息。
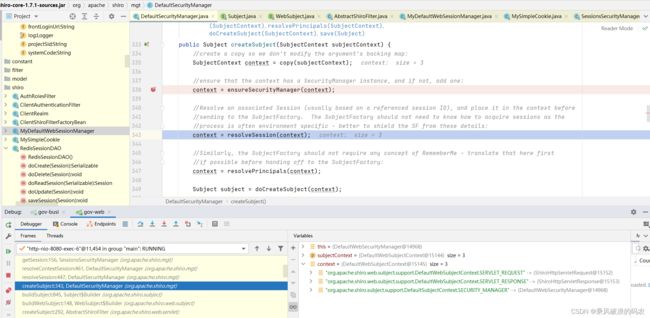
6.7 最后一步开始构建subject主题对象。
    DefaultWebSubjectFactory
public Subject createSubject(SubjectContext context) {
        //SHIRO-646
        //Check if the existing subject is NOT a WebSubject. If it isn't, then call super.createSubject instead.
        //Creating a WebSubject from a non-web Subject will cause the ServletRequest and ServletResponse to be null, which wil fail when creating a session.
        boolean isNotBasedOnWebSubject = context.getSubject() != null && !(context.getSubject() instanceof WebSubject);
        if (!(context instanceof WebSubjectContext) || isNotBasedOnWebSubject) {
            return super.createSubject(context);
        }
        WebSubjectContext wsc = (WebSubjectContext) context;
        SecurityManager securityManager = wsc.resolveSecurityManager();
        Session session = wsc.resolveSession();
        boolean sessionEnabled = wsc.isSessionCreationEnabled();
        PrincipalCollection principals = wsc.resolvePrincipals();
        boolean authenticated = wsc.resolveAuthenticated();
        String host = wsc.resolveHost();
        ServletRequest request = wsc.resolveServletRequest();
        ServletResponse response = wsc.resolveServletResponse();

        return new WebDelegatingSubject(principals, authenticated, host, session, sessionEnabled,
                request, response, securityManager);
    }
这里读到的 principals 跟上面的一样,从SESSION的属性中获取值。为当前登录用户。
6.8 验证是否认证成功
DefaultSubjectContext
 public boolean resolveAuthenticated() {
        Boolean authc = getTypedValue(AUTHENTICATED, Boolean.class);
        if (authc == null) {
            //see if there is an AuthenticationInfo object.  If so, the very presence of one indicates a successful
            //authentication attempt:
            AuthenticationInfo info = getAuthenticationInfo();
            authc = info != null;
        }
        if (!authc) {
            //fall back to a session check:
            Session session = resolveSession();
            if (session != null) {
                Boolean sessionAuthc = (Boolean) session.getAttribute(AUTHENTICATED_SESSION_KEY);
                authc = sessionAuthc != null && sessionAuthc;
            }
        }

        return authc;
} 
可以看到SESSION中 AUTHENTICATED_SESSION_KEY的值为TRUE,即为认证成功。
6.9 至此可以看subject所需的属性字段全部构建完成。


6.10 至此subject已创建完成,接下来就是进行filter责任链的执行,获取subject,判断是否已认证成功,和登录用户信息,来判断是否成功,还是返回未登录。
