hugo-stack for github
静态博客框架jekyll、hexo和hugo三者之间的区别与差异
博客生成器?
- 全名为静态网站生成器, 可在任意拥有主机功能的环境下寄存(托管)可直接配合域名进行全球访问
劣势: 每次更新网页必须重新生成整个网站 - 编译速度(单位:秒)
- Jekyll: 15.90
- Hugo: 4.90
- Hexo的数据应当介于二者之间。
environment
- Jekyll 有github支持,可以将markdown文件直接放到git仓库,github会自动生成网页文件。(Github一直是一个亲ruby的社区)
- Hexo提供了方便的部署命令,可以做到一条命令部署到github上。
- Hugo的官方文档写的非常好,部署简洁。前两者部署时需要安装很多依赖,而hugo可以直接提供二进制文件运行,甚至不需要root权限。
To install Hugo on Kali Linux 2023.1, there are a few options available, depending on your preference. Here are two methods:
- Method 1: Install using the APT package manager. Open a terminal and run the following command:
- download hugo
# kali/debian
sudo apt install hugo
hugo version # 查看版本

# yum
sudo yum install hugo -y

# arch
sudo pacman -S hugo
# 选择主题进行下载  也可手动下载
git submodule add https://github.com/CaiJimmy/hugo-theme-stack/ themes/hugo-theme-stack
- download git
# kali自带 预装
# yum/redhat系
sudo yum install git
# arch
sudo pacman -Syu git
# debian
sudo pacman -Syu git
- 安装Hugo
https://gohugo.io/getting-started/installing/#less-technical-users
- 安装Git
winget install Git.Git
安装Hugo相关的VSCode插件:
- 你可以在VSCode的插件市场中搜索并安装以下插件,这些插件会提供语法高亮,代码片段,快速导航等功能,以提高你使用Hugo的效率:
- Front Matter: 这个插件可以帮助你管理文章的元数据例如创建日期,修改日期,标题,SEO检查等gohugo.io。
Hugo Language and Syntax Support: 这个插件提供Hugo语法的高亮和代码片段功能gohugo.io。 - Hugo Helper: 这个插件包含一些有用的Hugo命令gohugo.io。
- Hugo Themer: 如果你在开发主题,这个插件可以帮助你更方便地导航你的主题文件gohugo.io。
- Hugofy: 这个插件可以使得在使用Hugo时更加便捷gohugo.io。
- Syntax Highlighting for Hugo Shortcodes: 这个插件为Shortcodes添加了语法高亮,使得视觉识别各个部分更加容易gohugo.io。
- 设置VSCode任务:
- Front Matter: 这个插件可以帮助你管理文章的元数据例如创建日期,修改日期,标题,SEO检查等gohugo.io。
//在VSCode中,你可以设置任务来运行Hugo命令。首先,创建一个.vscode/tasks.json文件,并添加如下内容:
   {
     "version": "2.0.0",
     "tasks": [
       {
         "label": "Start Dev",
         "type": "shell",
         "command": "hugo server -D",
         "problemMatcher": []
       }
     ]
   }
-
通过“运行任务”或“命令面板”来运行这个任务,这将启动Hugo的开发服务器laurentsenta.com。
使用VSCode的User Snippets:
VSCode的User Snippets功能可以帮助你快速插入常用的代码片段。例如,你可以创建一个User Snippet来快速插入Hugo的YAML front matter,这可以大大提高你创建新文章的速度moonbooth.com。 -
配置Hugo:
在你的Hugo项目中,你可以在config.toml文件中设置你的首选编辑器为VSCode,如下所示:
   # Set content editor
   newContentEditor = "code"
- 这样,当你从命令行创建新的内容时,VSCode将会自动打开新创建的文件vninja.net。
记住,不同的Hugo主题可能有不同的配置选项,确保你查看了你所使用主题的文档以了解详细的配置指南gohugo.io。
hugo from github
- 1 log in or sign in
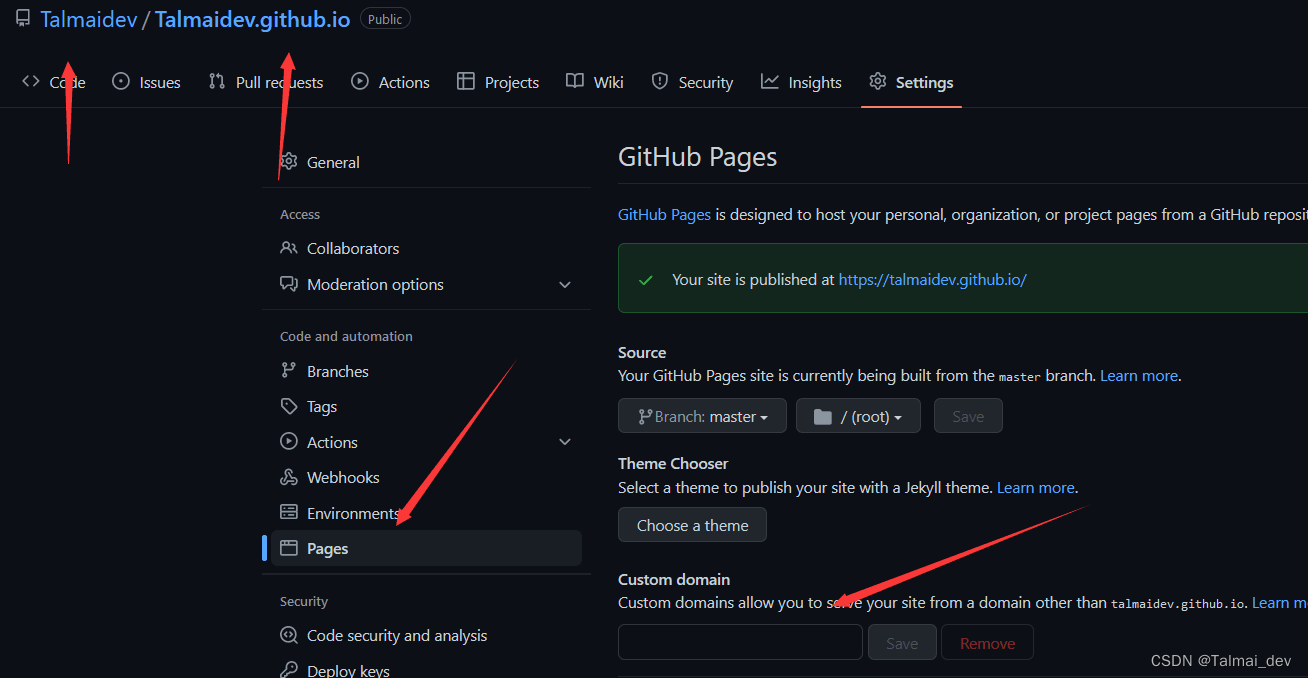
github - 2 在github账户中创建一个项目 名为 你的Github用户名.github.io
- 这是存放生成出来的网站文件的地方
- 3在本地环境编写网站(原因开头:每次更新发布都需要修改整个网站 延迟2min左右)
- 选择hugo主题模板网站的地方
https://themes.gohugo.io/ - 打开系统终端 (使用stack为例子)
stack
hugo new site  test  # 你的网站的根目录名
cd test/theme
git clone # 你的主题的GitHub网址.git  # wait a long time!
├── archetypes
│   └── default.md
├── config.yaml                 # 网站配置文件
├── content                     # 站点内的内容都在这里
│   ├── categories              # “分类”页面的首页
│   │   └── Test                # “分类”页面下的一个分类页面
│   ├── page                    # 显示在网站主页左侧边栏菜单的选项
│   │   ├── about               # 左侧边栏菜单中的“关于”页面
│   │   ├── archives            # 左侧边栏菜单中的“归档”页面
│   │   ├── links               # 左侧边栏菜单中的“链接”页面
│   │   └── search              # 左侧边栏菜单中的“搜索”页面
│   └── post                    # 用户写的帖子都放在这里,每个子文件夹对应一个帖子
│       ├── chinese-test
│       ├── emoji-support
│       ├── markdown-syntax
│       ├── math-typesetting
│       ├── placeholder-text
│       └── rich-content
├── data
├── layouts
├── LICENSE
├── README.md
├── resources
│   └── _gen
│       ├── assets
│       └── images
├── static                     # 放用户自定义字体、用户头像、网站小图标等
└── themes                     # 放各种主题
    └── hugo-theme-stack       # stack主题
        ├── archetypes
        ├── assets
        ├── config.yaml
        ├── data
        ├── debug.sh
        ├── exampleSite
        ├── go.mod
        ├── i18n
        ├── images
        ├── layouts
        ├── LICENSE
        ├── netlify.toml
        ├── README.md
        └── theme.toml
- create(开始基本用法介绍)
hugo new posts/随便一个名字/index.md

---
title: "文章标题"
description: "简介"
date: 2022-01-29T02:02:45-05:00
image: "你同目录下的封面图片名字(带后缀并且是相对路径)"
categories:
    - 分类1
    - 分类2
tags:
    - 标签1
    - 标签2
---

hugo new categories/分类名字/_index.md

---
title: "分类名"
date: 2022-02-08T01:03:14-05:00
image: 你的图片名(带后缀)
style:
    background: "#2a9d8f"
    color: "#fff"
---
- 发布网站在网站根目录
hugo --theme=主题文件夹名
#进入public准备发布
cd public
#发布上GitHub
git init
git add -A
git commit -m "对这次发布的说明"
git remote add origin https://github.com/你的Github用户名/你的Github用户名.github.io.git
git push -u origin master
makdown语法快速入门
-
markdown语法
- Markdown 是一种轻量级标记语言,创始人是约翰・格鲁伯(John Gruber)。它允许人们 “使用易读易写的纯文本格式编写文档,然后转换成有效的 HTML 文档”。—— 维基百科。
- markdow 支持html css可以用来写电子书 比如gitbook 如今被广泛应用到写博客 ,比如 GitHub、简书、reddit、Diaspora、Stack Exchange、OpenStreetMap 、SourceForge csdn
-
environment
- 系统默认编辑器 markdown github 网页版
- 1.众所周知网页开发基本必备各种网页版编译环境
- 2.Typora
- 3.vscode
- Markdown 源文件只规定了显示的内容,并没有定义显示的样式,所以在不同的预览环境下会看到不同的效果。为了使其保持统一,需要将 Markdown 文件转换成 HTML 文件;
- 常见的 Markdown 编辑器都带有导出成 HTML 的功能,导出后通常含有编辑器自带样式;
- 利用 Pandoc,我们可以在命令行中直接将 Markdown 文件导出成 HTML 文件。
## 一 标题
#### 1 下划线标题
#   h1
##  h2
### h3
####  h4
#####  h5
###### h6
**加粗样式**
*斜体样式*
~~删除线格式~~
> 这里是引用
- 三 段落
比如这样
随便换行
但是csdn这个吸金gouB特有的disbuff就是吞噬空格 和换行 下面会教你使用html代码解决这个问题
 :一个字符的半角的不断行的空格,如果需要在网页中插入多个空格,可以将“ ”代码写多遍(常用方式);
  :一个字符的半角的空格,也可以将“ ”写多遍来插入多个空格;
  :两个字符的全角的空格,也可以将“ ”写多遍来插入更多的空格;
 :小于一个字符的空格;说明:单词后面的分号记得带上,是不能省略的,它也是html代码中的一部分
> 这里是引用
<p>行内的 html 代码: <code><head><title>网页标题title>head>code>p>
<p>行内的 json 代码:<code>var json = {key: value};code>p>
- 高级语法
- 超链接
[Markdown语法](https://markdown.com.cn "最好的markdown教程")```
# 中括号为显示部分
# 括号里面放链接
# 引号里面放渲染部分  当年客户端展示时鼠标放到上面会显示链接的悬停标题
效果如下
Markdown语法
- 表格
| 项目 | Value |
| ---- | ----- |
| 电脑 | $1600 |
| 手机 | $12   |
| 导管 | $1    |

|     Column 1      |               Column 2 |
| :---------------: | ---------------------: |
| centered 文本居中 | right-aligned 文本居右 |
- 列表
- 无序
- List item
- 有序
1. List item
- 代办
- [ ] List item
- 隐藏玩法可使用的html标签
<span>、<cite>、<del>
 <a>  <img>
- 区域块不受限
<div>、<table>、<pre>、<p>
# 为了避免bug 这里不需要遵守html规则可直接使用这些标签
如下
This is a regular paragraph.

<table>
    <tr>
        <td>Footd>
    tr>
table>

This is another regular paragraph.
This is a regular paragraph.
| Foo |
- 当你使用markdown语法无法完成某一操作的时候 就需要去使用html/css
<p>html空格   空格   基础教程(cainiaojc.com)p>
<p>html空格   空格   基础教程(cainiaojc.com)p>
<p>html空格   空格   基础教程(cainiaojc.com)p>
<p>html空格   空格   基础教程(cainiaojc.com)p>
- 2 不常用的html字符
符号										表示

 									普通的英文半角空格
     		普通的英文半角空格但不换行
 								中文全角空格(一个中文宽度)
   					半角(en)空格 (半个中文宽度,不受字体影响)
   					全角(em)空格 (一个中文宽度,不受字体影响)
 								四分之一全角(em)空格 (四分之一中文宽度)
 									普通空格
 									相比普通空格,不间断,按下space键产生的空格,不累加
在GitHub上搭建个人博客时,你可以选择购买国内或国外的域名。这两种选择各有其优缺点:
- 国内域名:最大的差异在于,国内域名需要备案才能使用,而且必须要有3个租期以上的服务器才能开始备案,一台服务器只能为一个域名备案zhuanlan.zhihu.com。另外,由于Github部署的是国外服务器,国内的域名是不能用在国外服务器的,所以如果你打算在Github上部署博客,那么应该考虑购买国外域名zhuanlan.zhihu.com。
- 国外域名:国外域名买了就能用,不需要备案zhuanlan.zhihu.com。你可以在诸如Godaddy和NameSilo等国外知名的域名服务商上购买zhuanlan.zhihu.com。另外,域名是可以随时转到不同服务商下的,比如将国外域名转为国内,将腾讯云买的域名转到阿里云等。但是,需要注意的是: 选好之后就尽量不要换了,在更换域名服务商之后,3个月内域名是用不了的,类似被冻结的状态zhuanlan.zhihu.com。
中国用户在Github上搭建个人博客环境下,可以考虑购买以下几家公司的国外域名:
- GoDaddy:GoDaddy是全球最大的域名注册商,提供多种顶级域名注册服务,比如.com、.net、.org等。它有中文界面,支持支付宝和银联支付,购买流程简单易懂。GoDaddy还提供DNS管理服务,方便你将域名解析到Github上zhuanlan.zhihu.com。
- Namecheap:Namecheap是另一个国外知名的域名注册商,提供多种顶级域名注册服务。Namecheap的价格相对较低,而且提供免费的Whois隐私保护服务,可以保护你的个人信息不被公开。Namecheap也支持支付宝支付,但需要注意的是它的界面是英文的zhuanlan.zhihu.com。
- NameSilo:NameSilo是一家提供低廉价格的域名注册服务的公司。它提供免费的Whois隐私保护服务,并且没有任何隐藏费用。NameSilo的界面是英文的,支持支付宝支付zhuanlan.zhihu.com。
选择域名服务商时, 考虑以下几点:
- 价格:不同的域名服务商价格可能会有所不同,比如初次购买价格、续费价格等。你需要根据自己的预算来选择适合的服务商。
- 支付方式:不同的域名服务商可能支持不同的支付方式,如信用卡、Paypal、支付宝等。你需要选择支持你方便的支付方式的服务商。
- 服务:你需要考虑域名服务商的客户服务,比如是否有中文客户服务,解决问题的速度如何等。
- 隐私保护:如果你不希望你的个人信息被公开,你需要选择提供Whois隐私保护服务的域名服务商。
以下是一些提供免费域名的平台:
- Freenom:Freenom 提供免费的顶级域名,包括 .tk、.ml、.ga、.cf 和 .gq 这些后缀。你可以免费使用这些域名,但需要注意的是,Freenom 不会发送续期通知,所以你需要自己记得及时续期iyideng.vip。
- Dot.tk:Dot.tk 是一个属于 Freenom 的网站,专门提供免费的 .tk 域名。你可以在这个网站上免费注册 .tk 域名,但同样需要注意的是,你需要自行记得续期,否则域名会被回收iyideng.vip。
- InfinityFree:InfinityFree 是一家提供免费虚拟主机的公司,同时也提供免费的顶级域名 .ml、.ga、.cf、.gq 和 .tk。你需要注册他们的免费虚拟主机服务,然后才能获得免费的顶级域名iyideng.vip。
- Hostinger:Hostinger 是一家提供虚拟主机服务的公司,如果你购买他们的年度高级版或商业版共享虚拟主机套餐,可以在第一年免费获得高级顶级域名hostinger.com.hk。
- Bluehost:Bluehost 是一家提供虚拟主机服务的公司,如果你从他们那里购买虚拟主机,则可以在第一年免费获得域名zhuanlan.zhihu.com。
- DreamHost:DreamHost 是一家美国的主机商,如果你在它家购买主机会免费赠送1个域名给你。当然你也可以单独在DreamHost官网上单独注册域名zhuanlan.zhihu.com。
(请注意,以上提供免费域名的公司可能会有一些附加的条款和条件,例如必须购买其他服务,或者只提供一定期限的免费域名。在注册免费域名之前,你应该仔细阅读这些条款和条件。)
域名&&CDN
- 网站虽然发布了, 但是资源还在 github.io 上,在国内访问还是很慢, 需要 CDN 加速访问。
- 什么是二级域名
.com               //顶级域名
baidu.com          //一级域名
www.baidu.com      //二级域名
bbs.baidu.com      //二级域名
tieba.baidu.com    //二级域名
#从 腾讯云 阿里云 等平台购买的域名如 .com .io .top 这些前面都有一段字符
比如 test.com 这些购买的域名都是一级域名 而二级域名 常常被人们广为使用  节约了成本 也方便管理
-
github项目设置 完成之后就可以
 -
腾讯云CDN
-
CloudFlare免费CDN配置进入Cloudflare官网
- 注册Cloudflare
- 选择可靠的邮箱(排除qq邮箱)
- 密码下面的选项是选择是否接受Cloudflared的一些产品相关信息,自由选择就好了。
- 进入你的邮箱邮件里点击url进行二次验证,点击链接后,你会看到提示,表示你的邮箱已经完成验证。
- 进入到账号后台界面,你点击 add site即添加自己需要配置的域名,确认方案后,Cloudflare会扫描该域名当前的DNS记录,你可以保留,也可以添加,也可以删除.
- 直接输入主域名(二级域名)就可以了->选择套餐,三个付费套餐之下,选择免费->点击 continue 进入下一步。
- Cloudflare会自动扫描你域名的dns记录
- 黄色图标亮起,则代表可以使用Cloudflared的cdn,灰色图标,则不可以。
- 你选择自己要加速的域名,不需要加速的也可以点击proxy status选项栏的按钮关闭。-> 选择好域名,点击 continue 进入下一步,修改DNS服务器。 - 域名注册商处修改NS记录
- NS记录是指处理域名解析的服务器,修改域名的NS记录,让它由不同的解析服务商来解析,例如可以指向Cloudflare。
- NS记录修改生效。一般半个小时左右就可以修改成功。之后就可以用Cloudflare管理你的域名解析了。待NS记录修改生效后,在Cloudflare的DNS下面,添加你的域名解析A记录即可。
- 注册Cloudflare
-
上述流程操作全部需要手动操作web页面选项 ,故而可以写py脚本
import requests
import json

def get_record_id(dns_name, zone_id, token):
    resp = requests.get(
        'https://api.cloudflare.com/client/v4/zones/{}/dns_records'.format(zone_id),
        headers={
            'Authorization': 'Bearer ' + token,
            'Content-Type': 'application/json'
        })
    if not json.loads(resp.text)['success']:
        return None
    domains = json.loads(resp.text)['result']
    for domain in domains:
        if dns_name == domain['name']:
            return domain['id']
    return None

def update_dns_record(dns_name, zone_id, token, dns_id, ip, proxied=False):
    resp = requests.put(
        'https://api.cloudflare.com/client/v4/zones/{}/dns_records/{}'.format(
            zone_id, dns_id),
        json={
            'type': 'A',
            'name': dns_name,
            'content': ip,
            'proxied': proxied
        },
        headers={
            'Authorization': 'Bearer ' + token,
            'Content-Type': 'application/json'
        })
    if not json.loads(resp.text)['success']:
        return False
    return True

dns_id = get_record_id(dns_name, zone_id, token)
result = update_dns_record(dns_name, zone_id, token, dns_id, ip, proxied)
- py只实现了部分功能,但是我用更熟练的cpp可以更加完善 (需要按照库:sudo apt-get install libcurl4-openssl-dev)
#include - 添加错误处理代码,设置HTTP头部,使用libcurl库来发送HTTP请求,并添加错误处理代码和设置HTTP头部,当curl_easy_perform函数返回非零值时,我们打印错误信息并清理curl句柄。我们还添加了设置HTTP头部的代码,你可以使用curl_slist_append函数来添加HTTP头部。
#include 


