..笔记..
Home
wangchaolun edited this page on 11 Jan 2021 · 2 revisions
- 经验积累
- 技术文档
- 实用工具
- 小米路由器
- GitHub Community Forum
- Mac OS
- Win 10
Experience
chaolun edited this page on 19 Aug 2021 · 4 revisions
踩过的坑
-
占用磁盘空间的凶手,看看Unity超大日志文件:
C:/Users//AppData/Local/Unity/Editor/Editor-prev.log -
存一个空场景都要等很久?看看是不是开启了Cache Server,千万不要在未配置Server之前开启它,否则适得其反
-
打ab包时如果禁止写入 TypeTree,则要注意所有进ab包的资源,需要序列化的部分不要使用 UNITY_EDITOR 宏区分,否则会出现兼容问题,导致ab包无法正常加载
在编码时应该要遵守如下规范:
- 仅编辑器下用的脚本应该放在 Editor 目录下
- 运行时和编辑器下都需要用的脚本,应该为该脚本创建一个对应的Editor脚本并放在 Editor 目录下,参考如下:
[CustomEditor(typeof(MyPlayer))] public class MyPlayerEditor : Editor { ... } - 如果在编辑器下使用的只有一两行代码,不想专门为该脚本创建一个对应的Editor脚本。则只在方法内添加 UNITY_EDITOR 宏
项目管理
如何在Unity里使用Git
- 添加Unity专用的.gitignore
- 打开编辑器设置窗口通过 Edit > Project Settings > Editor
- 使.meta文件可见,以避免损坏引用对象
Version Control / Mode: “Visible Meta Files“ - 使用纯文本序列化可以避免无法解决的合并冲突
Asset Serialization / Mode: “Force Text” - 你也可以通过直接修改ProjectSettings/EditorSettings.asset文件来达到一样的效果
m_ExternalVersionControlSupport: Visible Meta Files
m_SerializationMode: 2
- 使.meta文件可见,以避免损坏引用对象
- 启用Git Large File Storage通过添加.gitattributes
常用命令
# 删除当前目录下没有被track过的文件和文件夹
git clean -df

# 还原当前目录下被track过的文件
git reset --hard

# 将当前目录下所有变化的文件,放入暂存区
$ git add .

# 将指定目录下所有变化的文件,放入暂存区
$ git add

# 合并某个分支上的单个commit到当前分支
git cherry-pick 62ecb3

# 刷新远程仓库分支列表
git remote update origin -p

# 生成 SSH 公钥
ssh-keygen -t rsa -b 4096 -C"<添加注释>"
缓存凭证
git config --global credential.helper manager
删除历史记录
# 克隆Repository
git clone .git

# 移除.git文件目录
rm -rf .git

# 仅使用最新内容重建本地仓库
git init
git add .
git commit -m "Initial commit"

# 推到Remote
git remote add origin .git
git push -u --force origin master
Git LFS 相关的错误
-
错误1:[404] Object does not exist on the server
解决方法1:通过命令行上传指定文件
git lfs push --object-id origin f8efcb92cf226f3cd236f7aa4a31e5cda7cd94a89bcece6241dbfc97986fe5e4解决方法2:通过命令行上传全部文件
git lfs push --all origin master
迁移现有的Repository数据到LFS
-
安装Git LFS v2.2.1 (or later)
-
重写例如当前分支上所有Remote上不存在的*.mp4视频文件:
git lfs migrate import --include="*.mp4" -
或者,重写给定分支上的所有*.mp4视频文件,而不管它们是否存在于Remote(可能需要force-push):
git lfs migrate import --include="*.mp4" --include-ref=refs/heads/master --include-ref=refs/heads/my-feature -
将转换后的Repository作为新Repository推送:
git push --force -
迁移后清理.git目录
上面的代码成功地将先前存在的git对象转换为lfs对象。 但是,常规对象仍保留在.git目录中。 这些将最终由git清除,但是要立即清除它们,请运行:
git reflog expire --expire-unreachable=now --all
git gc --prune=now
使用BFG迁移现有的Repository数据到LFS
-
克隆Repository
git clone --mirror [email protected]:/ .git 通过添加镜像标签可以得到一个包含所有分支的.git文件夹
-
备份克隆下来的.git文件夹,以防之后出现错误可以还原回这个版本
-
Fetch LFS
cd.git git lfs fetch --all 理论上上一步的镜像克隆已经取得了LFS,但似乎这个并没有支持的很完美,出于安全的考虑还是在执行一次该操作
-
使用BFG转换Git历史记录
确保你已经下载了最新的BFG版本
调用如下指令:
java -jarbfg-x.x.x.jar --convert-to-git-lfs "*.{png,mp4}" --no-blob-protection 是你下载的bfg-x.x.x.jar的绝对路径,本示例中只转换png和mp4两种类型的文件
这将重写所有分支的所有历史记录,并用LFS版本替换所有png或mp4文件
这里再提供一个完整版本的指令:
java -jarbfg-x.x.x.jar --convert-to-git-lfs "*.{cubemap,unitypackage,apk,exe,ipa,pdf,dll,pdb,so,7z,bz2,gz,rar,tar,zip,3dm,3ds,blend,c4d,collada,dae,dxf,fbx,jas,lws,lxo,ma,max,mb,obj,ply,skp,stl,ztl,abc,aif,aiff,it,mod,mp3,ogg,s3m,wav,xm,otf,ttf,bmp,exr,gif,hdr,iff,jpeg,jpg,pict,png,psd,tga,tif,tiff,ai,asd,pmp,asf,avi,flv,mov,mp4,mpeg,mpg,ogv,wmv,a,arobject,lxo,reason,rns}" --no-blob-protection -
Prune LFS
git reflog expire --expire = now --all && git gc --prune = nowBFG重写历史记录,将文件提取到lfs或objects,并添加.gitattributes进行LFS跟踪
-
初始化Git LFS
git lfs install这会将pre-push hook添加到Repository中
-
将转换后的Repository推回Remote
git push --force --all这会将所有大文件推送到LFS存储,然后用新的历史记录覆盖原来的历史记录
-
在操作中你可能遇到如下问题:

编程语言
FAQ
A: 在访问 this[] 这种类似中括号里获取某个属性的方式,在写lua脚本时总是获取不到。例如C#中有一个Animation对象animation,访问其中的一个AnimationState就可以直接animation["动画名"]这样获取,可是在lua中这样获取不到。
Q: 如果你的XLua版本在2.1.11之上,那么可以用 get_Item 来获取值,用 set_Item 来设置值,比如刚才的需求可以写为 animation:get_Item("动画名") 如果是之下的版本,就只能自己在C#里封装一个方法然后导出给lua这边使用,方法直接 return animation["动画名"] 就可以了,动画名就是传入C#方法的参数。
Python
-
怎么下载Google Sheets
import requests url = str.format('https://docs.google.com/spreadsheets/d/{0}/export?format=xlsx&id={0}', '131TMF9DbpSCaDUawGTCyW6SSeqDLsm1NkSc35r17Hr8') res = requests.get(url) with open('test.xlsx', 'wb') as file: file.write(res.content) -
怎么读取xlsx表
import openpyxl with open('test.xlsx', 'rb') as file: sheets = openpyxl.load_workbook(filename=file, data_only=True) worksheet1 = sheets.get_sheet_by_name('工作表1') a1 = worksheet1.cell(row=1, column=1).value print(a1) -
打印显示颜色
显示方式 显示效果 0 默认值 1 高亮 4 下划线 5 闪烁 7 反显 8 不可见 前景色 背景色 颜色说明 30 40 黑色 31 41 红色 32 42 绿色 33 43 黄色 34 44 蓝色 35 45 紫红色 36 46 青蓝色 37 47 白色 import colorama colorama.init(autoreset=True) # 支持Win10控制台 # \033[显示方式;字体色;背景色m ... [\033[0m print('\033[31m红色\033[0m') -
正则表达式
语法 描述 '^[\[\(]\d*,\d*[\]\)]$' 区域 '^(.+,.+;)*(.+,.+;?)$' 键值对 import re if re.match('^[\[\(]\d*,\d*[\]\)]$', '[0,1)') is None: print('匹配失败') else print('匹配成功') -
怎么将python转成exe格式
-
下载、安装pyinstaller
-
下载、安装pyinstaler运行时所需要的windows扩展pywin32
-
添加、配置Pyinstaller EXE
-
运行Tools -> External Tools -> PyInstaller EXE
-
在你的工程目录下会生成build和dist文件夹,可执行文件就在dist文件夹下
-
Experience Go
-
环境配置
-
下载安装包
-
Windows 下可以使用 .msi 后缀(在下载列表中可以找到该文件,如go1.4.2.windows-amd64.msi)的安装包来安装。
默认情况下 .msi 文件会安装在 c:\Go 目录下。你可以将 c:\Go\bin 目录添加到 Path 环境变量中。添加后你需要重启命令窗口才能生效。
-
-
测试
- 创建工程目录
- 创建文件test.go
package main import "fmt" func main() { fmt.Println("Hello, World!") }- 命令行到工程目录,执行:go run test.go
- 输出 Hello, World!
-
生成可执行文件
- 命令行到工程目录的上级,执行:go build test.exe
- 你会在工程目录下找到 test.exe 可执行文件。
Experience Batch
批处理
-
for语句遍历的文本路径存在空格怎么办
1. for /f %%i in (文件名) do (……)
2. for /f %%i in ('命令语句') do (……)
3. for /f %%i in ("字符串") do (……)
4. for /f "usebackq" %%i in ("文件名") do (……)
5. for /f "usebackq" %%i in (`命令语句`) do (……)
6. for /f "usebackq" %%i in ('字符串') do (……)
@echo off @set currentDirectory=%~dp0% @echo Changed directory to %currentDirectory%... for /f "usebackq" %%i in ("%currentDirectory%example.txt") do ( @echo %%i... ) ::@timeout 10 @pause -
怎么运行python脚本
<命令行参数> @echo off "%cd%\venv\Scripts\python.exe" "%cd%\main.py" -path %cd%\example\ exit
Map dependencies with code maps
- Article
- 12/22/2021
- 9 minutes to read
- 14 contributors
In this article, you'll learn how to visualize dependencies across your code with code maps.
What are code maps?
In Visual Studio, code maps help you more quickly see how your program code fits together without reading through files and lines of code. With these maps, you can see the organization and relationships in your code, including its structure and its dependencies, how to update it, and estimate the cost of proposed changes.
You can map dependencies for code in these languages:
-
Visual C# or Visual Basic in a solution or assemblies (.dll or .exe)
-
Native or managed C or C++ code in Visual C++ projects, header files (.h or
#include), or binaries -
X++ projects and assemblies made from .NET modules for Microsoft Dynamics AX
Note
For projects other than C# or Visual Basic, there are fewer options for starting a code map or adding items to an existing code map. For example, you cannot right-click an object in the text editor of a C++ project and add it to a code map. However, you can drag and drop individual code elements or files from Solution Explorer, Class View, and Object Browser.
Prerequisites
To create a code map in Visual Studio, first install the Code Map and Live Dependency Validation components
To create and edit code maps, you need Visual Studio Enterprise edition. However, in Visual Studio Community and Professional editions, you can open diagrams that were generated in Enterprise edition, but you cannot edit them.
Note
Before you share maps created in Visual Studio Enterprise with others who use Visual Studio Professional, make sure that all the items on the map (such as hidden items, expanded groups, and cross-group links) are visible.
Add a code map
You can create an empty code map and drag items onto it, including assembly references, files and folders, or you can generate a code map for all or part of your solution.
To add an empty code map:
-
In Solution Explorer, open the shortcut menu for your top-level solution node. Choose Add > New Item.
-
In the Add New Item dialog, under Installed, choose the General category.
-
Choose the Directed Graph Document(.dgml) template and then select Add.
Tip
This template may not appear alphabetically, so scroll down to the bottom of the template list if you don't see it.
A blank map appears in your solution's Solution Items folder.
Similarly, you can create a new code map file without adding it to your solution by selecting Architecture > New Code Map or File > New > File.
Learn more:
- Share code maps
- Create code maps for C++
- Improve code map performance
Generate a code map for your solution
To see all the dependencies in your solution:
-
On the menu bar, choose Architecture > Generate Code Map for Solution. If your code hasn't changed since the last time you built it, you can select Architecture > Generate Code Map for Solution Without Building instead.
A map is generated that shows the top-level assemblies and aggregated links between them. The wider the aggregate link, the more dependencies it represents.
-
Use the Legend button on the code map toolbar to show or hide the list of project type icons (such as Test, Web, and Phone Project), code items (such as Classes, Methods, and Properties), and relation types (such as Inherits From, Implements, and Calls).
This example solution contains Solution Folders (Tests and Components), Test Projects, Web Projects, and assemblies. By default, all containment relationships appear as groups, which you can expand and collapse. The Externals group contains anything outside your solution, including platform dependencies. External assemblies show only those items that are used. By default, system base types are hidden on the map to reduce clutter.
-
To drill down into the map, expand the groups that represent projects and assemblies. You can expand everything by pressing CTRL+A to select all the nodes and then choosing Group, Expand from the shortcut menu.
-
However, this may not be useful for a large solution. In fact, for complex solutions, memory limitations may prevent you from expanding all the groups. Instead, to see inside an individual node, expand it. Move your mouse pointer on top of the node and then click the chevron (down arrow) when it appears.
Or use the keyboard by selecting the item then pressing the plus key (+). To explore deeper levels of code, do the same for namespaces, types, and members.
Tip
For more details about working with code maps using the mouse, keyboard, and touch, see Browse and rearrange code maps.
-
To simplify the map and focus on individual parts, choose Filters on the code map toolbar and select just the types of nodes and links you are interested in. For example, you can hide all the Solution Folder and Assembly containers.

You can also simplify the map by hiding or removing individual groups and items from the map, without affecting the underlying solution code.
-
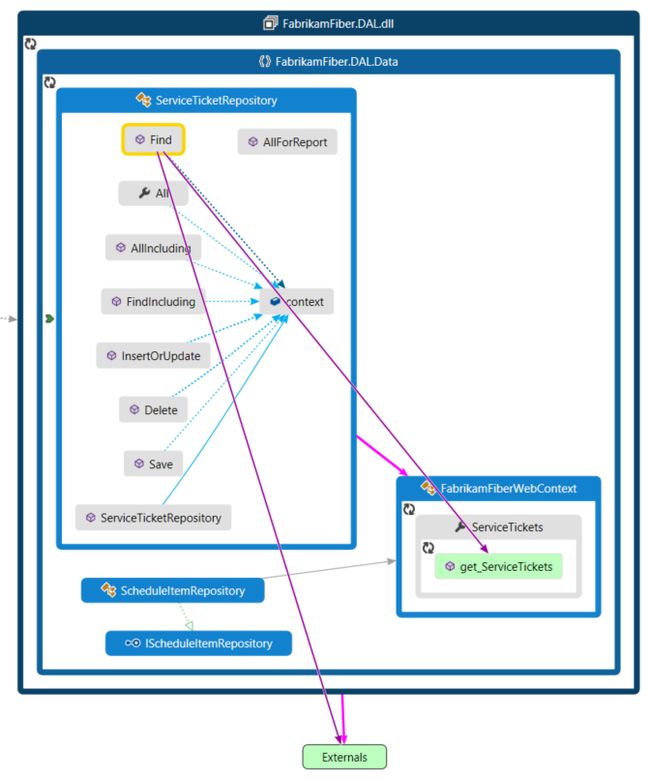
To see the relationships between items, select them in the map. The colors of the links indicate the types of relationship, as shown in the Legend pane.
In this example, the purple links are calls, the dotted links are references, and the light blue links are field access. Green links can be inheritance, or they may be aggregate links that indicate more than one type of relationship (or category).
Tip
If you see a green link, it might not mean there's just an inheritance relationship. There might also be method calls, but these are hidden by the inheritance relationship. To see specific types of links, use the checkboxes in the Filters pane to hide the types you aren't interested in.
-
To get more information about an item or link, move the pointer on top of it until a tooltip appears. This shows details of a code element or the categories that a link represents.
-
To examine items and dependencies represented by an aggregate link, first select the link and then open its shortcut menu. Choose Show Contributing Links (or Show Contributing Links on New Code Map). This expands the groups at both ends of the link and shows only those items and dependencies that participate in the link.
-
To focus in on specific parts of the map, you can continue to remove items you aren't interested in. For example, to drill into class and member view, simply filter all the namespace nodes in the Filters pane.

-
Another way to focus in on a complex solution map is to generate a new map containing selected items from an existing map. Hold Ctrl while selecting the items you want to focus on, open the shortcut menu, and choose New Graph from Selection.
-
The containing context is carried over to the new map. Hide Solution Folders and any other containers you don't want to see using the Filters pane.
-
Expand the groups and select items in the map to view the relationships.
Also see:
- Browse and rearrange code maps
- Customize code maps by editing the DGML files
- Find potential problems in your code by running an analyzer
View dependencies
Suppose you have a code review to perform in some files with pending changes. To see the dependencies in those changes, you can create a code map from those files.
-
In Solution Explorer, select the projects, assembly references, folders, files, types, or members that you want to map.
-
On the Solution Explorer toolbar, choose Show on Code Map . Or, open the shortcut menu for one or a group of items and choose Show on Code Map.
You can also drag items from Solution Explorer, Class View, or Object Browser, into a new or existing code map. To include the parent hierarchy for your items, press and hold the Ctrl key while you drag items, or use the Include Parents button on the code map toolbar to specify the default action. You can also drag assembly files from outside Visual Studio, such as from Windows Explorer.
Note
When you add items from a project that's shared across multiple apps, like Windows Phone or Microsoft Store, those items appear on the map with the currently active app project. If you change context to another app project and add more items from the shared project, those items now appear with the newly active app project. Operations that you perform with an item on the map apply only to those items that share the same context.
-
The map shows the selected items within their containing assemblies.
-
To explore items, expand them. Move the mouse pointer on top of an item, then click the chevron (down arrow) icon when it appears.
To expand all items, select them using Ctrl+A, then open the shortcut menu for the map and choose Group > Expand. However, this option isn't available if expanding all groups creates an unusable map or memory issues.
-
Continue to expand items you are interested in, right down to the class and member level if necessary.

To see members that are in the code but don't appear on the map, click the Refetch Children icon in the top left corner of a group.
-
To see more items related to those on the map, select one and choose Show Related on the code map toolbar, then select the type of related items to add to the map. Alternatively, select one or more items, open the shortcut menu, and then choose the Show option for the type of related items to add to the map. For example:
For an assembly, choose:
Option Description Show Assemblies This References Add assemblies that this assembly references. External assemblies appear in the Externals group. Show Assemblies Referencing This Add assemblies in the solution that reference this assembly. For a namespace, choose Show Containing Assembly, if it's not visible.
For a class or interface, choose:
Option Description Show Base Types For a class, add the base class and the implemented interfaces.
For an interface, add the base interfaces.Show Derived Types For a class, add the derived classes.
For an interface, add the derived interfaces and the implementing classes or structs.Show Types This References Add all classes and their members that this class uses. Show Types Referencing This Add all classes and their members that use this class. Show Containing Namespace Add the parent namespace. Show Containing Namespace and Assembly Add the parent container hierarchy. Show All Base Types Add the base class or interface hierarchy recursively. Show All Derived Types For a class, add all the derived classes recursively.
For an interface, add all the derived interfaces and implementing classes or structs recursively.For a method, choose:
Option Description Show Methods This Calls Add methods that this method calls. Show Fields This References Add fields that this method references. Show Containing Type Add the parent type. Show Containing Type, Namespace, and Assembly Add the parent container hierarchy. Show Overridden Methods For a method that overrides other methods or implements an interface's method, add all the abstract or virtual methods in base classes that are overridden and, if any, the interface's method that is implemented. For a field or property, choose:
Option Description Show Containing Type Add the parent type. Show Containing Type, Namespace, and Assembly Add the parent container hierarchy. -
The map shows the relationships. In this example, the map shows the methods called by the
Findmethod and their location in the solution or externally. -
To simplify the map and focus on individual parts, choose Filters on the code map toolbar and select just the types of nodes and links you are interested in. For example, turn off display of Solution Folders, Assemblies, and Namespaces.
See also
- Share code maps
- Create code maps for C++
- Improve code map performance
- Use code maps to debug your applications
- Map methods on the call stack while debugging
- Find potential problems using code map analyzers
- Browse and rearrange code maps
- Customize code maps by editing the DGML files
Recommended content
-
Install architecture code tools - Visual Studio (Windows)
Install Code Map and Live Dependency Validation.
-
Create dependency diagrams from your code - Visual Studio (Windows)
Learn how you can create a dependency diagram in Visual Studio to visualize your software system's high-level, logical architecture.
-
What's new for design in Visual Studio 2017
Learn about new features for code design, like live dependency validation, that are available in Visual Studio 2017.
-
Use code maps to debug your applications - Visual Studio (Windows)
Learn how to use code maps to help you avoid getting lost in large code bases, unfamiliar code, or legacy code.
Show more
XCode下载
- 注册成为开发者
- Xcode Releases
怎么获取Apple Beta版的软件
- Sign up for the Apple Beta software program
怎么安装IPSW文件
- 下载
- 连接你的iPhone或iOS设备到你的电脑
- 用iTunes选择你的设备
- 在Mac上,按住Option+Alt键的同时鼠标点击Check for Update
- 在Windows上,按住SHIFT键的同时鼠标点击Check for Updat
- 选中你下载的IPSW文件并点击Choose
- 让设备自动安装就可以了
Xcode build with exportOptionsPlist
-
exportOptionsAdHoc.plist
method ad-hoc -
exportOptionsRelease.plist
method app-store -
xcodebuild -exportArchive
AdHoc xcodebuild -exportArchive -archivePath ~/Desktop/build/AdHoc/AdHoc.xcarchive -exportPath ~/Desktop/build/AdHoc -exportOptionsPlist ~/Desktop/build/AdHoc/exportOptionsAdHoc.plist Release xcodebuild -exportArchive -archivePath ~/Desktop/build/Release/Release.xcarchive -exportPath ~/Desktop/build/Release -exportOptionsPlist ~/Desktop/build/Release/exportOptionsRelease.plist Folders and Files on my desktop: build AdHoc AdHoc.xcarchive exportOptionsAdHoc.plist Release exportOptionsRelease.plist Release.xcarchive All Available keys for -exportOptionsPlist: compileBitcode : Bool For non-App Store exports, should Xcode re-compile the app from bitcode? Defaults to YES. embedOnDemandResourcesAssetPacksInBundle : Bool For non-App Store exports, if the app uses On Demand Resources and this is YES, asset packs are embedded in the app bundle so that the app can be tested without a server to host asset packs. Defaults to YES unless onDemandResourcesAssetPacksBaseURL is specified. iCloudContainerEnvironment For non-App Store exports, if the app is using CloudKit, this configures the "com.apple.developer.icloud-container-environment" entitlement. Available options: Development and Production. Defaults to Development. manifest : Dictionary For non-App Store exports, users can download your app over the web by opening your distribution manifest file in a web browser. To generate a distribution manifest, the value of this key should be a dictionary with three sub-keys: appURL, displayImageURL, fullSizeImageURL. The additional sub-key assetPackManifestURL is required when using on demand resources. method : String Describes how Xcode should export the archive. Available options: app-store, ad-hoc, package, enterprise, development, and developer-id. The list of options varies based on the type of archive. Defaults to development. onDemandResourcesAssetPacksBaseURL : String For non-App Store exports, if the app uses On Demand Resources and embedOnDemandResourcesAssetPacksInBundle isn't YES, this should be a base URL specifying where asset packs are going to be hosted. This configures the app to download asset packs from the specified URL. teamID : String The Developer Portal team to use for this export. Defaults to the team used to build the archive. thinning : String For non-App Store exports, should Xcode thin the package for one or more device variants? Available options:(Xcode produces a non-thinned universal app), (Xcode produces a universal app and all available thinned variants), or a model identifier for a specific device (e.g. "iPhone7,1"). Defaults to . uploadBitcode : Bool For App Store exports, should the package include bitcode? Defaults to YES. uploadSymbols : Bool For App Store exports, should the package include symbols? Defaults to YES.
发布版本时遇到的一些问题
-
问题 1:This bundle is invalid. The key UIRequiredDeviceCapabilities in the Info.plist may not contain values that would prevent this application from running on devices that were supported by previous versions.
原因:在你的应用程序进入商店后你将无法对 UIRequiredDeviceCapabilities 进行修改
解决:可以用 Xcode 打开新旧版本,并找到Required device capabilities项进行对比,使新版与旧版保持一致
  如果你的新版本在 Required device capabilities 中添加有 metal 而旧版本中却没有,有可能是 Unity 升级导致 Graphics API 改变引起,

  可以尝试在 Unity 的 Player Settings -> Other Settings 中取消选择 Auto Graphics API 并添加 OpenGLES3 和 OpenGLES2 在 Metal 之后
EmmyLua
-
安装EmmyLua插件(测试版本1.3.5.194-IDEA203)
-
添加调试器
-
下载EmmyLua-AttachDebugger(测试版本1.0.0.7)
-
解压EmmyLua-AttachDebugger到
C:\Program Files\JetBrains\JetBrains Rider 2020.3.2\plugins -
关联Unity.exe
-
打断点调试
-
无法断点的情况
- 使用了自定义加载
private void Start () { luaenv = new LuaEnv(); luaenv.AddLoader(LuaLoader); luaenv.DoString ( @" require 'Lua.. ' " ); } private byte[] LuaLoader(ref string filepath) { string path = filepath.Replace(".", "/") + ".lua.txt"; // 错误:像这样在获取到正确的路径之后,没有将值赋回给filepath,就会导致无法断点! scriptPath = Path.Combine( , path); byte[] result = File.ReadAllBytes(scriptPath); // 正确 filepath= Path.Combine( , path); byte[] result = File.ReadAllBytes(filepath); return result; }
- 使用了自定义加载
自动化构建
配置Jenkins
-
安装 Git 插件
-
安装 Pipeline 插件
-
安装 Unity3d 插件
-
Manage Jenkins -> Global Tool Configuration
这里需要注意的是,如果你的项目开启了LFS功能,而你并没有安装git lfs的话,那么你可能会遇到以下错误:
hudson.plugins.git.GitException: Command "/usr/bin/git checkout -f 73df1c09462e5ba09801205b05d0d24290784635" returned status code 128:
stdout:
stderr: git-lfs filter-process: git-lfs: command not found
fatal: the remote end hung up unexpectedly
解决方法:
- 使用命令
$ which git-lsf查看是否安装了LFS - 如果没有安装,则执行如下命令
$ brew install git-lfs $ git lfs install - 如果已经安装,则通过如下命令
获得git的默认访问路径,将 git-lfs 移动到该路径下$ git --exec-path
- 使用命令
-
添加 Android Sdk
-
如果你的项目包含SubModules,那么你需要勾选红框内的两个选项
-
创建并选择相应的证书
-
构建命令
- Unity3dBuilder Plugin
- Command line arguments
-
重置Jenkins的build序号
Manage Jenkins -> Script Console
item = Jenkins.instance.getItemByFullName("<你创建的打包管线的名称>")
// 清除所有的历史记录重新开始
item.builds.each() { build ->
  build.delete()
}
item.updateNextBuildNumber(1)
Blue Ocean
-
开始之前
-
Jenkins 下载
-
Blue Ocean 插件安装
Blue Ocean 提升 Jenkins 原有流水线的可视化程度
-
-
创建一条流水线
在开始构建之前,你需要创建一个Jenkinsfile文件到你要构建的分支的根目录下面。
下面是一个简单的测试用例:
pipeline { agent any stages { stage('Hello World') { steps { echo 'Hello World' } } } }这里还要注意一点,如果你的项目启用了LFS功能,那么你务必要添加 Git LFS pull after checkout Behaviours(如下图所示)。
不然的话,Jenkins可能会一直卡死在checkout(如下图所示)。
-
执行Unity脚本
pipeline { agent any environment { projectPath = "'${WORKSPACE}'" unityPath = "'C:/Program Files/Unity/Hub/Editor/2019.4.10f1/Editor/Unity.exe'" executeMethod = "BuildUtility.Build" } stages { stage('Unity Build') { steps { script { def buildCommand = "${unityPath} -quit -batchmode" buildCommand += " -executeMethod ${executeMethod}" buildCommand += " -projectPath ${projectPath}" buildCommand += " -logFile build.log" echo buildCommand sh buildCommand } } } } } -
选择参数
def buildCommand // 全局变量
pipeline
{
  agent any
  environment // 全局环境变量,但是在input下不可用,未来Jenkins可能会修复
  {
    UNITY_PATH = "'C:/Program Files/Unity/Hub/Editor/2019.4.10f1/Editor/Unity.exe'"
    EXECUTE_METHOD = 'BuildUtility.Build'
  }
  stages
  {
    stage('Options')
    {
      input
      {
        message "Should we continue?"
        ok 'Yes, we should.'
        parameters // 局部参数,只能在当前stage下使用
        {
          string(name: 'Command', defaultValue: 'env.UNITY_PATH -quit -batchmode -executeMethod env.EXECUTE_METHOD -projectPath env.PROJECT_PATH -logFile build.log', description: 'run Unity from the command line')
        }
      }
      steps
      {
        script
        {
          buildCommand = "${Command}"
          def projectPath = "${WORKSPACE}"
          projectPath = projectPath.replaceAll("\\\\", "/") // 将\替换成/,默认得到的工作路径是反斜杠,在下面替换时会被移除,导致路径错误,所以事先处理一下
          buildCommand = buildCommand.replaceAll("env.PROJECT_PATH", projectPath)
          buildCommand = buildCommand.replaceAll("env.UNITY_PATH", "$env.UNITY_PATH")
          buildCommand = buildCommand.replaceAll("env.EXECUTE_METHOD", "$env.EXECUTE_METHOD")
          echo buildCommand
        }
      }
    }
    stage('Unity Build')
    {
      steps
      {
        script
        {
          sh buildCommand
        }
      }
    }
  }
}
踩过的坑
-
Cannot run program "nohup"

添加以下路径到系统环境变量PATH
C:\Program Files\Git\binC:\Program Files\Git\usr\bin
-
使用Java Web连接的节点,控制台输出的中文乱码
使用命令行启动并在命令行中添加
-Dfile.encoding=UTF-8 -
如何根据不同平台设置不同的环境变量
agent any stages { stage('设置环境') { when { equals expected: "Windows_NT", actual: env.OS } steps { script { env.Path = "C:\\Program Files (x86)\\Common Files\\Oracle\\Java\\javapath;C:\\Windows\\system32;C:\\Windows;C:\\Windows\\System32\\Wbem;C:\\Windows\\System32\\WindowsPowerShell\\v1.0\\;C:\\Windows\\System32\\OpenSSH\\;C:\\Program Files (x86)\\NVIDIA Corporation\\PhysX\\Common;C:\\Program Files\\Git\\cmd;C:\\Program Files\\Git\\bin;C:\\Program Files\\Git\\usr\\bin;C:\\Program Files\\TortoiseGit\\bin;C:\\Users\\user\\AppData\\Local\\Programs\\Python\\Python37;C:\\Python27" } } } } -
不同平台下的节点怎么选择Git
Dashboard -> Nodes -> -> Configure -> Tool Locations 添加Git(例:
"C:\Program Files\Git\cmd\git.exe") -
如何安全的切换节点
def agentLabel = "master" if (env.node) { agentLabel = "${node}" } pipeline { } -
$BUILD_USER_ID环境变量不可用需要安装Jenkins user build vars plugin插件
在Pipeline中使用如下方法调用:
steps { wrap([$class: 'BuildUser']) { sh 'echo "${BUILD_USER}"' } } -
如何使用Python脚本获取当前构建的日志
import requests from requests.auth import HTTPBasicAuth def get_log(): url = <${BUILD_URL}> + "consoleText" r = requests.get(url=url, auth=HTTPBasicAuth('', ' '), verify=False) r.encoding = "utf-8" text = r.text.replace("\ufffd", "") return text -
在MacOS的外接硬盘上构建安卓工程时报错
FAILURE: Build failed with an exception.

* Where:

Build file '/Volumes/T7/workspace/garden_affairs_Android_Develop_QA2/GGXCUnity/Temp/gradleOut/launcher/build.gradle' line: 3

* What went wrong:

A problem occurred evaluating project ':launcher'.

> Failed to apply plugin [class 'org.gradle.api.plugins.BasePlugin']

    > Could not create service of type OutputFilesRepository using ExecutionServices.createOutputFilesRepository().
Java没有全磁盘访问权限
iOS构建
-
注册一个新的Identifier
-
注册一个新的Provisioning Profile
-
如果你安装了两个版本的XCode你可能会遇到下面的问题:
ld: could not reparse object file in bitcode bundle: 'Invalid bitcode version (Producer: '1001.0.46.4.0_0' Reader: '1000.11.45.5_0')', using libLTO version 'LLVM version 10.0.0, (clang-1000.11.45.5)' for architecture arm64需要如下图所示这样,设置正确的环境变量来解决
-
构建并导出
echo "Remove old build data"
rm -rf ./Builds/UnityBuild
mkdir ./Builds/UnityBuild
mkdir ./Builds/${BUILD_NUMBER}
echo "Environment Variables"
env
-quit -batchmode -nographics -executeMethod Jenkins.CommandLineBuildiOScd "${WORKSPACE}/Builds/UnityBuild/" xcodebuild -scheme "Unity-iPhone" archive \ -archivePath "${WORKSPACE}/Builds/UnityBuild/Unity-iPhone.xcarchive"\ -allowProvisioningUpdates \ #ENABLE_BITCODE="No" \ xcodebuild -exportArchive \ -archivePath "${WORKSPACE}/Builds/UnityBuild/Unity-iPhone.xcarchive" \ -allowProvisioningUpdates \ -exportPath "${WORKSPACE}/Builds/${BUILD_NUMBER}" \ -exportOptionsPlist "${HOME}/.jenkins/ExportOptions/${ProjectName}.plist"如果出现如下错误,那么你可能需要取消对
#Enabled ENABLE_BITCODE="No"这一行的注释:'Invalid bitcode version (Producer: '1001.0.46.4.0_0' Reader: '1000.11.45.5_0')' happened and you don't set the DEVELOPER_DIR or you have third part library that don't support bitcode!
TestFlight
-
创建新的应用在App Store Connect
-
设置上传TestFlight的配置文件
-
通过Jenkins上传
#Xcode10 or before
#ALTOOLPATH=/Applications/Xcode.app/Contents/Applications/Application\ Loader.app/Contents/Frameworks/ITunesSoftwareService.framework/Versions/A/Support/altool
#"${ALTOOLPATH}" --upload-app --file "${WORKSPACE}/Builds/${BUILD_NUMBER}/Unity-iPhone.ipa" --username [email protected] --password @keychain:"Application Loader: [email protected]"

#Xcode11 or later
xcrun altool --upload-app --file "${WORKSPACE}/Builds/${BUILD_NUMBER}/Unity-iPhone.ipa" --username [email protected] --password @keychain:"Application Loader: [email protected]"
如果你的账号开启了二次验证,那么你需要为你的应用程序生成专用密码
不然的话你可能会收到如下报错:
"Error Domain=NSCocoaErrorDomain Code=-1011 "Authentication failed" UserInfo={NSLocalizedDescription=Authentication failed, NSLocalizedFailureReason=Unable to get authorization for username '[email protected]' and password provided.}"
怎么通过网页下载应用
-
创建一个HTML脚本
Install APP -
XCode build with exportOptionsPlist
添加一个manifest键值对到exportOptionsPlist
Publish Over FTP Plugin
可以参考下图所示设置:
Source files栏,需要填相对于工作空间的路径
Remove prefix栏,不填的话你会得到这样的路径:/htdocs/builds/TAYCAN/Builds/${BUILD_NUMBER}/**
Unity
-
如果你需要在运行时旋转UI,那么记得一定要取消在Canvas上的pixel perfect选项,这对减轻图片闪烁有很大的帮助
-
如果你需要在运行时移动UI,那么记得在导出图片时在边缘多留出几个像素,这对减轻图片闪烁有很大的帮助
Win10 虚拟键盘
private void Start()
{
    var virtualKeyboard = new VirtualKeyboard();

    // Open on screen keyboard
    virtualKeyboard.ShowOnScreenKeyboard();

    // Just set on screen keyboard position and size
    //virtualKeyboard.RepositionOnScreenKeyboard(new Rect(0, 0.5f * Screen.height, Screen.width, 0.5f * Screen.height));

    // Not only set on screen keyboard position and size, but also hide on screen keyboard title bar and borders
    StartCoroutine(virtualKeyboard.AsynRepositionOnScreenKeyboard(new Rect(0, 0.5f * Screen.height, Screen.width, 0.5f * Screen.height)));

    // Close on screen keyboard
    //virtualKeyboard.HideOnScreenKeyboard();
}
如何获得第二块显示屏的鼠标位置
private void Update()
{
    // Z轴表示屏幕的索引值,即0=Display1,1=Display2,依次类推...
    var mousePosition = Display.RelativeMouseAt(new Vector3(Input.mousePosition.x, Input.mousePosition.y, 1));
}
怎么确定一个物体在视野中
- 使用渲染组件的Renderer.isVisible参数
- 或者使用如下方式:
public bool I_Can_See(GameObject go)
{
    Plane[] planes = GeometryUtility.CalculateFrustumPlanes(Camera.main);
    Collider col = go.GetComponent();

    if (GeometryUtility.TestPlanesAABB(planes, col.bounds))
    {
        return true;
    }
   else
    {
        return false;
    }
}
Windows Mixed Reality
-
XR Plug-in Framework
-
Unity development overview
-
MixedRealityToolkit
-
Package a UWP app with Visual Studio
可能出现的错误1:Selected Visual Studio is missing required components and may not be able to build the generated project.
解决方案:
可能出现的错误2:
解决方案:删除 Windows.ApplicationModel.CommunicationBlocking.CommunicationBlockingContract.winmd 文件
-
Using SteamVR with Windows Mixed Reality
Magic Leap
- Setting up your device for development
- Install the Tools
- Get a Developer Certificate
- Deploy Unity Apps to Device
AR Foundation
-
iOS AR 无法正常的显示环境反射
Environmental Reflection Source 使用 Skybox 并赋予材质球,但材质球在构建后失 - Unity2019.2 版本有此问题
暂时的解决方案是 使用 Custom 并赋予 Cubemap来解决
使用Vive手柄不需连接头显
Rendering with Replaced Shaders
有时候有些效果可能会需要让同一个物体在不同的摄像机下呈现出完全不同的效果
这个时候你可以尝试使用 Camera.RenderWithShader 或 Camera.SetReplacementShader方法
ShaderLab
- 着色器变体
-
shader_feature 和 multi_compile 之间的区别:
shader_feature和multi_compile非常的相似,唯一的区别是使用shader_feature的变体如果没有被使用到则不会被加入构建
因此,你应该使用shader_feature如果keywords从材质球设置而来,而从脚本设置而来的keywords更适合用multi_compile
下面是一个使用shader_feature的简单例子:
Shader "Custom/Example"
{
    Properties
    {
        // Will set "FANCY_STUFF" shader keyword when set
        [Toggle(FANCY_STUFF)] _Fancy ("Fancy?", Float) = 0
    }
    SubShader
    {
        Tags { "Queue"="Opaque" }

        Pass
        {
            CGPROGRAM
            #pragma shader_feature FANCY_STUFF

            #include "UnityCG.cginc"

            ...
        }
    }
}
-
预计算实时光照(全局光照)
-
生成光照贴图
因为烘培的光照贴图是储存到模型的uv2中的,所以如果你导入的模型并没有分uv2,那么你需要启用Generate Lightmap UVs,如下图所示:
-
可以通过调节渲染组件上的Scale In Lightmap参数来优化烘培的光照贴图的质量或大小
[https://github.com/chaolunner/CloudNotes/wiki/Images/Experience/ScaleInLightmap.png]]
-
间接光照分辨率,一般建议室内设置在23像素,室外则应保持在0.51像素,而地形的话则应该在0.1~0.5像素
[https://github.com/chaolunner/CloudNotes/wiki/Images/Experience/indirect_resolution.jpg]]
-
直接光照分辨率,建议是间接光照分辨率的10倍左右
-
环境光遮蔽,在光照效果调试阶段一般建议禁用
-
实时光照,在移动平台不建议开启
烘培光照经验总结
- 首选线性空间作为项目的开发环境,Gamma空间适合Opengl3.0之前的项目
- 在线性空间下,Direction light(主光源)白天强度在1.5-1.8之间,夜间月光在0.4-0.7之间
- 在Gamma空间下,Direction light(主光源)白天强度在0.5-1之间,夜间月光在0.2-0.5之间
- 光照的间接光强度不能高过直接光的强度,在线性空间下间接光一般小于1
- 在Englighten渲染模式下,尽可能的降低植被的Cluster Resolution,提高渲染效率
- 静态物体尽可能优化掉不需要烘焙的部分,提高重要物体的Lightmap精度。不参与烘焙的物体使用Light Probe照明
- 优化UV Chart,单个物体UV Chart越少越好
- 优化不同种类的Cluster Resolution,保证不同种类的物体都有合理的计算分辨率
- 混合光照手机平台建议实时阴影距离不超过20米
- 使用Unity提供的Procudral Skybox进行烘焙光照贴图。可以获得更真实的Lightmap
- 不轻易的调整Unity的Albedo boost和Indirect intensity参数。尽可能的保证Albedo boost=1, indirect intensity=1
烘培光照参考文章
- Unity的光照烘焙技术(上)
- Unity的光照烘焙技术(下)
- 光照探针
- 使用光照探针实现静态光照
数据结构
FlatBuffers
-
Writing a schema
namespace MyGame; enum PhoneType : int { MOBILE = 0, HOME = 1, WORK = 2, } table PhoneNumber { number:string (required); type:int; } table People { name:string; age:int; phone:[PhoneNumber]; } table AddressBook { people:[People]; } root_type AddressBook; -
Generate Code
执行命令行: flatc.exe --csharp -o Resource/Sample Sample.fbs 则可以生成目标语言的代码。
–csharp 指定了编译的目标语言。-o 则用于指定输出文件路径,如果没有提供则将当前目录作为输出目录。最后,则是.fbs文件路径。
-
二进制文件生成Json文件
执行命令行: flatc.exe --raw-binary -t Sample.fbs -- AddressBook.ab 则可以生成一个名叫AddressBook.json的文件,方便查看生成的二进制文件是否正确。
注意:AddressBook.ab前面有一个空格。