Spring Boot:整合Spring Security
综合概述
Spring Security 是 Spring 社区的一个顶级项目,也是 Spring Boot 官方推荐使用的安全框架。除了常规的认证(Authentication)和授权(Authorization)之外,Spring Security还提供了诸如ACLs,LDAP,JAAS,CAS等高级特性以满足复杂场景下的安全需求。另外,就目前而言,Spring Security和Shiro也是当前广大应用使用比较广泛的两个安全框架。
Spring Security 应用级别的安全主要包含两个主要部分,即登录认证(Authentication)和访问授权(Authorization),首先用户登录的时候传入登录信息,登录验证器完成登录认证并将登录认证好的信息存储到请求上下文,然后再进行其他操作,如在进行接口访问、方法调用时,权限认证器从上下文中获取登录认证信息,然后根据认证信息获取权限信息,通过权限信息和特定的授权策略决定是否授权。
本教程将首先给出一个完整的案例实现,然后再分别对登录认证和访问授权的执行流程进行剖析,希望大家可以通过实现案例和流程分析,充分理解Spring Security的登录认证和访问授权的执行原理,并且能够在理解原理的基础上熟练自主的使用Spring Security实现相关的需求。
实现案例
接下来,我们就通过一个具体的案例,来讲解如何进行Spring Security的整合,然后借助Spring Security实现登录认证和访问控制。
生成项目模板
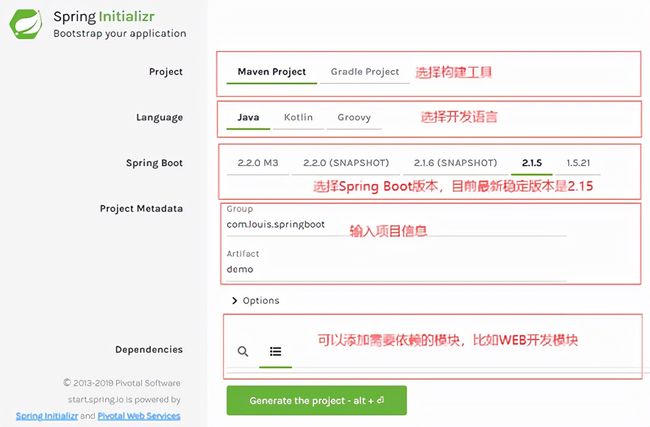
为方便我们初始化项目,Spring Boot给我们提供一个项目模板生成网站。
1. 打开浏览器,访问:https://start.spring.io/
2. 根据页面提示,选择构建工具,开发语言,项目信息等。
3. 点击 Generate the project,生成项目模板,生成之后会将压缩包下载到本地。
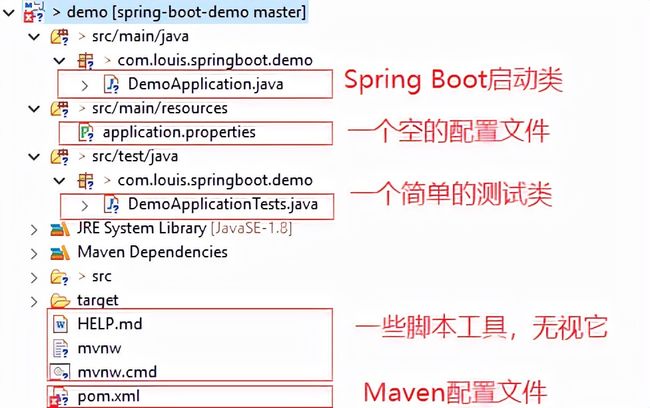
4. 使用IDE导入项目,我这里使用Eclipse,通过导入Maven项目的方式导入。
添加相关依赖
清理掉不需要的测试类及测试依赖,添加 Maven 相关依赖,这里需要添加上web、swagger、spring security、jwt和fastjson的依赖,Swagge和fastjson的添加是为了方便接口测试。
pom.xml
![]()
    4.0.0

        org.springframework.boot
        spring-boot-starter-parent
        2.1.5.RELEASE


    com.louis.springboot
    demo
    0.0.1-SNAPSHOT
    demo
    Demo project for Spring Boot


        1.8


                org.springframework.boot
                spring-boot-starter-web


            io.springfox
            springfox-swagger2
            2.9.2


            io.springfox
            springfox-swagger-ui
            2.9.2


            org.springframework.boot
            spring-boot-starter-security


            io.jsonwebtoken
            jjwt
            0.9.1


            com.alibaba
            fastjson
            1.2.58


                org.springframework.boot
                spring-boot-maven-plugin


                src/main/java

                    **/sqlmap/*.xml

                false


                src/main/resources

                        **/*.*

                    true
![]()
添加相关配置
1.添加swagger 配置
添加一个swagger 配置类,在工程下新建 config 包并添加一个 SwaggerConfig 配置类,除了常规配置外,加了一个令牌属性,可以在接口调用的时候传递令牌。
SwaggerConfig.java
![]()
package com.louis.springboot.demo.config;
import java.util.ArrayList;
import java.util.List;
import org.springframework.context.annotation.Bean;
import org.springframework.context.annotation.Configuration;
import springfox.documentation.builders.ApiInfoBuilder;
import springfox.documentation.builders.ParameterBuilder;
import springfox.documentation.builders.PathSelectors;
import springfox.documentation.builders.RequestHandlerSelectors;
import springfox.documentation.schema.ModelRef;
import springfox.documentation.service.ApiInfo;
import springfox.documentation.service.Parameter;
import springfox.documentation.spi.DocumentationType;
import springfox.documentation.spring.web.plugins.Docket;
import springfox.documentation.swagger2.annotations.EnableSwagger2;

@Configuration
@EnableSwagger2
public class SwaggerConfig {

    @Bean
    public Docket createRestApi(){
        // 添加请求参数,我们这里把token作为请求头部参数传入后端
        ParameterBuilder parameterBuilder = new ParameterBuilder();
        List parameters = new ArrayList();
        parameterBuilder.name("Authorization").description("令牌").modelRef(new ModelRef("string")).parameterType("header")
                .required(false).build();
        parameters.add(parameterBuilder.build());
        return new Docket(DocumentationType.SWAGGER_2).apiInfo(apiInfo()).select().apis(RequestHandlerSelectors.any())
                .paths(PathSelectors.any()).build().globalOperationParameters(parameters);
    }

    private ApiInfo apiInfo(){
        return new ApiInfoBuilder()
                .title("SpringBoot API Doc")
                .description("This is a restful api document of Spring Boot.")
                .version("1.0")
                .build();
    }

} ![]()
加了令牌属性后的 Swagger 接口调用界面,会多出一个令牌参数,在发起请求的时候一起发送令牌。
2.添加跨域 配置
添加一个CORS跨域配置类,在工程下新建 config 包并添加一个 CorsConfig配置类。
CorsConfig.java
![]()
package com.louis.springboot.demo.config;
import org.springframework.context.annotation.Configuration;
import org.springframework.web.servlet.config.annotation.CorsRegistry;
import org.springframework.web.servlet.config.annotation.WebMvcConfigurer;

@Configuration
public class CorsConfig implements WebMvcConfigurer {

    @Override
    public void addCorsMappings(CorsRegistry registry) {
        registry.addMapping("/**")    // 允许跨域访问的路径
        .allowedOrigins("*")    // 允许跨域访问的源
        .allowedMethods("POST", "GET", "PUT", "OPTIONS", "DELETE")    // 允许请求方法
        .maxAge(168000)    // 预检间隔时间
        .allowedHeaders("*")  // 允许头部设置
        .allowCredentials(true);    // 是否发送cookie
    }
}![]()
安全配置类
下面这个配置类是Spring Security的关键配置。
在这个配置类中,我们主要做了以下几个配置:
1. 访问路径URL的授权策略,如登录、Swagger访问免登录认证等
2. 指定了登录认证流程过滤器 JwtLoginFilter,由它来触发登录认证
3. 指定了自定义身份认证组件 JwtAuthenticationProvider,并注入 UserDetailsService
4. 指定了访问控制过滤器 JwtAuthenticationFilter,在授权时解析令牌和设置登录状态
5. 指定了退出登录处理器,因为是前后端分离,防止内置的登录处理器在后台进行跳转
WebSecurityConfig.java
![]()
package com.louis.springboot.demo.config;
import org.springframework.beans.factory.annotation.Autowired;
import org.springframework.context.annotation.Bean;
import org.springframework.context.annotation.Configuration;
import org.springframework.http.HttpMethod;
import org.springframework.security.authentication.AuthenticationManager;
import org.springframework.security.config.annotation.authentication.builders.AuthenticationManagerBuilder;
import org.springframework.security.config.annotation.method.configuration.EnableGlobalMethodSecurity;
import org.springframework.security.config.annotation.web.builders.HttpSecurity;
import org.springframework.security.config.annotation.web.configuration.EnableWebSecurity;
import org.springframework.security.config.annotation.web.configuration.WebSecurityConfigurerAdapter;
import org.springframework.security.core.userdetails.UserDetailsService;
import org.springframework.security.web.authentication.UsernamePasswordAuthenticationFilter;
import org.springframework.security.web.authentication.logout.HttpStatusReturningLogoutSuccessHandler;

import com.louis.springboot.demo.security.JwtAuthenticationFilter;
import com.louis.springboot.demo.security.JwtAuthenticationProvider;
import com.louis.springboot.demo.security.JwtLoginFilter;

@Configuration
@EnableWebSecurity
@EnableGlobalMethodSecurity(prePostEnabled = true)
public class WebSecurityConfig extends WebSecurityConfigurerAdapter {

    @Autowired
    private UserDetailsService userDetailsService;

    @Override
    public void configure(AuthenticationManagerBuilder auth) throws Exception {
        // 使用自定义登录身份认证组件
        auth.authenticationProvider(new JwtAuthenticationProvider(userDetailsService));
    }

    @Override
    protected void configure(HttpSecurity http) throws Exception {
        // 禁用 csrf, 由于使用的是JWT,我们这里不需要csrf
        http.cors().and().csrf().disable()
            .authorizeRequests()
            // 跨域预检请求
            .antMatchers(HttpMethod.OPTIONS, "/**").permitAll()
            // 登录URL
            .antMatchers("/login").permitAll()
            // swagger
            .antMatchers("/swagger**/**").permitAll()
            .antMatchers("/webjars/**").permitAll()
            .antMatchers("/v2/**").permitAll()
            // 其他所有请求需要身份认证
            .anyRequest().authenticated();
        // 退出登录处理器
        http.logout().logoutSuccessHandler(new HttpStatusReturningLogoutSuccessHandler());
        // 开启登录认证流程过滤器
        http.addFilterBefore(new JwtLoginFilter(authenticationManager()), UsernamePasswordAuthenticationFilter.class);
        // 访问控制时登录状态检查过滤器
        http.addFilterBefore(new JwtAuthenticationFilter(authenticationManager()), UsernamePasswordAuthenticationFilter.class);
    }

    @Bean
    @Override
    public AuthenticationManager authenticationManager() throws Exception {
        return super.authenticationManager();
    }

}![]()
登录认证触发过滤器
JwtLoginFilter 是在通过访问 /login 的POST请求是被首先被触发的过滤器,默认实现是
UsernamePasswordAuthenticationFilter,它继承了 AbstractAuthenticationProcessingFilter,抽象父类的 doFilter 定义了登录认证的大致操作流程,这里我们的 JwtLoginFilter 继承了 UsernamePasswordAuthenticationFilter,并进行了两个主要内容的定制。
1. 覆写认证方法,修改用户名、密码的获取方式,具体原因看代码注释
2. 覆写认证成功后的操作,移除后台跳转,添加生成令牌并返回给客户端
JwtLoginFilter.java
![]()
package com.louis.springboot.demo.security;

import java.io.BufferedReader;
import java.io.IOException;
import java.io.InputStream;
import java.io.InputStreamReader;
import java.nio.charset.Charset;

import javax.servlet.FilterChain;
import javax.servlet.ServletException;
import javax.servlet.ServletRequest;
import javax.servlet.ServletResponse;
import javax.servlet.http.HttpServletRequest;
import javax.servlet.http.HttpServletResponse;

import org.springframework.security.authentication.AuthenticationManager;
import org.springframework.security.authentication.event.InteractiveAuthenticationSuccessEvent;
import org.springframework.security.core.Authentication;
import org.springframework.security.core.AuthenticationException;
import org.springframework.security.core.context.SecurityContextHolder;
import org.springframework.security.web.authentication.UsernamePasswordAuthenticationFilter;

import com.alibaba.fastjson.JSON;
import com.alibaba.fastjson.JSONObject;
import com.louis.springboot.demo.utils.HttpUtils;
import com.louis.springboot.demo.utils.JwtTokenUtils;

/**
 * 启动登录认证流程过滤器
 * @author Louis
 * @date Jun 29, 2019
 */
public class JwtLoginFilter extends UsernamePasswordAuthenticationFilter {

    public JwtLoginFilter(AuthenticationManager authManager) {
        setAuthenticationManager(authManager);
    }

    @Override
    public void doFilter(ServletRequest req, ServletResponse res, FilterChain chain)
            throws IOException, ServletException {
        // POST 请求 /login 登录时拦截, 由此方法触发执行登录认证流程,可以在此覆写整个登录认证逻辑
        super.doFilter(req, res, chain);
    }

    @Override
    public Authentication attemptAuthentication(HttpServletRequest request, HttpServletResponse response) throws AuthenticationException {
        // 可以在此覆写尝试进行登录认证的逻辑,登录成功之后等操作不再此方法内
        // 如果使用此过滤器来触发登录认证流程,注意登录请求数据格式的问题
        // 此过滤器的用户名密码默认从request.getParameter()获取,但是这种
        // 读取方式不能读取到如 application/json 等 post 请求数据,需要把
        // 用户名密码的读取逻辑修改为到流中读取request.getInputStream()

        String body = getBody(request);
        JSONObject jsonObject = JSON.parseObject(body);
        String username = jsonObject.getString("username");
        String password = jsonObject.getString("password");

        if (username == null) {
            username = "";
        }

        if (password == null) {
            password = "";
        }

        username = username.trim();

        JwtAuthenticatioToken authRequest = new JwtAuthenticatioToken(username, password);

        // Allow subclasses to set the "details" property
        setDetails(request, authRequest);

        return this.getAuthenticationManager().authenticate(authRequest);

    }

    @Override
    protected void

