flask后端【文件上传、请求钩子函数、session信息存储、错误页面】
flask作为python轻量的微服务端后端框架,可以帮助我们快速搭建一个服务端来处理前端传过来的各种请求,是敏捷开发最常用的框架之一;结合gunicorn负载均衡,更能完成高并发的请求接口,下面我们搭建一个flask服务端demo。
from flask import Flask,redirect,url_for,abort,request,make_response,render_template,session,Response
from werkzeug.utils import secure_filename
app = Flask(__name__)

@app.route('/')
def hello_world():
    return render_template('main.html',title="主页")

if __name__ == "__main__":
    app.run(debug=True,port=8080)
1、首先引入flask包,实例化一个app对象。
2、接着在app的根路径(‘/’)下绑定视图函数,直接调用渲染模板,返回一个写好的前端页面。
3、最后在入口函数下,app调用run方法,可以设置的参数有debug模式,绑定端口,绑定请求ip地址等。
然后看下前端代码
DOCTYPE html>
<html lang="en">
  <head>
    <meta charset="UTF-8" />
    <meta http-equiv="X-UA-Compatible" content="IE=edge" />
    <meta name="viewport" content="width=device-width, initial-scale=1.0" />
    <title>Documenttitle>

    <link
      rel="stylesheet"
      href="https://unpkg.com/element-ui/lib/theme-chalk/index.css"
    />

    <script src="https://unpkg.com/[email protected]/dist/vue.min.js">script>
    <script src="https://unpkg.com/element-ui/lib/index.js">script>
  head>
  <body>
    <div id="app">
      <el-tabs v-model="activeName" @tab-click="aaa">

        <el-tab-pane label="重定向demo" name="first">
          <el-link type="primary" href="/redirect_test">重定向百度el-link>
        el-tab-pane>

        <el-tab-pane label="error page demo" name="second">
          <el-link type="success" href="/error_page">错误页面el-link>
        el-tab-pane>

        <el-tab-pane label="登录demo" name="third"
          ><el-link type="warning" href="/login_page">登录页面el-link>
        el-tab-pane>

        <el-tab-pane label="上传文件demo" name="fourth">
          <el-link type="danger" href="/upload_test">上传页面el-link>el-link>
          el-tab-pane>

          <el-tab-pane label="pdf demo" name="fifth">
          <el-link type="danger" href="/pdf_check">pdf校验el-link>el-link>
          el-tab-pane>


      el-tabs>


    div>
    <script>
      new Vue({
        el: "#app",
        data: function () {
          return {
            visible: false,
            num: 0,
            activeName: "second",
          };
        },

        methods: {
          aaa(e) {
            console.log(e);
          },
        },
      });
    script>
  body>
html>
运行后端,打开localhost:8080

请求钩子函数
flask中定义了钩子函数,允许在请求发送前,返回相应后做一些操作。一共有四种:
before_request      #每次执行视图函数之前调用,对请求进行一些准备处理
after_request       #如果没有抛出错误,每次执行视图函数之后(已经包装为响应对象)调用,在此函数中可以对响应值在返回之前 做最后一步修改处理接受一个参数:包装好的响应对象需要将修改后的响应对象返回
before_first_request   #web应用被第一次请求前调用,可以进行web应用初始化处理
teardown_request     #每次执行视图函数之后调用无论是否出现异常都会执行, 一般用于请求收尾接受一个参数:错误信息,如果有相关错误抛出
下面我们具体实践一下,添加如下代码:
def prepare():
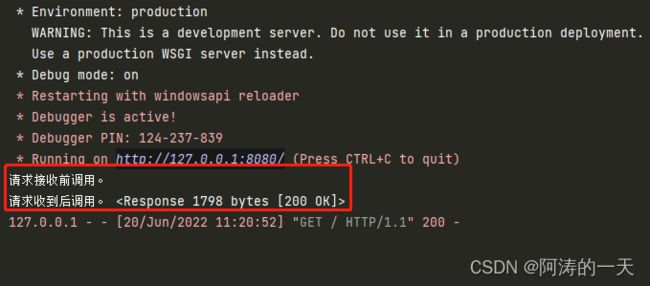
print('请求接收前调用。')
def finish(res):
print('请求收到后调用。',res)
return res
app.before_request(prepare)
app.after_request(finish)
在实际操作中,我们可以在请求到来前连接数据库,在返回请求后断开数据库连接,清空文件夹等操作。
上传文件
这里需要简单介绍一下http的get、post请求方式。get请求方式就是一般从服务端获取,打开网页的方式;post为传文件到后端,这里我们需要用到post。
flask后端添加代码:
@app.route('/upload_test',methods=['GET','POST'])
def upload_demo():
    if request.method == 'POST':
        f = request.files['file']
        basepath = os.path.dirname(__file__)
        #拼接保存路径
        upload_path = os.path.join(basepath,'save_upload',secure_filename(f.filename))
        f.save(upload_path)
        #url for 可以直接调用视图函数
        return redirect(url_for('upload_demo'))
    return render_template('upload.html')
这里我们新绑定一个路由取名为’/upload_test’,然后设置它可以接受的请求方式为[‘GET’,‘POST’]。然后我们判断如果前端请求的方式为POST,然后调用request的file方法,获取当前文件夹路径,将file的内容写入到该路径下,保存。然后返回前端上传页面。
前端上传页面:
DOCTYPE html>
 <html lang="en">
<head>
<meta charset="UTF-8">
<title>Titletitle>
head>
<body>
<h3>文件上传示例h3>
<form action="" enctype='multipart/form-data' method='POST'>
<input type="file" name="file">
<input type="submit" value="上传">
form>
body>
html>
前端用form表单post提交一个file对象,然后submit就可以了。

session信息存储
flask中有一个session对象,它允许你在不同请求间存储特定用户的信息。它是在cookie的基础上实现的,并且对cookie进行密钥签名要使用会话,你需要设置一个密钥。因为flask的session是通过加密后保存在cookie中的,有加密就需要有解密用的密钥,所以只要用到了flask的session模块,就一定要配置’SECRET_KEY’这个全局宏。一般设置为24位的字符。
后端添加如下代码:
app = Flask(__name__)
app.config['SECRET_KEY'] = os.urandom(24)

@app.route('/login_page',methods=['GET','POST'])
def login_page():
    if request.method == 'POST':
        userName = request.form.get('username')
        passWord = request.form.get('password')
        print(userName,passWord)
        session['user'] = userName
        session['pwd'] = passWord
        # print(session.get('user'),session.get('pwd'))
        for i in session.items():
            print(i)
        # return redirect(url_for('login_page'))
    return render_template('login.html')
首先我们还是绑定一个新的路由(‘/login_page’),然后设置请求方式为GET、POST,然后从前端form表单中获取用户名username,密码password,保存到变量中。flask中session的用法与字典的用法一样,直接将键值赋值给键名就可以了。还有不要忘记设置24位的密钥全局宏。
前端登录页面:
DOCTYPE html>
<html lang="en">
<head>
	<meta charset="UTF-8">
	<title>登陆页面title>
	<style type="text/css">
		@import url(http://fonts.googleapis.com/css?family=Source+Sans+Pro:200,300);
		* {
		  box-sizing: border-box;
		  margin: 0;
		  padding: 0;
		  font-weight: 300;
		}
		p {color:red;}
		body {
		  font-family: 'Source Sans Pro', sans-serif;
		  color: white;
		  font-weight: 300;
		}
		body ::-webkit-input-placeholder {
		  /* WebKit browsers */
		  font-family: 'Source Sans Pro', sans-serif;
		  color: white;
		  font-weight: 300;
		}
		body :-moz-placeholder {
		  /* Mozilla Firefox 4 to 18 */
		  font-family: 'Source Sans Pro', sans-serif;
		  color: white;
		  opacity: 1;
		  font-weight: 300;
		}
		body ::-moz-placeholder {
		  /* Mozilla Firefox 19+ */
		  font-family: 'Source Sans Pro', sans-serif;
		  color: white;
		  opacity: 1;
		  font-weight: 300;
		}
		body :-ms-input-placeholder {
		  /* Internet Explorer 10+ */
		  font-family: 'Source Sans Pro', sans-serif;
		  color: white;
		  font-weight: 300;
		}
		.wrapper {
		  background: #50a3a2;
		  background: -webkit-linear-gradient(top left, #50a3a2 0%, #53e3a6 100%);
		  background: linear-gradient(to bottom right, #50a3a2 0%, #53e3a6 100%);
		  position: absolute;
		  left: 0;
		  width: 100%;
		  height: 100%;
		/*  margin-top: -200px;*/
		  overflow: hidden;
		}
		.wrapper.form-success .container h1 {
		  -webkit-transform: translateY(85px);
		          transform: translateY(85px);
		}
		.container {
		  max-width: 600px;
		  margin: 0 auto;
		  padding: 80px 0;
		  padding-top:200px;
		  height: 400px;
		  text-align: center;
		}
		.container h1 {
		  font-size: 40px;
		  -webkit-transition-duration: 1s;
		          transition-duration: 1s;
		  -webkit-transition-timing-function: ease-in-put;
		          transition-timing-function: ease-in-put;
		  font-weight: 200;
		}
		form {
		  padding: 20px 0;
		  position: relative;
		  z-index: 2;
		}
		form input {
		  -webkit-appearance: none;
		     -moz-appearance: none;
		          appearance: none;
		  outline: 0;
		  border: 1px solid rgba(255, 255, 255, 0.4);
		  background-color: rgba(255, 255, 255, 0.2);
		  width: 250px;
		  border-radius: 3px;
		  padding: 10px 15px;
		  margin: 0 auto 10px auto;
		  display: block;
		  text-align: center;
		  font-size: 18px;
		  color: white;
		  -webkit-transition-duration: 0.25s;
		          transition-duration: 0.25s;
		  font-weight: 300;
		}
		form input:hover {
		  background-color: rgba(255, 255, 255, 0.4);
		}
		form input:focus {
		  background-color: white;
		  width: 300px;
		  color: #53e3a6;
		}
		form button {
		  -webkit-appearance: none;
		     -moz-appearance: none;
		          appearance: none;
		  outline: 0;
		  background-color: white;
		  border: 0;
		  padding: 10px 15px;
		  color: #53e3a6;
		  border-radius: 3px;
		  width: 125px;
		  cursor: pointer;
		  font-size: 18px;
		  -webkit-transition-duration: 0.25s;
		          transition-duration: 0.25s;
		}
		form button:hover {
		  background-color: #f5f7f9;
		}
		.bg-bubbles {
		  position: absolute;
		  top: 0;
		  left: 0;
		  width: 100%;
		  height: 100%;
		  z-index: 1;
		}
		.bg-bubbles li {
		  position: absolute;
		  list-style: none;
		  display: block;
		  width: 40px;
		  height: 40px;
		  background-color: rgba(255, 255, 255, 0.15);
		  bottom: -160px;
		  -webkit-animation: square 25s infinite;
		  animation: square 25s infinite;
		  -webkit-transition-timing-function: linear;
		  transition-timing-function: linear;
		}
		.bg-bubbles li:nth-child(1) {
		  left: 10%;
		}
		.bg-bubbles li:nth-child(2) {
		  left: 20%;
		  width: 80px;
		  height: 80px;
		  -webkit-animation-delay: 2s;
		          animation-delay: 2s;
		  -webkit-animation-duration: 17s;
		          animation-duration: 17s;
		}
		.bg-bubbles li:nth-child(3) {
		  left: 25%;
		  -webkit-animation-delay: 4s;
		          animation-delay: 4s;
		}
		.bg-bubbles li:nth-child(4) {
		  left: 40%;
		  width: 60px;
		  height: 60px;
		  -webkit-animation-duration: 22s;
		          animation-duration: 22s;
		  background-color: rgba(255, 255, 255, 0.25);
		}
		.bg-bubbles li:nth-child(5) {
		  left: 70%;
		}
		.bg-bubbles li:nth-child(6) {
		  left: 80%;
		  width: 120px;
		  height: 120px;
		  -webkit-animation-delay: 3s;
		          animation-delay: 3s;
		  background-color: rgba(255, 255, 255, 0.2);
		}
		.bg-bubbles li:nth-child(7) {
		  left: 32%;
		  width: 160px;
		  height: 160px;
		  -webkit-animation-delay: 7s;
		          animation-delay: 7s;
		}
		.bg-bubbles li:nth-child(8) {
		  left: 55%;
		  width: 20px;
		  height: 20px;
		  -webkit-animation-delay: 15s;
		          animation-delay: 15s;
		  -webkit-animation-duration: 40s;
		          animation-duration: 40s;
		}
		.bg-bubbles li:nth-child(9) {
		  left: 25%;
		  width: 10px;
		  height: 10px;
		  -webkit-animation-delay: 2s;
		          animation-delay: 2s;
		  -webkit-animation-duration: 40s;
		          animation-duration: 40s;
		  background-color: rgba(255, 255, 255, 0.3);
		}
		.bg-bubbles li:nth-child(10) {
		  left: 90%;
		  width: 160px;
		  height: 160px;
		  -webkit-animation-delay: 11s;
		          animation-delay: 11s;
		}
		@-webkit-keyframes square {
		  0% {
		    -webkit-transform: translateY(0);
		            transform: translateY(0);
		  }
		  100% {
		    -webkit-transform: translateY(-700px) rotate(600deg);
		            transform: translateY(-700px) rotate(600deg);
		  }
		}
		@keyframes square {
		  0% {
		    -webkit-transform: translateY(0);
		            transform: translateY(0);
		  }
		  100% {
		    -webkit-transform: translateY(-700px) rotate(600deg);
		            transform: translateY(-700px) rotate(600deg);
		  }
		}
		.cc{
			text-decoration: none;
			color: #53e3a6;
			}
	style>
	<script type="text/javascript">

		 $("#login-button").click(function(event){
				 event.preventDefault();

			 $('form').fadeOut(500);
			 $('.wrapper').addClass('form-success');
		});
		function check(){
	    {
		  if(form.username.value == "")//如果用户名为空
		  {
			alert("您还没有填写用户名!");
			form.username.focus();
			return false;
		  }
		  if(form.password.value == "")//如果密码为空
		  {
			alert("您还没有填写密码!");
			myform.password.focus();
			return false;
		  }
		}
	script>
head>
<body>
	<div class="wrapper">
		<div class="container">
			<h2>登录demoh2>
    <form method="POST">
        <input type="text" name="username" placeholder="用户名">
        <input type="text" name="password" placeholder="密码">
        <input type="submit" value="登陆">
    form>
		div>
	div>
body>
html>


最后再补充一个知识点,flask对于错误状态码的处理。可以直接使用abort()方法,里面添加对应的状态码就可以了。
常用状态码:
3**:表示重定向
4**:表示客户端错误
5**:表示服务端错误
服务端添加代码:
@app.route('/error_page')
def error_page_demo():
    abort(401)
    # this_is_never_executed()

希望能帮助到每一位浏览的同学,谢谢观看~