java后端吊着面试官打的那些解析(高级技术)
java后端吊着面试官打的那些解析(老司机)
2022-04-02 07:20·文字代表述说
1.java过滤器过滤
允许整个项目跨域访问,可通过filter来进行过虑:
public class SimpleCORSFilter implements Filter{

    @Override
    public void destroy() {

    }

    @Override
    public void doFilter(ServletRequest req, ServletResponse res,
            FilterChain chain) throws IOException, ServletException {
            HttpServletResponse response = (HttpServletResponse) res;
            response.setHeader("Access-Control-Allow-Origin", "*");
            response.setHeader("Access-Control-Allow-Methods", "POST, GET, OPTIONS, DELETE");
            response.setHeader("Access-Control-Max-Age", "3600");
            response.setHeader("Access-Control-Allow-Headers", "x-requested-with");
            chain.doFilter(req, res);

    }

    @Override
    public void init(FilterConfig arg0) throws ServletException {

    }

}
在web.xml中需要添加如下配置:
      cors
      com.ssm.web.filter.SimpleCORSFilter


      cors
      /*
为单个方法提供跨域访问,直接添加请求头:
       response.setHeader("Access-Control-Allow-Origin", "*");
            response.setHeader("Access-Control-Allow-Methods", "POST, GET, OPTIONS, DELETE");
            response.setHeader("Access-Control-Max-Age", "3600");
            response.setHeader("Access-Control-Allow-Headers", "x-requested-with");
2.后台Http请求转发
使用HttpClinet转发进行转发(简单的例子 不推荐使用这种方式)
try {
    HttpClient client = HttpClients.createDefault();            //client对象
    HttpGet get = new HttpGet("http://localhost:8080/test");    //创建get请求
    CloseableHttpResponse response = httpClient.execute(get);   //执行get请求
    String mes = EntityUtils.toString(response.getEntity());    //将返回体的信息转换为字符串
    System.out.println(mes);
} catch (ClientProtocolException e) {
    e.printStackTrace();
} catch (IOException e) {
    e.printStackTrace();
}
3、后台配置同源Cors (推荐)
在SpringBoot2.0 上的跨域 用以下代码配置 即可完美解决你的前后端跨域请求问题
import org.springframework.context.annotation.Bean;
import org.springframework.context.annotation.Configuration;
import org.springframework.web.cors.CorsConfiguration;
import org.springframework.web.cors.UrlBasedCorsConfigurationSource;
import org.springframework.web.filter.CorsFilter;
/**
 * 实现基本的跨域请求
 * @author linhongcun
 *
 */
@Configuration
public class CorsConfig {
    @Bean
    public CorsFilter corsFilter() {
        final UrlBasedCorsConfigurationSource urlBasedCorsConfigurationSource = new UrlBasedCorsConfigurationSource();
        final CorsConfiguration corsConfiguration = new CorsConfiguration();
        /*是否允许请求带有验证信息*/
        corsConfiguration.setAllowCredentials(true);
        /*允许访问的客户端域名*/
        corsConfiguration.addAllowedOrigin("*");
        /*允许服务端访问的客户端请求头*/
        corsConfiguration.addAllowedHeader("*");
        /*允许访问的方法名,GET POST等*/
        corsConfiguration.addAllowedMethod("*");
        urlBasedCorsConfigurationSource.registerCorsConfiguration("/**", corsConfiguration);
        return new CorsFilter(urlBasedCorsConfigurationSource);
    }
}
4、使用SpringCloud网关
服务网关(zuul)又称路由中心,用来统一访问所有api接口,维护服务。
Spring Cloud Zuul通过与Spring Cloud Eureka的整合,实现了对服务实例的自动化维护,所以在使用服务路由配置的时候,我们不需要向传统路由配置方式那样去指定具体的服务实例地址,只需要通过Ant模式配置文件参数即可
5、使用nginx做转发
现在有两个网站想互相访问接口 在http://a.a.com:81/A中想访问 http://b.b.com:81/B 那么进行如下配置即可
然后通过访问 www.my.com/A 里面即可访问 www.my.com/B
s
erver {
        listen       80;
        server_name  www.my.com;
        location /A {
            proxy_pass  http://a.a.com:81/A;
            index  index.html index.htm;
        }
        location /B {
            proxy_pass  http://b.b.com:81/B;
            index  index.html index.htm;
        }
    }
如果是两个端口想互相访问接口 在http://b.b.com:80/Api中想访问 http://b.b.com:81/Api 那么进行如下配置即可
使用nginx转发机制就可以完成跨域问题
server {
        listen       80;
        server_name  b.b.com;
        location /Api {
            proxy_pass  http://b.b.com:81/Api;
            index  index.html index.htm;
        }
    }
Java后端WebSocket的实现
一.WebSocket简单介绍
WebSocket 是 HTML5 开始提供的一种在单个 TCP 连接上进行全双工通讯的协议。
WebSocket 使得客户端和服务器之间的数据交换变得更加简单,允许服务端主动向客户端推送数据。在 WebSocket API 中,浏览器和服务器只需要完成一次握手,两者之间就直接可以创建持久性的连接,并进行双向数据传输。
在 WebSocket API 中,浏览器和服务器只需要做一个握手的动作,然后,浏览器和服务器之间就形成了一条快速通道。两者之间就直接可以数据互相传送。
现在,很多网站为了实现推送技术,所用的技术都是 Ajax 轮询。轮询是在特定的的时间间隔(如每1秒),由浏览器对服务器发出HTTP请求,然后由服务器返回最新的数据给客户端的浏览器。这种传统的模式带来很明显的缺点,即浏览器需要不断的向服务器发出请求,然而HTTP请求可能包含较长的头部,其中真正有效的数据可能只是很小的一部分,显然这样会浪费很多的带宽等资源。
HTML5 定义的 WebSocket 协议,能更好的节省服务器资源和带宽,并且能够更实时地进行通讯。
这里主要讲Java后端WebSocket的Tomcat实现
应该明白了WebSocket。下来创建WebSocket
1.新建web项目 应该都会
2.查看tomcat版本,支持7以上的版本,打开apache-tomcat-9.0.14\lib目录找到jar包拷贝到项目lib下面
3.编写jsp页面
3.创建java文件
import java.io.IOException;

import javax.websocket.OnClose;
import javax.websocket.OnError;
import javax.websocket.OnMessage;
import javax.websocket.OnOpen;
import javax.websocket.Session;
import javax.websocket.server.ServerEndpoint;
 /**
 * @ServerEndpoint 注解是一个类层次的注解,它的功能主要是将目前的类定义成一个websocket服务器端,注解的值将被用于监听用户连接的终端访问URL地址,客户端可以通过这个URL来连接到WebSocket服务器端
*/
@ServerEndpoint("/WebSocketTest")
public class WebSocketTest {
	private Session session;
	 @OnOpen//打开连接执行
	 public void onOpw(Session session) {
		 this.session=session;
		 System.out.println("打开了连接");
	 }
	 @OnMessage//收到消息执行
	 public void onMessage(String message,Session session) {
		System.out.println(message);
	try {
		sendMessage(message);
	} catch (IOException e) {
		// TODO Auto-generated catch block
		e.printStackTrace();
	}
	 }
	 @OnClose//关闭连接执行
	 public void onClose(Session session) {
		 System.out.println("关闭连接");
	 }
	 @OnError//连接错误的时候执行
	 public void onError(Throwable error,Session session) {
		 System.out.println("错误的时候执行");
		  error.printStackTrace();
	 }
        /*
        websocket  session发送文本消息有两个方法:getAsyncRemote()和
       getBasicRemote()  getAsyncRemote()和getBasicRemote()是异步与同步的区别,
       大部分情况下,推荐使用getAsyncRemote()。
      */
	 public void sendMessage(String message) throws IOException{
	    this.session.getAsyncRemote().sendText(message);
          }
}
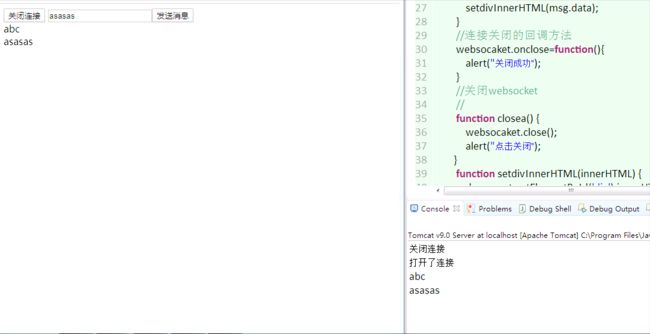
4.这是对应的项目运行图
总结:所有的面试题目都不是一成不变的,特别是像一线大厂,上面的面试题只是给大家一个借鉴作用,最主要的是给自己增加知识的储备,有备无患。最后给大家分享Spring系列的学习笔记和面试题,包含spring面试题、spring cloud面试题、spring boot面试题、spring教程笔记、spring boot教程笔记、最新阿里巴巴开发手册(63页PDF总结)、2022年Java面试手册。一共整理了1184页PDF文档。私信博主(777)领取,祝大家更上一层楼!!


