Git安装与Github基本使用(完整版 for mac)
文章目录
-
- 一、安装Git
- 1.1 通过homebrew安装git
- 1.2 通过Xcode安装
- 二、创建ssh key、配置git
- 2.1 设置username和email(github每次commit都会记录他们)
- 2.2 通过终端命令创建ssh key
- 2.3 添加`ssh key`
- 三、提交本地项目到Github
- 3.1 在Github上创建一个repository或者Start a Project
- 3.2 填写项目信息
- 3.3 Clone工程到本地
- 3.4 在Xcode中新建工程
- 3.5 提交修改
一、安装Git
首先,需要检查一下我们的mac电脑上有没有安装Git呢,这个时候可以在终端输入git:

如果你的电脑安装过了git就会出现上述图片中的信息,否则,不会出现这些信息的。现在来分享如何安装git呢?
在mac上安装Git主要有两种方式:
1.1 通过homebrew安装git
①如果没有安装homebrew,则需要安装一下homebrew
/usr/bin/ruby -e "$(curl -fsSL https://raw.githubusercontent.com/Homebrew/install/master/install)"
但是,这个执行该安装的命令的时候,多数会遇到下面的问题,原因一般是因为网络连接的问题,毕竟这个Github是一个国外的网站的。
curl: (7) Failed to connect to raw.githubusercontent.com port 443: Operation timed out
那么,这个时候就需要使用中科大的镜像源来加速访问,如下:
/usr/bin/ruby -e "$(curl -fsSL https://cdn.jsdelivr.net/gh/ineo6/homebrew-install/install)"
如果执行这个命令,然后卡在下面这个信息的时候:
==> Tapping homebrew/core
Cloning into '/usr/local/Homebrew/Library/Taps/homebrew/homebrew-core'...
那么,此时,按住ctrl + c来中终端命令的执行,然后执行下面的命令:
cd "$(brew --repo)/Library/Taps/"
mkdir homebrew && cd homebrew
git clone git://mirrors.ustc.edu.cn/homebrew-core.git
然后,在安装cask同样也有安装失败或者卡住的问题,解决办法也是一样的:
cd "$(brew --repo)/Library/Taps/"
cd homebrew
git clone https://mirrors.ustc.edu.cn/homebrew-cask.git
成功执行了后,继续执行前文的安装命令:
/usr/bin/ruby -e "$(curl -fsSL https://cdn.jsdelivr.net/gh/ineo6/homebrew-install/install)"
最后,如果看见了==> Installation successful!,就说明安装成功了。
最后,再执行下面这个命令:
brew update
这里为了之后下载安装其他的源文件的方便,介绍一下设置镜像的方法:
因为brew、homebrew/core是必备的项目,而homebrew/cask、homebrew/bottles则按需设置即可。
可以通过brew config命令查看配置信息。
1)中科大源
git -C "$(brew --repo)" remote set-url origin https://mirrors.ustc.edu.cn/brew.git

git -C "$(brew --repo homebrew/core)" remote set-url origin https://mirrors.ustc.edu.cn/homebrew-core.git

git -C "$(brew --repo homebrew/cask)" remote set-url origin https://mirrors.ustc.edu.cn/homebrew-cask.git

brew update

# 长期替换homebrew-bottles
echo 'export HOMEBREW_BOTTLE_DOMAIN=https://mirrors.ustc.edu.cn/homebrew-bottles' >> ~/.bash_profile
source ~/.bash_profile
注意bottles可以临时设置,在终端中执行下面的命令:
export HOMEBREW_BOTTLE_DOMAIN=https://mirrors.ustc.edu.cn/homebrew-bottles
2)清华大学源
git -C "$(brew --repo)" remote set-url origin https://mirrors.tuna.tsinghua.edu.cn/git/homebrew/brew.git

git -C "$(brew --repo homebrew/core)" remote set-url origin https://mirrors.tuna.tsinghua.edu.cn/git/homebrew/homebrew-core.git

git -C "$(brew --repo homebrew/cask)" remote set-url origin https://mirrors.tuna.tsinghua.edu.cn/git/homebrew/homebrew-cask.git

brew update

# 长期替换homebrew-bottles
echo 'export HOMEBREW_BOTTLE_DOMAIN=https://mirrors.tuna.tsinghua.edu.cn/homebrew-bottles' >> ~/.bash_profile
source ~/.bash_profile
3)恢复默认源
git -C "$(brew --repo)" remote set-url origin https://github.com/Homebrew/brew.git

git -C "$(brew --repo homebrew/core)" remote set-url origin https://github.com/Homebrew/homebrew-core.git

git -C "$(brew --repo homebrew/cask)" remote set-url origin https://github.com/Homebrew/homebrew-cask.git

brew update
这里需要注意一下:homebrew-bottles配置只能手动删除,将~/.bash_profile文件中的HOMEBREW_BOTTLE_DOMAIN=https://mirrors.xxx.com内容删除,并执行source ~/.bash_profile
②安装Git
brew install git
1.2 通过Xcode安装
直接从AppStore安装Xcode,Xcode集成了Git,不过默认没有安装,你需要运行Xcode,选择菜单“Xcode”->“Preferences”,在弹出窗口中找到“Downloads”,选择“Command Line Tools”,点“Install”就可以完成安装了。
二、创建ssh key、配置git
2.1 设置username和email(github每次commit都会记录他们)
git config --global user.name "自己定义一个名称"
git config --global user.email "自己的邮箱即可"
如下图:

2.2 通过终端命令创建ssh key
ssh-keygen -t rsa -C "自己刚刚写的邮箱"
例如,

回车后,就能够有以下的输出:

成功地话会在~/下生成.ssh文件夹,进去,采用cat命令查看:

整个ssh key为:

2.3 添加ssh key
(这里默认你已经注册了github账号)
①打开github,如下:
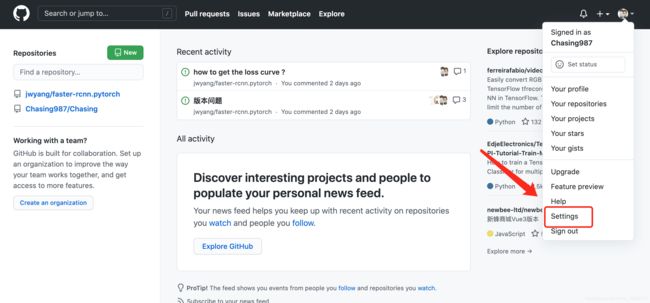
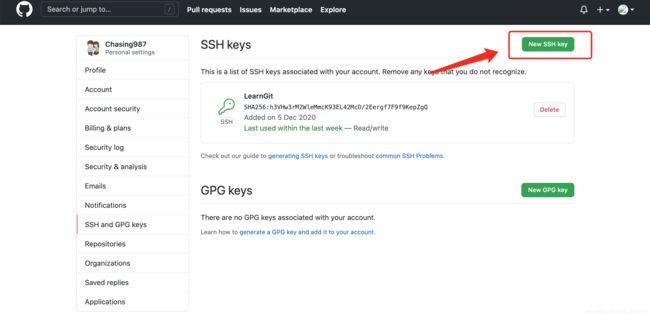
②点击New SSH key,如下:

③链接验证
ssh -T [email protected]
终端输出的结果:

说明已经链接成功!!!
三、提交本地项目到Github
3.1 在Github上创建一个repository或者Start a Project
如图:

3.2 填写项目信息
如下图所示:
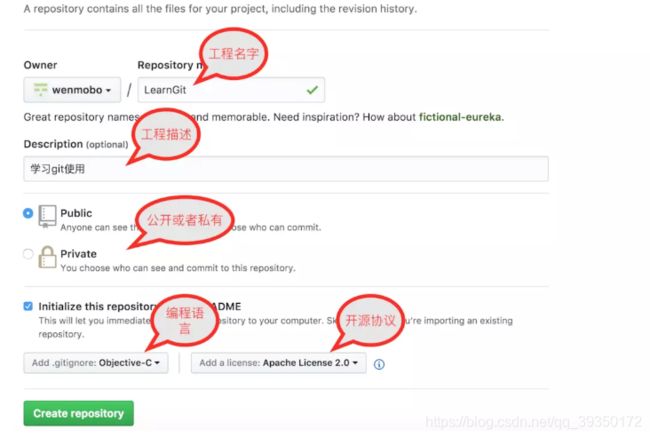
点击Create repository,就创好一个工程了。
3.3 Clone工程到本地
①首先复制ssh地址

②克隆项目
先打开终端,这里先测试一下,我将工程克隆在桌面上,首先需要将你的路径切换到桌面,输入以下的命令:
cd Desktop
git clone [email protected]:Chasing987/LyfdeBlog.git

上述的命令中[email protected]:Chasing987/LyfdeBlog.git是刚刚复制的ssh路径。
终端上的输出为:
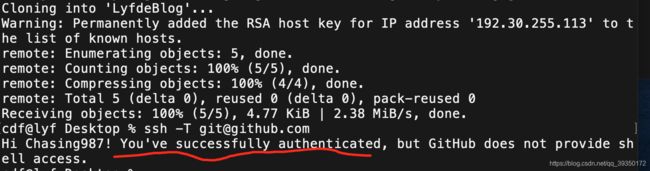
这时,你桌面上就会出现一个名叫LyfdeBlog的文件夹
3.4 在Xcode中新建工程
在Xcode中创建一个工程,保存的路径为刚刚克隆下来的LyfdeBlog的文件夹,如下图所示:

3.5 提交修改
首先就是要切换到LyfdeBlog的文件夹的路径:
cd Desktop
cd LyfdeBlog
然后,输入:
//文件添加到仓库(.代表提交所有文件)
git add .
//把文件提交到仓库
git commit -m "First Commit"
//上传到github
git push
终端上完整输出如下:
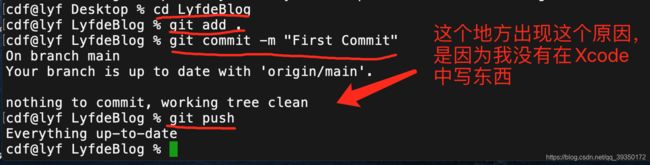
如果你在Xcode中写入东西,则在Github仓库中就能够看到这个文件已经上传到你的Github仓库中了。