Kubeadm安装K8s1.26集群
Kubeadm安装K8s1.26集群
基本介绍
k8s集群1.26.4在Centos7.9机器上基于Kubeadm安装,CRI使用containerd,CNI使用Calico,路由规则使用ipvs。具体步骤会有原理解释,会侧重企业级集群应用的考量。希望通过此文章帮助读者掌握Kubeadm安装k8s的基本原理。
环境介绍
| 机器名 | ip | 系统版本 | 系统内核 | cpu架构 |
|---|---|---|---|---|
| m1 | 10.11.81.152 | CentOS Linux release 7.9 | 5.4.242-1.el7 | x86 |
| w1 | 10.11.81.153 | CentOS Linux release 7.9 | 5.4.242-1.el7 | x86 |
| w2 | 10.11.81.154 | CentOS Linux release 7.9 | 5.4.242-1.el7 | x86 |
| w3 | 10.11.81.155 | CentOS Linux release 7.9 | 5.4.242-1.el7 | x86 |
1.初始化基本环境
1.1确保每个机器之间ip互相能访问通
cat /etc/hosts
10.11.81.152  m1
10.11.81.153  w1
10.11.81.154  w2
10.11.81.155  w3
1.2 升级每台机器系统内核 参考文章
Centos7.9默认的系统内核为3.10,使用ipvs需要内核版本高于4.1
#安装ELRepo仓库的yum源
yum install -y https://www.elrepo.org/elrepo-release-7.el7.elrepo.noarch.rpm

#更新yum源仓库
yum -y update

#查看可用的系统内核包
yum  --disablerepo="*"  --enablerepo="elrepo-kernel"  list  available
# 长期维护版本为lt,最新主线稳定版为ml

#选择的是长期维护版本kernel-lt,如需更新最新稳定版选择kernel-ml,建议选择长期维护版,目前为5.4版本,内核版本过高也不好
yum  --enablerepo=elrepo-kernel  install  -y  kernel-lt

#查看可用内核版本及启动顺序
awk -F\' '$1=="menuentry " {print i++ " : " $2}' /boot/grub2/grub.cfg

0 : CentOS Linux (5.4.108-1.el7.elrepo.x86_64) 7 (Core)
1 : CentOS Linux (3.10.0-1160.11.1.el7.x86_64) 7 (Core)
2 : CentOS Linux (3.10.0-1160.el7.x86_64) 7 (Core)
3 : CentOS Linux (0-rescue-20210128140208453518997635111697) 7 (Core)

#安装辅助工具
yum install -y grub2-pc

#设置内核默认启动顺序
grub2-set-default 0

#编辑/etc/default/grub文件
vim /etc/default/grub

#设置GRUB_DEFAULT=0  #只需要修改这里即可
sed -i 's/GRUB_DEFAULT=saved/GRUB_DEFAULT=0/g' /etc/default/grub

#生成grub 配置文件
# 运行grub2-mkconfig命令来重新创建内核配置
grub2-mkconfig -o /boot/grub2/grub.cfg

#重启系统
reboot
# 或者
shutdown -r now

#重启完成后,查看内核版本是否正确
uname -r
1.3每台机器都设置转发IPv4并让iptables看到桥接流量
cat <<EOF | sudo tee /etc/modules-load.d/k8s.conf
overlay
br_netfilter
EOF

sudo modprobe overlay
sudo modprobe br_netfilter

# 设置所需的 sysctl 参数,参数在重新启动后保持不变
cat <<EOF | sudo tee /etc/sysctl.d/k8s.conf
net.bridge.bridge-nf-call-iptables  = 1
net.bridge.bridge-nf-call-ip6tables = 1
net.ipv4.ip_forward                 = 1
EOF

# 应用 sysctl 参数而不重新启动
sudo sysctl --system
集群安装好后切换到ipvs
1.4每台机器设置时间同步
yum install chrony -y
systemctl start chronyd
systemctl enable chronyd
chronyc sources
1.5每台机器关闭防火墙
生产环境需要按需开放防火墙端口。当然生产环境K8s集群前还会有负载均衡的堡垒机,如果并不是直接面向外网也可以关闭K8s集群内机器的防火墙
systemctl stop firewalld
systemctl disable firewalld
1.6每台机器关闭swap,关闭swap主要是为了性能考虑
# 临时关闭
swapoff -a
# 永久关闭
sed -ri 's/.*swap.*/#&/' /etc/fstab
# 可以通过这个命令查看swap是否关闭了
free
# 临时关闭
setenforce 0
# 永久禁用
sed -i 's/^SELINUX=enforcing$/SELINUX=disabled/' /etc/selinux/config
2.安装CRI
自 Kubernetes 1.20 版本开始,官方不再支持使用 Docker 作为默认的容器运行时。不在支持的Docker的原因请查看 K8s宣布弃用Docker
2.1每台机器安装containerd
# 添加docker源
curl -L -o /etc/yum.repos.d/docker-ce.repo https://mirrors.aliyun.com/docker-ce/linux/centos/docker-ce.repo
# 安装containerd
yum install -y containerd.io
# 创建默认配置文件
containerd config default > /etc/containerd/config.toml
# 设置aliyun地址,不设置会连接不上, 如果无法下载镜像检查一下配置是否替换 cat /etc/containerd/config.toml |grep sandbox_image
# 将pause:3.6替换为pause:3.9,如果有关版本发生变化需要修改
sed -i "s#registry.k8s.io/pause:3.6#registry.aliyuncs.com/google_containers/pause:3.9#g" /etc/containerd/config.toml
# 设置驱动为systemd,Kubernetes官网推荐设置
sed -i 's/SystemdCgroup = false/SystemdCgroup = true/g' /etc/containerd/config.toml
# 设置dicker地址为aliyun镜像地址
sed -i '/\[plugins\."io\.containerd\.grpc\.v1\.cri"\.registry\.mirrors\]/a\      [plugins."io.containerd.grpc.v1.cri".registry.mirrors."docker.io"]\n        endpoint = ["https://8aj710su.mirror.aliyuncs.com" ,"https://registry-1.docker.io"]' /etc/containerd/config.toml

# 重启服务
systemctl daemon-reload
systemctl enable --now containerd
systemctl restart containerd

# 查看是否安装成功
containerd -version
2.2每台机器安装crictl工具
# 安装crictl工具
yum install -y cri-tools
# 生成配置文件
crictl config runtime-endpoint
# 编辑配置文件
cat << EOF | tee /etc/crictl.yaml
runtime-endpoint: "unix:///run/containerd/containerd.sock"
image-endpoint: "unix:///run/containerd/containerd.sock"
timeout: 10
debug: false
pull-image-on-create: false
disable-pull-on-run: false
EOF

# 查看是否安装成功
crictl info
crictl version
3.安装kubelet kubeadm kubectl
3.1每台机器安装kubelet kubeadm kubectl
cat <<EOF > /etc/yum.repos.d/kubernetes.repo
[kubernetes]
name=Kubernetes
baseurl=https://mirrors.aliyun.com/kubernetes/yum/repos/kubernetes-el7-x86_64/
enabled=1
gpgcheck=1
repo_gpgcheck=1
gpgkey=https://mirrors.aliyun.com/kubernetes/yum/doc/yum-key.gpg https://mirrors.aliyun.com/kubernetes/yum/doc/rpm-package-key.gpg
exclude=kubelet kubeadm kubectl #添加可以确保不发生版本漂移
EOF

# 安装指定版本
sudo yum install -y kubelet-1.26.4 kubeadm-1.26.4 kubectl-1.26.4 --disableexcludes=kubernetes

#启动kubelet
systemctl enable kubelet
3.2 m1机器执行集群初始化
kubeadm init \
  --apiserver-advertise-address=10.11.81.152 \
  --image-repository registry.aliyuncs.com/google_containers \
  --kubernetes-version v1.26.4 \
  --service-cidr=172.16.0.0/16 \
  --pod-network-cidr=10.244.0.0/16 \
  --ignore-preflight-errors=all
3.3如果kubelet启动失败查看启动文件
cat /usr/lib/systemd/system/kubelet.service.d/10-kubeadm.conf
cat /var/lib/kubelet/kubeadm-flags.env
3.4初始化出错重置命令
kubeadm reset
rm -fr ~/.kube/  /etc/kubernetes/* var/lib/etcd/*
3.5出现类似输出则表示成功
Your Kubernetes control-plane has initialized successfully!

To start using your cluster, you need to run the following as a regular user:

  mkdir -p $HOME/.kube
  sudo cp -i /etc/kubernetes/admin.conf $HOME/.kube/config
  sudo chown $(id -u):$(id -g) $HOME/.kube/config

Then you can join any number of worker nodes by running the following on each as root:

kubeadm join 10.11.81.152:6443 --token abcdef.1234567890abcdef \
    --discovery-token-ca-cert-hash sha256:0123456789abcdef0123456789abcdef0123456789abcdef0123456789abcdef
3.6将3个worker节点加入集群
kubeadm join 10.11.81.152:6443 --token abcdef.1234567890abcdef \
    --discovery-token-ca-cert-hash sha256:0123456789abcdef0123456789abcdef0123456789abcdef0123456789abcdef

#如果出现如下错误
[ERROR FileContent--proc-sys-net-ipv4-ip_forward]: /proc/sys/net/ipv4/ip_forward contents are not set to 1
#执行
sysctl -w net.ipv4.ip_forward=1
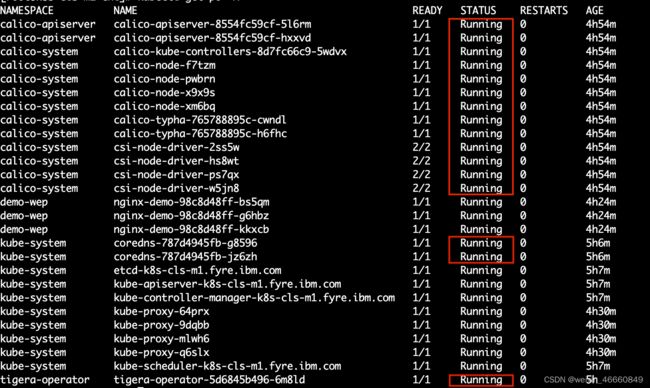
4.安装Calico网络插件
当前企业级环境使用的最多的CNI插件是Calico,其优点是转发效率好,容易查错
4.1 m1节点安装Calico插件 官方文档安装方式
# 创建一个yaml文件存放目录
mkdir /root/cni
cd /root/cni

# 下载operator & custom-resources
wget https://raw.githubusercontent.com/projectcalico/calico/v3.25.1/manifests/tigera-operator.yaml
wget https://raw.githubusercontent.com/projectcalico/calico/v3.25.1/manifests/custom-resources.yaml

# 修改custom-resources.yaml匹配容器网络 --pod-network-cidr=10.244.0.0/16
vi custom-resources.yaml #cidr: 192.168.0.0/16 -> cidr: 10.244.0.0/16

# 器群启动calico网络
kubectl create -f tigera-operator.yaml
kubectl create -f custom-resources.yaml
5.切换ipvs
5.1所有机器执行准备步骤
# 所有机器执行,为kube-proxy开启ipvs的前提需要加载以下的内核模块
cat > /etc/sysconfig/modules/ipvs.modules <<EOF
#!/bin/bash
modprobe -- ip_vs
modprobe -- ip_vs_rr
modprobe -- ip_vs_wrr
modprobe -- ip_vs_sh
modprobe -- nf_conntrack
EOF

# 执行加载命令,检查是否完成加载
chmod 755 /etc/sysconfig/modules/ipvs.modules && bash /etc/sysconfig/modules/ipvs.modules && lsmod | grep -e ip_vs -e nf_conntrack

# 所有机器ipset软件包
yum install -y ipset ipvsadm
5.2 m1机器修改kube-proxy configmap
#修改kube-proxy configmap为ipvs模式
kubectl edit configmap kube-proxy -n kube-system

...
    kind: KubeProxyConfiguration
    metricsBindAddress: ""
    mode: "ipvs"  # "" 改成 ipvs
    nodePortAddresses: null
    oomScoreAdj: null
...

configmap/kube-proxy edited

# 重启kube-proxy容器
kubectl  delete pods -n kube-system -l k8s-app=kube-proxy

# 成功验证
kubectl -n kube-system logs kube-proxy-qmdhp|grep ipvs

I0415 10:48:49.984477       1 server_others.go:259] Using ipvs Proxier.
 # 在 kube-proxy pod 看到如上信息后说明是启用ipvs的
6.后续可选操作
1.检验集群是否可用
# 使用 deployment 控制器部署镜像
kubectl create deployment nginx-demo --image=nginx --replicas=1
deployment.apps/nginx-demo created

# 创建service暴露方式为NodePort
kubectl expose deployment nginx-demo --port=80 --target-port=80 --type=NodePort
service/nginx-demo exposed

# 访问Nginx资源
kubectl get svc
NAME         TYPE        CLUSTER-IP      EXTERNAL-IP   PORT(S)        AGE
kubernetes   ClusterIP   172.16.0.1      <none>        443/TCP        5h59m
nginx-demo   NodePort    172.16.17.244   <none>        80:30392/TCP   11s

curl http://9.46.255.229:30392
<!DOCTYPE html>
<html>
<head>
<title>Welcome to nginx!</title>
<style>
html { color-scheme: light dark; }
body { width: 35em; margin: 0 auto;
font-family: Tahoma, Verdana, Arial, sans-serif; }
</style>
</head>
<body>
<h1>Welcome to nginx!</h1>
<p>If you see this page, the nginx web server is successfully installed and
working. Further configuration is required.</p>

<p>For online documentation and support please refer to
<a href="http://nginx.org/">nginx.org</a>.<br/>
Commercial support is available at
<a href="http://nginx.com/">nginx.com</a>.</p>

<p><em>Thank you for using nginx.</em></p>
</body>
</html>
6.2 m1机器设置kubectl简写,实际操作中非常实用
cat >> ~/.bashrc << EOF
alias kg='kubectl get'
alias k='kubectl'
alias kd='kubectl describe pods'
alias ke='kubectl explain'
alias ka='kubectl apply'
EOF

source ~/.bashrc

