SpringBoot单元测试之常见框架和注解
Mock的概念
在软件开发中提及"mock",通常理解为模拟对象。它可以用来对系统、组件或类进行隔离。在测试过程中,我们通常关注测试对象本身的功能和行为,而对测试对象涉及的一些依赖,仅仅关注它们与测试对象之间的交互(比如是否调用、何时调用、调用的参数、调用的次数和顺序,以及返回的结果或发生的异常等),并不关注这些被依赖对象如何执行这次调用的具体细节。因此,Mock 机制就是使用 Mock 对象替代真实的依赖对象,并模拟真实场景来开展测试工作。
使用 Mock 对象完成依赖关系测试的示意图如下所示:
SpringBootTest包导入的组件
比如 JUnit、JSON Path、AssertJ、Mockito、Hamcrest 等,这里我们有必要对这些组件进行展开说明。
- JUnit:JUnit 是一款非常流行的基于 Java 语言的单元测试框架,在我们的课程中主要使用该框架作为基础的测试框架。
- JSON Path:类似于 XPath 在 XML 文档中的定位,JSON Path 表达式通常用来检索路径或设置 JSON 文件中的数据。
- AssertJ:AssertJ 是一款强大的流式断言工具,它需要遵守 3A 核心原则,即 Arrange(初始化测试对象或准备测试数据)——> Actor(调用被测方法)——>Assert(执行断言)。
- Mockito:Mockito 是 Java 世界中一款流行的 Mock 测试框架,它主要使用简洁的 API 实现模拟操作。在实施集成测试时,我们将大量使用到这个框架。
- Hamcrest:Hamcrest 提供了一套匹配器(Matcher),其中每个匹配器的设计用于执行特定的比较操作。
- JSONassert:JSONassert 是一款专门针对 JSON 提供的断言框架。
- Spring Test & Spring Boot Test:为 Spring 和 Spring Boot 框架提供的测试工具。
Spring单元测试编写
大致可以分为如下三类:
- 单元测试:一般面向方法,编写一般业务代码时,测试成本较大。涉及到的注解有
@Test。 - 切片测试:一般面向难于测试的边界功能,介于单元测试和功能测试之间。涉及到的注解有
@RunWith、@WebMvcTest等。 - 功能测试:一般面向某个完整的业务功能,同时也可以使用切面测试中的mock能力,推荐使用。涉及到的注解有
@RunWith、@SpringBootTest等。
初始化测试环境
@SpringBootTest
@RunWith(SpringRunner.class)
复制代码
@SpringBootTest注解
默认情况下,@SpringBootTest不会启动嵌入式的服务器。您可以使用 @SpringBootTest 的 webEnvironment 属性进一步完善测试的运行方式:
- MOCK: 加载 WebApplicationContext 并提供一个 Mock 的 Servlet 环境,此时内置的 Servlet 容器并没有正式启动,可以配合
@AutoConfigureMockMvc或@AutoConfigureWebTestClient结合使用。
-
- 在多数场景下,一个真实的 Servlet 环境对于测试而言过于重量级,通过 MOCK 环境则可以缓解这种环境约束所带来的成本和挑战。
- RANDOM_PORT: 加载 EmbeddedWebApplicationContext 并提供一个真实的 Servlet 环境,然后使用一个随机端口启动内置容器。
- DEFINED_PORT: 这个配置也是通过加载 EmbeddedWebApplicationContext 提供一个真实的 Servlet 环境,但使用的是默认端口,如果没有配置端口就使用 8080。
- NONE: 加载 ApplicationContext 但并不提供任何真实的 Servlet 环境
使用命令行参数
如果您的应用程序需要arguments,您可以使用@SpringBootTest的args属性注入它们
@SpringBootTest(args = "--app.test=one")
class ApplicationArgumentsExampleTests {

    @Test
    void applicationArgumentsPopulated(@Autowired ApplicationArguments args) {
        assertThat(args.getOptionNames()).containsOnly("app.test");
        assertThat(args.getOptionValues("app.test")).containsOnly("one");
    }

}
复制代码
常见测试注解总结
自动配置类型的注解(@AutoConfigure*)
- @AutoConfigureJsonTesters 自动配置JsonTester
- @AutoConfigureTestEntityManager 自动配置TestEntityManager
- @AutoConfigureMockRestServiceServer 自动配置 MockRestServiceServer
- @AutoConfigureWebTestClient 自动配置 WebTestClient
- @AutoConfigureMockMvc 自动配置 MockMvc
- @AutoConfigureTestDatabase 自动配置Test Database,可以使用内存数据库
事务回滚@Transactional
单独的@Transactional是回滚事务,在添加@Transactional的情况下如果要提交事务,只需要增加@Rollback(false);另外由于@Rollback可以用在方法上,所以一个测试类中,我们可以实现部分测试方法用@Rollback回滚事务,部分测试方法用@Rollback(false)来提交事务。
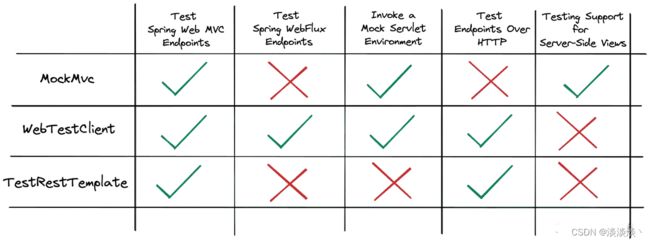
TestRestTemplate、WebTestClient 和 MockMvc 有什么区别?
虽然这三位候选者都服务于相似的目标:调用我们的 HTTP 端点并验证响应
MockMvc : 与模拟 servlet 环境交互的 Fluent API,有支持验证服务器端渲染视图端点的模型或视图名称的 API。
-
- 使用MockMvc,我们不需要启动我们的嵌入式 servlet 容器(例如Tomcat)。因此我们不占用任何端口。我们使用该MockMvc实例与这个模拟环境交互,而不启动真正的 HTTP 通信。
WebTestClient : 最初是用于调用和验证 Spring WebFlux 端点的测试工具。然而,我们也可以使用它为正在运行的servlet容器或MockMvc编写测试。
TestRestTemplate : 通过HTTP测试和验证正在运行的servlet容器的控制器端点,API不太流畅。
MockMvc工具类
MockMvc 类提供的基础方法分为以下 6 种,下面一一对应来看下。
- Perform:执行一个 RequestBuilder 请求,会自动执行 SpringMVC 流程并映射到相应的 Controller 进行处理。
- get/post/put/delete:声明发送一个 HTTP 请求的方式,根据 URI 模板和 URI 变量值得到一个 HTTP 请求,支持 GET、POST、PUT、DELETE 等 HTTP 方法。
- param:添加请求参数,发送 JSON 数据时将不能使用这种方式,而应该采用 @ResponseBody 注解。
- andExpect:添加 ResultMatcher 验证规则,通过对返回的数据进行判断来验证 Controller 执行结果是否正确。
- andDo:添加 ResultHandler 结果处理器,比如调试时打印结果到控制台。
- andReturn:最后返回相应的 MvcResult,然后执行自定义验证或做异步处理。
测试案例
  @Test
  void pageMessageCenterByUserId(@Autowired MockMvc mvc) throws Exception {
    MvcResult mvcResult = mvc.perform(get("xxx")
      // 请求数据类型
      .contentType(MediaType.APPLICATION_FORM_URLENCODED_VALUE)
      // 返回数据类型
      .accept(MediaType.APPLICATION_JSON_UTF8_VALUE)
      // session会话对象
      .session(session)
      // URL传参
      .param("key", "value")
      // body传参
      .content(json))
      // 验证参数
      .andExpect(status().isOk())
      .andExpect(jsonPath("$.code").value(0))
      // 打印请求和响应体
      .andDo(MockMvcResultHandlers.print());
    // 打印响应body
    System.out.println(mvcResult.getResponse().getContentAsString());
  }
复制代码
测试下载文件
使用mockMvc测试下载文件时,需要注意controller方法的返回值需要为void,否则会报HttpMessageNotWritableException的异常错误
@Test
@WithUserDetails("admin")
@DisplayName("测试下载excel文件")
void downExcel() throws Exception {
    mockMvc.perform(get("/system/operate/export/excel")
                    .accept(MediaType.APPLICATION_OCTET_STREAM)
                    .param("startTime", "2022-11-22 10:51:25")
                    .param("endTime", "2022-11-23 10:51:25"))
    .andExpect(status().isOk())
    .andDo((result) -> {
        String contentDisposition = result.getResponse().getHeader("Content-Disposition");
        String fileName = URLDecoder.decode(contentDisposition.split("=")[1]);
        ByteArrayInputStream inputStream = new ByteArrayInputStream(result.getResponse().getContentAsByteArray());
        String basePath = System.getProperty("user.dir");
        // 保存为文件
        File file = new File(basePath + "/" + fileName);
        FileUtil.del(file);
        FileOutputStream outputStream = new FileOutputStream(file);
        StreamUtils.copy(inputStream, outputStream);
        outputStream.close();
        inputStream.close();
    });
}
复制代码
SpringSecurity 单元测试
Spring Security 也提供了专门用于测试安全性功能的 spring-security-test 组件,如下所示:
     org.springframework.security
     spring-security-test
     test

复制代码
测试用户/认证
使用@WithMockUser、@WithUserDetails、@WithAnonymousUser等注解
@WithAnonymousUser是用来模拟一种特殊的用户,也被叫做匿名用户。如果有测试匿名用户的需要,可以直接使用该注解。
@WithMockUser注解可以帮我们在Spring Security安全上下文中模拟一个用户。
- 虽然
@WithMockUser是一种非常方便的方式,但可能并非在所有情况下都凑效。有时候你魔改了一些东西使得安全上下文的验证机制发生了改变,比如你定制了UserDetails,这一类注解就不好用了。但是通过UserDetailsService 加载的用户往往还是可靠的。
@WithUserDetails就派上了用场,它会根据传入的用户名调用UserDetailsService 的loadUserByUsername方法查找用户并加载到安全上下文中
测试 CSRF
下述 csrf() 方法的作用就是在请求中添加 CSRF Token
@Test
public void testHelloUsingPOSTWithCSRF() throws Exception {
     mvc.perform(post("/hello").with(csrf()))
            .andExpect(status().isOk());
}
复制代码
测试CORS
我们通过 MockMvc 发起请求,然后对响应的消息头进行验证即可,测试用例如下所示:
@SpringBootTest
@AutoConfigureMockMvc
public class MainTests {

    @Autowired
    private MockMvc mvc;

    @Test
    public void testCORSForTestEndpoint() throws Exception {
        mvc.perform(options("/hello")
                .header("Access-Control-Request-Method", "POST")
                .header("Origin", "http://www.test.com")
        )
        .andExpect(header().exists("Access-Control-Allow-Origin"))
        .andExpect(header().string("Access-Control-Allow-Origin", "*"))
        .andExpect(header().exists("Access-Control-Allow-Methods"))
        .andExpect(header().string("Access-Control-Allow-Methods", "POST"))
        .andExpect(status().isOk());
    }
}
复制代码
可以看到,针对 CORS 配置,我们分别获取了响应结果的"Access-Control-Allow-Origin"和"Access-Control-Allow-Methods"消息头并进行了验证。
SpringBoot加载测试专用属性
用args添加临时命令行参数
@SpringBootTest(args = {"--test.prop=test"})
复制代码
激活指定配置文件
@ActiveProfiles("pro")
复制代码
加载其他配置文件
@TestPropertySource(locations = "classpath:config-test.properties")
复制代码
常见问题
Junit版本问题
如果使用的是JUnit 4,需要添加@RunWith(SpringRunner.class)到测试中,否则会报错。如果您使用的是JUnit 5,则无需添加,因为@SpringBootTest中已经添加了@ExtendWith(SpringExtension.class),测试类中不需要在写@Runwith的时候,可以在pom中排除junit4的依赖。
断言
JUnit5 断言使用org.junit.jupiter.api.Assertions的静态方法。 除此之外还可以使用 AssertJ(org.assertj.core.api.Assertions的assertThat方法)。
单元测试中@Transactional不回滚的问题
docs.spring.io/spring-boot…
If your test is @Transactional, it rolls back the transaction at the end of each test method by default. However, as using this arrangement with either RANDOM_PORT or DEFINED_PORT implicitly provides a real servlet environment, the HTTP client and server run in separate threads and, thus, in separate transactions. Any transaction initiated on the server does not roll back in this case.
如果您的测试是@Transactional,默认情况下,它会在每个测试方法结束时回滚事务。然而,使用RANDOM_PORT或DEFINED_PORT的这种提供了一个真正的servlet环境的情况下,HTTP客户端和服务器在单独的线程中运行,因此会在单独的事务中运行。这种情况下,服务器上发起的任何事务都不会回滚。
you should use caution if Spring-managed or application-managed transactions are configured with any propagation type other than REQUIRED or SUPPORTS (see the discussion on transaction propagation for details).
如果Spring管理的或应用管理的事务被配置为REQUIRED或SUPPORTS以外的任何传播类型,你应该谨慎行事,因为它们都需要遵循事务的传播方式,也会出现事务不会滚的问题,比如你用了REQUIRED_NEW的话就跟单元测试中的事务不在一个事务中了,所以无法回滚。


