SpringBoot整合笔记
文章目录
- 一、SpringBoot快速入门
-
- 1.1 快速搭建
- 1.2 SpringBoot依赖引入
- 1.3 RestController的使用
- 1.4 SpringBoot启动方式
- 二、SpringBoot整合Web开发
-
- 2.1 springboot整合静态资源访问
- 2.2 yml与properties格式区别
- 2.3 Springboot整合freemarker模板引擎
- 2.4 freemarker模板引擎条件判断用法
- 2.5 thymeleaf渲染web界面
- 2.6 解决thymeleaf误报问题
- 2.7 thymeleaf循环和if判断写法
- 三、整合数据库访问层
-
- 1.整合JDBC
- 2.Druid数据源
- 3.整合Mybatis框架查询
- 4.整合redis插入、查询、修改、删除操作
- 四、整合Swagger接口文档
-
- 4.1 引入依赖
- 4.2 SwaggerConfig配置类
- 五、整合热部署框架
-
- 5.1 整合devtools工具
- 5.2 整合Lombok简化代码
- 六、整合读取配置文件
-
- 6.1 使用@value注解读取配置文件
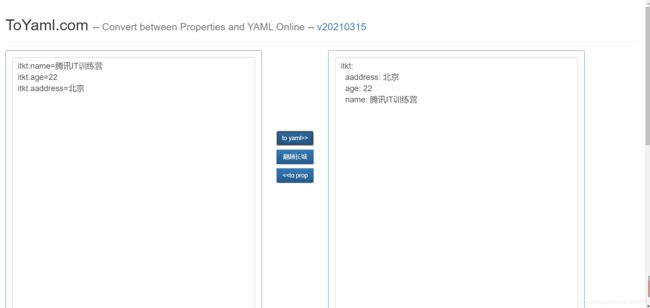
- 6.2 properties转换yml格式
- 6.3 @ConfigurationProperties
- 6.4 整合多环境下不同配置文件
- 6.5 修改端口号和上下文路径
- 七、整合日志框架
-
- 7.1 logback配置日志级别
- 7.2 整合log4j2日志
- 八、整合定时任务
-
- 8.1 使用创建定时任务
- 8.2 定时任务
- 九、整合多线程异步
-
- 9.1 使用@Async实现异步调用
- 9.2 @Async失效问题
- 9.3 @Async整合线程池
- 十、SpringBoot文件上传
-
- 10.1 文件上传
- 10.1 文件下载
- 十一、项目打包部署
-
- 11.1 整合全局捕获异常
- 11.2 打包运行发布
后台管理系统 后台模板
一、SpringBoot快速入门
1.1 快速搭建
开发工具:IDEA、JDK1.8
1.New Project->Spring Initializr

2.选择相关依赖->finish

3.新建一个controller包,在包下新建一个IndexController类
@RestController
public class IndexController {
    @RequestMapping("/hello")
    public String Hello(){
        return "学习SpringBoot快速入门";
    }
}
4.启动主类

5.访问8080端口,http://localhost:8080/hello

1.2 SpringBoot依赖引入
 		#引入后在声明其他dependency时不需要version

            org.springframework.boot
            spring-boot-starter-parent
            2.5.3


        #spring-boot-starter-web已经整合好SpringMVC框架

            org.springframework.boot
            spring-boot-starter-web


		#spring-boot-devtools的模块来使Spring Boot应用支持热部署,提高开发者的开发效率

            org.springframework.boot
            spring-boot-devtools
            runtime
            true


		#引入Lombok

            org.projectlombok
            lombok
            true


            org.springframework.boot
            spring-boot-starter-test
            test
1.3 RestController的使用
1.如果在类上加上@RestController,该类中所有SpringMVC URL接口映射都是返回json格式
2.@RestController是我们SpringMVC提供 而不是Springboot提供
3. Rest 微服务接口开发中 Rest风格 数据传输格式json格式 协议http协议
4.Controller 控制层注解SpringMVC url接口映射默认的情况下返回页面跳转 如果需要返闯json格式的情况下需要ResponseBody注解
@Target({ElementType.TYPE})
@Retention(RetentionPolicy.RUNTIME)
@Documented
@Controller
@ResponseBody
public @interface RestController {
    @AliasFor(
        annotation = Controller.class
    )
    String value() default "";
}
1.4 SpringBoot启动方式
方式一
@RestController
public class IndexController {
    @RequestMapping("/hello")
    public String Hello(){
        return "学习SpringBoot快速入门";
    }

    public static void main(String[] args) {
        SpringApplication.run(SpringbootLearnApplication.class,args);
    }
}
方式二
@Controller
@EnableAutoConfiguration
public class IndexController {
    @RequestMapping("/hello")
    @ResponseBody
    public String Hello(){
        return "学习SpringBoot快速入门";
    }

    public static void main(String[] args) {
        SpringApplication.run(SpringbootLearnApplication.class,args);
    }
}
方式三
@Controller
@EnableAutoConfiguration
//根据定义的扫描路径,把符合扫描规则的类装配到spring容器中
@ComponentScan("com/example/springbootlearn/controller")
public class IndexController {
    @RequestMapping("/hello")
    @ResponseBody
    public String Hello(){
        return "使用ComponentScan";
    }

    public static void main(String[] args) {
        SpringApplication.run(SpringbootLearnApplication.class,args);
    }
}
方式四
@RestController
public class IndexController {
    @RequestMapping("/hello")
    public String Hello(){
        return "SpringBoot启动";
    }
}
@SpringBootApplication
public class SpringbootLearnApplication {

    public static void main(String[] args) {
        SpringApplication.run(SpringbootLearnApplication.class, args);
    }

}
SpringBootApplication开启自动配置,扫描同级包或子包

二、SpringBoot整合Web开发
Configurable
public class WebMvcConfig  extends WebMvcConfigurerAdapter {
    @Override
    public void addResourceHandlers(ResourceHandlerRegistry registry) {
        registry.addResourceHandler("doc.html")
                .addResourceLocations("classpath:/META-INF/resources/");

        registry.addResourceHandler("swagger-ui.html")
                .addResourceLocations("classpath:/META-INF/resources/");

        registry.addResourceHandler("/webjars/**")
                .addResourceLocations("classpath:/META-INF/resources/webjars/");

        if(!registry.hasMappingForPattern("/**")){
            registry.addResourceHandler("/static/**").addResourceLocations("classpath:/static/");
        }
        super.addResourceHandlers(registry);
    }
}
2.1 springboot整合静态资源访问
可以在src/main/resources/目录下创建static,在该位置放置一个图片文件。启动程序后,尝试访问http://localhost:8080/NBA_logo.jpg。如能显示图片,配置成功。

2.2 yml与properties格式区别
SpringBoot支持两种配置方式,一种是properties文件,一种是yml。
使用yml可以减少配置文件的重复性。
例如:application.properties
tgxit.name=taotao
tgxit.age=18
controller包下新建一个类UserController
@RestController
public class UserController {
    @Value("${tgxit.name}")
    private String name;
    @Value("${tgxit.age}")
    private String age;

    @RequestMapping("/getProp")
    public String getProp(){
        return name+"--"+age;
    }
}
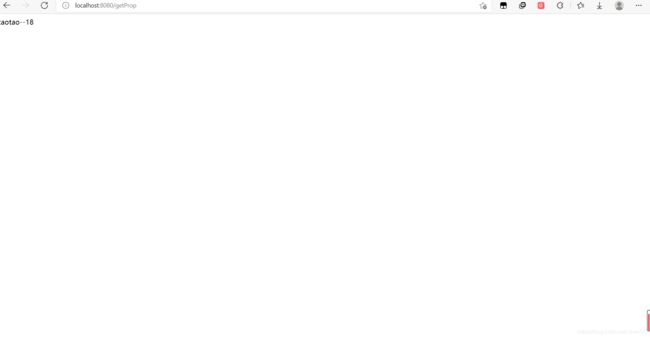
访问http://localhost:8080/getProp,返回结果值taotao–18
新建一个application.yml
#注意yml语法格式,冒号':'后面又有空格,不加空格会造成值不生效
tgxit:
  name: xiaohuihui
  age: 22
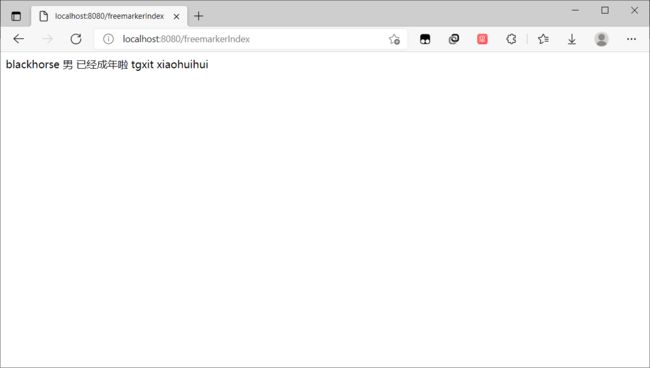
2.3 Springboot整合freemarker模板引擎
引入freemarker依赖
       org.springframework.boot
       spring-boot-starter-freemarker
编写freemarkerIndex.ftl
DOCTYPE html>
<html>
<head lang="en">
    <meta charset="UTF-8"/>
    <title>title>
head>
<body>
${name}
body>
html>
编写Controller类
@Controller
public class FreemarkerController {
    @RequestMapping("/freemarkerIndex")
    @ResponseBody
    public String freemarker(Map<String,String > result){
        result.put("name","blackhorse");
        return "freemarkerIndex";
    }
}
2.4 freemarker模板引擎条件判断用法
DOCTYPE html>
<html>
<head lang="en">
    <meta charset="UTF-8"/>
    <title>title>
head>
<body>
${name}
<#if sex=='0'>
    男
    <#elseif sex=='1'>
    女
        <#else>
    其他
#if>

<#if age gte 18>
    已经成年啦
    <#else>
    未成年
#if>
<#list list as user>
    ${user}
#list>
body>
html>
#比较大小 两种方法
1.用符号代替 > gt >= gte ; < lt  <=lte
2.加括号 <#if(x>y)>
@Controller
public class FreemarkerController {
    @RequestMapping("/freemarkerIndex")
    public String freemarker(Map<String,Object > result){
        result.put("name","blackhorse");
        result.put("sex","0");
        result.put("age",22);

        ArrayList<String> list=new ArrayList<>();
        list.add("tgxit");
        list.add("xiaohuihui");
        result.put("list",list);
        return "freemarkerIndex";
    }
}
2.5 thymeleaf渲染web界面
引入依赖
          org.springframework.boot
          spring-boot-starter-thymeleaf
添加thymeleaf配置文件
 ##Thymeleaf模板配置
  thymeleaf:
    prefix: classpath:/templates/
    check-template-location: true
    cache: true
    suffix: .html
    encoding: UTF-8
    mode: HTML5
编写html页面
doctype html>
<html lang="en" xmlns:th="http://www.thymeleaf.org">
<head>
    <meta charset="UTF-8">
    <meta name="viewport"
          content="width=device-width, user-scalable=no, initial-scale=1.0, maximum-scale=1.0, minimum-scale=1.0">
    <meta http-equiv="X-UA-Compatible" content="ie=edge">
    <title>UserListtitle>
head>
<body>
<table>
    姓名:<span th:text="${user.userName}">span>
    年龄:<span th:text="${user.age}">span>
table>

body>
html>
2.6 解决thymeleaf误报问题
代码优化
@Controller
public class MyThymeleafController {
    @RequestMapping("/myThymeleaf")
    public String myThymeleaf(HttpServletRequest request, Map<String,Object> result){
        result.put("user",new UserEntity("xiaohuihui",22));
        return "myThymeleaf";
    }
}
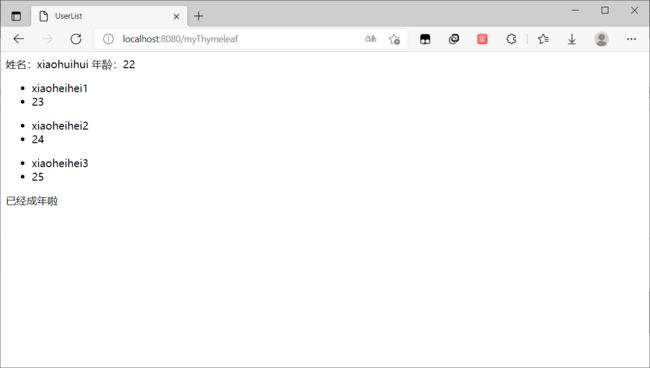
2.7 thymeleaf循环和if判断写法
@Controller
public class MyThymeleafController {
    @RequestMapping("/myThymeleaf")
    public String myThymeleaf(HttpServletRequest request, Map<String,Object> result){
        ArrayList<UserEntity> userEntities = new ArrayList<>();
        userEntities.add(new UserEntity("xiaoheihei1",23));
        userEntities.add(new UserEntity("xiaoheihei2",24));
        userEntities.add(new UserEntity("xiaoheihei3",25));
        result.put("userList",userEntities);
        return "myThymeleaf";
    }
}
编写html代码
doctype html>
<html lang="en" xmlns:th="http://www.thymeleaf.org">
<head>
    <meta charset="UTF-8">
    <meta name="viewport"
          content="width=device-width, user-scalable=no, initial-scale=1.0, maximum-scale=1.0, minimum-scale=1.0">
    <meta http-equiv="X-UA-Compatible" content="ie=edge">
    <title>UserListtitle>
head>
<body>
<table>
    //遍历userList
    <ul th:each="user:${userList}">
        <li th:text="${user.userName}">li>
        <li th:text="${user.age}">li>
    ul>
table>

body>
html>
    <span th:if="${user.age>17}">已经成年啦span>
    <span th:if="${user.age<18}">未成年span>
详细内容可以参照thymeleaf官网
三、整合数据库访问层
1.整合JDBC
对于数据库访问层,SpringBoot底层都是采用Spring Data的方式进行统一处理
创建表
CREATE TABLE 'user'(
'id' int(11) NOT NULL AUTO_INCREMENT,
'name'varchar(32)NOT NULL COMMENT '用户名称',
'age' int(11) DEFAULT NULL,
PRIMARY KEY ('id')
)ENGINE=InnoDB AUTO_INCREMENT=3 DEFAULT CHARSET=utf8;
1.引入依赖
      org.springframework.boot
      spring-boot-starter-jdbc


      mysql
      mysql-connector-java
2.配置数据库连接
application.yml新增配置
  datasource:
    url: jdbc:mysql://localhost:3306/jdbc
    username: root
    password: 123456
    driver-class-name: com.mysql.jdbc.Driver
然后测试
@SpringBootTest
class SpringbootDataApplicationTests {
      @Autowired
      DataSource dataSource;
      @Test
      void contextLoads() {
          System.out.println(dataSource.getClass());
          //输出数据源:class com.zaxxer.hikari.HikariDataSource
      }
  }
使用JDBCTemplate
新建一个JDBCController.java,用jdbcTemplate实现增删查改
@RestController//return的不在是跳转作用,而是返回字符串
public class JDBCController {
@Autowired
JdbcTemplate jdbcTemplate;
//查询数据库的所有信息
//没有实体类 获取数据库中的东西
@GetMapping("/courseList")
public List<Map<String,Object>> userList(){
String sql = "select * from course";
List<Map<String, Object>> maps = jdbcTemplate.queryForList(sql);
return maps;//返回数据库表中所有信息
}
@GetMapping("/addCourse")
public String addCourse(){
String sql = "insert into test.course(c_id,c_name,t_id) values(5,'生物','05')";
int i = jdbcTemplate.update(sql);
return i+"";
}
@GetMapping("/updateCourse/{c_id}")
public String updateCourse(@PathVariable("c_id") int c_id){
String sql = "update test.course set c_name = ?,t_id = ? where c_id = " + c_id;
//封装
Object[] objects = new Object[2];
objects[0] = "地理";
objects[1] = "01";
jdbcTemplate.update(sql,objects);
return "ok!";
}
@GetMapping("/deleteCourse/{c_id}")
public String deleteCourse(@PathVariable("c_id") int c_id){
String sql = "delete from test.course where c_id = ?";
jdbcTemplate.update(sql,c_id);
return "deleteOk";
}
}
2.Druid数据源
①导入依赖
      com.alibaba
      druid
      1.1.10
appilication.yml
spring:
datasource:
username: root
password: 123456
url: jdbc:mysql://localhost:3306/test?characterEncoding=UTF-8
driver-class-name: com.mysql.jdbc.Driver
type: com.alibaba.druid.pool.DruidDataSource
#指定数据源:Druid
#Spring Boot 默认是不注入这些属性值的,需要自己绑定
#druid 数据源专有配置
initialSize: 5
minIdle: 5
maxActive: 20
maxWait: 60000
timeBetweenEvictionRunsMillis: 60000
minEvictableIdleTimeMillis: 300000
validationQuery: SELECT 1 FROM DUAL
testWhileIdle: true
testOnBorrow: false
testOnReturn: false
poolPreparedStatements: true
#配置监控统计拦截的filters,stat:监控统计、log4j:日志记录、wall:防御sql注入
#如果允许时报错 java.lang.ClassNotFoundException: org.apache.log4j.Priority
#则导入 log4j 依赖即可,Maven 地址:https://mvnrepository.com/artifact/log4j/log4j
filters: stat,wall,log4j
maxPoolPreparedStatementPerConnectionSize: 20
useGlobalDataSourceStat: true
connectionProperties: druid.stat.mergeSql=true;druid.stat.slowSqlMillis=500
导入log4j依赖
      log4j
      log4j
      1.2.17
②创建DruidConfig.java
@Configuration
public class DruidConfig {
//将其余application.yaml文件绑定:datasource
@Bean
@ConfigurationProperties(prefix = "spring.datasource")
public DataSource druidSource(){
return new DruidDataSource();
}
//后台监控功能,相当于web.xml ==> ∵springboot内置了servlet容器,所有没有web.xml 替代方法是:ServletRegistrationBean
@Bean
public ServletRegistrationBean statViewServlet(){
//进入后台监控页面
ServletRegistrationBean<StatViewServlet> bean = new ServletRegistrationBean<>(new StatViewServlet(), "/druid/*");
HashMap<String,String> initParameters = new HashMap<>();
//添加配置,设置账号密码
initParameters.put("loginUsername","admin");//登录key:loginUsername :固定写法,不能改变
initParameters.put("loginPassword","123");
//允许谁可以访问
initParameters.put("allow","localhost");//后面的“”如果为空,所有人就都可以访问
//禁止谁能访问
initParameters.put("kalen","192.168.0.125");
//后台需要登录,账号密码配置
bean.setInitParameters(initParameters);//初始化参数 (Map参数)
return bean;
}
//filter
@Bean
public FilterRegistrationBean webStatFilter(){
FilterRegistrationBean bean = new FilterRegistrationBean();
bean.setFilter(new WebStatFilter());//设置过滤器
HashMap<String,String> initParameters = new HashMap<>();
initParameters.put("exclusions","*.js,*.css,/druid/*");//这些路径下的不进行统计
bean.setInitParameters(initParameters);
return bean;
}
}
访问:http://localhost:8080/druid/login.html
3.整合Mybatis框架查询
引入依赖
      org.mybatis.spring.boot
      mybatis-spring-boot-starter
      2.1.1
在application.properties配置文件中配置数据库连接信息
  spring.datasource.username=root
  spring.datasource.password=123456
  spring.datasource.url=jdbc:mysql://localhost:3306/test?characterEncoding=utf-8
  spring.datasource.driver-class-name=com.mysql.jdbc.Driver
1.pojo类
user.java:
  @Data
  @AllArgsConstructor
  @NoArgsConstructor
  public class user {
      private Integer id;
      private String name;
      private String pwd;
  }
2.mapper(Dao层)
@Mapper //表示这是一个MyBatis的Mapper类
//或者在启动类Application上加上@MapperScan("com.ckl.mapper") :扫描路径下的文件
@Repository //dao层
public interface UserMapper {
List<user> queryUserList();
user queryUserBuId(int id);
int addUser(user u);
int updateUser(user u);
int deleteuser(int id);
}
3.在resource目录下新建mybatis/mapper目录
然后创建UserMapper.xml(编写sql)
DOCTYPE mapper
PUBLIC "-//mybatis.org//DTD Mapper 3.0//EN"
"http://mybatis.org/dtd/mybatis-3-mapper.dtd">
<mapper namespace="com.ckl.mapper.UserMapper">
<select id="queryUserList" resultType="user">
select * from test.user;
select>
<select id="queryUserById" resultType="user">
select * from test.user where id = #{id};
select>
<insert id="addUser" parameterType="user">
insert into test.user(id,name,pwd) values (#{id},#{name},#{pwd});
insert>
<update id="updateUser" parameterType="user">
update test.user set name=#{name},pwd=#{pwd} where id=#{id};
update>
<delete id="deleteuser" parameterType="int">
delete from test.user where id=#{id};
delete>
mapper>
然后在application.properties中整合mybatis:
这样就可以将xm与dao联系起来
#整合mybatis
mybatis.type-aliases-package=com.pojo
mybatis.mapper-locations=classpath:mybatis/mapper/*.xml
然后创建UserController.java,实现具体业务
@RestController
public class UserController {
@Autowired
private UserMapper userMapper;
@GetMapping("/user/queryUserList")
public List<user> queryUserList(){
List<user> users = userMapper.queryUserList();
return users;
}
...
}
4.整合redis插入、查询、修改、删除操作
配置连接信息
spring:
    redis:
      host: 127.0.0.1
      port: 6379
      password:
      jedis:
        pool:
          max-active: 8
          max-wait: -1
          max-idle: 500
          min-idle: 0
      lettuce:
        shutdown-timeout: 0
在pom.xml文件中添加相关依赖
            org.apache.commons
            commons-pool2


            org.springframework.boot
            spring-boot-starter-data-redis


            com.alibaba
            fastjson
            1.2.28
编写测试类
@RestController
@RequestMapping("/api/redis")
public class RedisController {

    @Autowired
    private StringRedisTemplate redisTemplate;

    /**
     * 向redis数据库插入一条数据
     * @param req key:value
     * @return
     */
    @PostMapping("/add")
    public String add(@RequestBody JSONObject req){
        String key=req.getString("key");
        String value=req.getString("value");
        try {
            redisTemplate.opsForValue().set(key,value);
            return "add success";
        } catch (Exception e) {
            return e.getMessage();
        }
    }

    @PostMapping("/find")
    public String find(@RequestBody JSONObject req){
        String key=req.getString("key");
        try {
            String value = redisTemplate.opsForValue().get(key);
            return "find key!value:"+value;
        } catch (Exception e) {
            return e.getMessage();
        }
    }

    @PostMapping("/change")
    public String change(@RequestBody JSONObject req){
        String key = req.getString("key");
        String value = req.getString("value");
        try {
            redisTemplate.opsForValue().set(key,value);
            return "change success";
        } catch (Exception e) {
            return e.getMessage();
        }
    }

    @PostMapping("/del")
    public String delete(@RequestBody JSONObject req){
        String key = req.getString("key");
        try {
            redisTemplate.delete(key);
            return "delete success";
        } catch (Exception e) {
            return e.getMessage();
        }
    }
}
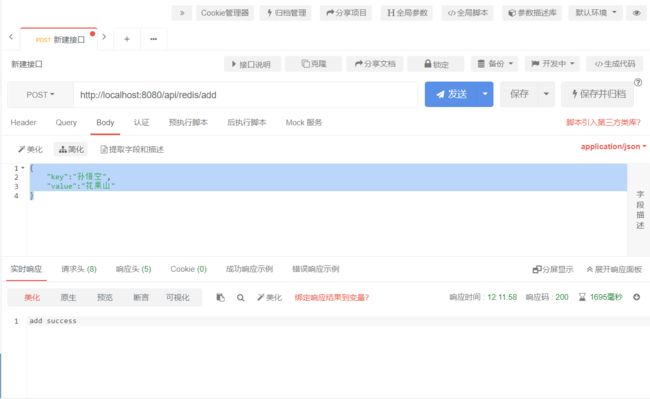
使用ApiPost进行测试,向redis数据库添加key和value
请求方法:POST
请求参数: {
		    "key":"孙悟空",
		    "value":"花果山"
		 }
请求路径:http://localhost:8080/api/redis/add
请求结果:如图
请求方法:POST
请求参数: {
    		"key":"孙悟空",
		  }
请求路径:http://localhost:8080/api/redis/find
请求结果:如图
请求方法:POST
请求参数:{
		    "key":"孙悟空",
		    "value":"水帘洞"
		 }
请求路径:http://localhost:8080/api/redis/change
请求结果:如图
请求方法:POST
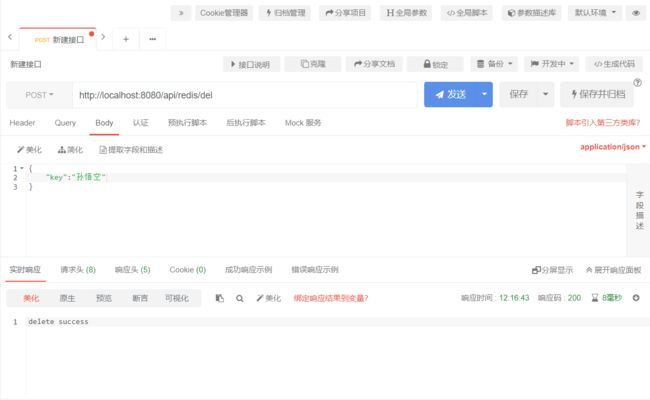
请求参数:{
   			 "key":"孙悟空"
		 }
请求路径:http://localhost:8080/api/redis/del
请求结果:如图
四、整合Swagger接口文档
4.1 引入依赖
      io.springfox
      springfox-swagger2
      2.9.2


      io.springfox
      springfox-swagger-ui
      2.9.2
4.2 SwaggerConfig配置类
@Configuration
@EnableSwagger2
public class SwaggerConfig {
    // swagger2的配置文件,这里可以配置swagger2的一些基本的内容,比如扫描的包等等
    @Bean
    public Docket createRestApi() {
        return new Docket(DocumentationType.SWAGGER_2)
                .apiInfo(apiInfo())
                .select()
                // 为当前包路径
                .apis(RequestHandlerSelectors.basePackage("com.cy.springboot.controller")).paths(PathSelectors.any())
                .build();
    }

    // 构建 api文档的详细信息函数,注意这里的注解引用的是哪个
    private ApiInfo apiInfo() {
        return new ApiInfoBuilder()
                // 页面标题
                .title("Spring Boot 测试使用 Swagger2 构建RESTful API")
                // 创建人信息
                .contact(new Contact("Tao", "https://github.com/", "[email protected]"))
                // 版本号
                .version("1.0")
                // 描述
                .description("API 描述")
                .build();
    }
}
五、整合热部署框架
5.1 整合devtools工具
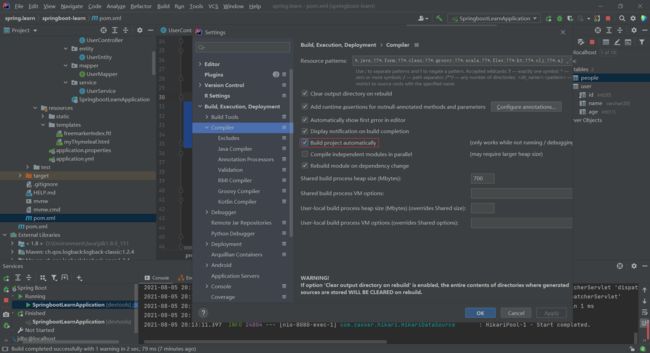
(1)idea设置 中勾选" Build project automatically"
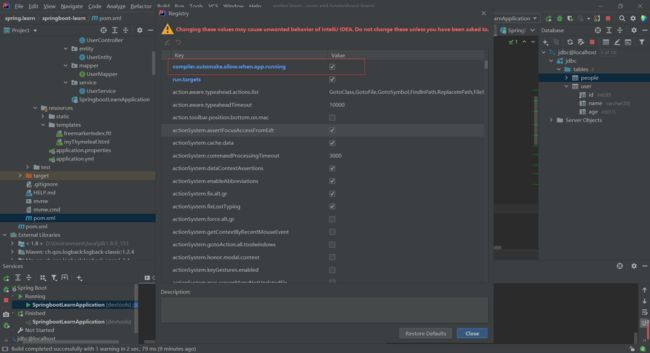
(2)组合键:“Ctrl+shift+alt+/”,选择"Register",选中"compiler.automake.allow.when.app.running"
5.2 整合Lombok简化代码
普通构建实体类,需要手动创建无参构造方法和有参构造方法,Get和Set方法,以及toString方法,代码十分繁琐。
package com.example.springbootlearn.entity;

import lombok.Data;
import lombok.extern.slf4j.Slf4j;

import java.util.logging.Logger;

/**
 * @Description:
 * @Author: at
 * @Date: 2021/8/5 17:40
 */
@Data
@Slf4j
public class UserEntity {
//  private static Logger log=Logger.getLogger(String.valueOf(UserEntity.class));
    private Integer id;
    private String name;
    private Integer age;

    public UserEntity(){

    }
    public UserEntity(Integer id, String name, Integer age) {
        this.id = id;
        this.name = name;
        this.age = age;
    }

//    public Integer getId() {
//        return id;
//    }
//
//    public void setId(Integer id) {
//        this.id = id;
//    }
//
//    public String getName() {
//        return name;
//    }
//
//    public void setName(String name) {
//        this.name = name;
//    }
//
//    public Integer getAge() {
//        return age;
//    }
//
//    public void setAge(Integer age) {
//        this.age = age;
//    }
//
//    @Override
//    public String toString() {
//        return "UserEntity{" +
//                "id=" + id +
//                ", name='" + name + '\'' +
//                ", age=" + age +
//                '}';
//    }

    public static void main(String[] args) {
        UserEntity userEntity=new UserEntity();
        userEntity.setName("张三");
        String username= userEntity.getName();
        System.out.println("username"+username);
        log.info("username"+username);
    }
}
六、整合读取配置文件
6.1 使用@value注解读取配置文件
1.在SpringBoot整合配置文件中,分成两大类:
application.properties
application.yml
或者是
bootstrap.properties
bootstrap.yml
相对于来说yml文件格式写法更加精简,减少配置文件的冗余性。
2.加载顺序
bootstrap.yml先加载,application.yml后加载。
bootstarp.yml用于应用程序上下文的引导阶段。
bootstrap.yml由父SpringApplicationContext加载。
3.区别
bootstrap.yml(bootstrap.properties)用来在程序引导时执行,应用于更加早期配置信息读取,如可以使用来配置application.yml中使用到参数等
application.yml(application.properties) 应用程序特有配置信息,可以用来配置后续各个模块中需使用的公共参数等。
bootstrap.yml 先于 application.yml 加载
后期开发中yml文件格式最常用
itkt:
  name: 腾讯IT
  age: 22
编写测试类
@RestController
public class MyIndexService {
    @Value("${itkt.name}")
    private String name;
    @Value("${itkt.age}")
    private String age;

    @RequestMapping("/getProp")
    public String getProp(){
        return name+"--"+age;
    }
}
访问http://localhost:8080/getProp,读取到application.yml中的配置

6.2 properties转换yml格式
6.3 @ConfigurationProperties
引入依赖
            org.springframework.boot
            spring-boot-configuration-processor
            true
ITKTEntity
@Component
@ConfigurationProperties(prefix = "itkt")
public class ITKTEntity {
    private String name;
    private String age;
    private String address;
}
MyIndexService
@RestController
public class MyIndexService {
    @Value("${itkt.name}")
    private String name;
    @Value("${itkt.age}")
    private String age;

    @Autowired
    private ITKTEntity itktEntity;

     /**
      * @Description: 使用@Value注解
      * @Author: At
      * @Date: 2021/8/5 21:19
      **/
    @RequestMapping("/getProp")
    public String getProp(){
        return name+"--"+age;
    }

     /**
      * @Description: @ConfigurationProperties
      * @Author: At
      * @Date: 2021/8/5 21:19
      **/
    @RequestMapping("/getNameAndAgeAddress")
    public String getNameAndAgeAddress(){
        return itktEntity.toString();
    }
}
6.4 整合多环境下不同配置文件
application-dev.yml:开发环境
application-test.yml:测试环境
application-prd.yml:生产环境
SpringBoot默认读取配置文件名称:application
spring:
  profiles:
    active: dev #指定环境
6.5 修改端口号和上下文路径
server:
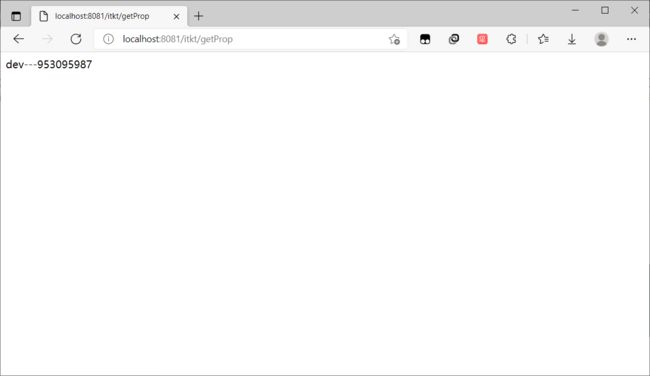
  port: 8081 #端口号
  servlet:
    context-path: /itkt #指定访问路径
七、整合日志框架
7.1 logback配置日志级别
maven依赖
            org.projectlombok
            lombok
Logback配置
<configuration>


    <appender name="console" class="ch.qos.logback.core.ConsoleAppender">
        <encoder>
            <pattern>%d %p(%file: %line\)- %m%npattern><charset>UTF-8
        encoder>
    appender>


    <appender name="fileLog"
              class="ch.qos.logback.core.rolling.RollingFileAppender">
        <File>log/file/fileLog.1ogFile>
        <rollingPolicy class="ch.qos.logback.core.rolling. TimeBasedRollingPolicy">
            <fileNamePattern>log/file/fileLog.log.%d.%ifileNamePattern>
            <timeBasedFileNamingAndTriggeringPolicy class="ch.qos.logback.core.rolling.SizeAndTimeBasedFNATP">

                <maxFilesize>64MBmaxFilesize>
            timeBasedFileNamingAndTriggeringPolicy>
        rollingPolicy>

        <encoder>

            <pattern>
                %d %p (%file: %line1)- %m%n
            pattern>
            <charset>UTF-8charset>

        encoder>
    appender>


    <appender name="sq1File" class="ch.qos.logback.core.rolling.RollingFileAppender">
            <File>1og/sql/sqlFi1le.logFile>
            <rollingPolicy class="ch.qos.logback.core.rolling.TimeBasedRollingPolicy">
                <fileNamePattern>log/sql/sq1File.log.%d.%ifileNamePattern>
                <timeBasedFileNamingAndTriggeringPolicy class="ch.qos.logback.core.rolling.SizeAndTimeBasedFN">

                     <maxFileSize>64 MBmaxFileSize>
                timeBasedFileNamingAndTriggeringPolicy>
            rollingPolicy>

            <encoder>

                <pattern>
                    %d %p (%file: %line1)- %m%n
                pattern>
                <charset>UTF-8charset>

            encoder>
    appender>


    <appender name="errorFile" class="ch.qos.logback.core.rolling.RollingFileAppender">
        <File>1og/error/errorFi1le.logFile>
        <rollingPolicy class="ch.qos.logback.core.rolling.TimeBasedRollingPolicy">
            <fileNamePattern>log/error/errorFile.%d.log.%ifileNamePattern>
            <timeBasedFileNamingAndTriggeringPolicy class="ch.qos.logback.core.rolling.SizeAndTimeBasedFN">

                <maxFileSize>64 MBmaxFileSize>
            timeBasedFileNamingAndTriggeringPolicy>
        rollingPolicy>

        <encoder>

            <pattern>
                %d %p (%file: %line1)- %m%n
            pattern>
            <charset>UTF-8charset>

        encoder>
    appender>

    <root level="INFO">
        <appender-ref ref="fileLog"/>
        <appender-ref ref="console"/>
        <appender-ref ref="errorFile"/>
    root>

    <logger name="com.dolpin.mapper" level="DEBUG" additivity="false">
        <appender-ref ref="console"/>
        <appender-ref ref="sqlFile"/>
    logger>
configuration>
整合logback配置
package com.example.springbootlearn.service;

import com.example.springbootlearn.entity.ITKTEntity;
import lombok.extern.slf4j.Slf4j;
import org.springframework.beans.factory.annotation.Autowired;
import org.springframework.beans.factory.annotation.Value;
import org.springframework.web.bind.annotation.RequestMapping;
import org.springframework.web.bind.annotation.RestController;

/**
 * @Description:
 * @Author: at
 * @Date: 2021/8/5 20:58
 */
@RestController
@Slf4j
public class MyIndexService {
    @RequestMapping("/getLog")
    public String getLog(String name,int age){
        log.info("name:{},age:{}",name,age);
        log.debug("");
        try{

        }catch (Exception e){
            log.error("");
        }
        return name;
    }
}
7.2 整合log4j2日志
    org.springframework.boot
    spring-boot-starter-web


            org.springframework.boot
            spring-boot-starter-logging


    org.springframework.boot
    spring-boot-starter-log4j2
<configuration status="WARN" monitorInterval="300">

    <appenders>

        <console name="Console" target="SYSTEM_OUT">

            <PatternLayout pattern="[%d{HH:mm:ss:SSS}] [%p] - %l - %m%n"/>
        console>

        <File name="log" fileName="exam/exam.log" append="false">
            <PatternLayout pattern="%d{HH:mm:ss.SSS} %-5level %class{36} %L %M - %msg%xEx%n"/>
        File>

        <RollingFile name="RollingFileInfo" fileName="exam/logs/info.log"
                     filePattern="exam/logs/$${date:yyyy-MM}/info-%d{yyyy-MM-dd}-%i.log">
            <Filters>

                <ThresholdFilter level="warn" onMatch="DENY" onMismatch="NEUTRAL"/>

                <ThresholdFilter level="info" onMatch="NEUTRAL" onMismatch="DENY"/>
            Filters>
            <PatternLayout pattern="[%d{HH:mm:ss:SSS}] [%p] - %l - %m%n"/>
            <Policies>
                <TimeBasedTriggeringPolicy/>
                <SizeBasedTriggeringPolicy size="100 MB"/>
            Policies>
        RollingFile>
        <RollingFile name="RollingFileWarn" fileName="exam/logs/warn.log"
                     filePattern="exam/logs/$${date:yyyy-MM}/warn-%d{yyyy-MM-dd}-%i.log">
            <Filters>

                <ThresholdFilter level="error" onMatch="DENY" onMismatch="NEUTRAL"/>

                <ThresholdFilter level="warn" onMatch="NEUTRAL" onMismatch="DENY"/>
            Filters>
            <PatternLayout pattern="[%d{HH:mm:ss:SSS}] [%p] - %l - %m%n"/>
            <Policies>
                <TimeBasedTriggeringPolicy/>
                <SizeBasedTriggeringPolicy size="100 MB"/>
            Policies>

            <DefaultRolloverStrategy max="20"/>
        RollingFile>
        <RollingFile name="RollingFileError" fileName="exam/logs/error.log"
                     filePattern="exam/logs/$${date:yyyy-MM}/error-%d{yyyy-MM-dd}-%i.log">
            <ThresholdFilter level="error" onMatch="ACCEPT" onMismatch="DENY"/>
            <PatternLayout pattern="[%d{HH:mm:ss:SSS}] [%p] - %l - %m%n"/>
            <Policies>
                <TimeBasedTriggeringPolicy/>
                <SizeBasedTriggeringPolicy size="100 MB"/>
            Policies>
        RollingFile>
    appenders>

    <loggers>
        <root level="all">
            <appender-ref ref="Console"/>
            <appender-ref ref="RollingFileInfo"/>
            <appender-ref ref="RollingFileWarn"/>
            <appender-ref ref="RollingFileError"/>
        root>
    loggers>
configuration>
八、整合定时任务
8.1 使用创建定时任务
在Spring Boot的主类中加入@EnableScheduling 注解,启用定时任务的配置
一个方法上设置了 fixedDelay=51000,那么当该方法某一次执行结束后,开始计算时间,当时间达到5秒,就开始再次执行该方法。
当方法上设置了 fiexdRate=51000,该执行该方法所花的时间是2秒,那么3秒后就会再次执行该方法。
第一种
@Configuration
@EnableScheduling
public class Schedule_1 {
    @Scheduled(cron = "0/5 * * * * ?")
    public void ScheduledM1() {
        System.err.println("【静态】执行定时任务:" + LocalDateTime.now().format(DateTimeFormatter.ofPattern("yyyy年MM月dd日 HH时mm分ss秒")));
    }
}
第二种
@Configuration
@EnableScheduling
public class Schedule_2 implements SchedulingConfigurer {

    // 匿名内部类形式
    @Override
    public void configureTasks(ScheduledTaskRegistrar taskRegistrar) {

        taskRegistrar.addTriggerTask(new Runnable() {
            @Override
            public void run() {
                System.err.println("【动态】执行定时任务:" + LocalTime.now().toString() + "\n");
            }
        }, new Trigger() {
            @Override
            public Date nextExecutionTime(TriggerContext triggerContext) {
                String cron = "0/5 * * * * ?";
                System.out.println("cron表达式为:" + cron);
                // 此处的cron可以从数据库中获取   重点
                return new CronTrigger(cron).nextExecutionTime(triggerContext);
            }
        });
    }

    // lambda表达式形式
//    @Override
//    public void configureTasks(ScheduledTaskRegistrar taskRegistrar) {
//        taskRegistrar.addTriggerTask(() -> {
//            System.err.println("【动态】执行定时任务:" + LocalTime.now().toString() + "\n");
//        }, (triggerContext) -> {
//            String cron = "0/5 * * * * ?";
//            System.out.println("cron表达式为:" + cron);
//            // 此处的cron可以从数据库中获取   重点
//            return new CronTrigger(cron).nextExecutionTime(triggerContext);
//        });
//    }
}
第三种
@Configuration
@EnableScheduling
@EnableAsync
public class Schedule_3 {
    //多个定时器同步执行
//      @Scheduled(cron = "0/1 * * * * ?")
//    public void s1() throws InterruptedException {
//        Thread.sleep(5000);
//        System.out.println("【同步1】执行定时任务:" + LocalTime.now().toString());
//    }
//
//    @Scheduled(cron = "0/1 * * * * ?")
//    public void s2() {
//        System.err.println("【同步2】执行定时任务:" + LocalTime.now().toString());
//    }


    //多个定时器异步执行
    @Async
    @Scheduled(cron = "0/1 * * * * ?")
    public void s1() throws InterruptedException {
        Thread.sleep(5000);
        System.out.println("【异步1】执行定时任务:" + LocalTime.now().toString());
    }

    @Async
    @Scheduled(cron = "0/1 * * * * ?")
    public void s2() {
        System.err.println("【异步2】执行定时任务:" + LocalTime.now().toString());
    }
}
8.2 定时任务
@Component
@Slf4j
public class scheduledTasks {
/***每隔2s时间执行到taskService*/
	@Scheduled(cron ="1/2****?")
	public void taskService() {
		log.info("<<定时任务执行>>"+ system.currentTimeMillis());
	}
}
九、整合多线程异步
9.1 使用@Async实现异步调用
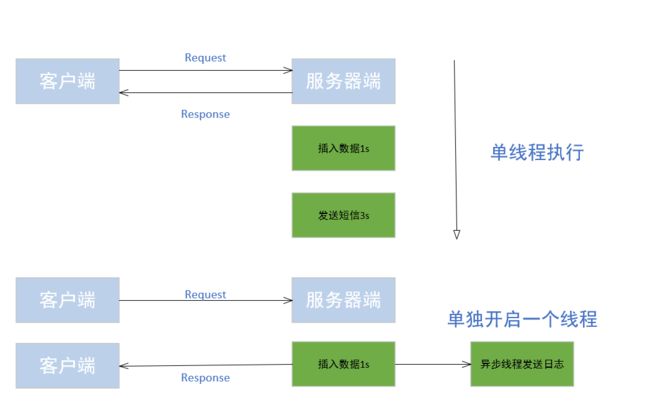
启动类加上@EnableAsync ,需要执行异步方法上加入 @Async,@Async实际就是多线程封装的。
异步执行方法可能会非常消耗CPU资源,所以大项目建议使用MQ异步实现
@RestController
@Slf4j
public class MemberService(){
@RequestMapping( "/addMember")
	public string addMember() {
		//1.数据库插入数据
		log.info(">01<");
		//2.发送短信
		new Thread(new Runnable(){
			@Override
			public void run(){
					sms();
				}
			}).start();
		log.info(">04<");return“用户注册成功";

	public string sms() {
		log.info(">02<");
		try {
			log.info(">正在发送短信..<");
			Thread.sleep(millis: 300e);
		}catch (Exception e) {
		}
		log.info(">03<");
		return "短信发送完成!";
	}
}
@SpringBootApplication
@EnableScheduling
public c1ass App (){
	public static void main(String[] args){ SpringApplication.run(App.class); }
}
9.2 @Async失效问题
注意:如果异步注解写当前自己类,有可能aop会失效,无法拦截注解,最终导致异步失效,需要经过代理类调用接口;
所以需要将异步的代码单独抽取成一个类调用接口。
编写MemberServiceAsync类
@Component
@S1f4j
public class MemberServiceAsync {
	@Async
	public String sms()
		log.info(">02<");
		try {
			log.info(">正在发送短信..<");
			Thread.sleep( millis: 3000);
		} catch (Exception e) {
		}
		log.info(">03<");
		return "短信发送完成!";
	}
}
编写MemberService类
@RestController
@Slf4j
public class MemberService(){

	@Autowired
	private MemberServiceAsync memberServiceAsync;

	@RequestMapping("/addMember")
	public string addMember() {
		//1.数据库插入数据
		log.info(">01<");
		memberServiceAsync.sms();
		log.info(">04<");
		return "用户注册成功";
	}
}
9.3 @Async整合线程池
config包下新建ThreadPoolconfig 类
@Configuration
@EnableAsync
public class ThreadPoolconfig {
	/**
	*每砂需要多少个线程处理?
	*tasks/(1/taskcost)
	*/
	private int corePoo1Size = 3;

	/**
	*线程池维护线程的最大数量
	*(max (tasks)- queuecapacity)/(1/taskcost)
	*/
	private int maxPoolsize = 3;

	/**
	*缓存队列
	*( coresizePooL/taskcost)
	*responsetime
	*/
	private int queuecapacity = 10;

	/**
	*允许的空闲时间*默认为6日
	*/
	private int keepAlive = 100;

	@Bean
	public TaskExecutor taskExcutor(){
	ThreadPoolTaskExecutor executor = new ThreadPoolTaskExecutor();
	//设置核心线程数
	executor.setCorePoolsize( corePoolSize);
	//设置最大线程数
	executor.setMaxPoolsize(maxPoo1size);
	//设置队列容量
	executor.setQueuecapacity(queuecapacity) ;
	//设置允许的空闲时间(秒)
	//executor.setKeepAliveseconds( keepALive);
	//设置默认线程名称
	executor.setThreadNamePrefix( "thread-" );
	//设置拒绝策略rejection-policy:当pool己经达到max size的时候,如何处理新任务
	//CALLER_RUNS:不在新线程中执行任务,而是有调用者所在的线程来执行
	executor.setRejectedExecutionHandler(new ThreadPoo1Executor.callerRunsPolicy());
	//等待所有任务结束后再关闭线程池
	executor.setWaitForTasksToCompleteonShutdown(true);
	return executor;
	}
}
编写MemberServiceAsync
@Component
@S1f4j
public class MemberServiceAsync(){
	@Async("taskExecutor") //指定线程池名称
	public string sms(){
		log.info(">02<");
		try {
		log.info(">正在发送短信..<");
		Thread.sLeep(millis: 3000);
		}catch(Exception e) {
	}
	log.info(">03<");
	return "短信发送完成!";
	}
/**
*′线程池*/
}
十、SpringBoot文件上传
10.1 文件上传
@ResponseBody
@RequestMapping(value = "uploadFile")
    public String upload(MultipartFile file) throws IOException {
        //获取文件原始名和后缀名
        String originalFilename = file.getOriginalFilename();
        //获取文件原始名字
        String fileOrgName = originalFilename.substring(0, originalFilename.lastIndexOf("."));
        //获取文件后缀
        String extension = "." + FilenameUtils.getExtension(originalFilename);
        //生成新的文件名字
        String newFileName = fileOrgName + UUID.randomUUID().toString().replace("-", "") + extension;
        //指定实际文件目录
        String realPath = ResourceUtils.getURL("classpath:").getPath() + "/static/files";
        //使用日期文件目录
        String dateDirPath = realPath + "/"+new SimpleDateFormat("yyyy-MM-dd").format(new Date());
        System.out.println(dateDirPath);
        File dateFile = new File(dateDirPath);
        if (!dateFile.exists()) {
            dateFile.mkdirs();
        }
        //文件上传
        file.transferTo(new File(dateDirPath, newFileName));

        return "文件上传成功";
    }
10.1 文件下载
@ResponseBody
@RequestMapping(value = "downloadFile")
  public String download(String fileName, HttpServletRequest request, HttpServletResponse response) throws IOException {
      String realPath = ResourceUtils.getURL("classpath:").getPath() + "/static/files/2022-09-07";
      FileInputStream fileInputStream = new FileInputStream(new File(realPath, fileName));
      //附件下载方式
      response.setHeader("content-disposition", "attachment;filename=" + URLEncoder.encode(fileName, "utf-8"));
      ServletOutputStream outputStream = response.getOutputStream();
      IOUtils.copy(fileInputStream, outputStream);
      IOUtils.closeQuietly(fileInputStream);
      IOUtils.closeQuietly(outputStream);
      return "文件下载成功";
  }
十一、项目打包部署
11.1 整合全局捕获异常
@ExceptionHandler表示拦截异常
@ControllerAdvice是 controller 的一个辅助类,最常用的就是作为全局异常处理的切面类@ControllerAdvice可以指定扫描范围
@ControllerAdvice约定了几种可行的返回值,如果是直接返回model 类的话,需要使用
@ResponseBody进行json转换
- 返回String,表示跳到某个view
- 返回modelAndView
- 返回 model +@ResponseBody
捕获运行时异常,返回json格式
@ControllerAdvice
public c1ass ExceptionHandler(){
	@ExceptionHandler(RuntimeException.class)
	@ResponseBody
	public Map<Object,Object> exceptionHandler() {
	HashMap<Object,Object> result = new HashMap<>();
	result.put("code",500);
	result.put("msg","系统错误");
	return result;
	}
}
返回页面,去掉@ResponseBody注解
@ControllerAdvice
public c1ass ExceptionHandler(){
	@ExceptionHandler(RuntimeException.class)
	//@ResponseBody
	public String exceptionHandler() {
	return null;
}
11.2 打包运行发布
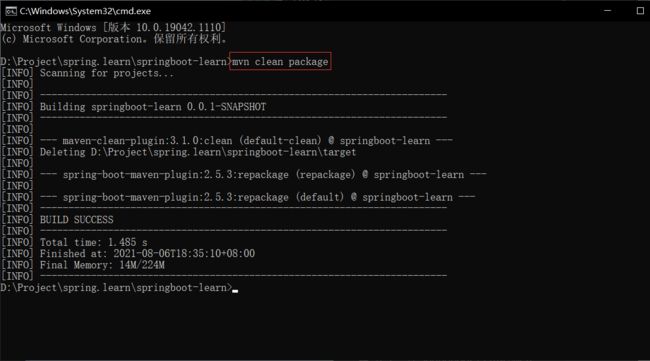
mvn package
java - jar包名
如果报错没有主清单,在 pom文件中新增
                    org.springframework.boot
                    spring-boot-maven-plugin


                                repackage


                        com.example.springbootlearn.SpringbootLearnApplication


                                junit
                                junit


                                org.springframework. boot
                                spring-boot-starter-test
mvn clean package


