Seata入门系列【12】AT模式源码分析之开启全局事务和数据源代理
1 开启全局事务
在之前,我们分析了TransactionalTemplate会进行全局事务的开启、提交或者回滚,接下来分析下,是如何开启全局事务的。
开始全局事务调用的是beginTransaction方法:
private void beginTransaction(TransactionInfo txInfo, GlobalTransaction tx) throws TransactionalExecutor.ExecutionException {
        try {
        	// 开启全局事务之前钩子
            triggerBeforeBegin();
            // 开始全局事务
            tx.begin(txInfo.getTimeOut(), txInfo.getName());
            // 开启全局事务之后钩子
            triggerAfterBegin();
        } catch (TransactionException txe) {
            throw new TransactionalExecutor.ExecutionException(tx, txe,
                TransactionalExecutor.Code.BeginFailure);

        }
    }
1.1 事务钩子TransactionHook
在开始全局事务会调用triggerBeforeBegin和triggerAfterBegin方法,会从ThreadLocal中获取当前事务的TransactionHook事务钩子,执行其钩子方法:
    private void triggerBeforeBegin() {
        for (TransactionHook hook : getCurrentHooks()) {
            try {
            	// 钩子中的beforeBegin
                hook.beforeBegin();
            } catch (Exception e) {
                LOGGER.error("Failed execute beforeBegin in hook {}", e.getMessage(), e);
            }
        }
    }
    private void triggerAfterBegin() {
        for (TransactionHook hook : getCurrentHooks()) {
            try {
            	// 钩子中的afterBegin
                hook.afterBegin();
            } catch (Exception e) {
                LOGGER.error("Failed execute afterBegin in hook {}", e.getMessage(), e);
            }
        }
    }
TransactionHook 接口就是事务钩子,可以在事务的各个状态中添加钩子,比如在事务回滚之后记录全局事务失败日志。
public interface TransactionHook {

    /**
     * before tx begin
     */
    void beforeBegin();

    /**
     * after tx begin
     */
    void afterBegin();

    /**
     * before tx commit
     */
    void beforeCommit();

    /**
     * after tx commit
     */
    void afterCommit();

    /**
     * before tx rollback
     */
    void beforeRollback();

    /**
     * after tx rollback
     */
    void afterRollback();

    /**
     * after tx all Completed
     */
    void afterCompletion();
}
1.2 事务角色
TransactionalTemplate.beginTransaction方法传入了TransactionInfo和GlobalTransaction参数,TransactionInfo封装了@GlobalTransactional注解的配置信息,而GlobalTransaction就是全局事务。

在GlobalTransaction实例对象有,有一个全局事务角色枚举类,源码如下:
public enum GlobalTransactionRole {

    /**
     * 发起者,开启全局事务
     */
    Launcher,

    /**
     * 参与者,加入已存在的全局事务
     */
    Participant
}
TM 开启事务时,在线程中是没有xid的,所以会创建一个全局事务,直接创建一个DefaultGlobalTransaction对象:
    /**
     * Try to create a new GlobalTransaction.
     *
     * @return the new global transaction
     */
    public static GlobalTransaction createNew() {
        return new DefaultGlobalTransaction();
    }
在DefaultGlobalTransaction的构造方法中,可以看到这里设置事务角色为Launcher
    DefaultGlobalTransaction() {
        this(null, GlobalStatus.UnKnown, GlobalTransactionRole.Launcher);
    }
在DefaultGlobalTransaction.begin开始方法中,首先就会判断角色
    @Override
    public void begin(int timeout, String name) throws TransactionException {
    	// 当前角色不是事务发起者
        if (role != GlobalTransactionRole.Launcher) {
        	// 不是发起者,判断xid 是否存在,不存在抛出IllegalStateException异常
        	// 存在xid ,直接return,说明只能TC 开启全局事务。
            assertXIDNotNull();
            if (LOGGER.isDebugEnabled()) {
                LOGGER.debug("Ignore Begin(): just involved in global transaction [{}]", xid);
            }
            return;
        }
		// 省略....
1.3 全局事务管理器
DefaultGlobalTransaction.begin校验角色之后,就会调用事务管理器开始全局事务,这里有一个xid 的生成及传递。
		// 开始全局事务之前xid 必须为空
        assertXIDNull();
        String currentXid = RootContext.getXID();
        if (currentXid != null) {
            throw new IllegalStateException("Global transaction already exists," +
                " can't begin a new global transaction, currentXid = " + currentXid);
        }
        // 调用事务管理器开始全局事务
        xid = transactionManager.begin(null, null, name, timeout);
        // 标记事务状态为开始
        status = GlobalStatus.Begin;
        // 绑定xid
        RootContext.bind(xid);
        if (LOGGER.isInfoEnabled()) {
            LOGGER.info("Begin new global transaction [{}]", xid);
        }
TransactionManager接口用于定义并控制全局事务,全局事务的开启、提交、回滚、状态报告,都由该接口完成,其默认实现类为DefaultTransactionManager。
所以开启事务,会进入到了DefaultTransactionManager的begin 方法,该方法会创建开始全局事务请求对象,请求Seata 服务端,并获取响应回来的xid :
    @Override
    public String begin(String applicationId, String transactionServiceGroup, String name, int timeout)
        throws TransactionException {
        // 请求对象
        GlobalBeginRequest request = new GlobalBeginRequest();
        request.setTransactionName(name);
        request.setTimeout(timeout);
        // 请求并返回响应
        GlobalBeginResponse response = (GlobalBeginResponse) syncCall(request);
        if (response.getResultCode() == ResultCode.Failed) {
            throw new TmTransactionException(TransactionExceptionCode.BeginFailed, response.getMsg());
        }
        // 返回响应中的xid
        return response.getXid();
    }
GlobalBeginRequest对象中,只传递了事务超时时间和当前执行的方法名:

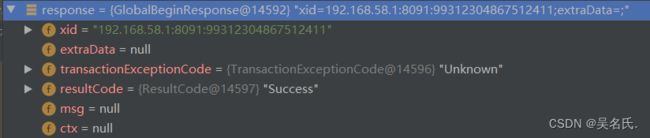
GlobalBeginResponse对象中,只返回了xid 和响应状态。
1.4 RPC 请求TC 服务端
TM 发送请求是基于Netty 框架,会获取TC 服务端地址,然后发送消息,具体源码就不分析了,内容太多。
    private AbstractTransactionResponse syncCall(AbstractTransactionRequest request) throws TransactionException {
        try {
            return (AbstractTransactionResponse)TmNettyRemotingClient.getInstance().sendSyncRequest(request);
        } catch (TimeoutException var3) {
            throw new TmTransactionException(TransactionExceptionCode.IO, "RPC timeout", var3);
        }
    }
在Seata 服务端,开启、提交、回滚全局事务,注册、提交、回滚分支事务都是由DefaultCoordinator(协调这)负责协调处理的。
TC开始全局事务时,就会进入到DefaultCoordinator的doGlobalBegin方法:
    @Override
    protected void doGlobalBegin(GlobalBeginRequest request, GlobalBeginResponse response, RpcContext rpcContext)
        throws TransactionException {
        // 调用DefaultCore的 begin方法
        response.setXid(core.begin(rpcContext.getApplicationId(), rpcContext.getTransactionServiceGroup(),
            request.getTransactionName(), request.getTimeout()));
            // 打印开始全局事务日志
        if (LOGGER.isInfoEnabled()) {
            LOGGER.info("Begin new global transaction applicationId: {},transactionServiceGroup: {}, transactionName: {},timeout:{},xid:{}",
                rpcContext.getApplicationId(), rpcContext.getTransactionServiceGroup(), request.getTransactionName(), request.getTimeout(), response.getXid());
        }
    }
在DefaultCore的 begin方法中,完成服务端整个开始全局事务的处理逻辑:
    @Override
    public String begin(String applicationId, String transactionServiceGroup, String name, int timeout)
        throws TransactionException {
        // 1. 创建全局事务Session
        GlobalSession session = GlobalSession.createGlobalSession(applicationId, transactionServiceGroup, name,
            timeout);
            // 2. 将xid 绑定到日志Slf4j的MDC机制中,用于追踪全局日志
        MDC.put(RootContext.MDC_KEY_XID, session.getXid());
        //Session 中添加回调监听 ,Session 管理器(观察者模式)
 session.addSessionLifecycleListener(SessionHolder.getRootSessionManager());
		// 会话开启
        session.begin();
        // 事务开始事件
        eventBus.post(new GlobalTransactionEvent(session.getTransactionId(), GlobalTransactionEvent.ROLE_TC,
            session.getTransactionName(), applicationId, transactionServiceGroup, session.getBeginTime(), null, session.getStatus()));
		// 响应XID 给TM端
        return session.getXid();
    }
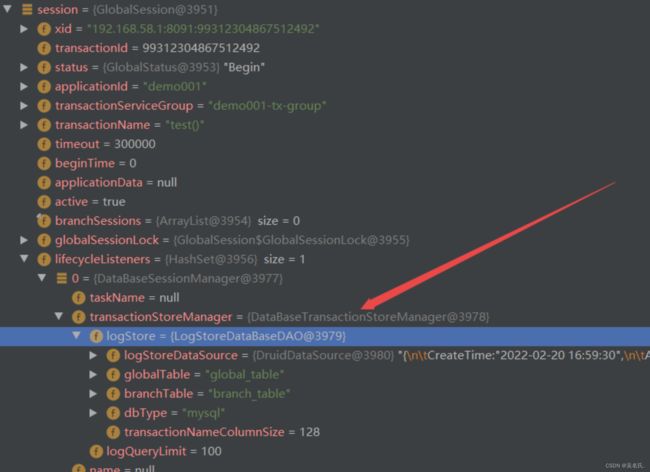
在创建全局会话的代码中,可以看到xid 是使用服务端IP+端口+雪花ID 方式生成的:
    public GlobalSession(String applicationId, String transactionServiceGroup, String transactionName, int timeout) {
        this.transactionId = UUIDGenerator.generateUUID();
        this.status = GlobalStatus.Begin;

        this.applicationId = applicationId;
        this.transactionServiceGroup = transactionServiceGroup;
        this.transactionName = transactionName;
        this.timeout = timeout;
        this.xid = XID.generateXID(transactionId);
    }
1.5 TC 服务端的事务会话管理器
服务端在开启全局事务时,会添加事务会话管理器,这里设置的是数据库存储,所以使用的是的DataBaseSessionManager:
Seata 支持三种事务会话存储,分别为数据库、文件、Redis:

之后begin 方法就到了DataBaseSessionManager的addGlobalSession方法:
    @Override
    public void addGlobalSession(GlobalSession session) throws TransactionException {
        if (StringUtils.isBlank(taskName)) {
        // 写入会话
            boolean ret = transactionStoreManager.writeSession(LogOperation.GLOBAL_ADD, session);
            if (!ret) {
                throw new StoreException("addGlobalSession failed.");
            }
        } else {
            boolean ret = transactionStoreManager.writeSession(LogOperation.GLOBAL_UPDATE, session);
            if (!ret) {
                throw new StoreException("addGlobalSession failed.");
            }
        }
    }
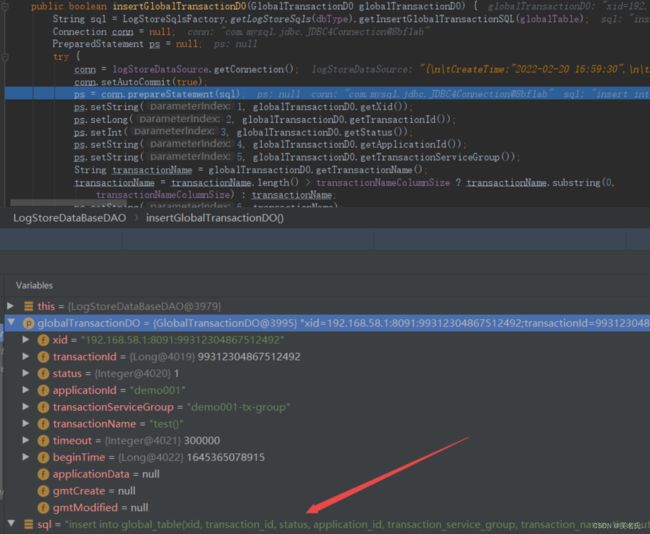
1.6 存储全局事务信息
在第五步写入Session 时,会将全局事务信息插入到global_table表中,并将xid 返回给TC,整个开始事务的流程就结束了
2 数据源代理
2.1 前言
在之前,我们了解到Seata 会对数据源进行代理,执行SQL时,会进入到Seata 的代理数据源中,接下来我们分析下是如何进行代理的?
2.2 数据源代理
2.2.1 自动代理配置类
在seata-spring-boot-starter模块的SeataDataSourceAutoConfiguration配置类中,开启了seata数据源的自动代理,该准备主要是注入了SeataDataSourceBeanPostProcessor和SeataAutoDataSourceProxyCreator。
@ConditionalOnBean(DataSource.class)
@ConditionalOnExpression("${seata.enable:true} && ${seata.enableAutoDataSourceProxy:true} && ${seata.enable-auto-data-source-proxy:true}")
public class SeataDataSourceAutoConfiguration {

    /**
     * The bean seataDataSourceBeanPostProcessor.
     */
    @Bean(BEAN_NAME_SEATA_DATA_SOURCE_BEAN_POST_PROCESSOR)
    @ConditionalOnMissingBean(SeataDataSourceBeanPostProcessor.class)
    public SeataDataSourceBeanPostProcessor seataDataSourceBeanPostProcessor(SeataProperties seataProperties) {
		//
        return new SeataDataSourceBeanPostProcessor(seataProperties.getExcludesForAutoProxying(), seataProperties.getDataSourceProxyMode());
    }

    /**
     * The bean seataAutoDataSourceProxyCreator.
     */
    @Bean(BEAN_NAME_SEATA_AUTO_DATA_SOURCE_PROXY_CREATOR)
    @ConditionalOnMissingBean(SeataAutoDataSourceProxyCreator.class)
    public SeataAutoDataSourceProxyCreator seataAutoDataSourceProxyCreator(SeataProperties seataProperties) {
        return new SeataAutoDataSourceProxyCreator(seataProperties.isUseJdkProxy(),
            seataProperties.getExcludesForAutoProxying(), seataProperties.getDataSourceProxyMode());
    }
}
2.2.2 数据源后置处理器
SeataDataSourceBeanPostProcessor 实现了BeanPostProcessor接口,BeanPostProcessor是Spring 中的后置处理器,作用是在Bean对象在实例化和依赖注入完毕后,调用初始化方法时在其前后添加我们自己的逻辑。
主要是重写了其postProcessAfterInitialization方法,在Bean 初始化完成后会调用该方法,会进行数据源的代理。
    @Override
    public Object postProcessAfterInitialization(Object bean, String beanName) throws BeansException {
        if (bean instanceof DataSource) {
            //When not in the excludes, put and init proxy.
            // 配置中没有忽略DataSource类的代理,则进行代理
            if (!excludes.contains(bean.getClass().getName())) {
                //Only put and init proxy, not return proxy.
                // 初始化代理
                DataSourceProxyHolder.get().putDataSource((DataSource) bean, dataSourceProxyMode);
            }

            //If is SeataDataSourceProxy, return the original data source.
            // 如果Bean 已经是SeataDataSourceProxy,返回原来的数据源
            if (bean instanceof SeataDataSourceProxy) {
                LOGGER.info("Unwrap the bean of the data source," +
                    " and return the original data source to replace the data source proxy.");
                return ((SeataDataSourceProxy) bean).getTargetDataSource();
            }
        }
        return bean;
    }
在上面的putDataSource方法中,会进行数据源代理类的创建:
    /**
     * Put dataSource
     *
     * @param dataSource          数据源
     * @param dataSourceProxyMode 代理模式,AT模式
     * @return dataSourceProxy
     */
    public SeataDataSourceProxy putDataSource(DataSource dataSource, BranchType dataSourceProxyMode) {
        DataSource originalDataSource;
        // 1. 如果数据源是SeataDataSourceProxy,则直接返回
        if (dataSource instanceof SeataDataSourceProxy) {
            SeataDataSourceProxy dataSourceProxy = (SeataDataSourceProxy) dataSource;
            //If it's an right proxy, return it directly.
            // 如果是正确的代理,请直接返回。
            if (dataSourceProxyMode == dataSourceProxy.getBranchType()) {
                return (SeataDataSourceProxy) dataSource;
            }

            //Get the original data source.
            // 获取原始数据源。
            originalDataSource = dataSourceProxy.getTargetDataSource();
        } else {
            originalDataSource = dataSource;
        }
		// 2. 从存放代理的集合中获取该数据源的代理数据源
        SeataDataSourceProxy dsProxy = dataSourceProxyMap.get(originalDataSource);
        if (dsProxy == null) {
        // 3.如果没有则创建代理并放入集合中
            synchronized (dataSourceProxyMap) {
                dsProxy = dataSourceProxyMap.get(originalDataSource);
                if (dsProxy == null) {
                    dsProxy = createDsProxyByMode(dataSourceProxyMode, originalDataSource);
                    dataSourceProxyMap.put(originalDataSource, dsProxy);
                }
            }
        }
        //4. 返回
        return dsProxy;
    }
createDsProxyByMode方法用于创建数据源代理,如果是XA 模式,创建DataSourceProxyXA,其他模式(AT模式)创建DataSourceProxy:
    private SeataDataSourceProxy createDsProxyByMode(BranchType mode, DataSource originDs) {
        return (SeataDataSourceProxy)(BranchType.XA == mode ? new DataSourceProxyXA(originDs) : new DataSourceProxy(originDs));
    }
DataSourceProxy就是代理数据源类,直接通过New 创建数据源代理:
    public DataSourceProxy(DataSource targetDataSource, String resourceGroupId) {
        if (targetDataSource instanceof SeataDataSourceProxy) {
            LOGGER.info("Unwrap the target data source, because the type is: {}", targetDataSource.getClass().getName());
            targetDataSource = ((SeataDataSourceProxy) targetDataSource).getTargetDataSource();
        }
        this.targetDataSource = targetDataSource;
        init(targetDataSource, resourceGroupId);
    }
在数据源代理的构造方法中,会调用init 初始化方法,获取原来数据源的属性信息,设置到当前代理类中,并开启一个定时任务,每分钟查询一次数据源的表结构信息并缓存,在需要查询数据库结构时会用到,不然每次去数据库查询结构效率会很低。
private void init(DataSource dataSource, String resourceGroupId) {
this.resourceGroupId = resourceGroupId;
try (Connection connection = dataSource.getConnection()) {
// 数据库连接
jdbcUrl = connection.getMetaData().getURL();
// 数据库类型,MySql
dbType = JdbcUtils.getDbType(jdbcUrl);
if (JdbcConstants.ORACLE.equals(dbType)) {
userName = connection.getMetaData().getUserName();
}
} catch (SQLException e) {
throw new IllegalStateException("can not init dataSource", e);
}
// 资源管理器管理注册本类
DefaultResourceManager.get().registerResource(this);
// 判断是否启动定时任务,定时任务的作用是缓存数据库表结构,表结构在RM保存数据快照的时候使用。如果内存中没有缓存,会实时查询数据库。
//默认1分钟运行一次。
if (ENABLE_TABLE_META_CHECKER_ENABLE) {
tableMetaExcutor.scheduleAtFixedRate(() -> {
try (Connection connection = dataSource.getConnection()) {
TableMetaCacheFactory.getTableMetaCache(DataSourceProxy.this.getDbType())
.refresh(connection, DataSourceProxy.this.getResourceId());
} catch (Exception ignore) {
}
}, 0, TABLE_META_CHECKER_INTERVAL, TimeUnit.MILLISECONDS);
}
//Set the default branch type to 'AT' in the RootContext.
RootContext.setDefaultBranchType(this.getBranchType());
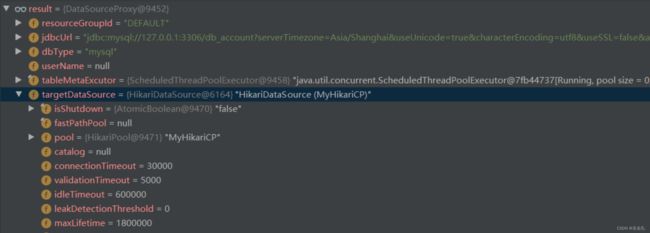
}
最终生成的代理数据源如下图所示:
2.2.3 添加AOP
在上面的类中,生成了数据源的代理对象,那么执行数据增删改查时,是如何切换到代理数据源的呢?
SeataAutoDataSourceProxyCreator继承了AbstractAutoProxyCreator抽象类,Spring 通过 AbstractAutoProxyCreator来创建 AOP 代理,其实现了BeanPostProcessor 接口,用于在 bean 初始化完成之后创建它的代理。在Seata 中,该类目的是为数据源添加Advisor,当数据源执行操作时,会进入其SeataAutoDataSourceProxyAdvice类中处理。
public class SeataAutoDataSourceProxyCreator extends AbstractAutoProxyCreator {
    private static final Logger LOGGER = LoggerFactory.getLogger(SeataAutoDataSourceProxyCreator.class);
    private final List<String> excludes;
    private final Advisor advisor;

    public SeataAutoDataSourceProxyCreator(boolean useJdkProxy, String[] excludes, String dataSourceProxyMode) {
        this.excludes = Arrays.asList(excludes);
        this.advisor = new DefaultIntroductionAdvisor(new SeataAutoDataSourceProxyAdvice(dataSourceProxyMode));
        setProxyTargetClass(!useJdkProxy);
    }
	// 为数据源Bean 添加 Advisor
    @Override
    protected Object[] getAdvicesAndAdvisorsForBean(Class<?> beanClass, String beanName, TargetSource customTargetSource) throws BeansException {
        if (LOGGER.isInfoEnabled()) {
            LOGGER.info("Auto proxy of [{}]", beanName);
        }
        return new Object[]{advisor};
    }
	// 不是DataSource 则跳过
    @Override
    protected boolean shouldSkip(Class<?> beanClass, String beanName) {
        return !DataSource.class.isAssignableFrom(beanClass) ||
            SeataProxy.class.isAssignableFrom(beanClass) ||
            excludes.contains(beanClass.getName());
    }
}
当数据源执行操作时,由于添加了AOP代理,最终会进入到SeataAutoDataSourceProxyAdvice的invoke方法中:
    @Override
    public Object invoke(MethodInvocation invocation) throws Throwable {
        if (!RootContext.requireGlobalLock() && dataSourceProxyMode != RootContext.getBranchType()) {
            return invocation.proceed();
        }
		// 数据源执行的方法,比如获取连接的 getConnection()
        Method method = invocation.getMethod();
        Object[] args = invocation.getArguments();
        // 查询代理数据源对应的方法 DataSourceProxy.getConnection()
        Method m = BeanUtils.findDeclaredMethod(dataSourceProxyClazz, method.getName(), method.getParameterTypes());
        if (m != null && DataSource.class.isAssignableFrom(method.getDeclaringClass())) {
            SeataDataSourceProxy dataSourceProxy = DataSourceProxyHolder.get().putDataSource((DataSource) invocation.getThis(), dataSourceProxyMode);
            // 执行代理数据源的方法
            return m.invoke(dataSourceProxy, args);
        } else {
            return invocation.proceed();
        }
    }