全志V3S 驱动OV2640 OV7725把图像显示到ST7789V LCD屏上
全志V3S 驱动OV2640 OV7725把图像显示到LCD屏上
文章目录
- 全志V3S 驱动OV2640 OV7725把图像显示到LCD屏上
- 一、设备树添加摄像头驱动
- 二、摄像头编译到内核
- 三、编译重启查看启动log是否正常
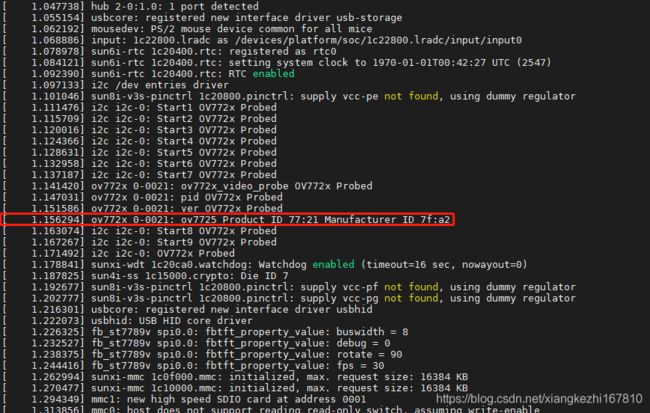
-
- 1.OV7725启动
- 2.OV2640启动
- 四、C实现摄像头捕获图像显示到fb
- 五、OV2640注意
一、设备树添加摄像头驱动
我使用的内核是最新的主线5.10内核,在sun8i_v3s.dtsi中修改如下:
pio: pinctrl@1c20800 {
			compatible = "allwinner,sun8i-v3s-pinctrl";
			reg = <0x01c20800 0x400>;
			interrupts = ,
				     ;
			clocks = <&ccu CLK_BUS_PIO>, <&osc24M>, <&rtc 0>;
			clock-names = "apb", "hosc", "losc";
			gpio-controller;
			#gpio-cells = <3>;
			interrupt-controller;
			#interrupt-cells = <3>;

			/omit-if-no-ref/
			csi1_8bit_pins: csi1-8bit-pins {
				pins = "PE0", "PE2", "PE3", "PE8", "PE9",
				       "PE10", "PE11", "PE12", "PE13", "PE14",
				       "PE15";
				function = "csi";
			};

			/omit-if-no-ref/
			csi1_mclk_pin: csi1-mclk-pin {
				pins = "PE1";
				function = "csi";
			};
			csi1_clk: csi1-clk@0 {
        		pins = "PE0","PE2","PE3";
        		bias-disable;
        		function = "csi";
			};
			csi1_8bit: csi1-8bit@0 {
				pins 	 = "PE6","PE7","PE8","PE9","PE10","PE11","PE12","PE13","PE14","PE15";
				bias-disable;
				function = "csi";
		 };

		 csi1_mclk: csi1-mclk@0 {
			 pins = "PE1";
			 bias-disable;
			 function = "csi";
		 };
			i2c0_pins: i2c0-pins {
				pins = "PB6", "PB7";
				function = "i2c0";
			};

			/omit-if-no-ref/
			i2c1_pe_pins: i2c1-pe-pins {
				pins = "PE21", "PE22";
				function = "i2c1";
			};
			i2c1_pins: i2c1-pins {
				pins = "PE21", "PE22";
				function = "i2c1";
			};
			uart0_pb_pins: uart0-pb-pins {
				pins = "PB8", "PB9";
				function = "uart0";
			};

			uart2_pins: uart2-pins {
				pins = "PB0", "PB1";
				function = "uart2";
			};

			mmc0_pins: mmc0-pins {
				pins = "PF0", "PF1", "PF2", "PF3",
				       "PF4", "PF5";
				function = "mmc0";
				drive-strength = <30>;
				bias-pull-up;
			};

			mmc1_pins: mmc1-pins {
				pins = "PG0", "PG1", "PG2", "PG3",
				       "PG4", "PG5";
				function = "mmc1";
				drive-strength = <30>;
				bias-pull-up;
			};

			spi0_pins: spi0-pins {
				pins = "PC0", "PC1", "PC2", "PC3";
				function = "spi0";
			};
};
csi1: csi@1cb4000 {
			compatible = "allwinner,sun8i-v3s-csi";
			reg = <0x01cb4000 0x3000>;
			interrupts = ;
			clocks = <&ccu CLK_BUS_CSI>,
					<&ccu CLK_CSI1_SCLK>,
					<&ccu CLK_DRAM_CSI>;
			clock-names = "bus", "mod", "ram";
			resets = <&ccu RST_BUS_CSI>;
			status = "okay";
};
最新的内核没有codec声卡,需要的话添加:
dma: dma-controller@01c02000 {
			compatible = "allwinner,sun8i-v3s-dma";
			reg = <0x01c02000 0x1000>;
			interrupts = ;
			clocks = <&ccu CLK_BUS_DMA>;
			resets = <&ccu RST_BUS_DMA>;
			#dma-cells = <1>;
		};
codec_analog: codec-analog@01c23000 {
			compatible = "allwinner,sun8i-v3s-codec-analog";
			reg = <0x01c23000 0x4>;
		};
codec: codec@01c22c00 {
			#sound-dai-cells = <0>;
			compatible = "allwinner,sun8i-v3s-codec";
			reg = <0x01c22c00 0x400>;
			interrupts = ;
			clocks = <&ccu CLK_BUS_CODEC>, <&ccu CLK_AC_DIG>;
			clock-names = "apb", "codec";
			resets = <&ccu RST_BUS_CODEC>;
			dmas = <&dma 15>, <&dma 15>;
			dma-names = "rx", "tx";
			allwinner,codec-analog-controls = <&codec_analog>;
			status = "disabled";
		};
最后在sun8i-v3s-licheepi-zero-dock.dts中添加如下,需要哪个摄像头就取消注释即可:
&csi1 {
	status = "okay";
	pinctrl-names = "default";
	pinctrl-0 = <&csi1_clk &csi1_8bit>;

	port {
		// csi1_ep: endpoint {
		// remote-endpoint = <&ov2640_0>;
		// hsync-active = <0>;
		// vsync-active = <0>;
		// bus-width = <10>;
	    // 	pclk-sample = <1>;
		// };
		csi1_ep: endpoint {

				remote-endpoint = <&ov7725_0>;
				hsync-active = <0>;
				vsync-active = <1>;
				bus-width = <8>;
			    pclk-sample = <1>;

				};
	};

 };
&i2c1 {
    	pinctrl-0 = <&i2c1_pins>;
		pinctrl-names = "default";
		clock-frequency = <400000>;
		status = "okay";


	ov7725: camera@21 {
		compatible = "ovti,ov7725";
		reg = <0x21>;
		pinctrl-names = "default";
		pinctrl-0 = <&csi1_mclk_pin>;
		clocks = <&ccu CLK_CSI1_MCLK>;
		clock-names = "xclk";
		assigned-clocks = <&ccu CLK_CSI1_MCLK>;
		assigned-clock-rates = <24000000>;
		port {
			ov7725_0: endpoint {
				remote-endpoint = <&csi1_ep>;
				//bus-width = <10>;
			};
		};
	};

	// ov2640: camera@30 {
	// 	compatible = "ovti,ov2640";
	// 	reg = <0x30>;
	// 	pinctrl-names = "default";
	// 	pinctrl-0 = <&csi1_mclk_pin>;
	// 	clocks = <&ccu CLK_CSI1_MCLK>;
	// 	clock-names = "xvclk";
	// 	assigned-clocks = <&ccu CLK_CSI1_MCLK>;
	// 	assigned-clock-rates = <24000000>;
	// 	port {
	// 		ov2640_0: endpoint {
	// 			remote-endpoint = <&csi1_ep>;
	// 			bus-width = <10>;
	// 		};
	// 	};
	// };
};
&codec {
	allwinner,audio-routing =
		"Headphone", "HP",
		"Headphone", "HPCOM",
		"MIC1", "Mic",
		"Mic",  "HBIAS";
	status = "okay";
};
&ohci0 {
	status = "okay";
};
&ehci0 {
	status = "okay";
};
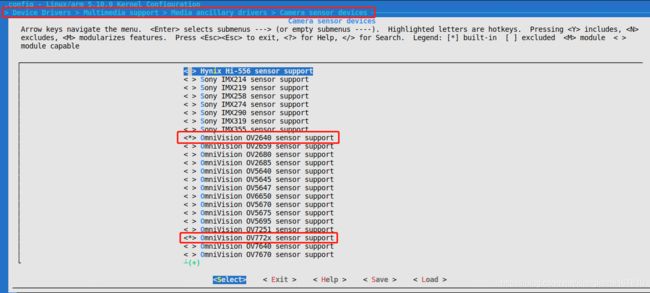
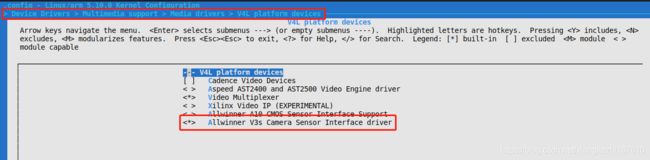
二、摄像头编译到内核
把需要的摄像头编译到内核,这里使用的是OV7725和OV2640,同时把videobuf2编译到内核才会有video0节点。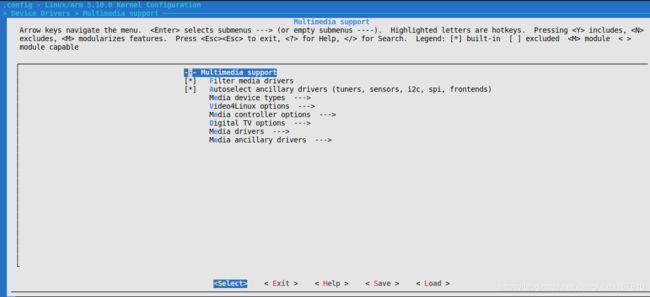
编译到内核后要拍照还要打开video0节点,也就是把video-buff2编译到内核:
三、编译重启查看启动log是否正常
1.OV7725启动
2.OV2640启动

四、C实现摄像头捕获图像显示到fb
首先需要安装arm-linux-gcc交叉编译工具链,
工作流程如下:
1、打开video0和fb0
2、初始化v4l2的格式为YUYV和画面大小为240x240(我的摄像头改了驱动为240*240为了适配ST7789V屏幕尺寸),申请buff用于捕获缓冲,打开mmap把图像复制到fb
3、初始化fb的参数,获取系统参数
4、开始捕获,获取YUYV,转换为YUV,然后转为RGB,显示到fb
使用以下代码:
#include
#include
#include
#include
#include
#include
#include
#include
#include
#include
#include
#include
#include
#include
#include
#include
#include
#include
#include

#define CAM_WIDTH 240
#define CAM_HEIGHT 240

static char *dev_video;
static char *dev_fb0;

static char *yuv_buffer;
static char *rgb_buffer;
typedef unsigned int u32;
typedef unsigned short u16;
typedef unsigned char u8;
#define YUVToRGB(Y)                                                            \
	((u16)((((u8)(Y) >> 3) << 11) | (((u8)(Y) >> 2) << 5) | ((u8)(Y) >> 3)))
struct v4l2_buffer video_buffer;
/*全局变量*/
int lcd_fd;
int video_fd;
unsigned char *lcd_mem_p = NULL; //保存LCD屏映射到进程空间的首地址
struct fb_var_screeninfo vinfo;
struct fb_fix_screeninfo finfo;

char *video_buff_buff[4]; /*保存摄像头缓冲区的地址*/
int video_height = 0;
int video_width = 0;
unsigned char *lcd_display_buff; //LCD显存空间
unsigned char *lcd_display_buff2; //LCD显存空间
static void errno_exit(const char *s)
{
	fprintf(stderr, "%s error %d, %s\n", s, errno, strerror(errno));
	exit(EXIT_FAILURE);
}

static int xioctl(int fh, int request, void *arg)
{
	int r;

	do {
		r = ioctl(fh, request, arg);
	} while (-1 == r && EINTR == errno);

	return r;
}

static int video_init(void)
{
	struct v4l2_capability cap;
	ioctl(video_fd, VIDIOC_QUERYCAP, &cap);

	struct v4l2_fmtdesc dis_fmtdesc;
	dis_fmtdesc.index = 0;
	dis_fmtdesc.type = V4L2_BUF_TYPE_VIDEO_CAPTURE;
	// printf("-----------------------支持格式---------------------\n");
	// while (ioctl(video_fd, VIDIOC_ENUM_FMT, &dis_fmtdesc) != -1) {
	// 	printf("\t%d.%s\n", dis_fmtdesc.index + 1,
	// 	       dis_fmtdesc.description);
	// 	dis_fmtdesc.index++;
	// }
	struct v4l2_format video_format;
	video_format.type = V4L2_BUF_TYPE_VIDEO_CAPTURE;
	video_format.fmt.pix.width = CAM_WIDTH;
	video_format.fmt.pix.height = CAM_HEIGHT;
	video_format.fmt.pix.pixelformat =
		V4L2_PIX_FMT_YUYV; //使用JPEG格式帧,用于静态图像采集

	ioctl(video_fd, VIDIOC_S_FMT, &video_format);

	printf("当前摄像头支持的分辨率:%dx%d\n", video_format.fmt.pix.width,
	       video_format.fmt.pix.height);
	if (video_format.fmt.pix.pixelformat != V4L2_PIX_FMT_YUYV) {
		printf("当前摄像头不支持YUYV格式输出.\n");
		video_height = video_format.fmt.pix.height;
		video_width = video_format.fmt.pix.width;
		//return -3;
	} else {
		video_height = video_format.fmt.pix.height;
		video_width = video_format.fmt.pix.width;
		printf("当前摄像头支持YUYV格式输出.width %d height %d\n",
		       video_height, video_height);
	}
	/*3. 申请缓冲区*/
	struct v4l2_requestbuffers video_requestbuffers;
	memset(&video_requestbuffers, 0, sizeof(struct v4l2_requestbuffers));
	video_requestbuffers.type = V4L2_BUF_TYPE_VIDEO_CAPTURE;
	video_requestbuffers.count = 4;
	video_requestbuffers.memory = V4L2_MEMORY_MMAP;
	if (ioctl(video_fd, VIDIOC_REQBUFS, &video_requestbuffers))
		return -4;
	printf("成功申请的缓冲区数量:%d\n", video_requestbuffers.count);
	/*4. 得到每个缓冲区的地址: 将申请的缓冲区映射到进程空间*/
	struct v4l2_buffer video_buffer;
	memset(&video_buffer, 0, sizeof(struct v4l2_buffer));
	int i;
	for (i = 0; i < video_requestbuffers.count; i++) {
		video_buffer.type = V4L2_BUF_TYPE_VIDEO_CAPTURE;
		video_buffer.index = i;
		video_buffer.memory = V4L2_MEMORY_MMAP;
		if (ioctl(video_fd, VIDIOC_QUERYBUF, &video_buffer))
			return -5;
		/*映射缓冲区的地址到进程空间*/
		video_buff_buff[i] =
			mmap(NULL, video_buffer.length, PROT_READ | PROT_WRITE,
			     MAP_SHARED, video_fd, video_buffer.m.offset);
		printf("第%d个缓冲区地址:%#X\n", i, video_buff_buff[i]);
	}
	/*5. 将缓冲区放入到采集队列*/
	memset(&video_buffer, 0, sizeof(struct v4l2_buffer));
	for (i = 0; i < video_requestbuffers.count; i++) {
		video_buffer.type = V4L2_BUF_TYPE_VIDEO_CAPTURE;
		video_buffer.index = i;
		video_buffer.memory = V4L2_MEMORY_MMAP;
		if (ioctl(video_fd, VIDIOC_QBUF, &video_buffer)) {
			printf("VIDIOC_QBUF error\n");
			return -6;
		}
	}
	printf("启动摄像头采集\n");
	/*6. 启动摄像头采集*/
	int opt_type = V4L2_BUF_TYPE_VIDEO_CAPTURE;
	if (ioctl(video_fd, VIDIOC_STREAMON, &opt_type)) {
		printf("VIDIOC_STREAMON error\n");
		return -7;
	}

	return 0;
}
int lcd_init(void)
{
	/*2. 获取可变参数*/
	if (ioctl(lcd_fd, FBIOGET_VSCREENINFO, &vinfo))
		return -2;
	printf("屏幕X:%d   屏幕Y:%d  像素位数:%d\n", vinfo.xres, vinfo.yres,
	       vinfo.bits_per_pixel);
	//分配显存空间,完成图像显示
	lcd_display_buff =
		malloc(vinfo.xres * vinfo.yres * vinfo.bits_per_pixel / 8);
	/*3. 获取固定参数*/
	if (ioctl(lcd_fd, FBIOGET_FSCREENINFO, &finfo))
		return -3;
	printf("smem_len=%d Byte,line_length=%d Byte\n", finfo.smem_len,
	       finfo.line_length);

	/*4. 映射LCD屏物理地址到进程空间*/
	lcd_mem_p = (unsigned char *)mmap(0, finfo.smem_len,
					  PROT_READ | PROT_WRITE, MAP_SHARED,
					  lcd_fd, 0); //从文件的那个地方开始映射
	memset(lcd_mem_p, 0xFFFFFFFF, finfo.smem_len);
	printf("映射LCD屏物理地址到进程空间\n");
	return 0;
}

static void close_device(void)
{
	if (-1 == close(video_fd))
		errno_exit("close");
	video_fd = -1;

	if (-1 == close(lcd_fd))
		errno_exit("close");
	lcd_fd = -1;
}

static void open_device(void)
{
	video_fd = open(dev_video, O_RDWR /* required */ | O_NONBLOCK, 0);
	if (-1 == video_fd) {
		fprintf(stderr, "Cannot open '%s': %d, %s\n", dev_video, errno,
			strerror(errno));
		exit(EXIT_FAILURE);
	}

	lcd_fd = open(dev_fb0, O_RDWR, 0);
	if (-1 == lcd_fd) {
		fprintf(stderr, "Cannot open '%s': %d, %s\n", dev_fb0, errno,
			strerror(errno));
		exit(EXIT_FAILURE);
	}
}
/*
将YUV格式数据转为RGB
*/
void yuv_to_rgb(unsigned char *yuv_buffer, unsigned char *rgb_buffer,
		int iWidth, int iHeight)
{
	int x;
	int z = 0;
	unsigned char *ptr = rgb_buffer;
	unsigned char *yuyv = yuv_buffer;
	for (x = 0; x < iWidth * iHeight; x++) {
		int r, g, b;
		int y, u, v;
		if (!z)
			y = yuyv[0] << 8;
		else
			y = yuyv[2] << 8;
		u = yuyv[1] - 128;
		v = yuyv[3] - 128;
		r = (y + (359 * v)) >> 8;
		g = (y - (88 * u) - (183 * v)) >> 8;
		b = (y + (454 * u)) >> 8;
		*(ptr++) = (b > 255) ? 255 : ((b < 0) ? 0 : b);
		*(ptr++) = (g > 255) ? 255 : ((g < 0) ? 0 : g);
		*(ptr++) = (r > 255) ? 255 : ((r < 0) ? 0 : r);
		if (z++) {
			z = 0;
			yuyv += 4;
		}
	}
}

void rgb24_to_rgb565(char *rgb24, char *rgb16)
{
	int i = 0, j = 0;
	for (i = 0; i < 240 * 240 * 3; i += 3) {
		rgb16[j] = rgb24[i] >> 3; // B
		rgb16[j] |= ((rgb24[i + 1] & 0x1C) << 3); // G
		rgb16[j + 1] = rgb24[i + 2] & 0xF8; // R
		rgb16[j + 1] |= (rgb24[i + 1] >> 5); // G

		j += 2;
	}
}
int main(int argc, char **argv)
{
	dev_video = "/dev/video0";
	dev_fb0 = "/dev/fb0";
	open_device();
	video_init();
	lcd_init();
	/*3. 读取摄像头的数据*/
	struct pollfd video_fds;
	video_fds.events = POLLIN;
	video_fds.fd = video_fd;

	memset(&video_buffer, 0, sizeof(struct v4l2_buffer));
	rgb_buffer = malloc(CAM_WIDTH * CAM_HEIGHT * 3);
	yuv_buffer = malloc(CAM_WIDTH * CAM_HEIGHT * 3);
	unsigned char *rgb_p;
	int w, h, i, j;
	unsigned char r, g, b;
	unsigned int c;
	while (1) {
		/*等待摄像头采集数据*/
		poll(&video_fds, 1, -1);
		/*得到缓冲区的编号*/
		video_buffer.type = V4L2_BUF_TYPE_VIDEO_CAPTURE;
		video_buffer.memory = V4L2_MEMORY_MMAP;
		ioctl(video_fd, VIDIOC_DQBUF, &video_buffer);
		printf("当前采集OK的缓冲区编号:%d,地址:%#X num:%d\n",
		       video_buffer.index, video_buff_buff[video_buffer.index],
		       strlen(video_buff_buff[video_buffer.index]));
		/*对缓冲区数据进行处理*/
		yuv_to_rgb(video_buff_buff[video_buffer.index], yuv_buffer,
		video_height, video_width);
		rgb24_to_rgb565(yuv_buffer, rgb_buffer);
		printf("显示屏进行显示\n");
		//显示屏进行显示: 将显存空间的数据拷贝到LCD屏进行显示
		memcpy(lcd_mem_p, rgb_buffer,
		       vinfo.xres * vinfo.yres * vinfo.bits_per_pixel / 8);
		/*将缓冲区放入采集队列*/
		ioctl(video_fd, VIDIOC_QBUF, &video_buffer);
		printf("将缓冲区放入采集队列\n");
	}
	/*4. 关闭视频设备*/
	close(video_fd);

	return 0;
}
Makefile:
CROSS_COMPILE  = /home/kevin/v3s/opt/arm-linux-gcc/gcc-4.6.4/bin/
CC    = $(CROSS_COMPILE)arm-none-linux-gnueabi-gcc

main: main.c
	$(CC)  -o main main.c -static
执行make编译后拷贝到TF卡的BOOT分区,然后开机挂载TF卡的BOOT分区
mount /dev/mmcblk0p1 /mnt/ && cd /mnt
运行
./main


五、OV2640注意
当使用OV2640时,原驱动拍出来的照片很暗,需要调整0x3c寄存器的值为0xEF:
