初次创建mybatis-plus项目(springboot整合mybatis-plus)
目录
一、先创建一个空的springboot项目
二、springboot整合mybaits-plus
1.配置pom.xml
①引入mybatis-plus的依赖
②引入mysql驱动
2.配置application.yml(以mysql为例)
①创建application.yml文件
②配置application.yml
3.创建实体类(以emp表为例)
①这是数据库的对应的表
②根据数据库表创建实体类
4.dao层
①创建mapper接口,继承父接口BaseMapper
② 创建对应的mapper.xml文件
5.在启动类上添加@MapperScan(basePackages = "com.jxd.mapper"),保证spring可以扫描到这个接口
6.service层
①创建service接口,继承IService接口
②service实现类,继承ServiceImpl并实现service接口
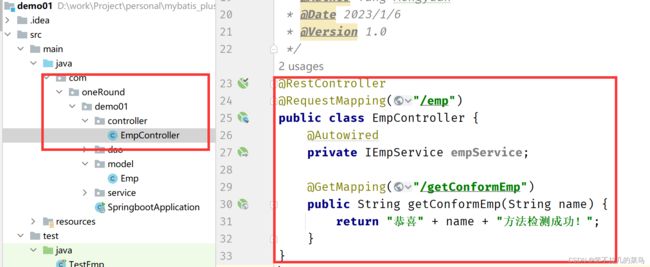
7.controller层
三、单元测试
一、先创建一个空的springboot项目
此处可以参考新建springboot项目详解_笨不拉几的菜鸟的博客-CSDN博客
二、springboot整合mybaits-plus
1.配置pom.xml
①引入mybatis-plus的依赖
注意:mybatis和mybatis-plus的依赖只能二选一
    com.baomidou
    mybatis-plus-boot-starter
    3.4.3.4
②引入mysql驱动
	mysql
	mysql-connector-java
     8.0.22
2.配置application.yml(以mysql为例)
①创建application.yml文件
②配置application.yml
spring:
  datasource:  #配置数据库信息
    driver-class-name: com.mysql.cj.jdbc.Driver   #mysql驱动
    #url:jdbc:mysql://ip地址:端口号/数据库名?useSSL=false&useUnicode=true&characterEncoding=utf-8&serverTimezone=UTC&allowMultiQueries=true
    url: jdbc:mysql://127.0.0.1:3306/ymy?useSSL=false&useUnicode=true&characterEncoding=utf-8&serverTimezone=UTC&allowMultiQueries=true
    username: root    #数据库名称
    password: 123456  #数据库密码


#配置mybatis-plus
mybatis-plus:
  #告诉mybatis框架映射文件的位置
  mapper-locations: classpath:com/oneRound/demo01/dao/mapper/*.xml
  #设置类型别名,在映射文件中可以直接写首字母小写的实体类名称即可
  type-aliases-package: com.oneRound.demo01.model
  #驼峰映射:例如数据库中的字段名emp_name能对应实体类中的属性名empName
  configuration:
    map-underscore-to-camel-case: true
#在控制台查看sql语句
logging:
  level:
    com.oneRound.demo01: debug
3.创建实体类(以emp表为例)
①这是数据库的对应的表
②根据数据库表创建实体类
4.dao层
①创建mapper接口,继承父接口BaseMapper
public interface EmpMapper extends BaseMapper {
    //该接口继承了MP提供的BaseMapper接口,继承父接口中的常用的增删改查抽象方法
}
② 创建对应的mapper.xml文件
想知道如何快速的创建mapper.xml文件,可以参照这里哦
springboot文件中创建mapper.xml文件_笨不拉几的菜鸟的博客-CSDN博客
5.在启动类上添加@MapperScan(basePackages = "com.jxd.mapper"),保证spring可以扫描到这个接口
@SpringBootApplication
@MapperScan(basePackages = "com.oneRound.demo01.dao")
public class springbootApplication {
    public static void main(String[] args) {
        SpringApplication.run(PlusApplication.class,args);
    }
}
6.service层
①创建service接口,继承IService接口
public interface IEmpService extends IService {
}
②service实现类,继承ServiceImpl并实现service接口
@Service
public class EmpServiceImpl extends ServiceImpl implements IEmpService {
  //MP提供了这些抽象方法的实现,我们只需继承对应的父类即可
  //ServiceImpl这个父类中是抽象方法的实现
}
7.controller层(写个例子测试一下)
@RestController
@RequestMapping("/emp")
public class EmpController {
    @Autowired
    private IEmpService empService;

    @GetMapping("/getConformEmp")
    public String getConformEmp(String name) {
        return "恭喜" + name + "方法检测成功!";
    }
}
三、单元测试
controller层写完了,我们可以在test中对controller层方法进行测试,单元测试详情介绍请参照
springboot单元测试_笨不拉几的菜鸟的博客-CSDN博客
@RunWith(SpringRunner.class)
@SpringBootTest(classes = SpringbootApplication.class)
@WebAppConfiguration
@ComponentScan(basePackages = "com.oneRound.demo01")
public class TestEmp {
    private MockMvc mockMvc;

    @Before
    public void setup(){
        mockMvc = MockMvcBuilders.standaloneSetup(new EmpController()).build();
    }

    @Test
    public void testGetConformEmp() throws Exception {
        mockMvc.perform(MockMvcRequestBuilders
                .get("/emp/getConformEmp")
                        .accept(MediaType.APPLICATION_JSON_UTF8_VALUE)
                        .param("name","张三"))
                .andExpect(MockMvcResultMatchers.status().isOk())
                .andDo(MockMvcResultHandlers.print());
    }
}
运行该方法后,可以看到控制台出现一系列信息,即springboot项目整合mybatis-plus成功


