knife4j-swagger封装配置,注解使用knife4j
knife4j-swagger
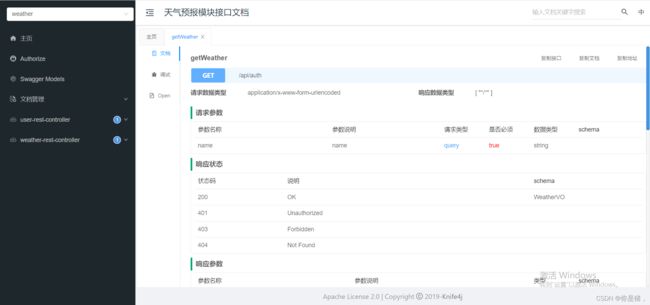
相对于swagger-ui更加的美观,相信大家看到这个界面也就更加肯定我的想法了,比原生的swagger厉害的多了,除了不能进行文件上传接口测试。大家可以去官网进行学习哈。

knife4j的使用
maven引入
            com.github.xiaoymin
            knife4j-spring-boot-starter
            2.0.7
knife4j使用
自定义注解,不懂得人可以复制这段代码,知道自定义注解得可以自己修改使其符合自己得业务。之所以想要使用注解,是因为平时开发时,每次开发一个应用,就要写一些swagger配置类,重复的工作,不如进行简单的封装,只要每次在新的springboot项目上使用注解就可以了。
@Target({ ElementType.TYPE })
@Retention(RetentionPolicy.RUNTIME)
@Documented
@Inherited
@Import({ SwaggerConfiguration.class })//SwaggerAutoConfiguration自己写的配置类
public @interface Swagger2 {

}
knife4j配置
- 首先是配置所需得实体类,当然也可以不用这么多得属性,为了方便,一些信息还是使用配置来进行变更就好了,设定这些默认值都为空字符,注解@Data,可以帮助我们不需要在实体类里写get和set方法。
/**
 * swagger配置得实体类
 */
//不需要写get和set方法,会自动给生成,没有需要手动添加get和set方法
@Data
@Component
public class SwaggerProperties
{

    /**
     * swagger会解析的包路径
     **/
    @Value("${my-swagger.base-package:}")
    private String basePackage = "";

    /**
     * swagger会解析的url规则
     **/
    private List basePath = new ArrayList<>();

    /**
     * 在basePath基础上需要排除的url规则
     **/
    private List excludePath = new ArrayList<>();

    /**
     * 标题
     **/
    @Value("${my-swagger.tittle:}")
    private String title = "";
    /**
     * 描述
     **/
    @Value("${my-swagger.description:}")
    private String description = "";
    /**
     * 版本
     **/
    @Value("${my-swagger.version:1.0}")
    private String version = "";
    /**
     * host信息
     **/
    private String host = "";
    /**
     * 全局统一鉴权配置
     **/
    private Authorization authorization = new Authorization();
    @Data
    public static class Authorization
    {
        /**
         * 鉴权策略ID,需要和SecurityReferences ID保持一致
         */
        private String name = "";

        /**
         * 需要开启鉴权URL的正则
         */
        private String authRegex = "^.*$";
        /**
         * 鉴权作用域列表
         */
        private List authorizationScopeList = new ArrayList<>();

        private List tokenUrlList = new ArrayList<>();

    }

    @Data
    public static class AuthorizationScope
    {
        /**
         * 作用域名称
         */
        private String scope = "";
        /**
         * 作用域描述
         */
        private String description = "";
    }
}
- 重点来了,swagger配置类,包含配置请求的头部信息配置,全局借鉴头部信息,使在调试接口时,不需要每次都填写头部内容,过滤认证接口/auth不需要头部信息,过滤springboot自带的/error接口等等,具体来看代码,可直接复制使用:
/**
 * 配置类,swagger.enabled参数可以在配置文件中配置,如果为false就不开放文档,这里matchIfMissing给的默认是true
 */
@Slf4j
@Configuration
@EnableSwagger2WebMvc
@EnableAutoConfiguration//自动加载该引用所需得bean。
//@ConditionalOnProperty(name = "swagger.enabled", matchIfMissing = true)//使用knife4j自带的配置,不需要自己来进行设置控制
public class SwaggerConfiguration {
    /**
     * 默认的排除路径,排除Spring Boot默认的错误处理路径和端点
     */
    private static final List DEFAULT_EXCLUDE_PATH = Arrays.asList("/error", "/actuator/**");

    private static final String BASE_PATH = "/**";

    @Autowired
    private ApplicationContext applicationContext;
    @Value("${my-swagger.contact.name:}")
    private String name;
    @Value("${my-swagger.contact.email:}")
    private String email;
    @Value("${my-swagger.contact.url:}")
    private String url;
    @Bean
    @ConditionalOnMissingBean//确保只有一个
    public SwaggerProperties swaggerProperties() {
        return new SwaggerProperties();
    }
    @Bean
    public Docket createRestApi(SwaggerProperties swaggerProperties) {
        String name = applicationContext.getId();//服务名对应这服务的id
        log.info("该应用服务名:{}", name);
        //base-path处理
        if (swaggerProperties.getBasePath().isEmpty()) {
            swaggerProperties.getBasePath().add(BASE_PATH);
        }
        // noinspection unchecked
        List> basePath = new ArrayList>();
        swaggerProperties.getBasePath().forEach(path -> basePath.add(PathSelectors.ant(path)));
        // exclude-path处理
        if (swaggerProperties.getExcludePath().isEmpty()) {
            swaggerProperties.getExcludePath().addAll(DEFAULT_EXCLUDE_PATH);
        }
        return new Docket(DocumentationType.SWAGGER_2)
                .apiInfo(apiInfo(swaggerProperties))//api基础信息
                .host(swaggerProperties.getHost())//默认是localhost:8080
                .select()//选择生成
                .apis(RequestHandlerSelectors.basePackage(swaggerProperties.getBasePackage()))//设置哪个包的controller类生成接口
                .paths(regex("^.*(? securitySchemes() {
        List apiKeyList = new ArrayList();
        apiKeyList.add(new ApiKey("Authorization", "Authorization", "header"));
        return apiKeyList;
    }
    /**
     * 安全上下文,设置哪些的接口需要进行头部认证,默认排除/auth验证路径
     */
    private List securityContexts() {
        List securityContexts = new ArrayList<>();
        securityContexts.add(
                SecurityContext.builder()
                        .forPaths(regex("^.*(? defaultAuth() {
        AuthorizationScope authorizationScope = new AuthorizationScope("global", "accessEverything");
        AuthorizationScope[] authorizationScopes = new AuthorizationScope[1];
        authorizationScopes[0] = authorizationScope;
        List securityReferences = new ArrayList<>();
        securityReferences.add(new SecurityReference("Authorization", authorizationScopes));
        return securityReferences;
    }

    private ApiInfo apiInfo(SwaggerProperties swaggerProperties) {
        return new ApiInfoBuilder()
                .title(swaggerProperties.getTitle())//api名称
                .description(swaggerProperties.getDescription())//api文档描述
                //.license(swaggerProperties.getLicense())//许可证
                //.licenseUrl(swaggerProperties.getLicenseUrl())//许可证url
                //.termsOfServiceUrl(swaggerProperties.getTermsOfServiceUrl())//服务条款url
                .contact(new Contact(name, url, email))//联系人信息
                .version(swaggerProperties.getVersion())//版本号
                .build();
    }
}
- 路径映射,如果系统做了其他静态资源配置,需要这个类,否则系统能自己找到resources下的静态文件。
/**
 * swagger 资源映射路径
 */
@Configuration
public class SwaggerWebConfiguration implements WebMvcConfigurer
{
    @Override
    public void addResourceHandlers(ResourceHandlerRegistry registry)
    {
        /** swagger-ui 地址 */
        registry.addResourceHandler("/doc.html/**")
                .addResourceLocations("classpath:/META-INF/resources/webjars/springfox-swagger-ui/");
    }
}
注解的使用
只需要在启动类上使用@swagger注解就可以了,版本原因可能导致出错,请往下看。
@Swagger2
@SpringBootApplication
public class WeatherApplication {

	public static void main(String[] args) {
		SpringApplication.run(WeatherApplication.class, args);
	}
}
- 你以为就可以启动看自己多聪明了嘛,启动时候报错,
org.springframework.context.ApplicationContextException: Failed to start bean
'documentationPluginsBootstrapper'; nested exception is java.lang.NullPointerException
- 解决办法
原因就是knife4j内置得Springfox版本与你使用得Spring Boot起了冲突,因为Springfox使用的路径匹配是基于AntPathMatcher的,而Spring Boot 2.6.X使用的是PathPatternMatcher。
解决起来也很简单:
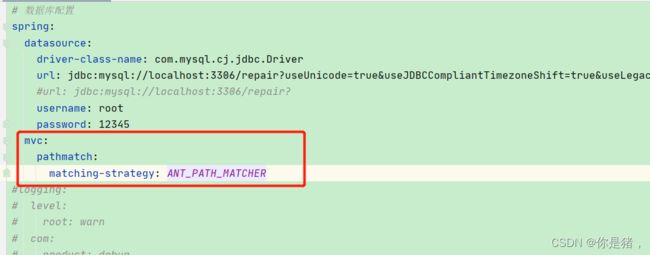
配置如下:
mvc:
    pathmatch:
      matching-strategy: ANT_PATH_MATCHER
最后给大家看一下我相关的配置:
#knife4j-swagger配置
knife4j:
  # 开启增强配置
  enable: true

  basic:
    enable: true
  # Basic认证用户名
    username: test
  # Basic认证密码
    password: 123

#swagger2参数配置
my-swagger:
  #基础controller包路径
  base-package: com.nchu.weather.controller
  #接口文档名称
  tittle: 天气预报模块接口文档
  #描述
  description: 接口文档里的接口都加了基础路径/api,实际前端调用请去掉api
  #版本号
  version: 2.0
  #接口文档联系人
  contact:
    name: liulaolao
    email: [email protected]
    url: cafee.top
效果: