Spring Boot2【核心技术(针对于Servlet)】
一、SpringBoot2基础入门
1.Spring与Springboot
1.1 Spring能做什么
最基本的:AOP、IOC、用SpringMVC开发web应用
高级的:微服务开发、响应式开发、分布式开发(Spring Cloud)、WEB开发 、无服务开发 等等
SpringBoot可以做什么:可以整合各种框架
1.2 SpringBoot介绍
能快速创建出生产级别的Spring应用,让我们以后用spring框架开发变得简单
1.2.1 什么是Springboot
SpringBoot是整合Spring技术栈的一站式框架
SpringBoot是简化Spring技术栈的快速开发脚手架
1.2.2 SpringBoot优点
-
可以创建独立的spring应用
用springboot也能创建spring应用,所以就不用原生的spring框架了
-
使用内嵌的web服务器
以前的web项目需要打包成war包,然后服务器还需要装tomcat等服务器。
而用springboot开发,即使服务器没有tomcat也没关系,因为我们创建的这个应用里面带了web服务器
-
自动配置依赖,简化构建配置
以前整合ssm的时候需要写很多配置文件,写错一个项目就启动不起来
现在使用springboot开发,它里面提供了很多starter(启动器),用到什么场景就导入什么场景的starter,并且进行了版本控制
-
自动配置Spring以及第三方功能
不需再写繁琐的配置文件
-
提供生产级别的监控、健康检查及外部化配置
-
无代码生成,无需编写XML
1.2.3 Springboot缺点
- 版本迭代快,需要时刻关注
- 封装太深,内部原理复杂,不容易精通
2.SpringBoot2快速体验
2.1 系统要求
- Java 8 & 兼容java14
- Maven 3.3+
- idea 2019.1.2
2.2 Hello World
需求:浏览发送/hello请求,响应 Hello,Spring Boot 2
2.2.1 创建Maven工程
如果需要用springBoot开发,需要在pom.xml文件中加入父工程标签
	<parent>
        <groupId>org.springframework.bootgroupId>
        <artifactId>spring-boot-starter-parentartifactId>
        <version>2.3.4.RELEASEversion>
    parent>
2.2.2 引入依赖
因为要开发web应用,所以添加web的场景启动器starter web
	<dependencies>
        <dependency>
            <groupId>org.springframework.bootgroupId>
            <artifactId>spring-boot-starter-webartifactId>
        dependency>
    dependencies>
2.2.3 创建主程序
编写主程序类的时候要加上@SpringBootApplication注解,告诉SpringBoot这是一个SpringBoot应用
- 创建一个java类
- 给类加上@SpringBootApplication注解
- 编写主方法(调用@SpringApplication.run(主程序类的类名.class,args))
@SpringBootApplication      //告诉SpringBoot这是SpringBoot主程序
public class HelloSpringBoot {
    public static void main(String[] args) {
        SpringApplication.run(HelloSpringBoot.class,args);//第二个参数是main里面传进来的数组
    }
}
2.2.4 编写业务
- 编写控制层(控制层的包一定要放在主程序的包里面)
- 创建一个controller包(放在主程序的包里面)
- 创建控制器类(类上要加上@RestController注解)
- 使用MVC写一个方法返回字符串
- 因为返回的是字符串所以类上要加@RestController
/**
 * @RestController注解:是@Controller和@ResponseBody的结合体
 * (@Controller表示这是一个控制器类,@ResponseBody表示方法返回的参数是响应体)
 */
@RestController
public class MainController {

    @RequestMapping("/hello")
    public String first(){
        return "Hello Spring Boot!";
    }
}
2.2.5 测试
直接运行main方法,然后浏览器输入:localhots:8080/请求地址
例如:@RequestMapping(“/hello”),所以我们地址中直接输入http://localhost:8080/hello
2.2.6 简化配置
因为SpringBoot可以简化配置,所以他把**所有的配置信息都放在application.properties文件下**(resources包下)
案例:修改服务器的端口号为8888
- 在resources包下创建Springboot的配置文件application.properties
- 在里面添加内容
server.port=8888
2.2.7 简化部署
SpringBoot提供的Maven插件可以**把项目打包成jar包,这个jar包自带项目运行的环境,可以直接运行**
-
pom.xml中设置打包方式
<packaging>jarpackaging> -
然后导入插件
<build> <plugins> <plugin> <groupId>org.springframework.bootgroupId> <artifactId>spring-boot-maven-pluginartifactId> plugin> plugins> build> -
然后重新打包
-
在电脑中找到target中打包的jar,在目录下cmd
-
运行程序
java -jar jar包名
-
打开浏览器就可以访问
3.了解自动配置原理
3.1 SpringBoot特点
3.1.1 依赖管理
-
父项目依赖管理
父项目有什么依赖,子项目就可以使用什么依赖
我们在一开始就使用了标签,把spring-boot引进来了,所以后面的依赖都没有写版本号,因为版本号都是由父项目SpringBoot管理的
我们项目的父项目 <parent> <groupId>org.springframework.bootgroupId> <artifactId>spring-boot-starter-parentartifactId> <version>2.3.4.RELEASEversion> parent> spring-boot-starter-parent的父项目 <parent> <groupId>org.springframework.bootgroupId> <artifactId>spring-boot-dependenciesartifactId> <version>2.3.4.RELEASEversion> parent> 几乎声明了所有开发中常用的依赖的版本号,自动版本仲裁机制 -
可以修改默版本号
如果他引入的依赖版本不是我们想要的,我们可以写一个里面写上需要修改的依赖key,然后写上版本号即可
1、查看spring-boot-dependencies里面规定当前依赖的版本用的key。 2、在当前项目里面重写配置 <properties> <mysql.version>5.1.43mysql.version> properties> -
无需关注版本号,自动版本仲裁
以后引入依赖都可以不写版本号
如果引入非版本仲裁的jar,一定要写版本号
-
开发导入starter场景启动器
一个使用场景的starter包含这个场景所需要的所有依赖
我们开发什么场景就引入什么场景的starter
官方starter名字是:spring-boot-starter-XXX : XXX就表示某种场景
第三方starter名字是:XXX-spring-boot-starter
例如:开发web,就引入spring-boot-starter-web
所有场景都需要的依赖:spring-boot-starter
<dependency>
    <groupId>org.springframework.bootgroupId>
    <artifactId>spring-boot-starter-webartifactId>
dependency>
3.1.2 自动配置
-
自动配好Tomcat
-
引入开发场景的时候,已经引入依赖
-
然后给配置好tomcat
-
-
自动配好SpringMVC
- 引入SpringMVC的全套组件
- 自动配好SpringMVC常用组件(功能)
-
自动配好Web常见功能,例如:字符编码问题
SpringBoot帮我们配置好了所有的web开发的常见场景
-
默认的包结构
主程序所在包及其下面的所有子包的组件都会被默认扫描进来,所以主程序所在包外面的controller不会被扫描到
如果确实要扫描外面其他的包,可以进行如下操作
- 方法一:@SpringBootApplictaion注解进行配置
- 方法二:@ComponentScan指定扫描包(一般不适用)
- 方法三:使用三个注解@SpringBootConfiguration@EnableAutoConfiguration@ComponentScan(“扫描路径”)
@SpringBootApplication(scanBasePackages = "love.junqing.springboot") //里面是包的扫描路径 -
各种配置拥有的默认值
-
好多属性都给了我们默认的值,如果我们需要修改,可以直接在application.properties中修改
-
默认配置都最终映射到某个类上,如:MultipartProperties
-
配置文件的值最终会绑定每个类上,这个类会在容器中创建对象
-
-
按需加载所有的配置项
-
引入了哪些场景这个场景的自动配置才会开启
-
- SpringBoot所有的自动配置功能都在 spring-boot-autoconfigure 包里面
-
3.2 容器功能
3.2.1 组件添加
案例:我现在有连个javaBean对象,想添加到IOC容器中
① @Configuration(配置类注解)
因为SpringBoot不适用xml配置文件了,所以我们可以创建一个配置类,类上加上@Configuration注解来说明这是一个配置类
配置类本身也是一个组件
然后**写一个方法,返回值是Bean的类型,然后方法上加上@Bean注解(单实例)从而表示给容器中添加组件,以方法名作为组件的id,返回类型就组件类型,返回的对象,就是IOC容器中保存的实例**
如果id不想使用方法名,可以在注解上添加值@Bean(“id”)
@Configuration
public class MyConfig {
    @Bean
    public Student student01(){
        return new Student("杨方健","男","201201042");
    }
}
重要说明:
-
@Configuration有一个属性proxyBeanMethods,他的值默认是true,他表示是否开启bean代理模式
-
被@Configuration标注的类,本身就被代理了
-
如果是proxyBeanMethods属性的值是true,则IOC容器每次访问bean对象,都会看看自己里面有没有创建,如果创建了就直接使用(为了保持组件单实例)
-
如果是proxyBeanMethods属性的值是false,则IOC容器每次访问bean对象,都直接创建一个新的
-
这样就引出了Configuration的两种配置模式:
- Full(全配置,加载慢):proxyBeanMethods = true【保证每个@Bean方法被调用多少次返回的组件都是单实例的】
- Lite(轻量级配置,加载快):proxyBeanMethods = false【每个@Bean方法被调用多少次返回的组件都是新创建的】
-
应用场景:如果一个配置类中的组件相互没有依赖关系,就可以设置proxyBeanMethods = false,如果组件之间存在依赖关系则设置proxyBeanMethods = true
-
案例:我在@Configuration标注的config类中设置两个组件一个人和一个宠物,然后人的组件可以获取冲去。我在其他地方通过人获取的宠物和直接获取宠物的时候必须是同一个对象,不能两次创建的宠物对象不一样,那么就可以设置proxyBeanMethods = true
② @Bean、@Component、@Controller、@Service、@Reponsitory
这些是以前的一些注解,也可以使用
@Component:表示是一个组件
@Controller:表示是一个控制层组件
@Service:表示是一个业务层组件
@Reponsitory:表示是一个Dao层组件
③ @ComponentScan、@Import(包扫描注解)
@ComponentScan:指定包扫描规则(上面有写)
@Import:给容器导入一个组件
- 它可以传进去一个数组,将数组里面的组件通过无参构造器创建,然后把组件自动放到类里面
- 默认组件的名字是全类名
@Import({Student.class, DBHelper.class})
@Configuration
public class MyConfig {
}
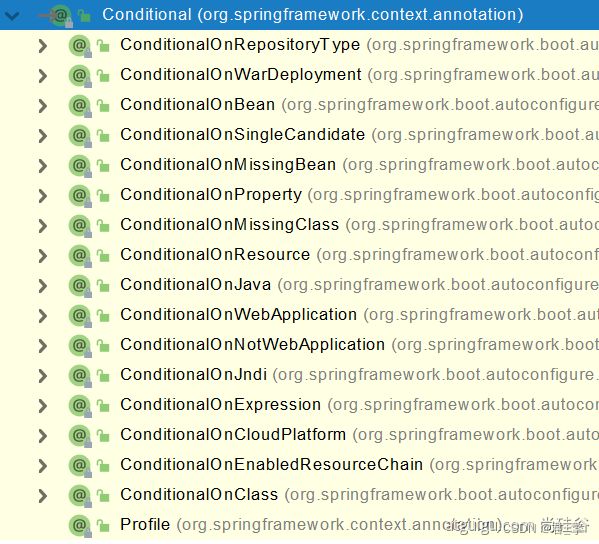
④ @Conditional(根据条件注入注解)
条件装配:满足Conditional指定的条件,则进行组件注入
它有很多派生注解
可以放到类上,可以放到方法上
个别讲解:
- ConditionalOnBean:当容器中有某个组件做什么
- ConditionalOnMissingBean:当容器中没有某个组件做什么
- ConditionalOnClass:当容器中有某类做什么
- ConditionalOnMissingClass:当容器中没有某个类做什么
- ConditionalOnResource:当类路径存在某个资源干什么
- ConditionalOnJava:当项目的版本号是什么的时候做什么
- ConditionalOnWebApplication:当项目是一个web项目会做什么
- ConditionalOnNotWebApplication:项目不是一个web项目会做什么
案例:
@Configuration
public class MyConfig {

    @Bean
    public Student yfj(){
        return new Student("yfj","男","201201042");
    }
    @ConditionalOnBean(name="yfj") //这里表示:如果有一个名字叫yfj的bean,才会执行下面创建tom组件的方法
    @Bean
    public Dog tom(){
        return new Dog("tom",5);
    }
}
3.2.2 原生配置文件导入
公司的老项目可能是使用老的技术,所以还是用spring的xml配置文件,所以springboot不能识别这些配置文件。
这个时候我们考虑怎么把它转化成springboot的配置类
- 方法一:一点一点手写成@Bean注解的形式
- 方法二:使用@ImportResource注解
-
使用案例:
我们在resources文件夹下有一个bean.xml配置文件,可以在配置类中使用@ImportResource注解
@ImportResource("classpath:bean.xml")//把bean.xml导入
@Configuration
public class MyConfig {

}
3.2.3 配置绑定
①ConfigurationProperties
我们想要把一个properties中的信息注入到一个javaBean中
只需要在这个javaBean的类上加上@ConfigurationProperties(prex=“前缀”)注解,然后在类上加上@Component(加入容器)注解即可
-
properties文件(我们就是用springboot的application.properties)
mydog.name=tom mydog.age=8 -
javaBean类:使用ConfigurationProperties和@Component
@Component	//只有加入容器才能够使用这个功能
@ConfigurationProperties(prefix = "mydog")//去掉properties的前缀才能匹配上
public class Dog {
    private String name;
    private Integer age;
    。。。
}
②@EnableConfigurationProperties + @ConfigurationProperties
这种方法适用于Bean对象是第三方的,且类上没有@Component注解
- @EnableConfigurationProperties****这个注解使用在配置类上,因为配置类有@Configuration注解所以一定在容器中
- @EnableConfigurationProperties里面参数的值是想要开启自动配置功能的javaBean的class对象
- javaBean类需要加上@ConfigurationProperties,不用加上@Component
-
配置文件使用springboot的application.properties
mydog.name=tom mydog.age=8 -
javaBean类添加@ConfigurationProperties注解,去掉前缀
//可以不需要@Component注解了 @ConfigurationProperties(prefix = "mydog") public class Dog { private String name; private Integer age; 。。。 } -
配置类上使用@EnableConfigurationProperties注解
@Configuration @EnableConfigurationProperties(Dog.class)//想注入谁就传进谁的class对象 public class MyConfig { } -
然后就可以使用
@Autowired
Dog dog;
@RequestMapping("/Dog")
public Dog getDog(){
    return dog;
}
3.3 自动配置原理入门
3.3.1 引导加载自动配置类
说明:@SpringBootApplication是由下面这三个注解组合而成的
- @SpringBootConfiguration
- @EnableAutoConfiguration
- @ComponentScan
1)@SpringBootConfiguration
就是一个@Configuration,就是一个配置类。
所以main就是一个配置类
2)@EnableAutoConfiguration
也是一个合成注解,由@Import和@AutoConfigurationPackage合成
-
@AutoConfigurationPackage
- 本质就是一个@Import(导入组件)
- 但是不是导入一个组件,而是使用Registrar给容器批量导入一系列组件
- 所以他的功能就是:指定了默认的包规则(将main程序所在包下所有的组件导入进来)
-
@Import
他是实际执行导包动作的注解
1、利用getAutoConfigurationEntry(annotationMetadata);给容器中批量导入一些组件
2、调用List<String> configurations = getCandidateConfigurations(annotationMetadata, attributes)获取到所有需要导入到容器中的配置类
3、利用工厂加载 Map<String, List<String>> loadSpringFactories(@Nullable ClassLoader classLoader);得到所有的组件
4、从META-INF/spring.factories位置来加载一个文件。
	默认扫描我们当前系统里面所有META-INF/spring.factories位置的文件
    spring-boot-autoconfigure-2.3.4.RELEASE.jar包里面也有META-INF/spring.factories
5、文件里面写死了spring-boot一启动就要给容器中加载的所有配置类
3)@ComponentScan
就是来指定需要扫描哪些包(Spring注解版讲过)
@ComponentScan(excludeFilters = { @Filter(type = FilterType.CUSTOM, classes = TypeExcludeFilter.class),
		@Filter(type = FilterType.CUSTOM, classes = AutoConfigurationExcludeFilter.class) })
3.3.2 按需开启自动配置项
虽然我们127个场景的所有自动配置**启动的时候默认全部加载**。xxxxAutoConfiguration
但是最终会按照条件装配规则(@Conditional(这个注解上面说了)),按需配置。
3.3.3 按需修改默认配置
SpringBoot默认会在底层配好所有的组件。但是如果用户自己配置了以用户的优先
总结:
-
SpringBoot先加载所有的自动配置类 (xxxxxAutoConfiguration)
-
每个自动**配置类按照条件进行生效,默认都会绑定配置文件指定的值**。(xxxxProperties里面拿。xxxProperties和配置文件进行了绑定)
-
生效的配置类就会给容器中装配很多组件
-
只要容器中有这些组件,相当于这些功能就有了
-
定制化配置(两种方法)
-
- 方法一:用户直接自己@Bean替换底层的组件
- 方法二:用户去看这个组件是获取的配置文件什么值就去修改。
xxxxxAutoConfiguration —> 组件 —> xxxxProperties里面拿值 ----> application.properties
3.3.4 最佳实践
-
引入场景依赖
https://docs.spring.io/spring-boot/docs/current/reference/html/using.html#using.build-systems.starters
-
查看自动配置了哪些(可以不做)
- 自己分析,引入场景对应的自动配置一般都生效了
- 配置文件中debug=true开启自动配置报告。Negative(不生效)\Positive(生效)
-
是否需要定制化(三种)
-
参照文档修改配置:
https://docs.spring.io/spring-boot/docs/current/reference/html/application-properties.html#appendix.application-properties
自己分析。xxxxProperties绑定了配置文件的哪些。 -
自定义加入或者替换组件
@Bean、@Component…
-
自定义器 XXXXXCustomizer;
-
4.开发小技巧
4.1 Lombok(公司、多人合作一定不要用)
可以简化JavaBean的代码量
!!!在公司 或者 多人合作 的时候一定不要用!!!
-
pom.xml中添加依赖
<dependency> <groupId>org.projectlombokgroupId> <artifactId>lombokartifactId> dependency> -
IDEA中下载插件:lombok
-
直接使用
@Data注解:可以不让我们写Get、Set、ToString方法
@ToString注解:可以不让我们写ToString方法
@NoArgsConstructor注解:表示无参构造器
@AllArgsConstructor注解:表示全部参数构造器
===============================简化JavaBean开发===================================
@NoArgsConstructor
//@AllArgsConstructor
@Data
@ToString
@EqualsAndHashCode
public class User {

    private String name;
    private Integer age;

    private Pet pet;

    public User(String name,Integer age){
        this.name = name;
        this.age = age;
    }


}


================================简化日志开发===================================
@Slf4j
@RestController
public class HelloController {
    @RequestMapping("/hello")
    public String handle01(@RequestParam("name") String name){

        log.info("请求进来了....");

        return "Hello, Spring Boot 2!"+"你好:"+name;
    }
}
4.2 dev-tools
作用:如果我们项目启动的时候修改了静态页面,以前是需要重新启动服务器,现在按快捷键Ctrl+F9即可
    <dependency>
        <groupId>org.springframework.bootgroupId>
        <artifactId>spring-boot-devtoolsartifactId>
        <optional>trueoptional>
    dependency>
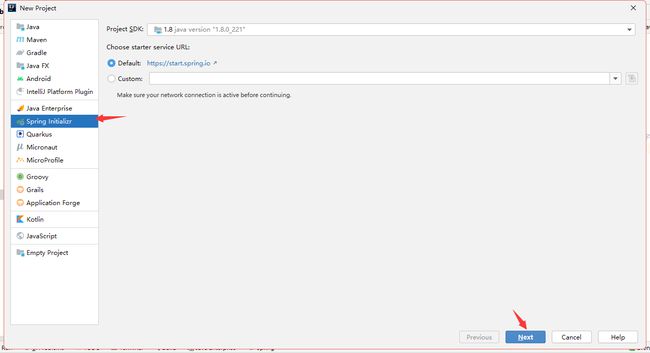
4.3 Spring Initailizr
可以快速创建SpringBoot应用,把依赖、项目结构、配置文件、主程序都创建好
- 点击创建新工程,选择Spring Initailizr
-
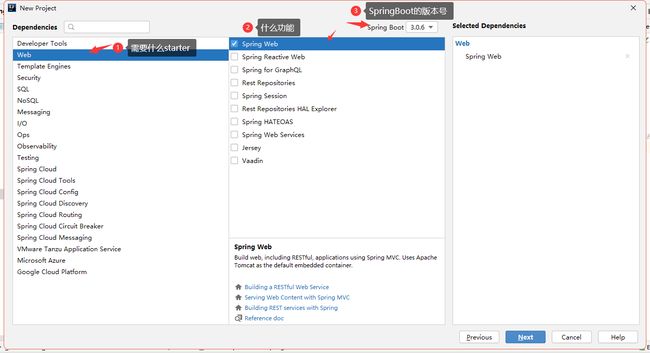
点击下一步,填好相关信息,然后下一步
-
然后选择项目需要的东西
二、Spring Boot2核心功能
1.配置文件
SpringBoot支持两种配置文件格式:properties、yaml
1.1 yaml简介
非常适合用来做以数据为中心的配置文件
1.2 yaml基本语法
- key: value(冒号和v之间有空格)
- 区分大小写
- 使用缩进表示层级关系
- 缩进的空格数不重要,只要相同层级的元素左对齐即可
- #表示注释
- 字符串不需要加引号(如果用了单引号,不会转义\,如果使用了双引号,会转义\)
1.3 数据类型
-
常规类型(例如:不可再拆分类型)
k: v -
对象类型(键值对的集合,例如:map、hash、set、object)
#写法一 student1: name: yfj age: 12 id: 201201042 #写法二 k: {k1: v1,k2: v2,k3: v3} -
数组类型(包括arry、list、queue)
#写法一
k:
   - v1
   - v2
   - v3
#写法二
k: {k1: v1,k2: v2,k3: v3}
1.4 示例
-
注入类
@Data //lombok的注解上面说过了 @Component //加入容器 @ConfigurationProperties(prefix="person")//和前缀是person的数据匹配 public class Person { private String userName; private Boolean boss; private Date birth; private Integer age; private Pet pet; private String[] interests; private List<String> animal; private Map<String, Object> score; private Set<Double> salarys; private Map<String, List<Pet>> allPets; } @Data public class Pet { private String name; private Double weight; } -
yaml配置文件(名字叫:application.yaml)
# yaml表示以上对象
person:
  userName: zhangsan
  boss: false
  birth: 2019/12/12 20:12:33
  age: 18
  pet:
    name: tomcat
    weight: 23.4
  interests: [篮球,游泳]
  animal:
    - jerry
    - mario
  score:
    english:
      first: 30
      second: 40
      third: 50
    math: [131,140,148]
    chinese: {first: 128,second: 136}
  salarys: [3999,4999.98,5999.99]
  allPets:
    sick:
      - {name: tom}
      - {name: jerry,weight: 47}
    health: [{name: mario,weight: 47}]
1.5 解决yaml不提示的问题
-
添加maven依赖
<dependency> <groupId>org.springframework.bootgroupId> <artifactId>spring-boot-configuration-processorartifactId> <optional>trueoptional> dependency> -
build标签中加入下面的配置
<configuration>
                    <excludes>
                        <exclude>
                            <groupId>org.springframework.bootgroupId>
                            <artifactId>spring-boot-configuration-processorartifactId>
                        exclude>
                    excludes>
                configuration>
2.web开发
2.1 SpringMVC自动配置概览
SpringBoot提供了很多自动的配置大多场景我们都无需自定义配置,但是我们需要知道到底做了哪些自动化配置
- 内容协商视图解析器和BeanName视图解析器
- 静态资源(之前需要配置)
- 自动注册
- 静态index.html 页支持
- 自定义
Favicon(页面左上角的小图标)
2.2 简单功能分析
2.2.1 静态资源访问
-
静态资源目录
类路径下(也就是resources路径下):/static 或者 /public 或者 /resources 或者/META-INF/resources
-
静态资源访问:IP地址:端口号/静态资源名
例如:访问/static下面的hello.jpg
地址:localhost:8080/hello.jpg
-
原理:
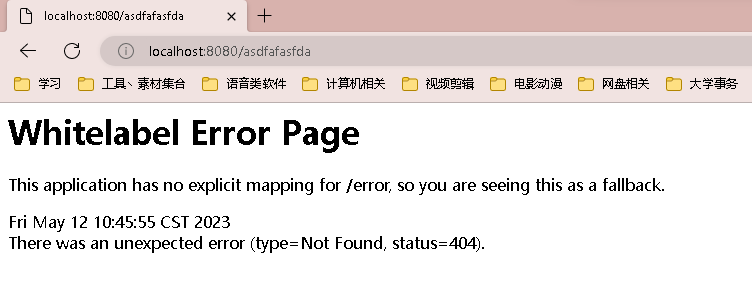
请求进来,先去找Controller看能不能处理。不能处理的所有请求又都交给静态资源处理器。静态资源也找不到则响应404页面
案例:
- /static下面有hello.jpg图片,控制器中有一个请求路径也是/hello.jpg,所以他会先去找controller
- 如果controller中没有/hello.jpg请求路径,就会去找/static下面有hello.jpg图片
-
改变默认静态资源路径(一般不用):
spring:
  resources:
    static-locations: [classpath:/包名/]
    #这个包是在resources包下
2.2.2 静态资源前缀(建议使用)
如果按上面的原理中的做法,可能会导致冲突,所以我们一般都给静态资源加一个前缀,从而保证每一个请求地址都不会冲突
-
在配置文件中配置下面的信息
spring: mvc: static-path-pattern: /res/** #/res是前缀,/**表示拦截所有请求 -
访问路径:ip地址:端口号/前缀/资源名
例如:/static下面的hello.jpg
路径:localhost:8080/res/hello.jpg
2.2.3 欢迎页支持
-
方式一:静态资源路径下:index.html
可以配置静态资源路径,但是不可以配置静态资源的访问前缀。否则导致 index.html不能被默认访问
-
方式二:编写controller能处理/index请求
2.2.4 页面小图标
浏览器标签左上角的小图标
-
图标的名字一定要叫:favicon.ico
-
图片放在静态路径下
-
页面前缀会导致这个功能失效
spring:
#  mvc:
#    static-path-pattern: /res/**   这个会导致 Favicon 功能失效
2.2.5 静态资源配置原理
-
SpringBoot启动默认加载 xxxAutoConfiguration 类(自动配置类)
-
SpringMVC功能的自动配置类 WebMvcAutoConfiguration,生效
@Configuration(proxyBeanMethods = false) @ConditionalOnWebApplication(type = Type.SERVLET) @ConditionalOnClass({ Servlet.class, DispatcherServlet.class, WebMvcConfigurer.class }) @ConditionalOnMissingBean(WebMvcConfigurationSupport.class) @AutoConfigureOrder(Ordered.HIGHEST_PRECEDENCE + 10) @AutoConfigureAfter({ DispatcherServletAutoConfiguration.class, TaskExecutionAutoConfiguration.class, ValidationAutoConfiguration.class }) public class WebMvcAutoConfiguration {} -
给容器中配了什么
@Configuration(proxyBeanMethods = false) @Import(EnableWebMvcConfiguration.class) @EnableConfigurationProperties({ WebMvcProperties.class, ResourceProperties.class }) @Order(0) public static class WebMvcAutoConfigurationAdapter implements WebMvcConfigurer {} -
配置文件的相关属性和xxx进行了绑定。WebMvcProperties==spring.mvc、ResourceProperties==spring.resources
2.3 请求参数处理
2.3.1 开启Rest风格(选择性开启)
SpringBoot的starter-web虽然默认导入了SpringMVC,但是默认没有开启Rest风格,所以需要手动开启
-
yaml配置文件中添加下面的配置
spring: mvc: hiddenmethod: filter: enabled: true #开启页面表单的Rest功能 -
测试:
表单的提交方式是post,添加隐藏域,隐藏域的名字是_method,value是相关方法
controller的@RequestMapping的value是请求地址,然后method是RequestMethod.相关方法(或者使用派生注解@GetMapping、@DeleteMapping)
-
前端代码
<form action="/user" method="post"> <input name="_method" type="hidden" value="DELETE"> <input value="DELETE 提交方式" type="submit"/> form> -
后端代码
@RequestMapping(value = "/user",method = RequestMethod.DELETE)
public String testDELETE(){
    return "测试DELETE";
}
-
-
Rest原理(表单提交要使用REST的时候)
- 表单提交会带上**_method=PUT**
- 请求过来被HiddenHttpMethodFilter拦截
-
- 请求是否正常,并且是POST
-
-
- 获取到**_method**的值
- 然后把值都转为大写
- 再判断是不是再下面这些类型中PUT、DELETE、PATCH
- 原生request(使用post),使用包装模式requesWrapper重写了getMethod方法,返回的是传入的值(_method的值)。
- 过滤器链放行的时候用wrapper。以后的方法调用getMethod是调用requesWrapper的。
-
-
说明:
-
开启Rest风格只是针对于表单
-
如果使用Rest客户端工具:例如PostMan直接发送put、delete等请求,无需Filter
-
所以选择性开启
-
-
扩展知识
问题:是否可以把_method改为我们自己想要的
解决方法:可以自己在配置类中,配置一个HiddenHttpMethodFilter,设置参数MethodParam为自己想要的即可,以后想要的隐藏域的名字就可以使用自己的
@Configuration
public class MyConfig {

    @Bean
    public HiddenHttpMethodFilter hiddenHttpMethodFilter(){
        HiddenHttpMethodFilter hiddenHttpMethodFilter = new HiddenHttpMethodFilter();
        hiddenHttpMethodFilter.setMethodParam("method");
        return hiddenHttpMethodFilter;
    }
}
2.3.2 请求映射原理
对SpringMVC的功能分析都从doDispatch开始
总结:所有的请求映射都在HandlerMapping中
-
SpringBoot自动配置欢迎页的HandlerMapping中。访问 / 能访问index.html
-
SpringBoot自动配置了默认的RequestMappingHandlerMapping
-
请求进来,挨个尝试所有的HandlerMapping,看是否有请求信息
①如果有就找到对应的handler
②如果没有就找下一个HandlerMapping
-
如果我们需要一些自定义的映射处理,我们可以自己给容器中放HandlerMapping。自定义 HandlerMapping
2.3.3 SpringMVC可以接收的参数类型
可以去看SpringMVC笔记
-
普通参数与基本注解
@PathVariable(获取请求参数)、@RequestHeader(获取请求头)、@ModelAttribute、@RequestParam(获取请求参数)、@MatrixVariable、@CookieValue、@RequestBody(获取请求体[post方式])、@RequestAttribute(获取域中的信息)
@RestController public class ParameterTestController { // car/2/owner/zhangsan @GetMapping("/car/{id}/owner/{username}") public Map<String,Object> getCar(@PathVariable("id") Integer id, @PathVariable("username") String name, @PathVariable Map<String,String> pv, @RequestHeader("User-Agent") String userAgent, @RequestHeader Map<String,String> header, @RequestParam("age") Integer age, @RequestParam("inters") List<String> inters, @RequestParam Map<String,String> params, @CookieValue("_ga") String _ga, @CookieValue("_ga") Cookie cookie){ Map<String,Object> map = new HashMap<>(); // map.put("id",id); // map.put("name",name); // map.put("pv",pv); // map.put("userAgent",userAgent); // map.put("headers",header); map.put("age",age); map.put("inters",inters); map.put("params",params); map.put("_ga",_ga); System.out.println(cookie.getName()+"===>"+cookie.getValue()); return map; } @PostMapping("/save") public Map postMethod(@RequestBody String content){ Map<String,Object> map = new HashMap<>(); map.put("content",content); return map; } //1、语法: 请求路径:/cars/sell;low=34;brand=byd,audi,yd //每个 / 中间的东西是一个整体,例如/boss/1;age=20;/2;age=40 这是传了两个:1号boss年龄等于20,2号boss年龄等于40 //2、SpringBoot默认是禁用了矩阵变量的功能,需要手动开启 // @Bean // public WebMvcConfigurer webMvcConfigurer(){ // return new WebMvcConfigurer() { // @Override // public void configurePathMatch(PathMatchConfigurer configurer) { // UrlPathHelper urlPathHelper = new UrlPathHelper(); // urlPathHelper.setRemoveSemicolonContent(false); // configurer.setUrlPathHelper(urlPathHelper); // } // }; // } //3.直接在路径中写具体的路径会报错,需要使用{path} //作用:使用url重写,在cookie被禁用的时候,传递sesson @GetMapping("/cars/{path}") public Map carsSell(@MatrixVariable("low") Integer low, @MatrixVariable("brand") List<String> brand, @PathVariable("path") String path){ Map<String,Object> map = new HashMap<>(); map.put("low",low); map.put("brand",brand); map.put("path",path); return map; } // /boss/1;age=20/2;age=10 @GetMapping("/boss/{bossId}/{empId}") public Map boss(@MatrixVariable(value = "age",pathVar = "bossId") Integer bossAge, @MatrixVariable(value = "age",pathVar = "empId") Integer empAge){ Map<String,Object> map = new HashMap<>(); map.put("bossAge",bossAge); map.put("empAge",empAge); return map; } } -
Servlet API
WebRequest、ServletRequest、MultipartRequest、 HttpSession、javax.servlet.http.PushBuilder、Principal、InputStream、Reader、HttpMethod、Locale、TimeZone、ZoneId
-
复杂参数
Map、**Model(map、model里面的数据会被放在request的请求域[request.setAttribute])、**Errors/BindingResult、RedirectAttributes( 重定向携带数据)、ServletResponse(response)、SessionStatus、UriComponentsBuilder、ServletUriComponentsBuilder
Map<String,Object> map, Model model, HttpServletRequest request 都是可以给request域中放数据, request.getAttribute(); -
自定义对象参数(自己建的类)
可以自动类型转换与格式化,可以级联封装。
/**
 *     姓名:

 *     年龄:

 *     生日:

 *     宠物姓名:

 *     宠物年龄:
 */
@Data
public class Person {

    private String userName;
    private Integer age;
    private Date birth;
    private Pet pet;

}

@Data
public class Pet {

    private String name;
    private String age;

}

result
自定义Converter
问题需要:我们传进参数的时候,不是用级联赋值(pet.name),而是直接直接传进宠物的所有信息(name1,age1)
问题解决:
写一个配置类(使用@Configer),然后写一个方法,返回值是WebMvcConfigurer,返回的对象是new WebMvcConfigurer(),重写里面的方法
//1、WebMvcConfigurer定制化SpringMVC的功能
@Bean
public WebMvcConfigurer webMvcConfigurer(){
    return new WebMvcConfigurer() {
        @Override
        public void configurePathMatch(PathMatchConfigurer configurer) {
            UrlPathHelper urlPathHelper = new UrlPathHelper();
            // 不移除;后面的内容。矩阵变量功能就可以生效
            urlPathHelper.setRemoveSemicolonContent(false);
            configurer.setUrlPathHelper(urlPathHelper);
        }

        @Override
        public void addFormatters(FormatterRegistry registry) {
            registry.addConverter(new Converter<String, Pet>() {

                @Override
                public Pet convert(String source) {
                    // 啊猫,3
                    if(!StringUtils.isEmpty(source)){
                        Pet pet = new Pet();
                        String[] split = source.split(",");//说明以,分割
                        pet.setName(split[0]);//名字是分割的第一个
                        pet.setAge(Integer.parseInt(split[1]));
                        return pet;
                    }//age是分割的第二个值
                    return null;
                }
            });
        }
    };
}
2.3.4 参数请求原理
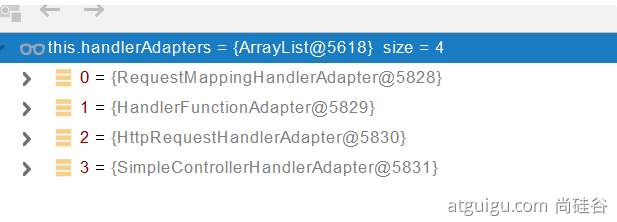
首先从HandlerMapping中找到能处理请求的Handler(也就是Controller中的哪个方法)
为这个Handler找一个适配器(HandlerAdapter)
然后利用找到的HandlerAdapter执行目标方法(ha.handle是Dispatched里面的)
执行目标方法的时候会设置参数解析器(26个),用来确定将要执行的目标方法每一个参数的值是什么
参数解析器会判断是否支持这种参数,如果支持就调用解析方法
执行目标方法
然后调用返回值处理器
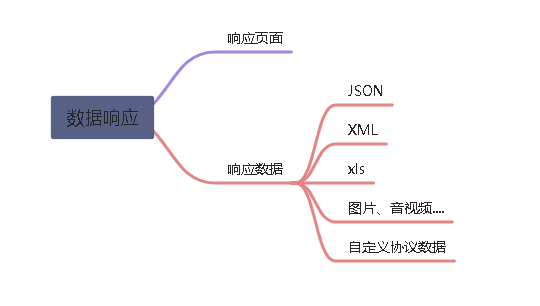
2.4 数据响应与内容协商
前端发送了个请求,需要资源,后端给他返回过去
2.4.1 响应json
2.4.1.1 jackson.jar+@ResponseBody
-
必须引入Starter-web开发场景,会自动引入json包
-
然后在控制器(@Controller)的方法或者类上加上@ResponseBody,然后直接把对象返回
@ResponseBody
@RequestMapping(value = "/user")
public Person returnPerson(){
    Person person = new Person();
    person.setName("yfj");
    person.setAge(12);
    return person;
}
2.4.1.2 HTTPMessageConverter原理
看是否支持将此Class类型的对象,转化为MediaType类型的数据
例子:Person对象转为json。或者Json转为Person
2.4.2 响应内容协商
根据客户端接收能力不同,返回不同媒体类型的数据
例如:网页需要接收json数据,app需要接收xml数据
网页的请求头中的accpet就是告诉服务器我可以接收什么数据
-
导入依赖
<dependency> <groupId>com.fasterxml.jackson.dataformatgroupId> <artifactId>jackson-dataformat-xmlartifactId> dependency> -
基于请求头的内容协商原理
- 判断当前响应头中是否已经有确定的媒体类型。MediaType
- 获取客户端可以接收的内容类型(获取客户端请求头的accept字段)
- 获取我们可以发送出去的数据类型
- 遍历循环当前系统的所有 MessageConverter,看谁支持要发送的这个对象
- 找到支持操作对象的converter,把converter支持的媒体类型统计出来。
- 客户端需要【application/xml】。服务端能力【10种、json、xml】
-
基于请求参数的内容协商原理
浏览器发送的参数中有format参数
例如:地址?format=json
只需要开启请求配置
spring:
    contentnegotiation:
      favor-parameter: true  #开启请求参数内容协商模式
2.4.3 自定义MessageConverter
情景需要:
- 如果浏览器发送请求返回xml
- 如果是ajax请求 返回json
- 如果app发送请求,返回自定义协商数据
-
给容器中添加一个WebMvcConfigurer
@Bean public WebMvcConfigurer webMvcConfigurer(){ return new WebMvcConfigurer() { @Override public void extendMessageConverters(List<HttpMessageConverter<?>> converters) { } } } -
编写自定义的Converter类,继承HttpMessageConverter
-
重写方法
2.5 视图解析与模板引擎
SpringBoot默认不支持jsp
2.5.1 Thymeleaf
2.5.1.1 基本语法
-
${ }:获取参数(默认获取的是request域中的值,如果获取session域中的参数需要使用这个格式:session.参数名)
-
@{ }:生成链接(会自动加上项目名)
-
[ [ ${ } ] ]:双中括号可以让th:在html的标签外面使用
-
想给前端标签的什么属性赋值前面加th:即可
例如://用接收过来的link覆盖了原来的href
-
因为解析器的路径是templates,如果你的页面在这个路径下的某个包里,在控制器返回的时候只需要返回包名和页面名
例如:templates/table包下有hello.html界面
控制器中返回:return “table/hello”;
2.5.1.2 抽取页面公共部分
-
创建一个公共的html页面作为被其他界面引用的页面
-
将公共的部分放到公共的html页面中
-
公共页面加上th的空间,然后将公共部分的路径使用th:和@{ }代替
@{ }:里面的资源路径最前面需要加/
-
哪里是公共的就在最外层标签加上th:fragment标签,然后起一个名字
例如:
整个页面都是公共的,就在body标签中加
<body th:fragment="commonbody">如果有一部分是部分页面需要的,就在那一部分的外面加一个标签给这一部分包起来
<div th:fragment="bufen"> 部分公共内容 div> -
然后其他页面引用需要部分即可
例如:例如common.html是公共页面,有一个fragment的名字是f1,需要被一个页面引用
<div th:replace=“common :: f1”>div>
2.5.1.3 遍历数据
<table>

    <tr th:each="n1:${arry1}">

        <td th:text="${n1.username}">td>
        <td th:text="${n1.password}">td>
    tr>
table>
说明:如果需要显示数据是第几个,可以在n1后面加上一个stats
然后遍历stats.count
<table>
    <tr th:each="n1,stats:${session.users}">
        <td th:text="${stats.count}">td>
        <td th:text="${n1.userName}">td>
        <td th:text="${n1.password}">td>
    tr>
table>
2.5.1.4 基本使用过程
-
添加Thymeleaf依赖
<dependency> <groupId>org.springframework.bootgroupId> <artifactId>spring-boot-starter-thymeleafartifactId> dependency> -
前端页面放到templates文件夹下
-
前端页面添加名称空间(在html标签里面)
xmlns:th="http://www.thymeleaf.org" -
控制器跳转页面(不需要前后缀)
@Controller public class TestController { @RequestMapping("/success") public String goSuccess(Model model){ model.addAttribute("name","yfj"); model.addAttribute("age", 12); return "success";//thymeleaf解析器不需要加前后缀 } } -
跳转页面接收信息
姓名:<input type="text" th:value="${name}">
年龄:<input type="text" th:value="${age}">
2.5.2 Thymeleaf和控制器的使用
创建登录页面和主界面,如果登录成功跳转到主界面,否则调回去
-
前端页面
<label th:text="${msg}">label> <form th:action="@{/go}" method="post"> 用户名:<input type="text" name="userName"> 密码:<input type="password" name="password"> <input type="submit"> form><body> 登录成功 用户名[[${session.userName}]] body> -
后端控制器
@Controller
public class TestController {
    //如果访问 / 或者访问 /login 则跳转到登录界面
    @RequestMapping(value = {"/","/login"})
    public String index(){
        return "login";
    }

    //获取表单信息,如果用户名和密码为空则不让登录,否则登录成功
    @RequestMapping("/go")
    public String login(User user, Model model, HttpSession session){
        if (user.getUserName()!=null && user.getPassword().equals("123456")){
            session.setAttribute("userName",user.getUserName());
            return "redirect:/success.html";//因为有后缀无法被thymeleaf解析,所以会被Dispatched拦截,然后在当作控制器的请求地址
        }else{
            model.addAttribute("msg","用户名和密码不能为空");
            return "login";
        }
    }
    //上面的请求请求到这里
    @RequestMapping("/success.html")
    public String flush(){
            return "success";
    }
}
2.5.4 视图解析原理分析
-
Thymeleaf解析器
- 会检查有没有前缀(forward、redirect),有就创建对应的对象
- 如果返回值是一个普通字符串,会调用thymeleaf解析器对象
2.6 拦截器
拦截器的作用:用来登录检查(使用perHandler)
SpringMVC提供的拦截器的三种方法:perHandler(目标方法处理之前)、postHandler(目标方法执行之后)、afterCompletion(页面处理完成之后)
2.6.1 登录检查案例
-
创建一个interceptor包,然后创建一个XXXInterceptor类
-
实现HandlerInterceptor接口
-
重写preHandler方法
-
获取session对象,判断里面是否有登录的用户,如果用户不等于什么条件,就放行(返回true),否则拦截(返回false)
-
创建配置类加上@Configuration注解,实现WebMvcConfigurer接口
-
配置类中重写addInterceptors方法,调用参数中registry对象的addInterceptor方法
-
addInterceptor方法中new一个我们写的拦截器
-
然后接着调用addPathPatterns方法设置拦截的路径
-
然后接着调用excludePathPatterns方法设置放行的路径(一部分页面和静态资源)
-
Interceptor类
public class TestInterceptor implements HandlerInterceptor { @Override public boolean preHandle(HttpServletRequest request, HttpServletResponse response, Object handler) throws Exception { //如果登录了就不拦截 HttpSession session = request.getSession(); if (session.getAttribute("userName")!=null){//登录成功的用户名放到session域里面了 return true; } //如果没有登录就进行拦截 request.setAttribute("msg","请先登录!!!"); request.getRequestDispatcher("/").forward(request,response); return false; } } -
Configuration
@Configuration
public class MyConfig  implements WebMvcConfigurer {
    @Override
    public void addInterceptors(InterceptorRegistry registry) {
        registry.addInterceptor(new TestInterceptor())
                .addPathPatterns("/**")//设置拦截路径  /**表示所有路径(包括静态资源)
                .excludePathPatterns("/","/login","/css/**","/js/**"); //放行的请求路径
        //访问首页、登录发送的请求也要放行
        //【因为静态文件实在static下面的所以直接/包名就可以了】
    }
}
2.6.2 拦截器原理
-
根据当前请求,找到HandlerExecutionChin【可以处理请求的handler以及handler的所有拦截器】
-
先来顺序执行所有拦截器的preHandler方法
- 如果当前拦截器preHandler为true则执行下一个拦截器的perHandler
- 如果返回为false,直接倒序执行所有已经执行了的atterCompletion
-
如果任何一个拦截器返回false,直接跳出,不执行方法
-
所有拦截器都返回true,执行方法
-
倒序执行所有拦截器的postHandler方法
-
前面的步骤有任何异常都会直接触发atterCompletion
2.7 文件上传
文件上传要用post请求
2.7.1 上传表单的写法
<form method="post" th:action="@{/file}" enctype="multipart/form-data">
    <input type="file" name="file"><br>
    <input type="file" name="files" multiple><br>
    <input type="submit" value="提交">
form>
2.7.2 控制器的用法
//跳转到表单页面
@GetMapping("/load")
public String upload(){
    return"File/fieldUpload";//thymeleaf自动解析到templates/  所以跳转静态页面不需要/
}

/**
 * 处理表单提交的信息
 * MultipartFile 会自动封装上传的单个文件
 * MultipartFile [] 会自动封装上传的多文件
 * @param file
 * @param files
 * @return
 */
@PostMapping("/file")
public String field(@RequestParam("file") MultipartFile file,
                    @RequestParam("files") MultipartFile[] files) throws IOException {

    System.out.println("单文件的大小:"+file.getSize());
    System.out.println("多文件的数量:"+files.length);

    //将文件保存到本地
    if (!file.isEmpty()){//如果文件不为空,就保存
        String originalFilename = file.getOriginalFilename();//原始文件名
        file.transferTo(new File("C:\\Users\\17716\\Desktop\\"+originalFilename));//名字可以使用uuid
    }

    if (files.length>0){//判断数组里面有没有东西
        for (MultipartFile multipartFile : files) {
            if (!multipartFile.isEmpty()){//判断每个文件是否有东西
                String originalFilename = multipartFile.getOriginalFilename();
                multipartFile.transferTo(new File("C:\\Users\\17716\\Desktop\\"+originalFilename));
            }
        }
    }
    return "redirect:/success.html";
}
2.7.3 自定义文件上传大小
单个文件默认最大1M,总文件默认最大10M
可以在springboot的xml或者yaml中配置
#设置单文件大小
spring.servlet.multipart.max-file-size=10MB
#设置总文件大小
spring.servlet.multipart.max-request-size=100MB
2.7.4 源码分析
文件上传自动配置类-MultipartAutoConfiguration-MultipartProperties
-
自动配置好了 StandardServletMultipartResolver 【文件上传解析器】
-
原理步骤
- 请求进来使用文件上传解析器判断并封装文件上传请求
- 参数解析器来解析请求中的文件内容封装成MultipartFile
- 将request中文件信息封装为一个Map;
2.8 异常处理
2.8.1 默认规则
SpringBoot提供了/error处理所有的错误映射
2.8.2 定义默认错误页面
因为我们有自己的错误页模板,不需要springboot提供的,所以我们可以自定义错误模板
只需要在static文件夹或者templates文件夹下创建error文件夹即可
-
创建error文件夹(在templates或者static文件夹下)
-
将页面命名为错误码(或者4XX)
以错误码命名:如果出现对应的错误码,就会跳转这个界面
以XX命名(4XX、5XX):表示所有以4开头的错误码,都会跳转到这个界面
-
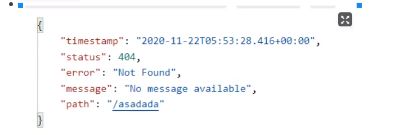
错误页面显示错误的相关信息
可以取的值就是上面第一张图片里面的(只要json有就可以取出来)【上面图片中的只是一部分】
2.8.3 异常处理自动配置【源码分析】
如果想要返回页面:就会找error视图【StaticView】(默认是springboot显示的)
-
在容器中放入了一个DefaultErrorAttributes类型的组件,id为errorAttributes(定义错误页面中可以包含哪些数据)
-
在容器中又放了一个BasicErrorController组件,id为basicErrorController( 处理默认/error路径的请求)
如果配置文件中配置了server.error.path,就会处理这个路径的请求
-
然后控制器有两个处理方法,可以根据请求的方式(浏览器 或 其他客户端)返回对应的数据(ModelAndView 或 json数据)
-
在容器中又放了一个View组件,id为error
-
在容器中又放了一个BeanNameViewResolver组件,他会按照返回的视图名作为组件的id去容器中找View对象
-
在容器中又放了一个DefaultErrorViewResolver(用来判断我们是否在error文件夹下放置了对应错误码的页面)
2.8.4 异常处理执行流程【源码分析】
-
执行目标方法,目标方法运行期间有任何异常都会被catch,而且标识当前请求结束,并且用dispatchException
-
进入视图解析:方法的参数中会接收mv,dispatchException。
-
处理handler发生的异常,处理完成后返回ModelAndView
-
遍历所有的handlerExceptionResolvers。看谁能处理当前异常
-
DefaultErrorAttributes先来处理异常。把异常信息保存到request域,并且返回null
-
默认没有任何人能处理异常,所以异常会被抛出
如果没有任何人能处理最终底层就会发送 /error 请求。会被底层的BasicErrorController处理
解析错误视图,遍历所有的 ErrorViewResolver看谁能解析
默认的 DefaultErrorViewResolver ,作用是把响应状态码作为错误页的地址,error/500.html
模板引擎最终响应这个页面error/500.html
-
2.8.5 定制错误处理逻辑(6种方式)
2.8.5.1 自定义错误页
看笔记的2.8.2
2.8.5.2 @ControllerAdivce+@ExceptionHandler处理全局异常
作用是处理整个web Controller的异常
推荐使用这个方法
-
创建一个exception包,创建一个类,加上@ControllerAdvice注解
-
编写方法处理特定异常,返回值是视图地址(方法上要加@ExceptionHandler注解)
例如:处理数学运算 和 空指针异常
@ControllerAdvice
public class TestException {

    @ExceptionHandler({ArithmeticException.class,NullPointerException.class})//标识可以处理数学运算和空指针异常
    public String handlerAr(Exception e){//可以不写参数
        System.out.println(e);
        return "login";//跳转到页面
    }
}
2.8.5.3 @ResponseStatus+自定义异常
会把@ResponseStatus注解的信息拿过来,调用/error请求(也就是调用2.8.2中自己写的异常界面,没有写就会用springboot自己的)
-
创建一个自定义异常类,继承RuntimeException
-
给异常类加上@ResponseStatus注解,注解的value属性是我们想给的状态码
-
然后我们的控制器抛出这个异常就可以
<!--自定义异常--> @ResponseStatus(value = HttpStatus.FORBIDDEN,reason = "用户数量太多") public class myException extends RuntimeException{ public myException() { } public myException(String message) { super(); } }<!--测试异常的控制器--> @GetMapping("/test") public String testException(HttpSession session){ List users = (List) session.getAttribute("users"); if (users.size()>3){ throw new myException("用户数量太多");//直接就会进入错误界面【如果自己写了4xx,5xx就会进入自己的】,不会在进行下面的行为 } return "login"; }<body> <h1 th:text="${status}"/> body>
2.8.5.4 Spring底层的异常
如:参数类型转换异常,SpringBoot会自动帮我们处理(跳转到一个错误界面)
2.8.5.5 自定义实现HandlerExceptionResolver处理异常
-
创建一个类,实现HandlerExceptionResolver接口
-
类上添加@Component注解
-
实现resolveException方法(可以返回一个ModelAndView或者response.sendError(自定义错误码,“错误原因”))
-
然后类上添加@Order注解设置优先级
@Order(value = Ordered.HIGHEST_PRECEDENCE)//优先级,数字越小,优先级越高
@Component
public class CustomException implements HandlerExceptionResolver {
    @Override
    public ModelAndView resolveException(HttpServletRequest request, HttpServletResponse response, Object handler, Exception ex) {

        try {
            response.sendError(520,"我爱自定义异常");//调用这个方法,会将error请求转给controller
        } catch (IOException e) {
            e.printStackTrace();
        }
        return new ModelAndView();
    }
}
2.8.5.6 ErrorViewResolver实现自定义处理异常
response.sendError方法的error请求会转给controller
你的异常没有任何人能够处理,tomcat底层response.sendError的error请求会转给controller
basicErrorController 要去的也买你地址是ErrorViewResolver
2.9 Web原生组件注入(Servlet、Filter、Listener)
以前是配置在web.xml中
2.9.1 方式一:使用Servlet API【推荐使用这种方式】
@ServletComponentScan:扫描原生组件
@WebServlet:声明这是一个Servlet,没有Spring的拦截器(因为没有走DispatcherServlet)
@WebFilter:声明这是一个过滤器(urlPatterns:是需要拦截的路径)【单星是servlet的写法,双星是spring的写法】
@WebListener:声明这是一个监听器
2.9.1.1 添加原生Servlet
-
创建Servlet,继承HttpServlet
-
类上添加@WebServlet注解(urlPatterns属性是能处理的请求)
-
重写doGet方法
-
在SpringBoot主类中添加@ServletComponentScan(basePackages=“需要扫描的包”)注解
@WebServlet(urlPatterns = "/testServlet") public class TestServlet extends HttpServlet { @Override protected void doGet(HttpServletRequest req, HttpServletResponse resp) throws ServletException, IOException { resp.getWriter().write("成功在SpringBoot中使用了原生Servlet"); } }@ServletComponentScan(basePackages = "love.junqing.springbootstudy02.controller") @SpringBootApplication public class Springbootstudy02Application { public static void main(String[] args) { SpringApplication.run(Springbootstudy02Application.class, args); } }
2.9.1.2 添加原生Filter
-
编写一个过滤器类,实现Filter接口
-
重写接口的方法
-
添加注解@WebFilter(urlPatterns是拦截路径)
-
在SpringBoot主类中添加@ServletComponentScan(basePackages=“需要扫描的包”)注解
@WebFilter(urlPatterns = {"/css/*","/testServlet"}) //urlPattern是需要拦截的资源、路径[*是servlet写法,**是Spring写法]
public class TestFilter implements Filter {
    @Override
    public void init(FilterConfig filterConfig) throws ServletException {

    }

    @Override
    public void doFilter(ServletRequest servletRequest, ServletResponse servletResponse, FilterChain filterChain) throws IOException, ServletException {
        System.out.println("已经拦截到了");
        filterChain.doFilter(servletRequest,servletResponse);//放行请求
    }

    @Override
    public void destroy() {

    }
}
2.9.1.3 添加原生Linster
-
实现ServletContextListener接口
-
添加@WebListener注解
-
重写方法
-
在SpringBoot主类中添加@ServletComponentScan(basePackages=“需要扫描的包”)注解
@WebListener
public class TestLinster implements ServletContextListener {
    @Override
    public void contextInitialized(ServletContextEvent sce) {
        System.out.println("监听到项目初始化完成");
    }

    @Override
    public void contextDestroyed(ServletContextEvent sce) {
        System.out.println("监听到项目销毁");
    }
}
2.9.2 方式二:使用RegistrationBean
直接在配置类种注册相关组件
ServletRegistrationBean,FilterRegistrationBean,ServletListenerRegistrationBean主类不需要加@ServletComponentScan注解
@Configuration
public class MyRegistConfig {

    @Bean
    public ServletRegistrationBean myServlet(){
        MyServlet myServlet = new MyServlet();//上面写好的servlet(不需要WebServlet注解 )

        return new ServletRegistrationBean(myServlet,"/my","/my02");//访问路径
    }


    @Bean
    public FilterRegistrationBean myFilter(){

        MyFilter myFilter = new MyFilter();
//        return new FilterRegistrationBean(myFilter,myServlet());
        FilterRegistrationBean filterRegistrationBean = new FilterRegistrationBean(myFilter);
        filterRegistrationBean.setUrlPatterns(Arrays.asList("/my","/css/*"));//需要拦截的路径
        return filterRegistrationBean;
    }

    @Bean
    public ServletListenerRegistrationBean myListener(){
        MySwervletContextListener mySwervletContextListener = new MySwervletContextListener();
        return new ServletListenerRegistrationBean(mySwervletContextListener);
    }
}
2.10 嵌入式Servlet容器
原理:
- SpringBoot应用启动发现当前是Web应用。web场景包-导入tomcat
- web应用会创建一个web版的ioc容器
ServletWebServerApplicationContextServletWebServerApplicationContext启动的时候寻找ServletWebServerFactory(Servlet 的web服务器工厂—> 会产生Servlet 的web服务器)- SpringBoot底层默认有很多的WebServer工厂:
TomcatServletWebServerFactory,JettyServletWebServerFactory,UndertowServletWebServerFactory- 底层直接会有一个自动配置类。
ServletWebServerFactoryAutoConfigurationServletWebServerFactoryAutoConfiguration导入了ServletWebServerFactoryConfiguration(配置类)ServletWebServerFactoryConfiguration 配置类 根据动态判断系统中到底导入了那个Web服务器的包。(默认是web-starter导入tomcat包),容器中就有 TomcatServletWebServerFactoryTomcatServletWebServerFactory 创建出Tomcat服务器并启动;TomcatWebServer的构造器拥有初始化方法initialize---this.tomcat.start();内嵌服务器,就是手动把启动服务器的代码调用(tomcat核心jar包存在)
2.10.1 切换嵌入式Servlet容器
-
先排除tomcat服务器
<dependency> <groupId>org.springframework.bootgroupId> <artifactId>spring-boot-starter-webartifactId> <exclusions> <exclusion> <groupId>org.springframework.bootgroupId> <artifactId>spring-boot-starter-tomcatartifactId> exclusion> exclusions> dependency> -
引入其他服务器的依赖(例如:undertow服务器)
<dependency>
    <groupId>org.springframework.bootgroupId>
    <artifactId>spring-boot-starter-undertowartifactId>
dependency>
2.10.2 定制Servlet容器
2.11 定制化原理
2.11.1 定制化的常见方式
2.11.1.1 方式一:使用@Bean+自定义配置类
替换、增加容器种的默认组件
例如:视图解析器
2.11.1.2 方式二:修改配置文件
2.11.1.3 方式三:XXXCustomizer
2.11.1.4 方式四:配置类实现WebMvcConfigurer实现定制化web功能
2.11.2 原理分析套路
场景starter - xxxxAutoConfiguration - 导入xxx组件 - 绑定xxxProperties – 绑定配置文件项
3.数据访问(MyBatis、Redis)
3.1 SQL
3.1.1数据源的自动配置
-
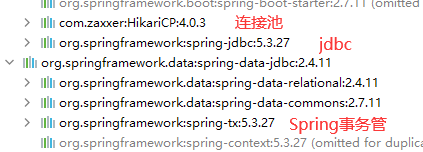
导入JDBC场景依赖(没有导入数据库驱动)
<dependency>
    <groupId>org.springframework.bootgroupId>
    <artifactId>spring-boot-starter-data-jdbcartifactId>
dependency>
为什么没有导入数据库驱动?
因为官方不知道我们具体使用什么数据库
-
导入MySQL驱动【官方已经给了默认版本】
说明:
-
SpringBoot底层给了默认的版本仲裁
-
但是我们的Mysql版本还是要和驱动版本对应
需要修改版本:
-
方法一:直接引入依赖的具体版本
-
方法二:直接修改pom.xml中properties标签的版本
<properties>
    <java.version>1.8java.version>
    <mysql.version>5.1.49mysql.version>
properties>
<dependency> <groupId>mysqlgroupId> <artifactId>mysql-connector-javaartifactId> <version>5.1.49version> dependency> -
-
分析自动配置
-
自动配置的类
DataSourceAutoConfiguration——数据源的自动配置它说明了:
- 如果需要修改数据源的相关信息,只需要修改**spring.datasource**
DataSourceTransactionManagerAutoConfiguration——事务管理器JdbcTemplateAutoConfiguration——jdbcTempalte的自动配置(数据库进行原生crud)它说明了:
- 如果需要修改jdbcTemplate的相关信息,只需要修改**spring.jdbc**
-
-
配置数据库信息
spring:
  datasource:
    url: jdbc:mysql://localhost:3306/mybatis
    username: root
    password: XXXXX
    driver-class-name: com.mysql.jdbc.Driver
3.1.2 使用Druid数据源
SpringBoot默认使用的是希卡利的数据源,但是开发中经常使用的是Druid的数据源,所以这涉及到整合第三方技术
- 整合第三方技术的两种方式
- 自定义
- 找starter
3.1.2.1 第一种方式:自定义方式
-
配置文件中导入依赖
<dependency> <groupId>com.alibabagroupId> <artifactId>druidartifactId> <version>1.1.17version> dependency> -
写一个配置类
需要的配置文件看3.1.1中的
@Configuration
public class DruidConfig {
    //当我们配置这个之后,自带的希卡利的就失效了
    @Bean
    @ConfigurationProperties("spring.datasource")//将配置文件的数据源自动注入到里面
    public DataSource dataSource(){
        DruidDataSource druidDataSource = new DruidDataSource();
        return new DruidDataSource();
    }
}
3.1.2.1 第二种方式:直接引入starter
-
配置文件中引入stater
<dependency> <groupId>com.alibabagroupId> <artifactId>druid-spring-boot-starterartifactId> <version>1.1.17version> dependency> -
自动配置【源码分析】
- 扩展配置项 spring.datasource.druid
- DruidSpringAopConfiguration.class, 监控SpringBean的;配置项:spring.datasource.druid.aop-patterns
- DruidStatViewServletConfiguration.class, 监控页的配置:spring.datasource.druid.stat-view-servlet;默认开启
- DruidWebStatFilterConfiguration.class, web监控配置;spring.datasource.druid.web-stat-filter;默认开启
- DruidFilterConfiguration.class}) 所有Druid自己filter的配置
-
开启相关功能【示例】
从上面的自动配置可以看到,他已经给我们配置好了相关信息,我们只需要在配置文件中开启相关配置即可
#数据源
spring:
  datasource:
    url: jdbc:mysql://localhost:3306/mybatis?useSSL=false
    username: root
    password: XXXX
    driver-class-name: com.mysql.jdbc.Driver

  druid:
    aop-patterns: love.junqing.springbootstudy02.*  #表示监控范围:这个包下的东西都进行监控
    filters: stat,wall     # 开启哪些功能:stat(sql监控),wall(防火墙)

    # 配置监控页功能
    stat-view-servlet:
      enabled: true
      login-username: admin #监控页账号
      login-password: admin
      resetEnable: false

      #监控web
    web-stat-filter:
      enabled: true
      urlPattern: /*
      exclusions: '*.js,*.gif,*.jpg,*.png,*.css,*.ico,/druid/*'


    filter:
      stat: # 对上面filters里面的stat的详细配置
        slow-sql-millis: 1000 #慢查询事件
        logSlowSql: true  #是否记录慢查询
        enabled: true
      wall:   #防火墙的相关功能
        enabled: true
        config:
          drop-table-allow: false #是否允许删表
3.1.3 整合Myabtis操作
想要使用MyBatis必须要有数据源(Druid连接池)、MySQL驱动
3.1.3.1 配置版
-
添加依赖
<dependency> <groupId>org.mybatis.spring.bootgroupId> <artifactId>mybatis-spring-boot-starterartifactId> <version>2.1.4version> dependency> -
已经自动配置的
很多东西已经自动配置好了,如果需要修改,可以修改配置文件中以mybatis开始的
- SqlSessionFactory:自动配置好了(从数据源拿)
- SqlSession:自动配置了SqlSessionTemplate组合了SqlSession
- Mapper:只要我们的MyBatis接口标注了@Mapper注解就会被自动扫描进来
-
配置Mybatis
-
resources文件夹下创建一个mybatis包,然后创建一个空的全局配置文件【因为里面的东西可以在springboot的配置文件中配置】
配置文件即使删了也是可以运行的
DOCTYPE configuration PUBLIC "-//mybatis.org//DTD Config 3.0//EN" "https://mybatis.org/dtd/mybatis-3-config.dtd"> <configuration> configuration> -
Springboot配置文件中进行配置
mybatis: config-location: classpath:mybatis/mybatis-config.xml #mybatis的全局配置文件位置 mapper-locations: classpath:mybatis/mapper/* #映射文件的位置 -
创建接口,编写方法
@Mapper public interface UserMapper { public User getUser(String username); } -
在mybatis包下创建mapper包(用来存放接口的映射文件),然后创建映射文件【需要和接口的名字一样】
DOCTYPE mapper PUBLIC "-//mybatis.org//DTD Mapper 3.0//EN" "https://mybatis.org/dtd/mybatis-3-mapper.dtd"> <mapper namespace="love.junqing.springbootstudy02.mapper.UserMapper"> <select id="getUser" resultType="love.junqing.springbootstudy02.bean.User"> select * from `t_emp` where username=#{username} select> mapper> -
然后调用测试
@Controller public class UserController { @Autowired UserMapper userMapper;//会报错,不用管他 @ResponseBody @GetMapping("/user") public User getUser(){ User user = userMapper.getUser("123456"); System.out.println(user); return user; } } -
其他功能的调用
-
开启驼峰命名策略(直接在springboot的配置文件中配置)
mybatis: configuration: map-underscore-to-camel-case: true #开启驼峰映射,开启它就不能在指定全局配置文件的位置 -
其他的功能也可以在SpringBoot配置文件的**mybatis.configuration**下配置
-
-
3.1.3.2 纯注解版
也是必须要有MySQL驱动、数据源
不建议使用,因为做不了复杂SQL
-
导入mybatis的stater(上面有)
-
创建javaBean
-
创建Mapper接口(需要@Mapper注解)
-
mapper接口的方法上面添加@Select、@Insert、@Updata注解【用来替代映射文件】,注解里面写sql语句
@Mapper public interface UserMapper { @Select("select * from `t_user` where username=#{username}") public User getUser(String username); } -
然后调用
3.1.3.3 混合版
使用注解版的时候,如果有复杂SQL,然后使用混合版
在注解版的基础上添加了映射文件,没有添加注解的方法可以使用配置文件
3.1.3.4 最佳实战
- 引入mybatis-stater
- 在application.yaml中指定mapper-location(映射文件位置)
- 编写Mapper接口并标注@Mapper注解
- 简单SQL使用注解方式
- 复杂SQL编写mapper.xml进行绑定映射
3.1.4 整合MyBtais-Plus完成CRUD
还没学,所以就没动手做,所以可能有问题
-
安装MybatisX插件
-
引入myabits-plus-stater
不需要mybatis的依赖了
<dependency> <groupId>com.baomidougroupId> <artifactId>mybatis-plus-boot-starterartifactId> <version>3.4.1version> dependency> -
分析自动配置
-
MybatisPlusAutoConfiguration 配置类,MybatisPlusProperties 配置项绑定。mybatis-plus:xxx 就是对mybatis-plus的定制
-
SqlSessionFactory 自动配置好。底层是容器中默认的数据源
-
mapperLocations 自动配置好的。有默认值。
classpath*:/mapper/**/*.xml:任意包的类路径下的所有mapper文件夹下任意路径下的所有xml都是sql映射文件。
建议以后sql映射文件,放在 mapper下
-
容器中也自动配置好了 SqlSessionTemplate
-
@Mapper 标注的接口也会被自动扫描
-
-
配置数据源【连接池】
spring: datasource: url: jdbc:mysql://localhost:3306/mybatis?useSSL=false username: root password: XXXXX driver-class-name: com.mysql.jdbc.Driver -
创建javaBean
-
创建mapper接口,加上@Mapper接口,继承BaseMapper,泛型是想要操作的数据类型(数据库中表封装的对象)
BaseMapper中有很多已经写好的方法
@Mapper public interface UserMapper extends BaseMapper<User> {//需要操作的表 对应User类 } -
然后直接在service中使用就好了
-
说明
- 表名和javaBean对应
- 要求bean中的所有属性都应该在数据库中存在
- 如果属性在表中不存在可以使用@TableField(exist=false)
- 如果表名和Bean名不一样可以使用@TableName(“表名”)进行标注
3.2 NoSQL【没看】
学完Redis再说
4.单元测试(Junit5)【没怎么看】
4.1 Junit5的使用方式
- 引入springBoot-stater-test依赖(一般会自动引入)
- 在类上加@SpringBootTest
- 在方法上加@Test方法【jupiter里面的】
4.2 JUnit5常用注解
- **@Test *表示方法是测试方法。但是与JUnit4的@Test不同,他的职责非常单一不能声明任何属性,拓展的测试将会由Jupiter提供额外测试
- **@ParameterizedTest *表示方法是参数化测试,下方会有详细介绍
- **@RepeatedTest *表示方法可重复执行,下方会有详细介绍
- **@DisplayName *给测试类或者测试方法设置展示名称
- **@BeforeEach *表示在每个单元测试之前执行【每个测试方法都会运行它】
- **@AfterEach *表示在每个单元测试之后执行【每个测试方法结束以后都会执行它】
- **@BeforeAll *表示在所有单元测试之前执行
- **@AfterAll *表示在所有单元测试之后执行
- **@Tag *表示单元测试类别,类似于JUnit4中的@Categories
- **@Disabled *表示测试类或测试方法不执行,类似于JUnit4中的@Ignore
- **@Timeout *表示测试方法运行如果超过了指定时间将会返回错误
- **@ExtendWith *为测试类或测试方法提供扩展类引用
5.指标监控
未来每一个微服务线上部署后,我们需要对其进行监控、追踪、控制等。SpringBoot就抽取了Actuator场景,使得我们每个微服务快速引用。从而获得生产级别的应用监控、审计功能
5.1 SpringBoot Actuator
5.1.1 基本使用
-
引入依赖
<dependency> <groupId>org.springframework.boot</groupId> <artifactId>spring-boot-starter-actuator</artifactId> </dependency> -
访问 http://localhost:8080/actuator/XXX
-
暴露所有监控信息为HTTP
management: endpoints: enabled-by-default: true #暴露所有端点信息,很危险,所以可以自定义开放端点 web: exposure: include: '*' #以web方式暴露 -
测试
http://localhost:8080/actuator/beans
http://localhost:8080/actuator/configprops
http://localhost:8080/actuator/metrics
http://localhost:8080/actuator/metrics/jvm.gc.pause
http://localhost:8080/actuator/监控端点名/下级路径
5.1.2 常用监控端点(Endpoint)
-
Health:监控状况
健康检查端点,我们一般用于在云平台,平台会定时的检查应用的健康状况,如果不健康,就上线一个新的,把坏的下线。所以我们就可以使用Health Endpoint(监控端点)为平台返回当前应用的一系列组件健康状况的集合。
重要的几点:
- health endpoint返回的结果,应该是一系列健康检查后的一个汇总报告
- 很多的健康检查默认已经自动配置好了,比如:数据库、redis等
- 可以很容易的添加自定义的健康检查机制
通过配置显示详细信息:
management: endpoint: health: show-details: always -
Metrics:运行时指标
提供详细的、层级的、空间指标信息,这些信息可以被一些专业的监控平台以pull(主动推送)或者push(被动获取)方式得到;
- 通过Metrics对接多种监控系统
- 简化核心Metrics开发
- 添加自定义Metrics或者扩展已有Metrics
-
Loggers:日志记录
5.1.3 管理端点
默认除shutdown以外所有的监控端点都是打开的,很危险,所以可以自定义打开的监控端点
-
可以禁用所有的监控端点,然后手动打开指定的监控端点
management:
  endpoints:
    enabled-by-default: false
  endpoint:
    beans:
      enabled: true
    health:
      enabled: true
5.1.4 定制端点
-
创建一个类(后缀必须是HealthIndicator),然后继承抽象类AbstractHealthIndicator
-
重写doHealthCheck方法【里面编写真实的检查方法】
-
如果健康使用builder.status(Status.up)等等等
@Component //放到组件中 public class MyComHealthIndicator extends AbstractHealthIndicator { /** * 真实的检查方法 * @param builder * @throws Exception */ @Override protected void doHealthCheck(Health.Builder builder) throws Exception { //mongodb。 获取连接进行测试 Map<String,Object> map = new HashMap<>(); // 检查完成 if(1 == 2){ // builder.up(); //健康 builder.status(Status.UP); map.put("count",1); map.put("ms",100); }else { // builder.down(); builder.status(Status.OUT_OF_SERVICE); map.put("err","连接超时"); map.put("ms",3000); } builder.withDetail("code",100) .withDetails(map); } } -
编写配置文件【定制info信息】
info:
  appName: boot-admin
  version: 2.0.1
  mavenProjectName: @project.artifactId@  #使用@@可以获取maven的pom文件值
  mavenProjectVersion: @project.version@
5.1.5 定制运行时指标【Metrics】
class MyService{
    Counter counter;
    public MyService(MeterRegistry meterRegistry){
         counter = meterRegistry.counter("myservice.method.running.counter");
    }

    public void hello() {
        counter.increment();
    }
}


//也可以使用下面的方式
@Bean
MeterBinder queueSize(Queue queue) {
    return (registry) -> Gauge.builder("queueSize", queue::size).register(registry);
}
5.1.6 可视化界面
5.1.6.1 第一步:创建服务器
-
创建新的项目,都如导入依赖
<dependency> <groupId>org.springframework.bootgroupId> <artifactId>spring-boot-starter-webartifactId> dependency> <dependency> <groupId>de.codecentricgroupId> <artifactId>spring-boot-admin-starter-serverartifactId> <version>2.6.2version> dependency> -
在主类上加@EnableAdminServer注解
-
设置服务器端口为8888
server.port=8888 -
然后启动服务器,访问8888端口
5.1.6.2 项目引入
-
我们的项目中引入依赖
<dependency> <groupId>de.codecentricgroupId> <artifactId>spring-boot-admin-starter-clientartifactId> <version>2.6.2version> dependency> -
配置文件中配置adminserver地址
boot: admin: client: url: http://localhost:8888 #adminserver服务器地址 -
暴露端点
management: endpoints: enabled-by-default: true #暴露所有端点信息 web: exposure: include: '*' #以web方式暴露 -
启动客户端应用
6.原理解析
6.1 Profile功能【环境切换】
为了多环境适配,SpringBoot简化了prifile功能
举例:因为项目一开始都是在本地开发,所用的数据库等配置都是我们本地的,如果项目上线,需要都切换为线上主机的。所以为了方便且换使用这个功能
6.1.1 快速切换配置文件
6.1.1 快速切换方法一
可以多创建几个配置文件,本地开发使用一个配置文件,上线时切换到另一个配置文件
【默认配置文件和激活的配置文件都会生效,但是如果有相同配置,激活的配置文件会覆盖默认配置文件】
-
创建本地开发的配置文件
规则:
- 配置文件的名字application-自定义名字.yaml或者application-自定义名字.properties
- 配置文件可以时yaml也可以是properties
-
创建开发时的配置文件
规则跟上面的一样
-
springboot自带的application.properties作为版本控制文件
使用spring.profiles.active=自定义名字进行版本切换
#激活的配置文件
spring.profiles.active=test
6.1.2 快速切换方法二:命令行方式
这种方式是在方法一的基础上(已经有多个配置文件,application.properties中已经指定配置文件),将项目打为jar包,然后部署的时候使用命令行进行指定切换
【默认配置文件和激活的配置文件都会生效,但是如果有相同配置,激活的配置文件会覆盖默认配置文件】
java -jar xxx.jar --spring.profiles.active=自定义配置文件名
java -jar xxx.jar --spring.profiles.active=test
6.1.2 快速切换里面的类
例如:我们有两个类一个是Boss,一个是emp。我们本地环境想使用Boss类,但是上线的时候想使用emp类
直接在类上加@Profile(“自定义的配置文件名”)
这样就能实现类的切换
-
测试环境
@Profile("test") public class Boss{ } -
上线环境
@Profile("prop")
public class emp{

}
6.1.2 快速切换组
-
原始配置文件中指定组
#spring.profiles.group.组名 #以数组的形式写就是执行数组中的所有配置文件 #test组:会加载application-ppo.yaml和application.test配置文件 spring.profiles.group.test[0]=ppo spring.profiles.group.test[1]=test -
激活组
#激活组
spring.profiles.active=test
6.2 外部化配置
将所有的信息抽取出来,放在一个文件中,进行单独管理
知道propertis中内配置哪些就可以了
6.3 自定义stater
6.3.1 stater启动原理
-
创建一个空项目
-
然后添加一个Maven模块,作为stater
-
在添加一个Springboot模块,作为自动配置包
-
stater模块的pom.xml引入springboot模块的配置文件
<dependencies>
        <dependency>
        	<groupId>springboot模块的groupId>
            <artifactId>Springboot模块的artifactId>
        dependency>
    dependencies>
6.4 SpringApplication创建流程
6.5 SpringBoot完整启动过程
6.5 自定义实践
置服务器端口为8888
server.port=8888
- 然后启动服务器,访问8888端口
5.1.6.2 项目引入
-
我们的项目中引入依赖
<dependency> <groupId>de.codecentricgroupId> <artifactId>spring-boot-admin-starter-clientartifactId> <version>2.6.2version> dependency> -
配置文件中配置adminserver地址
boot: admin: client: url: http://localhost:8888 #adminserver服务器地址 -
暴露端点
management: endpoints: enabled-by-default: true #暴露所有端点信息 web: exposure: include: '*' #以web方式暴露 -
启动客户端应用


