FreeROTS 任务通知和实操 详解
目录
什么是任务通知?
任务通知值的更新方式
任务通知的优势和劣势
任务通知的优势
任务通知的劣势
任务通知相关 API 函数
1. 发送通知
2. 等待通知
任务通知实操
1. 模拟二值信号量
2. 模拟计数型信号量
3. 模拟事件标志组
4. 模拟消息邮箱
什么是任务通知?
FreeRTOS 从版本 V8.2.0 开始提供任务通知这个功能,每个任务都有一个 32 位的通知值。按照 FreeRTOS 官方的说法,使用消息通知比通过二进制信号量方式解除阻塞任务快 45%, 并且更加 省内存(无需创建队列)。
在大多数情况下,任务通知可以替代二值信号量、计数信号量、事件标志组,可以替代长度为 1 的队列(可以保存一个 32 位整数或指针值),并且任务通知速度更快、使用的RAM更少!
任务通知值的更新方式
FreeRTOS 提供以下几种方式发送通知给任务 :
- 发送消息给任务,如果有通知未读, 不覆盖通知值
- 发送消息给任务,直接覆盖通知值
- 发送消息给任务,设置通知值的一个或者多个位
- 发送消息给任务,递增通知值
通过对以上方式的合理使用,可以在一定场合下替代原本的队列、信号量、事件标志组等。
任务通知的优势和劣势
任务通知的优势
- 1. 使用任务通知向任务发送事件或数据,比使用队列、事件标志组或信号量快得多。
- 2. 使用其他方法时都要先创建对应的结构体,使用任务通知时无需额外创建结构体。
任务通知的劣势
- 1. 只有任务可以等待通知,中断服务函数中不可以,因为中断没有 TCB 。
- 2. 通知只能一对一,因为通知必须指定任务。
- 3. 等待通知的任务可以被阻塞, 但是发送消息的任务,任何情况下都不会被阻塞等待。
- 4. 任务通知是通过更新任务通知值来发送数据的,任务结构体中只有一个任务通知值,只能保 持一个数据。
任务通知相关 API 函数
1. 发送通知
| 函数 | 描述 |
| xTaskNotify() | 发送通知,带有通知值 |
| xTaskNotifyAndQuery() | 发送通知,带有通知值并且保留接收任务的原通知值 |
| xTaskNotifyGive() | 发送通知,不带通知值 |
| xTaskNotifyFromISR() | 在中断中发送任务通知 |
| xTaskNotifyAndQueryFromISR() | 在中断中发送任务通知 |
| vTaskNotifyGiveFromISR() | 在中断中发送任务通知 |
BaseType_t xTaskNotify( TaskHandle_t xTaskToNotify,
                        uint32_t ulValue,
                        eNotifyAction eAction );
参数:
xTaskToNotify:
- 需要接收通知的任务句柄;
ulValue:
- 用于更新接收任务通知值, 具体如何更新由形参 eAction 决定;
eAction:
- 一个枚举,代表如何使用任务通知的值;
| 枚举值 | 描述 |
| eNoAction | 发送通知,但不更新值(参数ulValue未使用) |
| eSetBits | 被通知任务的通知值按位或ulValue。(某些场景下可代替事 件组,效率更高) |
| eIncrement | 被通知任务的通知值增加1(参数ulValue未使用),相当于 xTaskNotifyGive |
| eSetValueWithOverwrite | 被通知任务的通知值设置为 ulValue。(某些场景下可代替 xQueueOverwrite ,效率更高) |
| eSetValueWithoutOverwrite | 如果被通知的任务当前没有通知,则被通知的任务的通知值设为ulValue。 如果被通知任务没有取走上一个通知,又接收到了一个通 知,则这次通知值丢弃,在这种情况下视为调用失败并返回 pdFALSE (某些场景下可代替 xQueueSend ,效率更高) |
返回值:
- 如果被通知任务还没取走上一个通知,又接收了一个通知,则这次通知值未能更新并返回 pdFALSE, 而其他情况均返回pdPASS。
BaseType_t xTaskNotifyAndQuery( TaskHandle_t xTaskToNotify,
                                uint32_t ulValue,
                                eNotifyAction eAction,
                                uint32_t *pulPreviousNotifyValue );
参数:
xTaskToNotify:
- 需要接收通知的任务句柄;
ulValue:
- 用于更新接收任务通知值, 具体如何更新 由形参 eAction 决定;
eAction:
- 一个枚举,代表如何使用任务通知的值;
pulPreviousNotifyValue:
- 对象任务的上一个任务通知值,如果为 NULL, 则不需要回传, 这个时候就等价于函数 xTaskNotify()。
返回值:
- 如果被通知任务还没取走上一个通知,又接收了一个通知,则这次通知值未能更新并返回 pdFALSE, 而其他情况均返回pdPASS。
BaseType_t xTaskNotifyGive( TaskHandle_t xTaskToNotify );
参数:
- xTaskToNotify:接收通知的任务句柄, 并让其自身的任务通知值加 1。
返回值:
- 总是返回 pdPASS。
2. 等待通知
等待通知API函数只能用在任务,不可应用于中断中!
| 函数 | 描述 |
| ulTaskNotifyTake() | 获取任务通知,可以设置在退出此函数的时候将任务通知值清零或者减 一。当任务通知用作二值信号量或者计数信号量的时候,使用此函数来 获取信号量。 |
| xTaskNotifyWait() | 获取任务通知,比 ulTaskNotifyTake()更为复杂,可获取通知值和清除通知值的指定位 |
uint32_t ulTaskNotifyTake( BaseType_t xClearCountOnExit,
                            TickType_t xTicksToWait );
参数:
xClearCountOnExit:
- 指定在成功接收通知后,将通知值清零或减 1,
- pdTRUE:把通知值清零(二值信号量);pdFALSE:把通知值减一(计数型信号量);
xTicksToWait:阻塞等待任务通知值的最大时间;
- 超时时间,0 表示不超时,
- portMAX_DELAY表示卡死等待
返回值:
- 0:接收失败
- 非0:接收成功,返回任务通知的通知值
BaseType_t xTaskNotifyWait( uint32_t ulBitsToClearOnEntry,
                            uint32_t ulBitsToClearOnExit,
                            uint32_t *pulNotificationValue,
                            TickType_t xTicksToWait );
参数:
ulBitsToClearOnEntry:
- 函数执行前清零任务通知值那些位 。
ulBitsToClearOnExit:
- 表示在函数退出前,清零任务通知值那些位,在清 0 前,接收到的任务通知值会先被保存到形参 *pulNotificationValue 中。
pulNotificationValue:
- 用于保存接收到的任务通知值。 如果不需要使用,则设置为 NULL 即可
xTicksToWait:等待消息通知的最大等待时间。
- 超时时间,0 表示不超时,
- portMAX_DELAY表示卡死等待
任务通知实操
首先得打开CubeMX,将FreeRTOS移植到STM32F103C8T6,具体看我之前写过的文章
将FreeRTOS移植到STM32F103C8T6
1. 模拟二值信号量
(1)创建两个任务和设置按键引脚为输入
(2)设置两个按键分别发送和接收二值信号量
用到函数
- xTaskNotifyGive()
- ulTaskNotifyTake()
void StartTaskSend(void const * argument)
{
  for(;;)
  {
		if(HAL_GPIO_ReadPin(GPIOA, GPIO_PIN_0) == GPIO_PIN_RESET)
		{
			osDelay(20);
			if (HAL_GPIO_ReadPin(GPIOA, GPIO_PIN_0) == GPIO_PIN_RESET)
			{
				xTaskNotifyGive(TaskReceiveHandle);
				printf("任务通知:模拟二值信号量发送成功\r\n");
			}
			while (HAL_GPIO_ReadPin(GPIOA, GPIO_PIN_0) == GPIO_PIN_RESET);
		}
    osDelay(10);
  }
}

void StartTaskReceive(void const * argument)
{
  uint32_t rev = 0;
  for(;;)
  {
		if(HAL_GPIO_ReadPin(GPIOA, GPIO_PIN_1) == GPIO_PIN_RESET)
		{
			osDelay(20);
			if (HAL_GPIO_ReadPin(GPIOA, GPIO_PIN_1) == GPIO_PIN_RESET)
			{
				rev = ulTaskNotifyTake(pdTRUE,portMAX_DELAY);
				if(rev != 0)
					printf("任务通知:模拟二值信号量接受成功\r\n");
			}
			while (HAL_GPIO_ReadPin(GPIOA, GPIO_PIN_1) == GPIO_PIN_RESET);
		}
    osDelay(10);
  }
}
(3)打开串口助手,查看结果
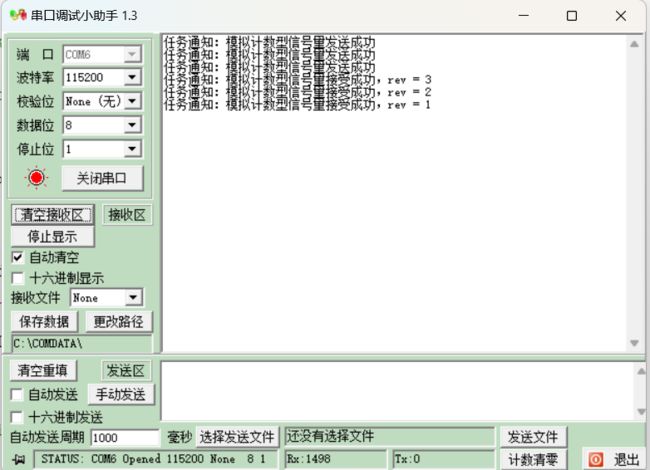
2. 模拟计数型信号量
模拟计数型信号量跟模拟二值信号量基本相同:
将ulTaskNotifyTake()函数中第一个参数从pdTRUE改为pdFALSE
(1)代码示例:
用到函数
- xTaskNotifyGive()
- ulTaskNotifyTake()
void StartTaskSend(void const * argument)
{
  for(;;)
  {
		if(HAL_GPIO_ReadPin(GPIOA, GPIO_PIN_0) == GPIO_PIN_RESET)
		{
			osDelay(20);
			if (HAL_GPIO_ReadPin(GPIOA, GPIO_PIN_0) == GPIO_PIN_RESET)
			{
				xTaskNotifyGive(TaskReceiveHandle);
				printf("任务通知:模拟计数型信号量发送成功\r\n");
			}
			while (HAL_GPIO_ReadPin(GPIOA, GPIO_PIN_0) == GPIO_PIN_RESET);
		}
    osDelay(10);
  }
}

void StartTaskReceive(void const * argument)
{
	uint32_t rev = 0;
  for(;;)
  {
		if(HAL_GPIO_ReadPin(GPIOA, GPIO_PIN_1) == GPIO_PIN_RESET)
		{
			osDelay(20);
			if (HAL_GPIO_ReadPin(GPIOA, GPIO_PIN_1) == GPIO_PIN_RESET)
			{
				rev = ulTaskNotifyTake(pdFALSE,portMAX_DELAY);
				if(rev != 0)
					printf("任务通知:模拟计数型信号量接受成功,rev = %d\r\n",rev);
			}
			while (HAL_GPIO_ReadPin(GPIOA, GPIO_PIN_1) == GPIO_PIN_RESET);
		}
    osDelay(10);
  }
}3. 模拟事件标志组
(1)代码示例:
用到函数
- xTaskNotify()
- xTaskNotifyWait()
void StartTaskSend(void const * argument)
{
  for(;;)
  {
		if(HAL_GPIO_ReadPin(GPIOA, GPIO_PIN_0) == GPIO_PIN_RESET)
		{
			osDelay(20);
			if (HAL_GPIO_ReadPin(GPIOA, GPIO_PIN_0) == GPIO_PIN_RESET)
			{
				printf("将bit0位置1\r\n");
				xTaskNotify(TaskReceiveHandle,0x01,eSetBits);
			}
			while (HAL_GPIO_ReadPin(GPIOA, GPIO_PIN_0) == GPIO_PIN_RESET);
		}
		if(HAL_GPIO_ReadPin(GPIOA, GPIO_PIN_1) == GPIO_PIN_RESET)
		{
			osDelay(20);
			if (HAL_GPIO_ReadPin(GPIOA, GPIO_PIN_1) == GPIO_PIN_RESET)
			{
				printf("将bit1位置1\r\n");
				xTaskNotify(TaskReceiveHandle,0x02,eSetBits);
			}
			while (HAL_GPIO_ReadPin(GPIOA, GPIO_PIN_1) == GPIO_PIN_RESET);
		}
    osDelay(10);
  }
}

void StartTaskReceive(void const * argument)
{
  uint32_t notify_rev = 0, event_bit = 0;
  for(;;)
  {
		xTaskNotifyWait(0,0xFFFFFFFF,¬ify_rev,portMAX_DELAY);
		if(notify_rev & 0x01)
		{
			event_bit |= 0x01;
		}
		if(notify_rev & 0x02)
		{
			event_bit |= 0x02;
		}
		if(event_bit == (0x01 | 0x02))
		{
			printf("任务通知模拟事件标志组接收成功\r\n");
			event_bit = 0;
		}
    osDelay(10);
  }
}
(2)打开串口助手,查看结果
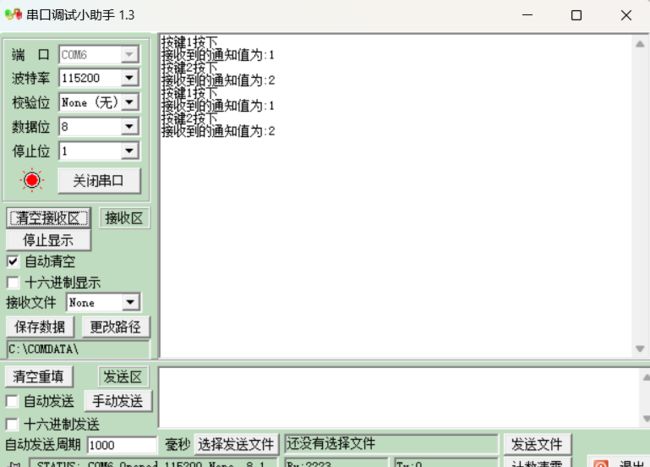
4. 模拟消息邮箱
模拟邮箱大概就是向任务发送数据,但是与队列不同,任务邮箱发送消息受到了很多限制。
- 只能发送一个32位的值。
- 消息邮箱的值被保存为一个任务的通知值,而且只能保存一个任务的值,相当于队列长度为1
(1)代码示例:
用到函数
- xTaskNotify()
- xTaskNotifyWait()
void StartTaskSend(void const * argument)
{
  for(;;)
  {
		if(HAL_GPIO_ReadPin(GPIOA, GPIO_PIN_0) == GPIO_PIN_RESET)
		{
			osDelay(20);
			if (HAL_GPIO_ReadPin(GPIOA, GPIO_PIN_0) == GPIO_PIN_RESET)
			{
				printf("按键1按下\r\n");
				xTaskNotify(TaskReceiveHandle,1,eSetValueWithOverwrite);
			}
			while (HAL_GPIO_ReadPin(GPIOA, GPIO_PIN_0) == GPIO_PIN_RESET);
		}
		if(HAL_GPIO_ReadPin(GPIOA, GPIO_PIN_1) == GPIO_PIN_RESET)
		{
			osDelay(20);
			if (HAL_GPIO_ReadPin(GPIOA, GPIO_PIN_1) == GPIO_PIN_RESET)
			{
				printf("按键2按下\r\n");
				xTaskNotify(TaskReceiveHandle,2,eSetValueWithOverwrite);
			}
			while (HAL_GPIO_ReadPin(GPIOA, GPIO_PIN_1) == GPIO_PIN_RESET);
		}
    osDelay(10);
  }
}

void StartTaskReceive(void const * argument)
{
  uint32_t notify_rev = 0;
  for(;;)
  {
    xTaskNotifyWait(0,0xFFFFFFFF,¬ify_rev,portMAX_DELAY);
    printf("接收到的通知值为:%d\r\n",notify_rev);
    osDelay(10);
  }
}
(2)打开串口助手,查看结果


