【目标检测】Visdrone数据集和CARPK数据集预处理
之前的博文【目标检测】YOLOv5跑通VisDrone数据集对Visdrone数据集简介过,这里不作复述,本文主要对Visdrone数据集和CARPK数据集进行目标提取和过滤。
需求描述
本文需要将Visdrone数据集中有关车和人的数据集进行提取和合并,车标记为类别0,人标记为类别1,并转换成YOLO支持的txt格式。
Visdrone数据集
Visdrone数据集转换成YOLO的txt格式
首先对原始数据集做一个格式转换,下面这段代码延用官方提供的转换脚本。
from utils.general import download, os, Path


def visdrone2yolo(dir):
    from PIL import Image
    from tqdm import tqdm

    def convert_box(size, box):
        # Convert VisDrone box to YOLO xywh box
        dw = 1. / size[0]
        dh = 1. / size[1]
        return (box[0] + box[2] / 2) * dw, (box[1] + box[3] / 2) * dh, box[2] * dw, box[3] * dh

    (dir / 'labels').mkdir(parents=True, exist_ok=True)  # make labels directory
    pbar = tqdm((dir / 'annotations').glob('*.txt'), desc=f'Converting {dir}')
    for f in pbar:
        img_size = Image.open((dir / 'images' / f.name).with_suffix('.jpg')).size
        lines = []
        with open(f, 'r') as file:  # read annotation.txt
            for row in [x.split(',') for x in file.read().strip().splitlines()]:
                if row[4] == '0':  # VisDrone 'ignored regions' class 0
                    continue
                cls = int(row[5]) - 1  # 类别号-1
                box = convert_box(img_size, tuple(map(int, row[:4])))
                lines.append(f"{cls} {' '.join(f'{x:.6f}' for x in box)}\n")
                with open(str(f).replace(os.sep + 'annotations' + os.sep, os.sep + 'labels' + os.sep), 'w') as fl:
                    fl.writelines(lines)  # write label.txt


dir = Path(r'E:\Dataset\VisDrone')  # datasets文件夹下Visdrone2019文件夹目录
# Convert
for d in 'VisDrone2019-DET-train', 'VisDrone2019-DET-val', 'VisDrone2019-DET-test-dev':
    visdrone2yolo(dir / d)  # convert VisDrone annotations to YOLO labels
标签可视化
对txt标签进行可视化,查看过滤之前的效果。
import os
import numpy as np
import cv2

# 修改输入图片文件夹
img_folder = "image"
img_list = os.listdir(img_folder)
img_list.sort()
# 修改输入标签文件夹
label_folder = "labels2"
label_list = os.listdir(label_folder)
label_list.sort()
# 输出图片文件夹位置
path = os.getcwd()
output_folder = path + '/' + str("output")
os.mkdir(output_folder)

# 坐标转换
def xywh2xyxy(x, w1, h1, img):
    label, x, y, w, h = x
    # print("原图宽高:\nw1={}\nh1={}".format(w1, h1))
    # 边界框反归一化
    x_t = x * w1
    y_t = y * h1
    w_t = w * w1
    h_t = h * h1
    # print("反归一化后输出:\n第一个:{}\t第二个:{}\t第三个:{}\t第四个:{}\t\n\n".format(x_t, y_t, w_t, h_t))
    # 计算坐标
    top_left_x = x_t - w_t / 2
    top_left_y = y_t - h_t / 2
    bottom_right_x = x_t + w_t / 2
    bottom_right_y = y_t + h_t / 2

    # print('标签:{}'.format(labels[int(label)]))
    # print("左上x坐标:{}".format(top_left_x))
    # print("左上y坐标:{}".format(top_left_y))
    # print("右下x坐标:{}".format(bottom_right_x))
    # print("右下y坐标:{}".format(bottom_right_y))
    # 绘制矩形框
    # cv2.rectangle(img, (int(top_left_x), int(top_left_y)), (int(bottom_right_x), int(bottom_right_y)), colormap[1], 2)
    # (可选)给不同目标绘制不同的颜色框
    if int(label) == 0:
        cv2.rectangle(img, (int(top_left_x), int(top_left_y)), (int(bottom_right_x), int(bottom_right_y)), (0, 255, 0), 2)
    elif int(label) == 1:
        cv2.rectangle(img, (int(top_left_x), int(top_left_y)), (int(bottom_right_x), int(bottom_right_y)), (255, 0, 0), 2)
    else:
        cv2.rectangle(img, (int(top_left_x), int(top_left_y)), (int(bottom_right_x), int(bottom_right_y)), (0, 0, 0), 2)

    return img


if __name__ == '__main__':
    for i in range(len(img_list)):
        image_path = img_folder + "/" + img_list[i]
        label_path = label_folder + "/" + label_list[i]
        # 读取图像文件
        img = cv2.imread(str(image_path))
        h, w = img.shape[:2]
        # 读取 labels
        with open(label_path, 'r') as f:
            lb = np.array([x.split() for x in f.read().strip().splitlines()], dtype=np.float32)
        # 绘制每一个目标
        for x in lb:
            # 反归一化并得到左上和右下坐标,画出矩形框
            img = xywh2xyxy(x, w, h, img)
        """
        # 直接查看生成结果图
        cv2.imshow('show', img)
        cv2.waitKey(0)
        """
        cv2.imwrite(output_folder + '/' + '{}.png'.format(image_path.split('/')[-1][:-4]), img)
可视化效果如图所示:
注:该数据集对人的姿态还进行区分,行走状态的人划分为pedestrian,其它姿态(比如躺下或坐下)标记为people。

过滤标签
具体过滤规则:
- 合并car、van、truck、bus为car(0)
- 合并pedestrian,people为person(1)
- 舍弃其它类别
import os
import numpy as np
from tqdm import tqdm

# Visdrone类别
# names: ['pedestrian', 'people', 'bicycle', 'car', 'van', 'truck', 'tricycle', 'awning-tricycle', 'bus', 'motor' ]

# 修改输入标签文件夹
label_folder = "labels"
label_list = os.listdir(label_folder)

# 标签输出文件夹
label_output = "labels2"

# class_set
car_set = [3, 4, 5, 8]
person_set = [0, 1]

if __name__ == '__main__':
    for label_file in tqdm(os.listdir(label_folder)):
        # 读取 labels
        with open(os.path.join(label_folder, label_file), 'r') as f:
            lb = np.array([x.split() for x in f.read().strip().splitlines()], dtype=np.float32)
        # 写入 labels
        with open(os.path.join(label_output, label_file), 'a') as f:
            for obj in lb:
                # 若是行人,修改类别为1
                if int(obj[0]) in person_set:
                    obj[0] = 1
                    f.write(('%g ' * 5).rstrip() % tuple(obj) + '\n')
                # 若是车辆,修改类别为0
                elif int(obj[0]) in car_set:
                    obj[0] = 0
                    f.write(('%g ' * 5).rstrip() % tuple(obj) + '\n')
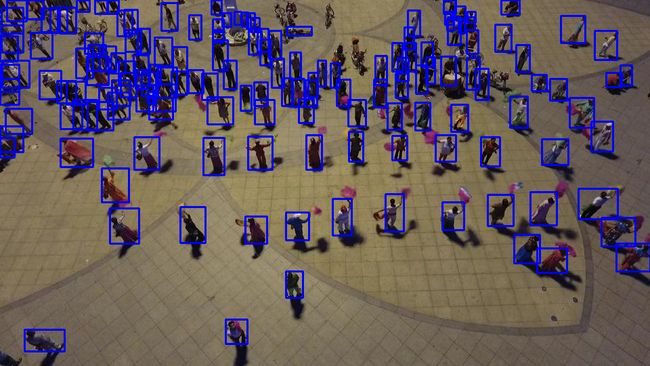
过滤之后的效果如图所示:
CARPK数据集
CARPK数据集是无人机在40米高空拍摄的汽车数据集,里面仅包含汽车单一目标。
下载地址:https://github.com/zstar1003/Dataset
原始label格式:
1019 521 1129 571 1
1013 583 1120 634 1
对应含义为: xmin, ymin, xmax, ymax,cls
处理脚本:
import os
import numpy as np
from tqdm import tqdm

# 修改输入标签文件夹
# label_folder = r"E:\Dataset\CARPK_devkit\data\Annotations"
label_folder = r"annotations"
label_list = os.listdir(label_folder)

# 标签输出文件夹
label_output = r"labels"

# 图像宽高
img_width = 1280
img_height = 720

if __name__ == '__main__':
    for label_file in tqdm(os.listdir(label_folder)):
        # 读取 labels
        with open(os.path.join(label_folder, label_file), 'r') as f:
            lb = np.array([x.split() for x in f.read().strip().splitlines()], dtype=int)
        for obj in lb:
            class_index = obj[4]
            xmin, ymin, xmax, ymax = obj[0], obj[1], obj[2], obj[3]
            # 将box信息转换到yolo格式
            xcenter = xmin + (xmax - xmin) / 2
            ycenter = ymin + (ymax - ymin) / 2
            w = xmax - xmin
            h = ymax - ymin
            # 绝对坐标转相对坐标,保存6位小数
            xcenter = round(xcenter / img_width, 6)
            ycenter = round(ycenter / img_height, 6)
            w = round(w / img_width, 6)
            h = round(h / img_height, 6)
            info = [str(i) for i in [class_index, xcenter, ycenter, w, h]]
            # 写入 labels
            with open(os.path.join(label_output, label_file), 'a') as f:
                # 若文件不为空,添加换行
                if os.path.getsize(os.path.join(label_output, label_file)):
                    f.write("\n" + " ".join(info))
                else:
                    f.write(" ".join(info))
可视化验证转换效果: