CS144_lab0
文章目录
- lab0 networking warmup
-
- 1 搭建环境
-
- References
- 2 小实验
-
- 2.1Fetch a Web Page
- 2.2 Send yourself an email
- 2.3 Listening and connecting
- 3 Writing a network program using an OS stream socket
-
- 3.1 Let’s get started—fetching and building the starter code
- 3.2 Modern C++: mostly safe but still fast and low-level
- 3.3 Reading the Sponge documentation
- 3.4 Writing webget
-
- 单个用例
- 所有测试
- 遇到的错误
- 4 An in-memory reliable byte stream
-
-
- 确定数据结构
- 实现接口
- byte_stream.hh
- byte_stream.cc
-
lab0 networking warmup
1 搭建环境
我使用的是 Windows + VirtualBox + centos7 + vscode + gcc8
如果能在Linux下直接调试再好不过,无Linux环境的兄弟可以参考的我的配置
https://gitee.com/HappyBinbin/my-notes/blob/master/%E6%95%88%E7%8E%87%E5%B7%A5%E5%85%B7/vscode%E5%81%9Assh%E8%BF%9C%E7%A8%8B%E7%BB%88%E7%AB%AF.md
References
https://www.cnblogs.com/jixiaohua/p/11732225.html
https://stackoverflow.com/questions/64101326/field-ifru-addr-has-incomplete-type-sockaddr
2 小实验
2.1Fetch a Web Page
抓取Web网页,这个很容易,跟着步骤来就行。
注意事项
- 每次回车是ctrl + Enter,这样可以换行
- 注意输入时长,会超时,建议写好再直接copy上去
- 我们没有 SUNet ID,所以有个例子搞不到(我是这么理解的,不知道是不是)
2.2 Send yourself an email
通过 smtp 来发送 eaml,我们没有环境连接到 stanford的邮件服务器,可以用国内的邮件服务器,例如qq邮箱。去qq邮箱打开 smtp服务,获取授权码。
然后根据步骤
- helo xxxxx
- 先要登录认证,输入 auth login
- 用户名:你的邮箱[email protected] 注意:这里要将邮箱账号通过 bash64编码过后再输入
- 授权码:一样,也需要先用 bash64 编码
剩下的按照步骤来即可成功
2.3 Listening and connecting
这个我懒得装 netcat了,就不搞了
3 Writing a network program using an OS stream socket
利用 Linxu 提供的 socket 编写一个网络程序,抓取网页。
3.1 Let’s get started—fetching and building the starter code
参考 -> 1、搭建环境
3.2 Modern C++: mostly safe but still fast and low-level
提醒我们使用c11的一些注意事项
3.3 Reading the Sponge documentation
让我们去看 Sponge 文档
3.4 Writing webget
正式开始编码
根据lab的提示开始构思:
- 先看相关的数据结构连接,TCPSocket Class 这个类,然后也有代码样例,模仿着就知道怎么创建套接字了
- 如何连接?bind 和 connect 函数,Address(host,portnum),这里的portnum是端口号,可以用"协议名"来替代。bind 是绑定,connect是绑定+连接
- path的用处, using the format of an HTTP(Web) request that you used earlier,即在HTTP请求里面的请求资源的url,即路径
- 讲义提到,发送端SHUTDOWN之后,服务器端就回发送一个答复,然后结束其自己的传出字节流。发送方读取完服务器的所有字节流之后,字节流末尾会读到 “EOF”,就可以关闭连接了。
void get_URL(const string &host, const string &path) {
    // Your code here.
    // 创建TCPSocket 套接字
    TCPSocket socket;
    // 将Address 绑定到套接字并连接 connetct,端口为 http 端口
    socket.connect(Address(host,"http"));
    // 发送 GET 请求,按照HTTP GET 请求的格式
    string info = "GET " + path + " HTTP/1.1\r\n"  +
                  "HOST: " + host + "\r\n" +
                  "Connetction: close\r\n\r\n";
    socket.write(info);
    // 发送完毕之后,关闭发送端
    socket.shutdown(SHUT_WR);
    // 服务器接收到 SHUTDOWN请求后,将剩余的数据发送完后,结尾会附带一个EOF,表示结束
    while(!socket.eof()){
        cout << socket.read() << endl;
    }
    socket.close();
    return;
}
单个用例
所有测试
遇到的错误
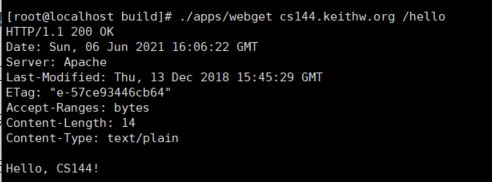
- ./apps/webget cs144.keithw.org /hello ,报错 GetAddrInfo() name or service not found,就是说我们的 host 这个ip地址识别不出来。嘿嘿,我也不知道具体怎么弄好的,搜索资料就是,没有配置好HOSTNAME。即 /etc/hosts 里面的 127.0.0.0 localhost 的 localhost 这个名字要与 vim /etc/sysconfig/network-scripts/ifcfg-enp0s3 网卡配置的 HOSTNAME = “xxx” 要相同
- 如果运行的时候一直报错,一定要记得,重新make,重新编译!!!
4 An in-memory reliable byte stream
这部分要求我们实验一个在内存中的可靠字节流传输
- 要求有序,即写入的数据与读出的数据顺序一致
- 写入器可以结束输入
- 控制流量,尽可能多地写。Write as many as will fit
- 确保缓冲区不会溢出
- 单线程
了解要求,其实就是写一个类似管道的东西,一边写入,一边输出。
编写者的界面如下所示:
// Write a string of bytes into the stream. Write as many
// as will fit, and return the number of bytes written.
size_t write(const std::string &data);
// Returns the number of additional bytes that the stream has space for
size_t remaining_capacity() const;
// Signal that the byte stream has reached its ending
void end_input();
// Indicate that the stream suffered an error
void set_error();
这是读者的界面:
// Peek at next "len" bytes of the stream
std::string peek_output(const size_t len) const;
// Remove ``len'' bytes from the buffer
void pop_output(const size_t len);
// Read (i.e., copy and then pop) the next "len" bytes of the stream
std::string read(const size_t len);
bool input_ended() const; // `true` if the stream input has ended
bool eof() const; // `true` if the output has reached the ending
bool error() const; // `true` if the stream has suffered an error
size_t buffer_size() const; // the maximum amount that can currently be peeked/read
bool buffer_empty() const; // `true` if the buffer is empty
size_t bytes_written() const; // Total number of bytes written
size_t bytes_read() const; // Total number of bytes popped
请打开libsponge / byte stream.hh和libsponge / byte http://stream.cc文件,并实现提供此接口的对象。 在开发字节流实现时,可以使用make check lab0运行自动化测试。
确定数据结构
- 一个固定长度的string,通过下标索引来进行循环读写(这与lab要求的使用modern c++要求不符,因为本质还是指针),通过索引值对传入的字节流进行拷贝的方式效率太低,会超时,过不了测试用例
- 一个队列字符队列,std::deque _buffer,可以做到往后写数据,往前读数据的功能
虽然string的各种方法一般被认为会比普通数组的操作要慢,但字符串的拼接是一个例外,string的+拼接的确要比按索引值逐个复制要快。
- 还是固定长度的string,但是采用拼接字符的方式来实现,而不是用下标索引来复制
实现接口
确定好数据结构之后,就比较简单了。
- 初始化容量、控制边界的几个变量
- 通过string 或 deque 提供的接口,可以轻松完成任务(注意每次都要判断len是否越界,即不能读超过缓冲区已有数据的大小,也不能写入超过缓冲区容量的大小)
注意:
这个函数不知道啥意思,我删了,void DUMMY_CODE(Targs &&… /* unused */) {}
byte_stream.hh
class ByteStream
{
private:
  // Your code here -- add private members as necessary.
  std::deque _buffer = {};
  size_t _capacity = 0;
  size_t _read_count = 0;
  size_t _write_count = 0;
  bool _input_ended_flag = false;
  // Hint: This doesn't need to be a sophisticated data structure at
  // all, but if any of your tests are taking longer than a second,
  // that's a sign that you probably want to keep exploring
  // different approaches.

  bool _error = false; //!< Flag indicating that the stream suffered an error.
}
byte_stream.cc
ByteStream::ByteStream(const size_t capacity)
{
  _capacity = capacity;
  ;
}

size_t ByteStream::write(const string &data)
{
  // 获取data的长度
  size_t len = data.length();
  // 判断缓冲区的容量大小,限制写入大小,防止溢出
  if (len > _capacity - _buffer.size())
  {
    len = _capacity - _buffer.size();
  }
  // 记录写入的字节数
  _write_count += len;
  // 往缓冲区中写入数据
  for (size_t i = 0; i < len; i++)
  {
    _buffer.push_back(data[i]);
  }
  return len;
}

//! \param[in] len bytes will be copied from the output side of the buffer
string ByteStream::peek_output(const size_t len) const
{
  size_t length = len;
  if (length > _buffer.size())
  {
    length = _buffer.size();
  }
  return string().assign(_buffer.begin(), _buffer.begin() + length);
}

//! \param[in] len bytes will be removed from the output side of the buffer
void ByteStream::pop_output(const size_t len)
{
  size_t length = len;
  if (length > _buffer.size())
  {
    length = _buffer.size();
  }
  _read_count += length;
  while (length--)
  {
    _buffer.pop_front();
  }
}

//! Read (i.e., copy and then pop) the next "len" bytes of the stream
//! \param[in] len bytes will be popped and returned
//! \returns a string
std::string ByteStream::read(const size_t len)
{
  size_t byte_read = (len > _buffer.size()) ? _buffer.size() : len;
  string ret = peek_output(byte_read);
  pop_output(byte_read);
  return ret;
}

void ByteStream::end_input()
{
  _input_ended_flag = true;
}

bool ByteStream::input_ended() const
{
  return _input_ended_flag;
}

size_t ByteStream::buffer_size() const
{
  return _buffer.size();
}

bool ByteStream::buffer_empty() const
{
  return _buffer.size() == 0;
}

bool ByteStream::eof() const
{
  return buffer_empty() && input_ended();
  ;
}

size_t ByteStream::bytes_written() const
{
  return _write_count;
}

size_t ByteStream::bytes_read() const
{
  return _read_count;
}

size_t ByteStream::remaining_capacity() const
{
  return _capacity - _buffer.size();
}
