cocos2d-x-html5之游戏启动
接触cocos2dx有5年多来,以后可能要切换到creator了。所以打算重新学习一下cocos2dx源码,并记录一下。
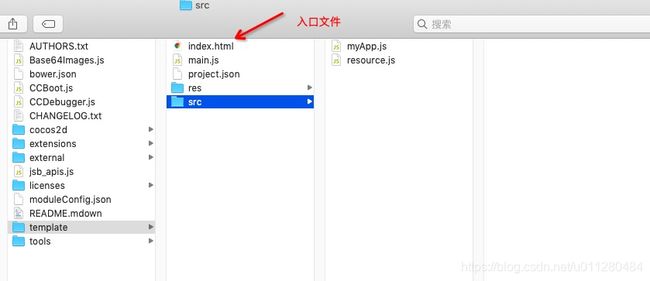
今天我们来讲一下web版本是怎么启动,首先看下模版工程的文件结构,其中index.html为入口。

接下来我们看下index.html里面的源码
<!DOCTYPE html>
<html>

<head>
    <meta charset="utf-8">
    <title>Cocos2d-html5 Hello World test</title>
    <link rel="icon" type="image/GIF" href="res/favicon.ico" />
    <meta name="viewport" content="width=321,user-scalable=no" />
    <meta name="apple-mobile-web-app-capable" content="yes" />
    <meta name="full-screen" content="yes" />
    <meta name="screen-orientation" content="portrait" />
    <meta name="x5-fullscreen" content="true" />
    <meta name="360-fullscreen" content="true" />
    <style>
        body,
        canvas,
        div {
            -moz-user-select: none;
            -webkit-user-select: none;
            -ms-user-select: none;
            -khtml-user-select: none;
            -webkit-tap-highlight-color: rgba(0, 0, 0, 0);
        }
    </style>
    <!--加载脚本-->
    <script src="../CCBoot.js"></script>
    <!--程序入口-->
    <script src="main.js"></script>
</head>

<body style="padding:0; margin: 0; background: #000;">
    <script src="res/loading.js"></script>
    <canvas id="gameCanvas" width="321" height="480"></canvas>
</body>

</html>
可以看到这边是加载了CCBoot.js和main.js文件,其中CCBoot.js是引擎提供的,里面包含了游戏启动的流程,main.js是每个项目组自己写的。
接下来我们看下main.js的源码:
// 重写 onStart 函数,执行cc.game.run后,最终执行这里
cc.game.onStart = function () {
    // 如果index.html引用了loading.js,这里需要移除
    if (!cc.sys.isNative && document.getElementById("cocosLoading")) //If referenced loading.js, please remove it
        document.body.removeChild(document.getElementById("cocosLoading"));

    // 声明并定义设计分辨率(竖屏)
    var designSize = cc.size(480, 800);
    // 屏幕分辨率
    var screenSize = cc.view.getFrameSize();
    // 如果不是原生,且高度小于800
    if (!cc.sys.isNative && screenSize.height < 800) {
        // 修改设计分辨率
        designSize = cc.size(320, 480);
        cc.loader.resPath = "res/Normal";
    } else {
        cc.loader.resPath = "res/HD";
    }
    // 等比拉伸,会留黑边
    cc.view.setDesignResolutionSize(designSize.width, designSize.height, cc.ResolutionPolicy.SHOW_ALL);

    //load resources
    // 运行loaderScene场景,加载资源成功后,运行回调函数
    cc.LoaderScene.preload(g_resources, function () {
        // 运行自己的场景,在src/myApp.js
        cc.director.runScene(new MyScene());
    }, this);
};
// 启动游戏,该方法在 CCBoot.js里面实现
cc.game.run();
流程可以看注释,从代码中我们看到加载资源的时候,是运行了cc.LoaderScne.preload来创建一个过渡场景,等资源加载成功后,运行自己的场景 MyScene。
接下来我们看下 CCLoaderScene.js的源码
/**
 * cc.LoaderScene is a scene that you can load it when you loading files
 * cc.LoaderScene can present thedownload progress
 * @class
 * @extends cc.Scene
 * @example
 * var lc = new cc.LoaderScene();
 */
// 用于下载文件时显示的场景
cc.LoaderScene = cc.Scene.extend({
    _interval: null,
    _label: null,
    _logo: null,
    _className: "LoaderScene",
    cb: null,
    target: null,
    /**
     * Contructor of cc.LoaderScene
     * @returns {boolean}
     */
    init: function () {
        // this赋值给self,后面不用 .bind(this)来访问成员方法
        var self = this;

        //logo
        var logoWidth = 160;
        var logoHeight = 200;

        // bg  创建颜色层
        var bgLayer = self._bgLayer = new cc.LayerColor(cc.color(32, 32, 32, 255));
        // 添加到场景
        self.addChild(bgLayer, 0);

        //image move to CCSceneFile.js
        var fontSize = 24,
            lblHeight = -logoHeight / 2 + 100; // 默认正中间
        cc._loaderImage = null;
        if (cc._loaderImage) {
            //loading logo
            // 加载logo
            cc.loader.loadImg(cc._loaderImage, {
                // 不跨域
                isCrossOrigin: false
            }, function (err, img) {
                logoWidth = img.width;
                logoHeight = img.height;
                // 显示logo
                self._initStage(img, cc.visibleRect.center);
            });
            fontSize = 14;
            // 有logo的时候,logo往下 10像素
            lblHeight = -logoHeight / 2 - 10;
        }
        //loading percent
        var label = self._label = new cc.LabelTTF("Loading... 0%", "Arial", fontSize);
        // 设置坐标
        label.setPosition(cc.pAdd(cc.visibleRect.center, cc.p(0, lblHeight)));
        label.setColor(cc.color(180, 180, 180));
        bgLayer.addChild(this._label, 10);
        return true;
    },

    _initStage: function (img, centerPos) {
        var self = this;
        // 创建纹理
        var texture2d = self._texture2d = new cc.Texture2D();
        texture2d.initWithElement(img);
        texture2d.handleLoadedTexture();
        var logo = self._logo = new cc.Sprite(texture2d);
        // 设置缩放
        logo.setScale(cc.contentScaleFactor());
        logo.x = centerPos.x;
        logo.y = centerPos.y;
        self._bgLayer.addChild(logo, 10);
    },
    /**
     * custom onEnter
     */
    onEnter: function () {
        var self = this;
        cc.Node.prototype.onEnter.call(self);
        // 0.3秒后执行 _startLoading  这边是循环定时器
        self.schedule(self._startLoading, 0.3);
    },
    /**
     * custom onExit
     */
    onExit: function () {
        cc.Node.prototype.onExit.call(this);
        var tmpStr = "Loading... 0%";
        this._label.setString(tmpStr);
    },

    /**
     * init with resources
     * @param {Array} resources
     * @param {Function|String} cb
     * @param {Object} target
     */
    initWithResources: function (resources, cb, target) {
        if (cc.isString(resources))
            resources = [resources];
        this.resources = resources || [];
        this.cb = cb;
        this.target = target;
    },

    _startLoading: function () {
        var self = this;
        // 取消定时器
        self.unschedule(self._startLoading);
        var res = self.resources;
        // 加载资源
        cc.loader.load(res,
            // 每个加载后的回调
            function (result, count, loadedCount) {
                var percent = (loadedCount / count * 100) | 0;
                percent = Math.min(percent, 100);
                self._label.setString("Loading... " + percent + "%");
            },
            function () {
                if (self.cb)
                    self.cb.call(self.target);
            });
    },

    _updateTransform: function () {
        this._renderCmd.setDirtyFlag(cc.Node._dirtyFlags.transformDirty);
        this._bgLayer._renderCmd.setDirtyFlag(cc.Node._dirtyFlags.transformDirty);
        this._label._renderCmd.setDirtyFlag(cc.Node._dirtyFlags.transformDirty);
        this._logo && this._logo._renderCmd.setDirtyFlag(cc.Node._dirtyFlags.transformDirty);
    }
});
/**
 * cc.LoaderScene.preload can present a loaderScene with download progress.
 * when all the resource are downloaded it will invoke call function
 * @param resources 需要加载的资源
 * @param cb 资源全部加载后的回调
 * @param target cb函数的指向
 * @returns {cc.LoaderScene|*}
 * @example
 * //Example
 * cc.LoaderScene.preload(g_resources, function () {
        cc.director.runScene(new HelloWorldScene());
    }, this);
 */
cc.LoaderScene.preload = function (resources, cb, target) {
    var _cc = cc;
    if (!_cc.loaderScene) {
        // 实例化LoaderScene
        _cc.loaderScene = new cc.LoaderScene();
        // 初始化,显示logo等信息
        _cc.loaderScene.init();
        // 注册监听工程文件修改
        cc.eventManager.addCustomListener(cc.Director.EVENT_PROJECTION_CHANGED, function () {
            _cc.loaderScene._updateTransform();
        });
    }

    // 保存要加载的资源,资源全部加载完成后的回调
    _cc.loaderScene.initWithResources(resources, cb, target);
    // 运行当前场景
    cc.director.runScene(_cc.loaderScene);
    return _cc.loaderScene;
};
看下src/myApp.js的源码
// 自己的层
var MyLayer = cc.Layer.extend({
    // 文本控件声明
    helloLabel: null,
    // 精灵控件声明
    sprite: null,

    init: function () {

        //
        // 1. super init first
        this._super();

        /
        // 2. add a menu item with "X" image, which is clicked to quit the program
        //    you may modify it.
        // ask director the window size
        // 获取窗口大大
        var size = cc.director.getWinSize();

        // add a "close" icon to exit the progress. it's an autorelease object
        // 创建菜单选项
        var closeItem = new cc.MenuItemImage(
            s_CloseNormal,
            s_CloseSelected,
            function () {
                cc.log("close");
            }, this);
        // 设置锚点
        closeItem.setAnchorPoint(0.5, 0.5);
        // 创建菜单
        var menu = new cc.Menu(closeItem);
        menu.setPosition(0, 0);
        // 添加到层
        this.addChild(menu, 1);
        closeItem.setPosition(size.width - 20, 20);

        /
        // 3. add your codes below...
        // add a label shows "Hello World"
        // create and initialize a label
        // 创建文本控件
        this.helloLabel = new cc.LabelTTF("Hello World", "Impact", 38);
        // position the label on the center of the screen
        this.helloLabel.setPosition(size.width / 2, size.height - 40);
        // add the label as a child to this layer
        this.addChild(this.helloLabel, 5);

        // add "Helloworld" splash screen"
        // 创建精灵
        this.sprite = new cc.Sprite(s_HelloWorld);
        this.sprite.setAnchorPoint(0.5, 0.5);
        this.sprite.setPosition(size.width / 2, size.height / 2);
        this.sprite.setScale(size.height / this.sprite.getContentSize().height);
        this.addChild(this.sprite, 0);
    }
});

// 自己的场景
var MyScene = cc.Scene.extend({
    // 运行场景后,下一帧执行该函数
    onEnter: function () {
        this._super();
        // 创建一个层
        var layer = new MyLayer();
        // 添加到场景上
        this.addChild(layer);
        // 运行层的init方法
        layer.init();
    }
});
做个总结:
1、入口为index.html,里面加载了CCBoot.js和main.js
2、main.js重写了CCBoot.js里面的cc.game.onStart方法,并执行cc.game.run(),然后执行onStart方法(原因见后面教程)
3、onStart方法运行了LoaderScene场景并加载游戏资源
4、加载成功后,运行自己的场景myScene