从0开始springboot后台管理项目-mybatis-plus/druid链接数据库多数据源
1.准备完成的功能
- 通过mybatis-plus/druid进行数据库链接
- 配置多数据源
使用mybatis-plus的原因就是太强大,比如支持Lambda,依赖少等等优点,可以搜索一下mybatis-plus和mybatis的区别。
2.mybatis-plus链接数据库
(1)引入pom文件
            com.baomidou
            mybatis-plus-boot-starter
            3.4.3.1


            com.alibaba
            druid-spring-boot-starter
            1.1.14


            org.projectlombok
            lombok
            RELEASE
            compile
直接将druid引入。
(2)编写测试代码
application.yml文件
spring:
  datasource:
    driver-class-name: com.mysql.cj.jdbc.Driver
    url: jdbc:mysql://localhost:3306/snail
    username: root
    password: 123456
mybatis-plus:
  configuration:
    #控制台打印sql。
    log-impl: org.apache.ibatis.logging.stdout.StdOutImpl
创建数据库文件
create table test_table
(
    id        int auto_increment comment '自增ID'
        primary key,
    user_name varchar(32) null comment '用户名',
    pass_word varchar(50) null comment '用户密码',
    constraint table_name_id_uindex
        unique (id)
)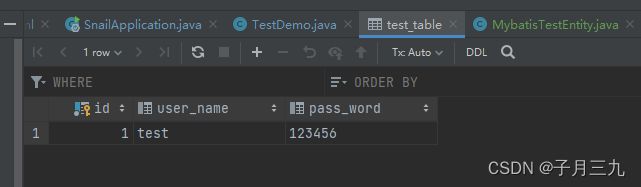
随机添加一条数据留着测试使用。
编写实体类
@Data
@TableName("test_table")
public class MybatisTestEntity {
    private String userName;
    private String passWord;
}
实体类后期可以用代码生成工具默认生成,这里仅仅为了测试是否好用手动编写,通过@TableName注释来指定数据表。或者你的实体类名称遵循以下规则这里可以不加@TableName注解:表名test_table----->实体类名称TestTable
这样mybatis-plus可以自动识别出表格。
@Data是为了方便实体类可以不用写get/set方法。
编写Mapper
@Repository
public interface MybatisTestMapper extends BaseMapper {
}
BaseMapper中封装好了很多基本的查询。按ctrl可以进去查看。
springboot启动类添加扫描包范围。
@SpringBootApplication
@MapperScan("com.monkey.snail.modules")
public class SnailApplication {

    public static void main(String[] args) {
        SpringApplication.run(SnailApplication.class, args);
    }

}
这里也可以不在启动类添加扫描,直接在Mapper文件上添加@Mapper注解。
编写controller进行测试
@RestController
@RequestMapping("/test")
public class MybatisTestController {
    @Autowired
    private MybatisTestMapper mybatisTestMapper;

    /**
     * 查询所有数据
     */
    @GetMapping("/list")
    public void test(){
        List list = mybatisTestMapper.selectList(null);
        for (int i = 0;i
测试结果
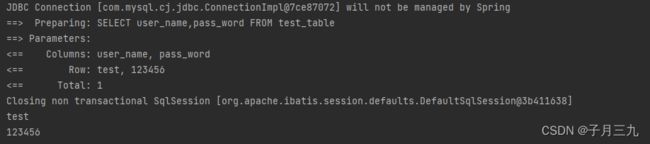
控制台打印出来,mybatis-plus连接成功。
3.配置durid +多数据源
(1)编写测试代码
修改application.yml文件
spring:
  autoconfigure:
    exclude: com.alibaba.druid.spring.boot.autoconfigure.DruidDataSourceAutoConfigure
  datasource:
    druid:
      stat-view-servlet:
        enabled: true
        loginUsername: admin
        loginPassword: 123456
        allow:
      web-stat-filter:
        enabled: true
    dynamic:
      druid:
        # 连接池的配置信息
        # 初始化大小,最小,最大
        initial-size: 5
        min-idle: 5
        maxActive: 1000
        # 配置获取连接等待超时的时间
        maxWait: 60000
        # 配置间隔多久才进行一次检测,检测需要关闭的空闲连接,单位是毫秒
        timeBetweenEvictionRunsMillis: 60000
        # 配置一个连接在池中最小生存的时间,单位是毫秒
        minEvictableIdleTimeMillis: 300000
        validationQuery: SELECT 1 FROM DUAL
        testWhileIdle: true
        testOnBorrow: false
        testOnReturn: false
        # 打开PSCache,并且指定每个连接上PSCache的大小
        poolPreparedStatements: true
        maxPoolPreparedStatementPerConnectionSize: 20
        # 配置监控统计拦截的filters,去掉后监控界面sql无法统计,'wall'用于防火墙
        #filters: stat,wall,slf4j
      datasource:
        master:
          url: jdbc:mysql://localhost:3306/snail
          username: root
          password: 123456
          driver-class-name: com.mysql.cj.jdbc.Driver
          #多数据源配置
        DS2:
          url: jdbc:mysql://localhost:3306/snail2
          username: root
          password: 123456
          driver-class-name: com.mysql.cj.jdbc.Driver
      primary: master
mybatis-plus:
  configuration:
    #控制台打印sql。
    log-impl: org.apache.ibatis.logging.stdout.StdOutImpl
新建数据库
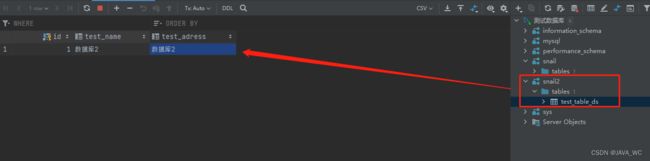
添加实体类
@Data
@TableName("test_table_ds")
public class MybatisTest2Entity {
    private String testName;
    private String testAdress;
}
添加Mapper
多数据源的时候通过类或者方法上添加@DS标签指定使用的数据源。值为mapper文件中自己定义的数据库名称我这里是master和DS2。
@Repository
@DS("DS2")
public interface MybatisTest2Mapper extends BaseMapper {
}
修改controller
一个controller中同时调用两个查询。
@RestController
@RequestMapping("/test")
public class MybatisTestController {
    @Autowired
    private MybatisTestMapper mybatisTestMapper;

    @Autowired
    private MybatisTest2Mapper mybatisTest2Mapper;

    /**
     * 查询所有数据
     */
    @GetMapping("/list")
    public void test(){
        List list = mybatisTestMapper.selectList(null);
        for (int i = 0;i list1 = mybatisTest2Mapper.selectList(null);
        for (int i = 0;i
测试
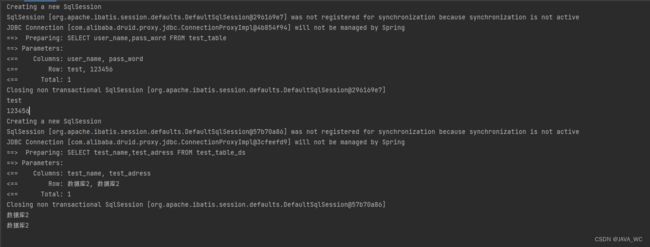
多数据源配置成功