基于Protobuf实现一个简单的RPC框架
文章目录
- 1、Proto定义RPC服务
-
- 1.1 编写proto文件
- 1.2 使用protoc工具生成RPC对象接口模型
- 2、编写RPC服务逻辑
- 3、编写RPC服务框架
-
- 3.1 RpcServer
- 3.2 构造数据包,方便识别service和method信息
- 3.3 RpcServer启动主程序
- 4、编写RPC客户端代码
- 5、编写客户端使用样例
- 6、RPC服务框架中类图
- 7、RPC调用链路
使用Protobuf实现RPC框架大致可以分为以下几步:
1、编写proto文件定义服务,并使用Protoc工具生成RPC对象接口模型。
2、编写RPC服务处理主逻辑(继承框架代码中的接口类实现服务的主逻辑)
3、编写RPC服务框架
- 作用:其作用主要包括注册的RPC Service(第1步定义、第2步实现),接收RPC客户端请求交由对应的RPC Service处理,处理完毕后对客户端进行回应
4、编写RPC客户端代码
- 本质上就是实现RpcChannel和RpcController两个类(实际客户端调用逻辑proto工具已经帮我们在stub类中封装好了,Stub与RpcChannel和RpcController交互的逻辑在后面会有讲解)。
- RpcChannel本质上是用于客户端与服务端之间交互的一条通道,其负责实现客户端向服务端请求时的一些数据和网络处理。一般情况下这个类中都会至少包括序列化和发包到服务端这两个操作。
- RpcController这个类主要用于记录一次rpc调用的上下文,包括这次调用的方法以及执行结果等,在客户端和服务端都要用到这个类,最常见的就是服务端设置failed状态,客户端读取服务端执行的状态。
5、编写客户端使用样例。
本文将会对上述每一个步骤进行讲解,并会在分模块讲解完之后将所有的涉及到的模块进行串联起来进行理解,最后为了对实现的RPC框架有一个直观的理解,还会给出RPC客户端请求RPC服务端时候的整个调用链路。
1、Proto定义RPC服务
1.1 编写proto文件
package goya.rpc.echo;
option cc_generic_services = true;

message EchoRequest {
  optional string message = 1;
}

message EchoResponse {
  optional string message = 1;
}

service EchoServer {
  rpc Echo(EchoRequest) returns(EchoResponse);
}
1.2 使用protoc工具生成RPC对象接口模型
$ protoc --cpp_out=./ echo_service.proto
$ ls
echo_service.pb.cc  echo_service.pb.h  echo_service.proto
生成的echo_service.pb.h文件中,包含两个主要和RPC相关的类,分别是接口类EchoServer和该接口的一个实现EchoServer_Stub。
其中EchoServer类是一个接口类,它继承::google::protobuf::Service抽象类,不允许实例化(默认构造函数声明为protected),这个接口中生成了一个与proto文件中的方法Echo对应的函数。
class EchoServer_Stub;

class EchoServer : public ::google::protobuf::Service {
	// 声明为protected,不允许显式实例化
 protected:
  // This class should be treated as an abstract interface.
  inline EchoServer() {};

 public:
  virtual ~EchoServer();
  typedef EchoServer_Stub Stub;
  // 获取当前service的属性descriptor,service的属性中又存在其中的method属性
  // 其中属性包括service->name(), service->method(), service->methmod(0)->name()的等
  static const ::google::protobuf::ServiceDescriptor* descriptor();
  // 与proto文件中对应的调用方法Echo
  virtual void Echo(::google::protobuf::RpcController* controller,
                       const ::goya::rpc::echo::EchoRequest* request,
                       ::goya::rpc::echo::EchoResponse* response,
                       ::google::protobuf::Closure* done);

  // implements Service ----------------------------------------------
  // 获取当前Service的descriptor
  const ::google::protobuf::ServiceDescriptor* GetDescriptor();

  // 实际调用方法,对于每一个远程调用方法,实际上都是通过调用该函数实现,后面后介绍
  void CallMethod(const ::google::protobuf::MethodDescriptor* method,
                  ::google::protobuf::RpcController* controller,
                  const ::google::protobuf::Message* request,
                  ::google::protobuf::Message* response,
                  ::google::protobuf::Closure* done);
  // 获取调用方法method的请求类型(如Echo方法的请求类型为EchoRequest)
  const ::google::protobuf::Message& GetRequestPrototype(
    const ::google::protobuf::MethodDescriptor* method) const;
  // 获取调用方法method的应答类型(如Echo方法的请求类型为EchoResponse)
  const ::google::protobuf::Message& GetResponsePrototype(
    const ::google::protobuf::MethodDescriptor* method) const;

 private:
  GOOGLE_DISALLOW_EVIL_CONSTRUCTORS(EchoServer);
};

class EchoServer_Stub : public EchoServer {
 public:
  EchoServer_Stub(::google::protobuf::RpcChannel* channel);
  EchoServer_Stub(::google::protobuf::RpcChannel* channel,
                   ::google::protobuf::Service::ChannelOwnership ownership);
  ~EchoServer_Stub();

  inline ::google::protobuf::RpcChannel* channel() { return channel_; }

  // implements EchoServer ------------------------------------------
  void Echo(::google::protobuf::RpcController* controller,
                       const ::goya::rpc::echo::EchoRequest* request,
                       ::goya::rpc::echo::EchoResponse* response,
                       ::google::protobuf::Closure* done);
 private:
  // 客户端与服务端交互的通道
  ::google::protobuf::RpcChannel* channel_;
  bool owns_channel_;
  GOOGLE_DISALLOW_EVIL_CONSTRUCTORS(EchoServer_Stub);
};
EchoServer的作用有两个:
- 作为RPC服务端逻辑处理类(EchoServerImpl)的基类,服务逻辑处理类通过实现RPC定义的方法来处理相关逻辑,即实现Echo()函数。
- 作为EchoServer_Stub类(上面已实现)的基类,EchoServer_Stub是客户端访问RPC服务的一个包装类
EchoServer_Stub作用如下:
EchoServer_Stub封装了RpcChannel,RpcChannel是客户端与服务通信的通道,由使用者自定义完成,将RPC调用本地化。
2、编写RPC服务逻辑
从1.2 中可以知道protobuf为我们生成了EchoServer基类用于完成服务端处理的实际逻辑。所以我们通过编写EchoServer的实现类即可实现服务端方法的处理逻辑。
// 继承EchoServer实现类EchoServerImpl,并填充实现逻辑即可
class EchoServerImpl : public goya::rpc::echo::EchoServer {
public:
  EchoServerImpl() {}
  virtual ~EchoServerImpl() {}

private:
  // 方法具体实现。将接收数据打屏,并设置返回数据到response中。
  // 逻辑执行结束后,调用闭包函数(回调函数)
  virtual void Echo(google::protobuf::RpcController* controller,
                    const goya::rpc::echo::EchoRequest* request,
                    goya::rpc::echo::EchoResponse* response,
                    google::protobuf::Closure* done)
  {
    std::cout << "server received client msg: " << request->message() << std::endl;
    response->set_message(
      "server say: received msg: ***" + request->message() + std::string("***"));
    done->Run();
  }
};
函数参数说明:
- controller:RPC控制器,用于记录当前方法调用的上下文,在服务端实现中,我们可以通过controller设置当前调用是否成功或者失败。
- request:调用请求体
- response:调用响应体
- done:回调函数,执行服务端逻辑后,调用该函数,通常会将回包的逻辑放在这里实现。
3、编写RPC服务框架
上面的RPC服务端处理逻辑写好了,但是有几个问题不知道你想过没有?
- 服务端是如何接收客户端的请求?
- 服务端如何识别客户端请求调用的是哪个远程方法?
- 服务端是如何将请求转发到具体方法实现上去执行相应的逻辑的呢?
3.1 RpcServer
要完成上述的过程,我们的RPCServer框架是必不可少的。
RPCServer的作用主要包括注册RPC Service,接收RPC客户端请求,将请求交由对应的RPC Service的Method进行处理,处理完毕后对客户端进行回应。
/* RpcServer存储注册Service结构体
	struct ServiceInfo {
    ::google::protobuf::Service* service_;
    std::map  mdescriptor_;
  };
  std::map services_;
  */
// 注册Service,将Service注册到RpcServer中,该server只处理被注册过的远程方法调用,其他不处理
bool RpcServerImpl::RegisterService(google::protobuf::Service* service, bool ownership)
{
  std::string     method_id;
  ServiceInfo     service_info;
  const ::google::protobuf::ServiceDescriptor* sdescriptor = service->GetDescriptor();
  // 将当前service中的method注册到RpcServer的当前service下
  for (int i = 0; i < sdescriptor->method_count(); ++i) {
    method_id = sdescriptor->method(i)->name();
    service_info.mdescriptor_[method_id] = sdescriptor->method(i);
  }

  service_info.service_ = service;
  services_[sdescriptor->name()] = service_info;
  return true;
}

// RPC接收逻辑
bool RpcServerImpl::Start(std::string& server_addr)
{
  server_addr_ = server_addr;
  size_t split_pos = server_addr_.find(':');
  std::string ip   = server_addr_.substr(0, split_pos);
  std::string port = server_addr_.substr(split_pos + 1);

  boost::asio::io_service io;
  boost::asio::ip::tcp::endpoint ep(
    boost::asio::ip::address::from_string(ip), std::stoi(port));
  boost::asio::ip::tcp::acceptor acceptor(io, ep);

  while (true) {
    auto socket = boost::make_shared<boost::asio::ip::tcp::socket>(io);
    acceptor.accept(*socket);

    // 首先解出包头
    // meta_size
    char rpc_meta_buf[sizeof(int)]; //★★★char 与send的类型要一致★★★
    socket->receive(boost::asio::buffer(rpc_meta_buf));
    int rpc_meta_size = *(int*)rpc_meta_buf;

    // meta_data
    std::vector<char> rpc_meta_data(rpc_meta_size, 0);
    socket->receive(boost::asio::buffer(rpc_meta_data));
    RpcMeta rpc_meta_data_proto;
    rpc_meta_data_proto.ParseFromString(std::string(&rpc_meta_data[0], rpc_meta_data.size()));

    // 然后解出请求数据
    // request_data
    std::vector<char> request_data(rpc_meta_data_proto.data_size(), 0);
    socket->receive(boost::asio::buffer(request_data));

    // ...
    // 调用第2节中实现的远程方法调用
    ProcRpcData(rpc_meta_data_proto.service_id(),
      rpc_meta_data_proto.method_id(), std::string(&request_data[0], request_data.size()), socket);
  }
}

// 处理数据逻辑,先解包,然后调用CallMethod函数进行处理
void RpcServerImpl::ProcRpcData(const std::string& service_id,
  const std::string& method_id,
  const std::string& serialzied_data,
  const boost::shared_ptr<boost::asio::ip::tcp::socket>& socket)
{
  auto service     = services_[service_id].service_;
  auto mdescriptor = services_[service_id].mdescriptor_[method_id];
  auto recv_msg = service->GetRequestPrototype(mdescriptor).New();
  auto resp_msg = service->GetResponsePrototype(mdescriptor).New();
  recv_msg->ParseFromString(serialzied_data);
  auto done = google::protobuf::NewCallback(
    this, &RpcServerImpl::OnCallbackDone, resp_msg, socket);

  RpcController controller;
  service->CallMethod(mdescriptor, &controller, recv_msg, resp_msg, done);
}

// 回调函数,回包逻辑
void RpcServerImpl::OnCallbackDone(::google::protobuf::Message* resp_msg,
  const boost::shared_ptr<boost::asio::ip::tcp::socket> socket)
{
  int serialized_size = resp_msg->ByteSize();
  std::string resp_data;
  resp_data.insert(0, std::string((const char*)&serialized_size, sizeof(int)));
  resp_msg->AppendToString(&resp_data);

  //resp_msg->SerializeToString(&resp_data);
  socket->send(boost::asio::buffer(resp_data));
}
注意上面RpcServer调用实际方法ProcData中,实际上是通过调用CallMethod进行处理,CallMethod在基类中实现如下:
// RpcServer中通过调用该函数路由到对应的逻辑处理。
void EchoServer::CallMethod(const ::google::protobuf::MethodDescriptor* method,
                             ::google::protobuf::RpcController* controller,
                             const ::google::protobuf::Message* request,
                             ::google::protobuf::Message* response,
                             ::google::protobuf::Closure* done) {
  GOOGLE_DCHECK_EQ(method->service(), EchoServer_descriptor_);
  switch(method->index()) {
    case 0:
      Echo(controller,
             ::google::protobuf::down_cast<const ::goya::rpc::echo::EchoRequest*>(request),
             ::google::protobuf::down_cast< ::goya::rpc::echo::EchoResponse*>(response),
             done);
      break;
    default:
      GOOGLE_LOG(FATAL) << "Bad method index; this should never happen.";
      break;
  }
}
如果你看到最后,会发现服务端和客户端的Echo函数和CallMethod函数的调用关系刚好是反过来的:
- 对于服务端,是通过CallMethod路由到Echo函数
- 对于客户端,对Echo函数的调用实际上是调用CallMethod函数
3.2 构造数据包,方便识别service和method信息
上面我们看到,服务端接收的是客户端发来的一个数据包,我们要向知道客户端是发起的哪个远程调用,最简单的方法就是在数据包中添加当前调用的一些信息,即哪个service的哪个method,我们可以通过将service->name和method->name放在包体中,服务端进行解包即可识别请求的是哪个方法。(当然这只是最朴素的方法之一,还可以有其他方法来对这个进行优化)
// 包头结构,包头中包含serviceid、methodid以及请求数据长度
package goya.rpc;
message RpcMeta {
  string service_id = 1;
  string method_id  = 2;
  int32  data_size  = 3;
}
进行数据发送的时候将包头大小+包头数据+请求体进行打包发送即可。
3.3 RpcServer启动主程序
有了上面的基础,RpcServer启动就简单了很多,首先将EchoService注册到RpcServer中,然后指定端口并启动服务。
int main(int argc, char* argv[])
{
  RpcServer rpc_server;

  goya::rpc::echo::EchoServer* echo_service = new EchoServerImpl();
  if (!rpc_server.RegisterService(echo_service, false)) {
    std::cout << "register service failed" << std::endl;
    return -1;
  }

  std::string server_addr("0.0.0.0:12321");
  if (!rpc_server.Start(server_addr)) {
    std::cout << "start server failed" << std::endl;
    return -1;
  }

  return 0;
}
4、编写RPC客户端代码
对于RPC客户端,从第1节中可以知道,protobuf已经为我们生成了RpcChannel的包装类,EchoServer_Stub,我们这里只需要实现RpcChannel和RpcControl类即可。RpcChannel本质上是用于客户端与服务端之间交互的一条通道,其负责实现客户端向服务端请求时的一些数据和网络处理。一般情况下这个类中都会至少包括序列化和发包到服务端这两个操作。RpcController这个类主要用于记录一次rpc调用的上下文,包括这次调用的方法以及执行结果等,在客户端和服务端都要用到这个类,最常见的就是服务端设置failed状态,客户端读取服务端执行的状态。
同时我们可以回过头来看EchoServer_stub中的Echo实现:
// 客户端中的Echo实现实际上是调用channel中的CallMethod函数,所以我们主要是实现RpcChannel中的CallMethod函数。
void EchoServer_Stub::Echo(::google::protobuf::RpcController* controller,
                              const ::goya::rpc::echo::EchoRequest* request,
                              ::goya::rpc::echo::EchoResponse* response,
                              ::google::protobuf::Closure* done) {
  channel_->CallMethod(descriptor()->method(0),
                       controller, request, response, done);
}
实现RpcChannel类需要继承google::protobuf::RpcChannel,框架Stub中实际调用的是RpcChannel的CallMethod函数。
// 初始化tcp链接
void RpcChannelImpl::Init(std::string& server_addr)
{
  server_addr_ = server_addr;
  size_t split_pos = server_addr_.find(':');
  std::string ip   = server_addr_.substr(0, split_pos);
  std::string port = server_addr_.substr(split_pos + 1);

  io_ = boost::make_shared<boost::asio::io_service>();
  socket_ = boost::make_shared<boost::asio::ip::tcp::socket>(*io_);
  boost::asio::ip::tcp::endpoint ep(
    boost::asio::ip::address::from_string(ip), std::stoi(port));

  try {
    socket_->connect(ep);
  } catch (boost::system::system_error ec) {
    std::cout << "connect fail, error code: " << ec.code() << std::endl;
  }
}

// 对数据进行打包,并通过网络发送到RPCServer进行处理。
void RpcChannelImpl::CallMethod(const ::google::protobuf::MethodDescriptor* method,
  ::google::protobuf::RpcController* controller,
  const ::google::protobuf::Message* request,
  ::google::protobuf::Message* response,
  ::google::protobuf::Closure* done)
{
  std::string request_data_str;
  request->SerializeToString(&request_data_str);

  // 发送格式: meta_size + meta_data + request_data
  RpcMeta rpc_meta;
  rpc_meta.set_service_id(method->service()->name());
  rpc_meta.set_method_id(method->name());
  rpc_meta.set_data_size(request_data_str.size());
  std::string rpc_meta_str;
  rpc_meta.SerializeToString(&rpc_meta_str);

  int rpc_meta_str_size = rpc_meta_str.size();
  std::string serialzied_str;
  serialzied_str.insert(0, std::string((const char*)&rpc_meta_str_size, sizeof(int)));
  serialzied_str += rpc_meta_str;
  serialzied_str += request_data_str;
  socket_->send(boost::asio::buffer(serialzied_str));

  // 接受格式: response_size + response_data
  char resp_data_size[sizeof(int)];
  socket_->receive(boost::asio::buffer(resp_data_size));
  int resp_data_len = *(int*)resp_data_size;
  std::vector<char> resp_data(resp_data_len, 0);
  socket_->receive(boost::asio::buffer(resp_data));

  response->ParseFromString(std::string(&resp_data[0], resp_data.size()));
}
RpcController就比较简单了,主要是对当前调用的一些状态的设置和读取操作。
class RpcController : public google::protobuf::RpcController {
public:
  RpcController() { Reset(); }
  virtual ~RpcController() {}

  virtual void Reset() { is_failed_ = false; error_code_ = ""; }
  virtual bool Failed() const { return is_failed_; }
  virtual void SetFailed(const std::string& reason) { is_failed_ = true; error_code_ = reason;}
  virtual std::string ErrorText() const { return error_code_; }
  virtual void StartCancel() { };
  virtual bool IsCanceled() const { return false; };
  // 当RPC调用被取消了会被调用
  virtual void NotifyOnCancel(::google::protobuf::Closure* /* callback */) { };

private:
  bool is_failed_;
  std::string error_code_;
};
5、编写客户端使用样例
到现在为止,我们的RPC服务端和客户端都已经完成了,那么就可以通过客户端对RpcServer上的方法进行远程调用了。
int main(int argc, char* argv[])
{
  echo::EchoRequest   request;
  echo::EchoResponse  response;
  request.set_message("hello tonull, from client");

  char* ip          = argv[1];
  char* port        = argv[2];
  std::string addr  = std::string(ip) + ":" + std::string(port);
  RpcChannel    rpc_channel(addr);
  // 初始化客户端的时候指定RpcChannel,用于客户端与服务端之间的通信
  echo::EchoServer_Stub stub(&rpc_channel);
	// controller用于获取调用状态
  RpcController controller;
  stub.Echo(&controller, &request, &response, nullptr);

  // 通过调用状态判断是够调用成功
  if (controller.Failed())
    std::cout << "request failed: %s" << controller.ErrorText().c_str();
  else
    std::cout << "resp: " << response.message() << std::endl;

  return 0;
}
6、RPC服务框架中类图
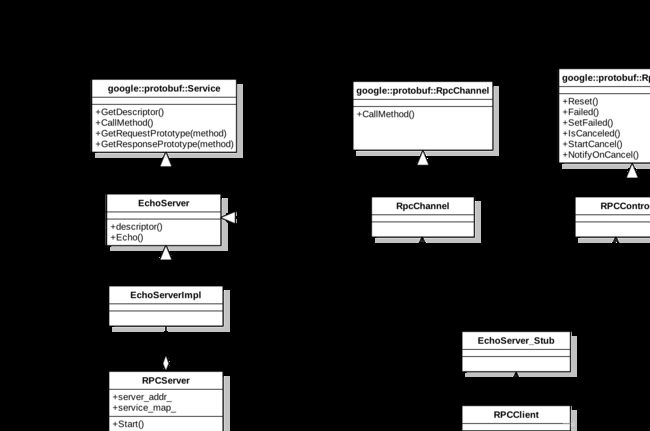
从第1节到第5节我们实现了一个简化版本的RPC服务,现在我们将每个模块以类图的方式将各个类之间的关系展现出来,可以更加直观的帮我们了解每个模块之间的关系。
7、RPC调用链路
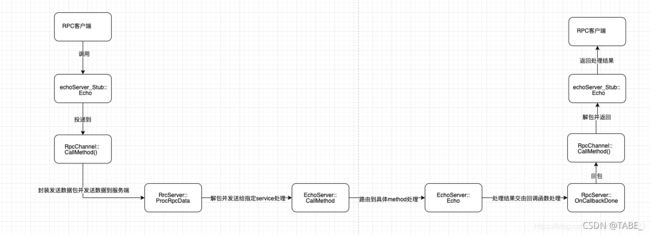
有了上面的实现,这里简单总结一下当通过Rpc客户端对Rpc服务端发起一个Echo请求调用的时候,整个过程中到底发生了什么,在处理的整个过程中每个模块之间工作的流程是怎么样的,当使用出现问题的时候也可以迅速的定位到哪个环节出了问题。

