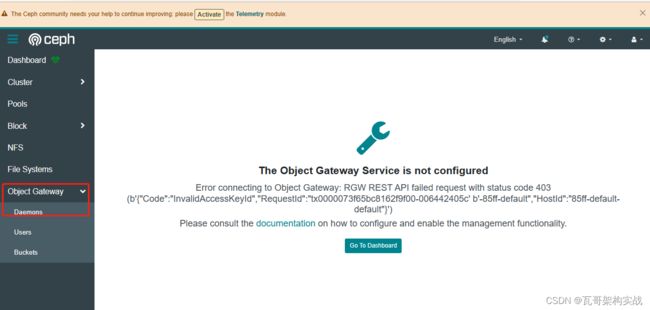
Ceph入门到精通-The Object Gateway Service is not configured
Error connecting to Object Gateway: RGW REST API failed request with status code 403 (b'{"Code":"InvalidAccessKeyId","RequestId":"tx0000082323f3158dea840-00644241e4' b'-85ff-default","HostId":"85ff-default-default"}')
ENABLING THE OBJECT GATEWAY MANAGEMENT FRONTEND
When RGW is deployed with cephadm, the RGW credentials used by the dashboard will be automatically configured. You can also manually force the credentials to be set up with:
ceph dashboard set-rgw-credentials
This will create an RGW user with uid dashboard for each realm in the system.
If you’ve configured a custom ‘admin’ resource in your RGW admin API, you should set it here also:
ceph dashboard set-rgw-api-admin-resource
If you are using a self-signed certificate in your Object Gateway setup, you should disable certificate verification in the dashboard to avoid refused connections, e.g. caused by certificates signed by unknown CA or not matching the host name:
ceph dashboard set-rgw-api-ssl-verify False
If the Object Gateway takes too long to process requests and the dashboard runs into timeouts, you can set the timeout value to your needs:
ceph dashboard set-rest-requests-timeout
The default value is 45 seconds.
[root@ceph01 ~]# ceph dashboard set-rgw-credentials
RGW credentials configured
[root@ceph01 ~]# ceph dashboard set-rgw-api-ssl-verify False
Option RGW_API_SSL_VERIFY updated
[root@ceph01 ~]# ceph dashboard set-rgw-credentials^C
[root@ceph01 ~]# ceph dashboard set-rgw-api-admin-resource
-bash: syntax error near unexpected token `newline'
[root@ceph01 ~]# ceph dashboard set-rgw-api-admin-resource admin
Option RGW_API_ADMIN_RESOURCE updated
[root@ceph01 ~]# radosgw-admin user create --uid=user01 --display-name=user01 --system
{
"user_id": "user01",
"display_name": "user01",
"email": "",
"suspended": 0,
"max_buckets": 1000,
"subusers": [],
"keys": [
{
"user": "user01",
"access_key": "TJMBFQ41KB9KCDCDLWR0",
"secret_key": "jD2wlGr0yPLPu9PiOVyMaBwKpuETvPO26tFCQBFM"
}
],
"swift_keys": [],
"caps": [],
"op_mask": "read, write, delete",
"system": "true",
"default_placement": "",
"default_storage_class": "",
"placement_tags": [],
"bucket_quota": {
"enabled": false,
"check_on_raw": false,
"max_size": -1,
"max_size_kb": 0,
"max_objects": -1
},
"user_quota": {
"enabled": false,
"check_on_raw": false,
"max_size": -1,
"max_size_kb": 0,
"max_objects": -1
},
"temp_url_keys": [],
"type": "rgw",
"mfa_ids": []
}一、配置RGW
1、dashboard 启用RGW ,开启Object Gateway管理功能
ceph Dashboard默认安装好后,没有启动rgw,需要手动启用RGW
#部署rgw,全部节点安装,达到高可用
yum install -y  ceph-radosgw
ceph -s
ceph-deploy rgw create ceph1 ceph2 ceph3
2、创建rgw系统账号
查看系统当前的用户
radosgw-admin user list
创建系统用户
radosgw-admin user create --uid=rgw --display-name=rgw --system
记下输出的access_key和secret_key的值,如果没有记住可以用以下命令查看
radosgw-admin user info --uid=rgw
3、设置access_key和secret_key
写入access_key值
echo EOTMCEYSCMIM9MAJMPBZ >access_key
写入secret_key值
echo uYhjInFIALCamU8EM5ZzeeAoobkfccEBhDQQL7az > secret_key
提供dashboard证书
ceph dashboard set-rgw-api-access-key -i access_key
ceph dashboard set-rgw-api-secret-key -i secret_key
禁用ssl
直接使用http,如果想要用https的话,不需要操作这一步
ceph dashboard set-rgw-api-ssl-verify False
二、prometheus+grafana监控ceph
1、安装grafana
#官网连接:https://grafana.com/docs/grafana/latest/installation/rpm/
cat > /etc/yum.repos.d/grafana.repo << EOF
[grafana]
name=grafana
baseurl=https://packages.grafana.com/oss/rpm
repo_gpgcheck=1
enabled=1
gpgcheck=1
gpgkey=https://packages.grafana.com/gpg.key
sslverify=1
sslcacert=/etc/pki/tls/certs/ca-bundle.crt
EOF
#通过yum命令安装grafana
yum install grafana -y
#启动grafana并设置开机自启
systemctl enable grafana-server --now
#检查版本
grafana-server -v
grafana-cli -v
2、安装prometheus
#下载安装包,下载地址
https://prometheus.io/download/
wget https://github.com/prometheus/prometheus/releases/download/v2.29.2/prometheus-2.29.2.linux-amd64.tar.gz
#解压
tar -zxvf prometheus-2.29.2.linux-amd64.tar.gz
#移动到安装目录
mv prometheus-2.29.2.linux-amd64 /usr/local/prometheus
#查看版本
cd /usr/local/prometheus/
./prometheus --version
#配置系统服务启动
cat > /etc/systemd/system/prometheus.service << EOF
[Unit]
Description=Prometheus Monitoring System
Documentation=Prometheus Monitoring System

[Service]
ExecStart=/usr/local/prometheus/prometheus \\
  --storage.tsdb.path=/usr/local/prometheus/data \\
  --config.file=/usr/local/prometheus/prometheus.yml \\
  --web.listen-address=:9090

[Install]
WantedBy=multi-user.target
EOF
#重新加载系统服务
systemctl daemon-reload
#启动服务和添加开机自启
systemctl enable prometheus --now
systemctl status prometheus
3、ceph mgr prometheus插件配置
ceph mgr module enable prometheus
ceph mgr module ls|head -20
#检查服务
ceph -s |grep mgr
netstat -nutlp|grep mgr
curl 192.168.112.130:9283/metrics
4、配置prometheus
在scrape_configs:配置项下添加
cat >> /usr/local/prometheus/prometheus.yml << EOF
  - job_name: "prometheus"
    static_configs:
      - targets: ["192.168.112.130:9283"]
EOF
注意:192.168.112.130这个是正在运行mgr得IP
ceph -s|grep mgr
#重启prometheus服务
systemctl restart prometheus
systemctl status prometheus
#检查prometheus服务器中是否添加成功
浏览器-》http:192.168.112.130:9090-》status-》Targets
5、配置grafana
URL:http:192.168.112.130:3000
默认登录的用户名密码都是admin,登录成功后会强制修改密码admin123
https://grafana.com/grafana/dashboards?search=ceph 常用于的ceph监控的模板,这里我选的是:917、2842
1、官网选择监控模板
2、添加数据源
3、添加数据源之后,选择prometheus
4、填写prometheus监控的url
5、导入监控数据
6、这里填写我们刚在官网找到的,用的最多的模板id:2842
7、导入成功
