vue/go项目部署
vue:
1)跨域配置:
1.新建:vue.config.js文件
2.
module.exports = {
    devServer: {
        proxy: { // 配置跨域
            '/api': {
                target: 'http://localhost:7003/user/',
                // ws: true,        //如果要代理 websockets,配置这个参数
                // secure: false,  // 如果是https接口,需要配置这个参数
                changOrigin: true,
                pathRewrite: {
                    '^/api': ''
                }
            },
        },
    },
}
2)混淆代码:
    1.npm install uglifyjs-webpack-plugin --save-dev
2.新建:vue.config.js文件
3.
const UglifyJsPlugin = require('uglifyjs-webpack-plugin')
module.exports = {
    configureWebpack: config => {
        if (process.env.NODE_ENV === 'production') {
            config.plugins.push(new UglifyJsPlugin())
        }
    }
}
3)nginx配置:
location /api {
            proxy_pass http://39.96.29.214:7003/user/;             add_header 'Access-Control-Allow-Origin' '*';
            add_header 'Access-Control-Allow-Credentials' 'true';
add_header 'Access-Control-Allow-Headers' 'DNT,X-Mx-ReqToken,Keep-Alive,User-Agent,X-Requested-With,If-Modified-Since,Cache-Control,Content-Type,  Access-Control-Expose-Headers, Token, Authorization,platform';
        }
伪静态:
location / {
try_files $uri $uri/ @router;
index index.html;
}
location @router {
rewrite ^.*$ /index.html last;
} 缓存处理
location ~* \.(html)$ {
add_header Cache-Control "private, no-store, no-cache, must-revalidate,
proxy-revalidate";
}
location ~ .*\.(gif|jpg|jpeg|png|bmp|swf)$
{
expires 30d;
error_log /dev/null;
access_log /dev/null;
}
location ~ .*\.(js|css|gz)?$
{
expires 12h;
error_log /dev/null;
access_log /dev/null;
}go:
1)beego 打包:bee pack -be GOOS=linux
2)nginx:
location / {
      proxy_pass http://127.0.0.1:8086;
    }
go开机启动(rc.local篇)
①编写.sh脚本如下
#!/bin/bash

#这里可替换为你自己的执行程序,其他代码无需更改

APP_NAME=go-test
#使用说明,用来提示输入参数
usage() {
    echo "Usage: sh robotcenter.sh [start|stop|restart|status]"
    exit 1
}

#检查程序是否在运行
is_exist(){
  pid=`ps -ef|grep $APP_NAME|grep -v grep|awk '{print $2}'`
  #如果不存在返回1,存在返回0
  if [ -z "${pid}" ]; then
   return 1
  else
    return 0
  fi
}

#启动方法
start(){
  is_exist
  if [ $? -eq 0 ]; then
    echo "${APP_NAME} is already running. pid=${pid}"
  else
    nohup java -jar ${APP_NAME}  >/dev/null 2>&1 &
    #Xms Xmx  指定虚拟内存上下限
    #nohup ${JRE_HOME}/bin/java -Xms128m -Xmx512m -jar ${APP_NAME} >/dev/null 2>&1 &
    echo "..."
    sleep 2
    echo "..."
    sleep 3
    is_exist
    if [ $? -eq 0 ]; then
      echo "${APP_NAME} is running success. pid=${pid}"
    fi
  fi
}

#停止方法
stop(){
  is_exist
  if [ $? -eq "0" ]; then
    kill -9 $pid
    echo "..."
    sleep 2
    is_exist
    if [ $? -eq 0 ]; then
      echo "${APP_NAME} still in the running. pid=${pid}"
    else
      echo "${APP_NAME} has stopped running."
    fi
  else
    echo "${APP_NAME} is not running"
  fi
}

#输出运行状态
status(){
  is_exist
  if [ $? -eq "0" ]; then
    echo "${APP_NAME} is running. Pid is ${pid}"
  else
    echo "${APP_NAME} is NOT running."
  fi
}

#重启
restart(){
  stop
  #sleep 5
  start
}

#根据输入参数,选择执行对应方法,不输入则执行使用说明
case "$1" in
  "start")
    start
    ;;
  "stop")
    stop
    ;;
  "status")
    status
    ;;
  "restart")
    restart
    ;;
  *)
    usage
    ;;
esacgo开机启动(宝塔篇):弃
①go项目放到:/home/www/11/
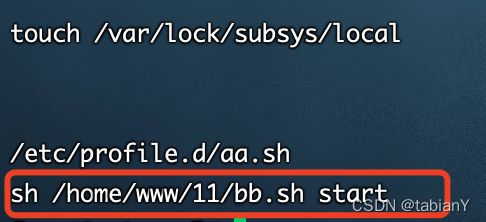
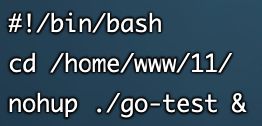
②编辑.sh文件如下放到/etc/profile.d/下
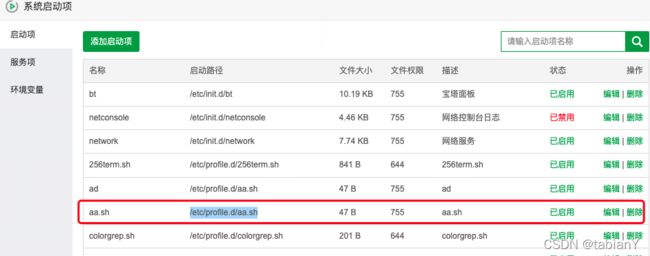
③添加宝塔开机启动:
go开机启动(chkconfig篇)弃
①编写.sh脚本如下放到/etc/rc.d/init.d/下边
②chkconfig --add aa.sh chkconfig aa.sh on设置开机启动
chkconfig --add httpd            # 添加服务,以便让chkconfig指令管理它
chkconfig httpd on               # 设置开机运行该服务,默认是设置2345等级开机运行服务
chkconfig --list                 # 列出所有被chkconfig管理的服务
chkconfig --add httpd            # 添加指定的服务,让chkconfig指令管理它
chkconfig --del httpd            # 删除指定的服务,不再让chkconfig指令管理它
chkconfig httpd on               # 设置开机运行服务,需要先执行 --add 才能执行该命令
chkconfig httpd off              # 设置开机不运行服务,需要先执行 --add 才能执行该命令
chkconfig --level 35 httpd on    # 设置服务在等级3和5时开机运行服务,默认是设置2345等级开机运行服务
go开机启动(profile篇)
#!/bin/bash
APP_NAME=chat-service
#检查程序是否在运行
is_exist(){
pid=`ps -ef|grep $APP_NAME|grep -v grep|awk '{print $2}'`
#如果不存在返回1,存在返回0
if [ -z "${pid}" ]; then
return 1
else
return 0
fi
}
#启动方法
start(){
is_exist
if [ $? -eq 0 ]; then
echo "${APP_NAME} is already running. pid=${pid}"
else
cd /www/wwwroot/niu.chatservice.mr727.top/go/
nohup ./chat-service &
#Xms Xmx 指定虚拟内存上下限
#nohup ${JRE_HOME}/bin/java -Xms128m -Xmx512m -jar ${APP_NAME} >/dev/null 2>&1 &
is_exist
if [ $? -eq 0 ]; then
echo "${APP_NAME} is running success. pid=${pid}"
fi
fi
}
start
直接将写好的脚本(.sh文件)放到目录/etc/profile.d/下。


