【毕设】Spring Boot整合Thymeleaf
1、Thymeleaf简介
Thymeleaf是一个跟Velocity、FreeMarker类似的模板引擎,它完全可以代替JSP。相比较于其他的模板引擎,它具有如下三个吸引人的特点:
- Thymeleaf在有网络和无网络的环境下即可运行,它即可用让美工在浏览器查看页面的静态效果,也可以让程序员在服务器查看带数据的动态效果。这是由于它支持HTML原型,然后在HTML标签里增加额外的属性来达到模板+数据的展示方式。浏览器解析HTML时会忽略未定义的标签属性,所以Thymeleaf的模板可以静态的运行;当有数据返回到页面时,Thymeleaf标签会动态地替换掉静态内容,使页面动态显示。
- Thymeleaf开箱即用的特性。他提供标准和Spring 标准两种方言,可以直接套用模板实现JSTL、OGNL表达式效果,避免每天套用模板、改JSTL、改标签的困扰,同时开发人员可以扩展和创建自定义的方言。
- Thymeleaf提供Spring标准方言和一个与SpringMVC完美集成的可选模板,可以快速地实现表单绑定、属性编辑器、国际化等功能。
如:张三静态时,th:text="${username}"被忽略,显示“张三”,动态时,th:text="${username}" 加载成功,覆盖“张三”
2、为什么使用Thymeleaf
如果希望以Jar形式发布模块,则尽量不要使用JSP知识,这是因为JSP在内嵌的Servlet容器上运行有一些问题(内嵌Tomcat、Jetty不支持Jar形式运行JSP,Undertow不支持JSP)。
Spring Boot中推荐使用Thymeleaf作为模板引擎,这是因为Thymeleaf提供了完美的Spring MVC支持。
Spring Boot提供了大量的模板引擎,包括:
- FreeMarker
- Groovy
- Mustache
- Thymeleaf
- Velocity
- Beetl(官网号称最快的模板引擎)
3、第一个Thymeleaf模板页
3.1 创建项目
直接看图,图中有标注
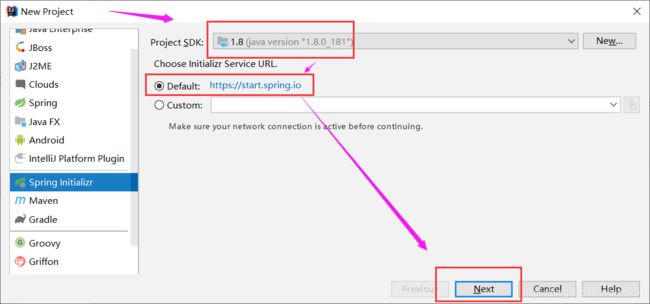


此时,项目就创建完毕了。
3.2 相关配置
此处建议添加一个依赖:nekohtml,其作用主要是允许使用非严格的 HTML 语法。
在pom.xml中添加以下依赖即可添加nekohtml依赖:
            net.sourceforge.nekohtml
            nekohtml
            1.9.22
完整的pom.xml如下所示:
    4.0.0

        org.springframework.boot
        spring-boot-starter-parent
        2.1.13.RELEASE


    com.cxhit
    hello-spring-boot-thymeleaf
    1.0.0-SNAPSHOT
    hello-spring-boot-thymeleaf
    Demo project for Spring Boot


        1.8


            org.springframework.boot
            spring-boot-starter-web


            org.springframework.boot
            spring-boot-starter-test
            test


            org.springframework.boot
            spring-boot-starter-thymeleaf


            net.sourceforge.nekohtml
            nekohtml
            1.9.22


                org.springframework.boot
                spring-boot-maven-plugin
修改application.properties为application.yml,配置Thymeleaf
spring:
  thymeleaf:
    cache: false  #开发时关闭缓存,不然没法实时看到页面
    mode: LEGACYHTML5  #用非严格的HTML(标签不必严格遵守W3C标准)
    encoding: UTF-8
    servlet:
      content-type: text/html #内容类型为HTML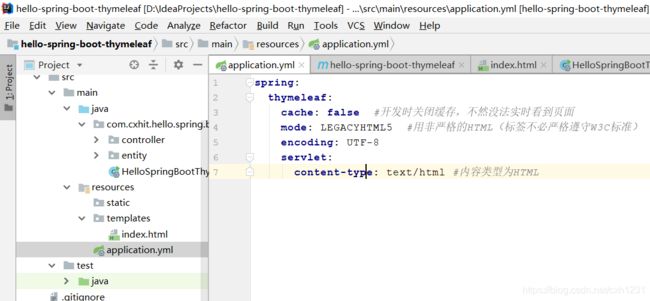
3.3 创建测试用JavaBean
如下:

package com.cxhit.hello.spring.boot.thymeleaf.entity;

import java.io.Serializable;

/*实现序列化接口*/
public class User implements Serializable {

    private String username;

    public String getUsername() {
        return username;
    }

    public void setUsername(String username) {
        this.username = username;
    }
}
3.4 创建测试用Controller
如下:

package com.cxhit.hello.spring.boot.thymeleaf.controller;

import com.cxhit.hello.spring.boot.thymeleaf.entity.User;
import org.springframework.stereotype.Controller;
import org.springframework.ui.Model;
import org.springframework.web.bind.annotation.RequestMapping;
import org.springframework.web.bind.annotation.RequestMethod;

@Controller
public class MainController {

    @RequestMapping(value = {"","index"},method = RequestMethod.GET)
    public String index(Model model){
        User user = new User();
        user.setUsername("张三");

        model.addAttribute("user",user);

        return "index";
    }


}
3.5 创建测试页面
首选创建一个HTML页面,如下:

修改前面HTML标签用于引入Thymeleaf引擎,这样才可以在其他标签中使用th:*语法,声明如下:
完整的HTML代码如下:
    Title


李四
3.6 测试结果
如果直接访问,显示“李四”,如果启动Spring Boot访问,显示“张三”,如下:

4、Thymeleaf常用语法
后续补充